greasetek LEVER Grease Gun
 SAFETY INFORMATION
| Improper operation or maintenance of this tool could result in serious injury and property damage. Read and understand all warnings and operation instructions before using this tool. When using any tool, basic safety precautions should always be followed to reduce the risk of personal injury. Use each tool for its intended function only. Do not use this product in unsafe work conditions. It is always recommended to keep a fire extinguisher and first aid kit near work areas. |
FAILURE TO OBSERVE AND FOLLOW SAFETY INSTRUCTIONS COULD RESULT IN INJURY OR DEATH.
| WARNING: This product may contain a chemical known to the state of California to cause cancer, or birth defects or other reproductive harm. |
| WHAT COULD HAPPEN | HOW TO PREVENT IT |
|
|
|
|
|
|
| Store tool in a secure location away from reach of children and untrained users. |
|
|
| WHAT COULD HAPPEN | HOW TO PREVENT IT |
|
|
| WHAT COULD HAPPEN | HOW TO PREVENT IT |
|
|
TROUBLE SHOOTING
| POSSIBLE PROBLEM | SOLUTION |
|
|
|
|
PACKAGE CONTENTS

Part | Description | Quantity |
| A | Barrel | 1 |
B | Head | 1 |
| C | Plunger | 1 |
D | Trigger | 1 |
| E | Extension | 1 |
F | Coupler | 1 |
| G | Spring Plunger Release | 1 |
H | Air Bleed Button | 1 |
| I | Bulk Filler Valve | 1 |
J | Top Outlet | 1 |
PREPARATION
Before assembling this tool, make sure all parts are present. Compare parts with package contents
list. If any part is missing or damaged, do not attempt to assemble the tool. Estimated Assembly Time: 3 – 5 minutes
Tools and Materials Required for Assembly (not included):
- Adjustable wrench (optional)
- Grease (bulk or cartridge)
- Clean rag/lint-free cloth
ASSEMBLY INSTRUCTIONS
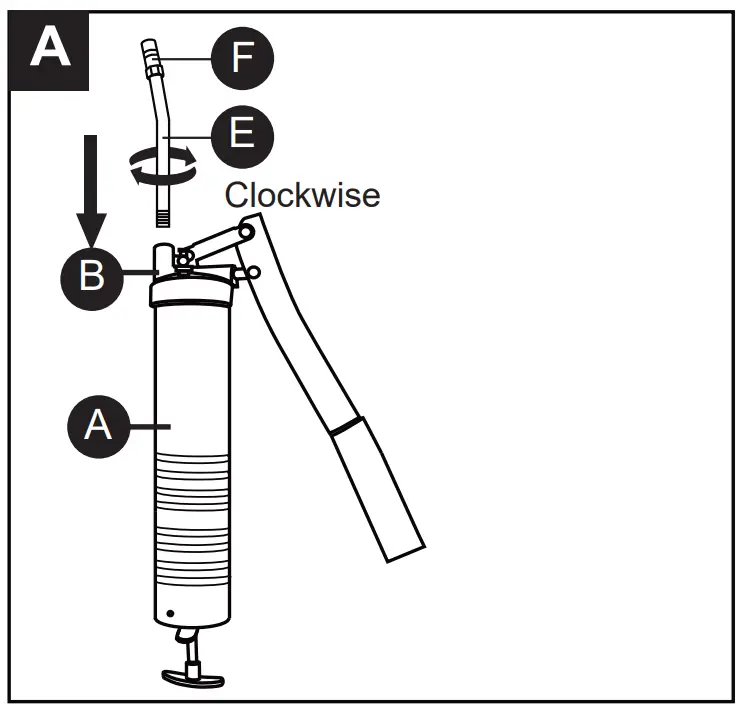
- Screw the extension (E) with coupler (F) securely onto the head (B) by aligning threads and turning clockwise. If necessary, tighten with adjustable wrench but do not overtighten (See Figure A).

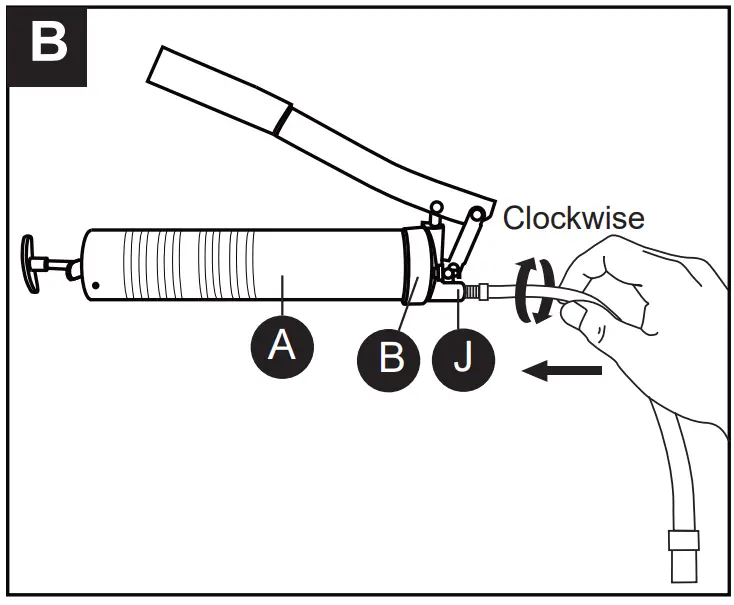
- Flex hose being screwed into top outlet (J) (See Figure B).

GREASE LOADING INSTRUCTIONS
CAUTION
Use caution when loading grease to prevent damaging substances (dirt, metal shavings or particles, etc.) from contaminating the grease.
There are two methods for loading grease:
Method 1:
Grease Cartridge Loading (most common)
Method 2:
Grease Tub Loading (from bulk container)
METHOD 1: GREASE CARTRIDGE LOADING
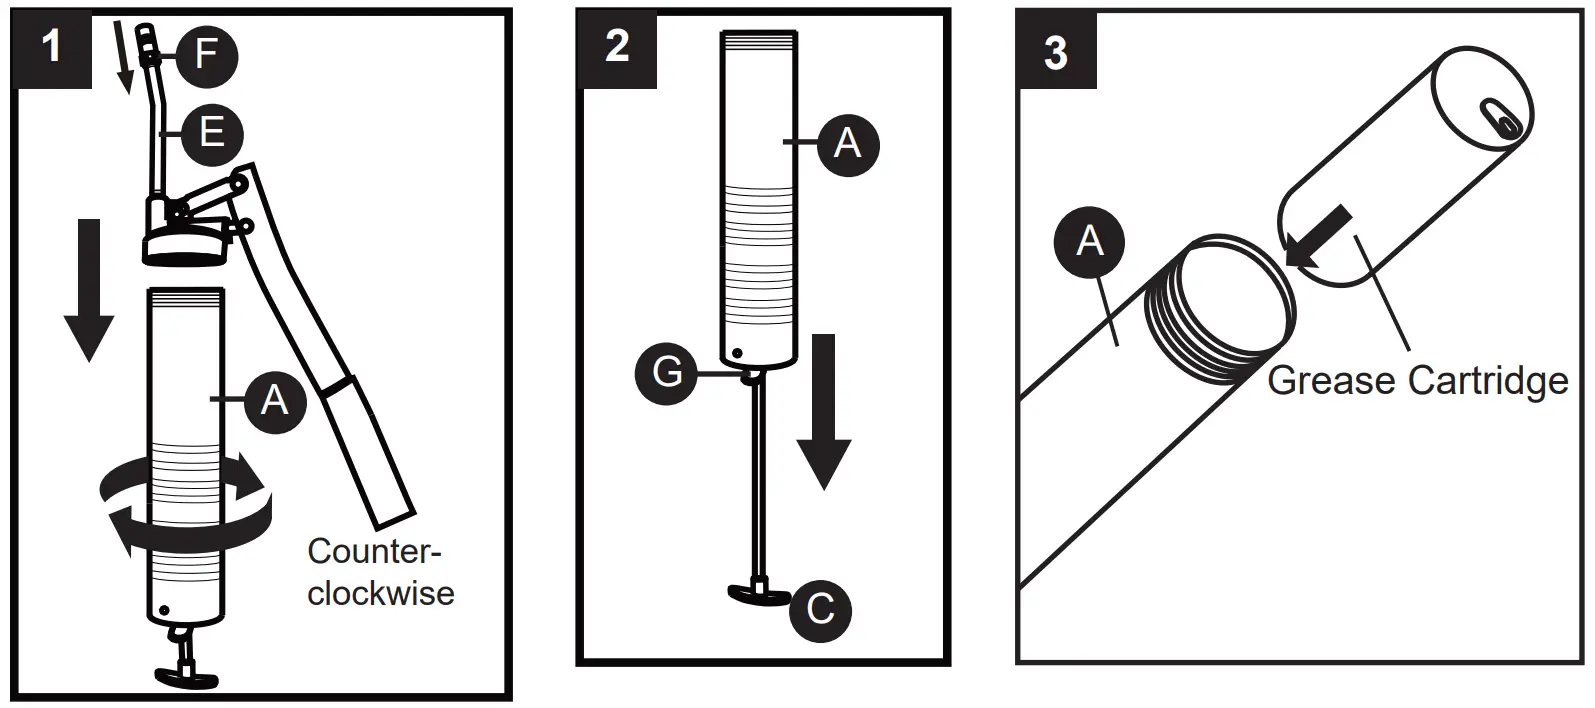
- Unscrew the barrel (A) from the head (B) by turning counterclockwise.
- Holding the barrel securely with one hand, pull the plunger (C) all the way out. Make sure it locks into place before relaxing your grip on the barrel or plunger. (See Figure 2).
- To prepare the grease catridge, first remove the plastic lid from one end, then insert the cartridge (open end first) all the way into the barrel. The metal pull-tab lid will be visible. (See Figure 3).
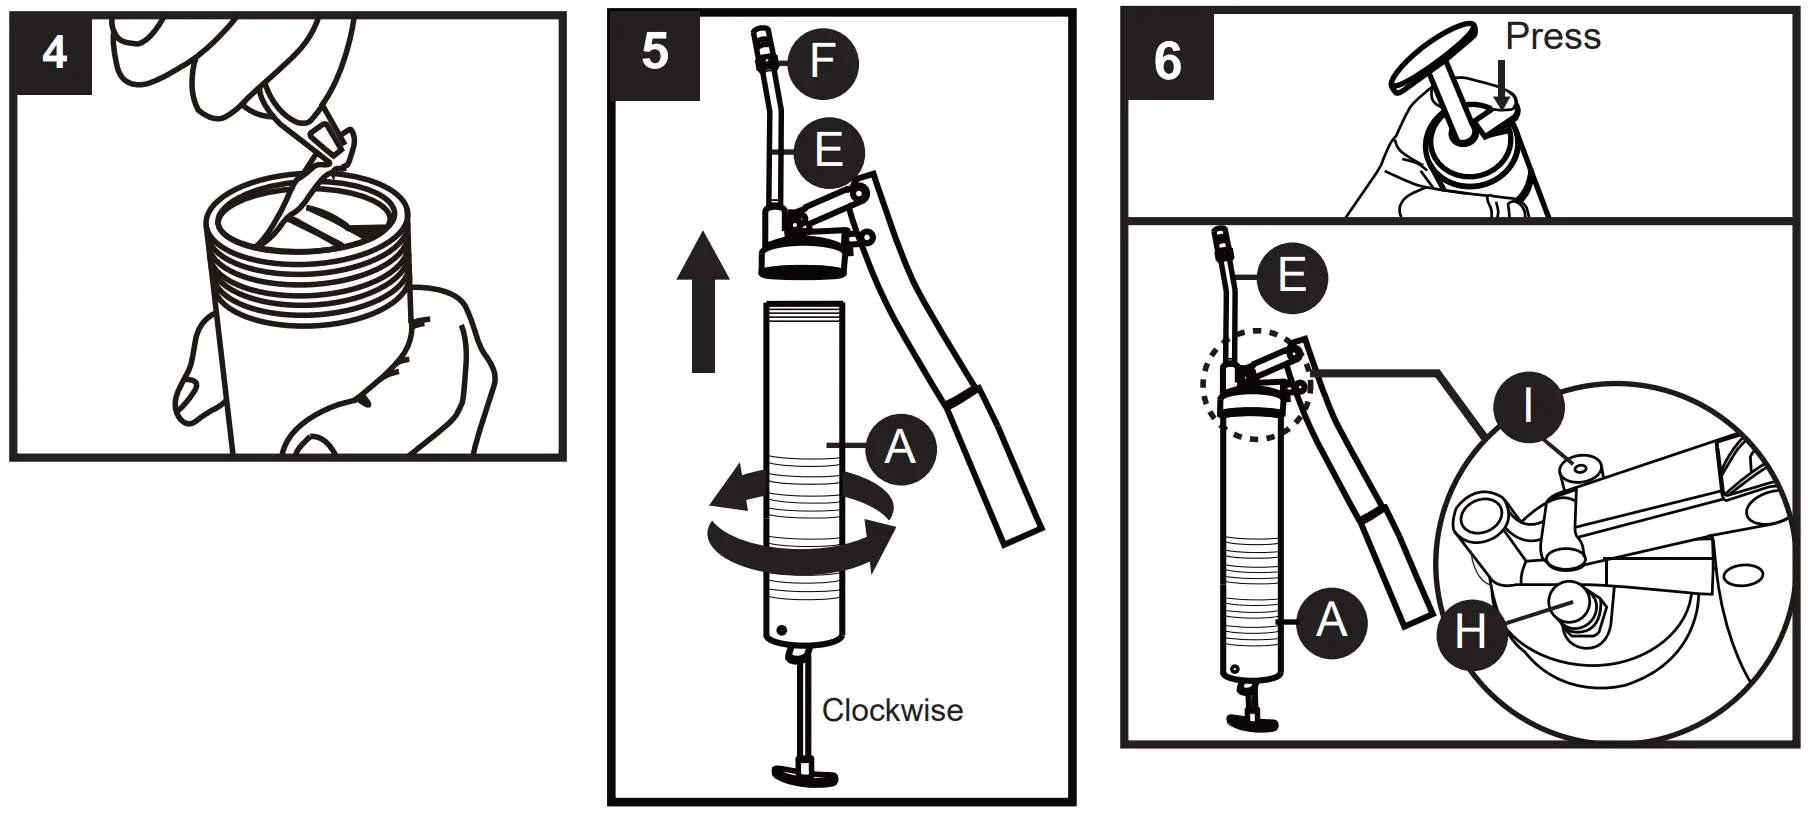
- Remove the metal pull-tab lid. Make sure no metal slivers fall into the grease. (See Figure 4).
- With the grease cartridge fully inserted, screw the barrel back on the head by turning clockwise and tighten by hand. (See Figure 5).
- Carefully release the plunger by pressing down on the spring pluger release (G). After releasing the plunger, press the air bleed button (H) to purge any excess air in the barrel (See Figure 6).
- Pump the trigger until grease begins to flow from the coupler (F). It will take several pumps until grease begins to flow. If grease does not flow, make sure the plunger is free to push grease up the barrel by pressing the spring plunger release (G). Press the air bleed button (H) as you release it to purge any excess air. Repeat until grease flows correctly (See Figure 6).
NOTE: Trapped air and air bubbles in the grease are the most common causes of poor grease flow.
Always purge trapped air using the air bleed button before using the gun.

METHOD 2: GREASE TUB LOADING
With close-fitting plastic washer covering grease in tub.
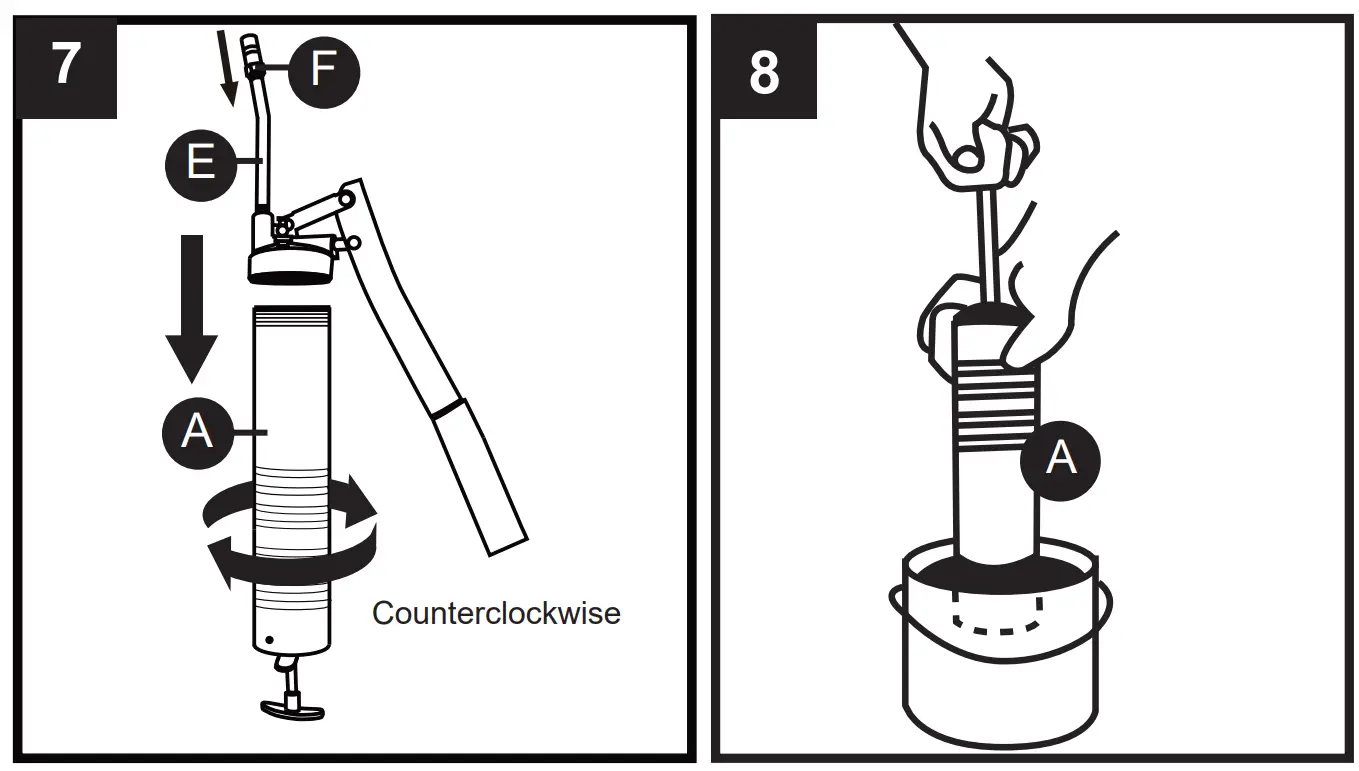
- Unscrew the barrel (A) from the head (B) by turning counterclockwise (See Figure 7)
- Place the tub of grease where you can use the grease gun barrel to push down on the close-fitting plastic washer while pulling back on the plunger (C) at the same time (See Figure 8).
- Line up the open end of the barrel over the hole in the washer. Holding the barrel securely with one hand, use it to push down on the washer while pulling back on the plunger at the same time. Grease will be forced up through the hole in the washer and sucked into the grease gun barrel (See Figure 8).

OPERATING INSTRUCTIONS
CAUTION:
Always make sure the dispensing nozzle or coupler (F) is clean before using. Pump out a small amount of grease, then wipe off with a clean rag or lint-free cloth before attaching to the grease fitting to be lubricated.
Always make sure grease fittings are clean before lubricating. Clean away all dirt before attaching the grease gun, even if grease fitting caps are used. Inspect and replace damaged fittings.
Clean grease fittings after applying grease.
Ensure the proper type of grease is used at every grease point. Applying the wrong grease can cause incompatibility problems and lead to bearing failure. Use colored labels, adhesive dots, or paint markers to identify which type of grease should be used on various lubrication points.
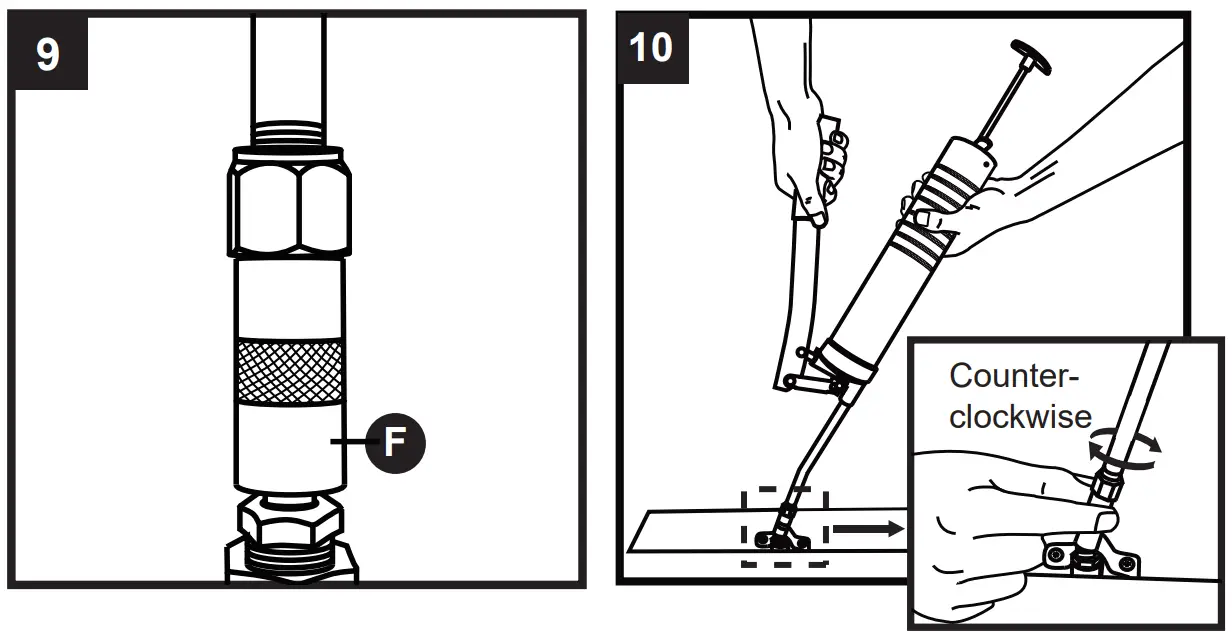
- The grease coupler provided at the end of the grease gun extension has small “jaws” that snap on to a grease fitting and maintain a tight fit.
To connect the coupler to a grease fitting, press the coupler straight onto the fitting to form a snug fit. Always keep the extension and coupler straight on to the grease fitting when pumping grease. (See Figure 9). - To remove, slightly tilt the coupler until resistance is felt, then twist and pull back. This tilt-and-twist movement will allow the coupler to properly detach from the grease fitting (See Figure 10).
If coupler is difficult to remove, loosen grease coupler a 1/4 turn or until jaws have relaxed their grip enough to remove the grease coupler from the grease fitting.
![]() WARNING
WARNING
Disengaging the coupler by pulling it out straight could break grease fitting.
CARE AND MAINTENANCE
Use a wet towel to clean the grease gun head, barrel and parts after each use, and dry it thoroughly.
Make sure the tool is properly cleaned and that there are no contaminates on it before storing.
STORAGE
Grease guns should be stored unpressurized in a horizontal position, in a clean, cool dry area to help prevent grease from separating. Grease gun clamps are recommended (not included) to make storage simpler and safer.
TROUBLESHOOTING
| PROBLEM | POSSIBLE CAUSE | CORRECTIVE ACTION |
| Gun will not dispense grease | Grease cartridge or barrel is empty Air is trapped in the head | Replace the grease cartridge or refill the barrel Make sure plunger is free to push grease up the barrel. Press air bleed button. |
| Grease leaks out of bottom of barrel around plunger | Damaged/worn rubber follower | Replace grease gun |
| Grease leaks out where extension is attached to head | Loose connection | Tighten connection. Apply thread sealant tape to threads and re-connect. |
| Grease leaks out around coupler | Damaged coupler | Replace coupler |


