Contents hide
COOL113CWT Air Cooler
User Manual
Preface
Thank you for purchasing the Nedis COOL113CWT.
This document is the user manual and contains all the information for correct, efficient and safe use of the product.
This user manual is addressed to the end user. Read this information carefully before installing or using the product.
Always store this information with the product for use in the future.
Product description
Intended use
The Nedis COOL113CWT is an air cooler with a 3 L water tank capacity.
The product is exclusively intended as an air cooler.
The product is intended for indoor use only.
The product is not intended for professional use.
Any modification of the product may have consequences for safety, warranty and proper functioning.
Specifications
Product | Air Cooler |
Article number | COOL113CWT |
Dimensions (l x w x h) | 260 x 230 x 560 mm |
Weight | 3.5 kg |
Power input | 220 – 240 VAC 50 – 60 Hz |
Rated power | 80 W |
Water tank capacity | 3 L |
Air volume | 270 m3/h |
Automatic air swing | Yes |
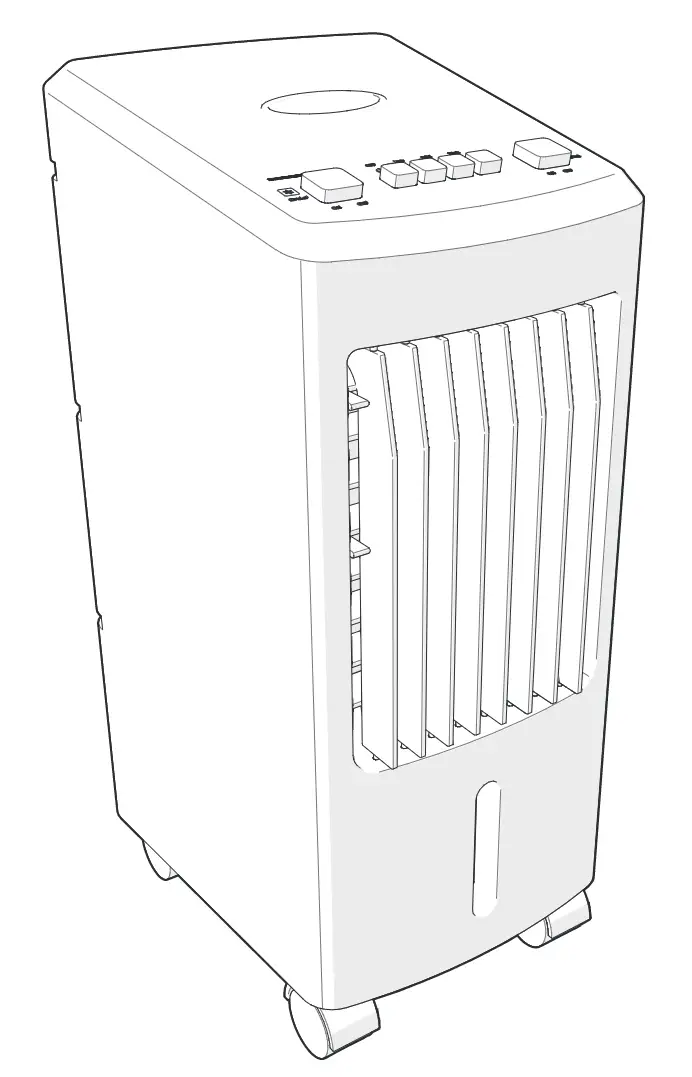
Main parts (image A)
") |
A |
1. Cover |
2. Ice pack |
3. Water tank |
4. Air filter |
5. Curtain paper |
6. Air filter slot |
7. Air cooler |
8. Water tank lock |
9. Water tank slot |
10. Water hose |
11. Power cable |
12. Vertical air flow control |
13. Air outlet |
14. Cooler on / off |
15. Air flow off |
16. Low Speed |
17. Moderate Speed |
18. High Speed |
19. Swing on / off |
Safety instructions
WARNING
- Only use the product as described in this manual.
- Do not use a damaged product.
- Disconnect the product from the power outlet and other equipment if problems occur.
- Do not drop the product and avoid bumping.
- This product may only be serviced by a qualified technician for maintenance to reduce the risk of electric shock.
- Close supervision is necessary when the product is used by or near children, animals or infirm persons. Do not allow children to play with it or touch it.
- Do not use the product in rooms where flammable liquids or gases are used or stored.
- Do not use the product in wet or damp environments.
- Avoid direct sunlight.
- Do not cover the product.
- Do not use the product without water in the tank.
- Do not use solvents to clean the product.
- Only plug the cable into a wall outlet. Do not use extension cords.
- Only use a power outlet rated 10 A or higher.
- Do not insert any objects into the product.
Installation
Check the contents of the package
Check that all parts are present and that no damage is visible on the parts. If parts are missing or damaged, contact the Nedis B.V. service desk via the website: www.nedis.com.
Setup
1. Place the product on a stable and flat surface.
2. Plug the power cable A11 into the power outlet.
Filling the water tank
1. Pull out the water tank A3.
2. Lift the cover A1.
3. Fill A3 with water.
- Do not fill the water tank above the “max” indicator.
- Do not use the product if the water level is below the “min” indicator.
4. Place A1 back on A3.
5. Insert A3 back into the water tank slot A9.
Using ice packs
- The use of ice packs A2 is optional.
- Use A2 if water does not provide enough cooling.
1. Fill A2 with water.
2. Place A2 in the freezer until frozen.
3. Turn the water tank lock A8 to unlock A3.
4. Pull out A3.
5. Lift A1.
6. Place A2 in A3.
7. Make sure the water level is between “min” and “max”.
8. Place A1 back on A3.
9. Place the water hose A10 into A3.
10. Insert A3 back into A9.
11. Turn A8 to lock A3.
Use
Using the fan
1. Press A16, A17 or A18 to switch on the fan and set the fan speed.
2.Press A15 to switch off the fan.
Using the cooling function
Press A14 to activate or deactivate the cooling function.
Setting air flow direction
1. Press A19 to automatically swing the air flow from left to right.
2. Use A12 to set the vertical air flow direction.
Maintenance
Disconnect A11 from the power outlet.
Cleaning the air filter
1. Remove the air filter A4 from the air filter slot A6.
2. Remove the curtain paper A5 from A4.
3. Clean A4 and A5 with tap water and a soft brush.
4. Insert A5 back into A4.
5. Insert A4 back into A6.
Cleaning the water tank
1. Turn A8 to unlock A3.
2. Pull out A3.
3. Clean A3 with soap and a soft brush.
4. Place back A3.
5. Turn A8 to lock A3.
Cleaning the housing
- Clean the product regularly with a soft, clean, dry cloth. Avoid abrasives that can damage the surface.
- Do not use aggressive chemical cleaning agents such as ammonia, acid or acetone when cleaning the product.
- Do not open the product.
Warranty
Any changes and/or modifications to the product will void the warranty. We accept no liability for damage caused by improper use of the product.
Disclaimer
Designs and specifications are subject to change without notice. All logos, brands and product names are trademarks or registered trademarks of their respective owners and are hereby recognized as such.
Disposal
 | This symbol indicates that this product should not be thrown away with other household waste throughout the EU. To prevent possible harm to the environment or human health by uncontrolled waste disposal, you are responsible for recycling it so that it can promote the sustainable reuse of raw materials. To return your used product, you can use the regular return and collection systems or contact the store where the product was purchased. They can recycle this product for the environment. |


