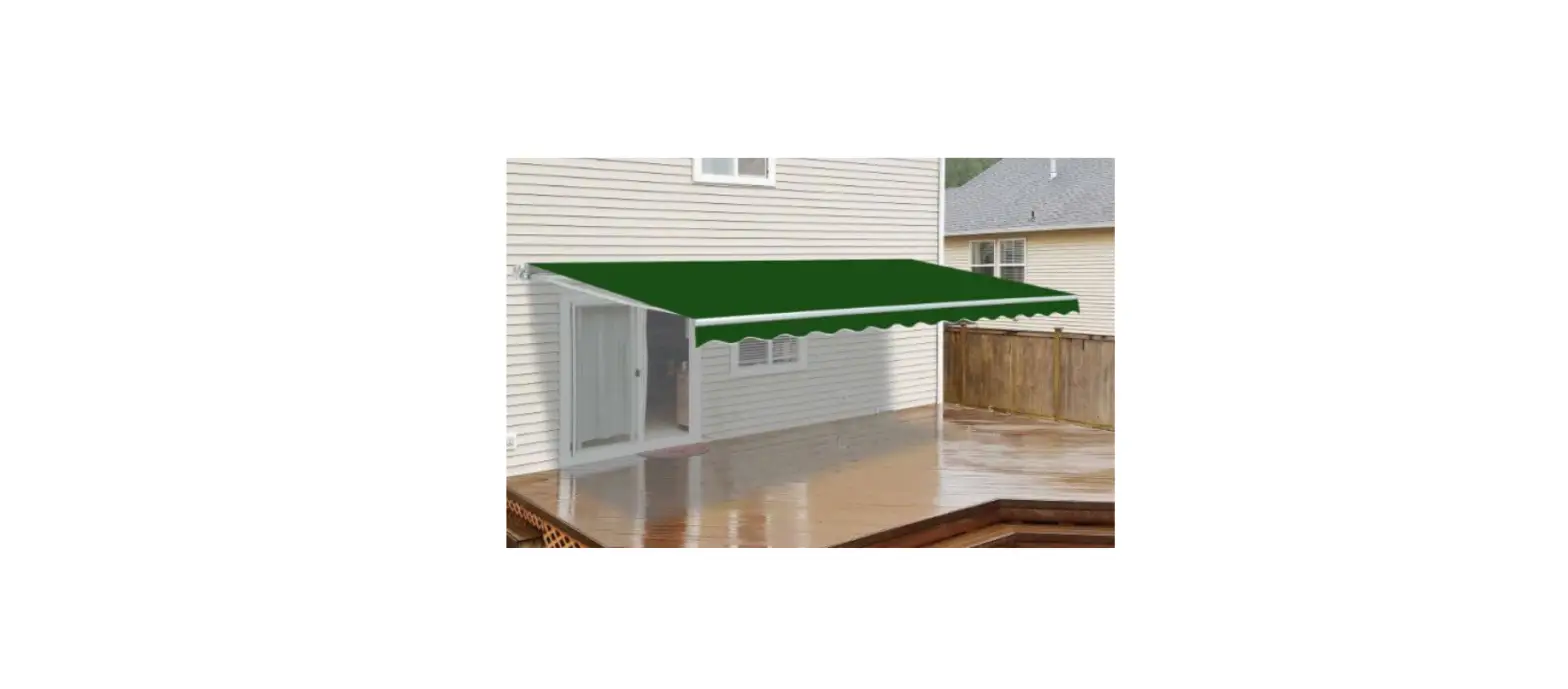
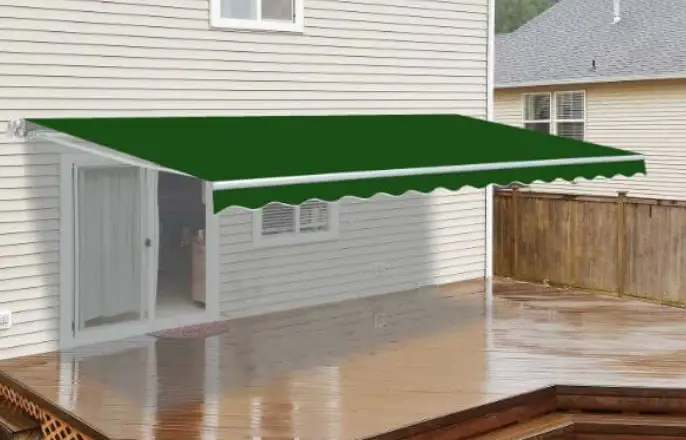
ALEKO RETRACTABLE AWNING
Important safety instructions
WARNING NOTE: FOR PERSONAL SAFETY, IT IS IMPORTANT TO FOLLOW THESE INSTRUCTIONS, PLEASE KEEP THESE INSTRUCTIONS IN SAFE PLACE
- This warning triangle calls attention to hazards that can lead to death or to serious injuries
- This sign identifies important notes
- Read these instructions carefully before you Begin with the assembly or operate the awning.
- The awning is intended primarily as protection against the sun. If the wind starts up or it begins to rain heavily (formation of water pockets)or snow begins to fall, it should be retracted immediately. Operating the awning in winter conditions can result in damage to the awning.
WARNING:
DO NOT REMOVE THE SAFETY SLEEVES FROM THE ARMS UNTIL INSTRUCTED TO DO SO.
- Before assembly please check whether the Delivered assembly brackets agree in type And amount with the order and whether the Mounting base specification provided in the order coincide with the actual conditions.
Required Tools
May vary, depending of installation conditions) Drill; Masonry drill bit, 16mm (Metric size); Wrench: 14mm,17mm,19mm (Metric size); Phillips screwdriver; Needle-nose pliers; Level, Measuring tape, Chalk line, Pencil; Step ladder.
- When extended, various forces, including wind and rain will affect an awning, These sometimes substantial forces must be absorbed by the awning and transferred to the assembled structure via its mounting brackets. under extreme loads, the excessive attractive force can be exerted on the anchor bolts.
- Note:
Sheeting was used to protect the paint This must be removed afterward.- WARNING:
The awning is heavy. A minimum of two persons is required to attach the awning to the wall brackets. - WARNING:
DO NOT ALLOW CHILDREN TO PLAY IN THE WORK AREA DURING ASSEMBLY AND ADJUSTMENTS. - WARNING:
DO NOT TRY to attach the awning alone. If the awning falls, it may cause serious injuries and get damage.
- WARNING:
- Please make sure that your hands are clean at the time of the assembly, otherwise, you may soil or stain the awning fabric and frame.
- Therefore, before starting assembly, check the load bearing capacity of the mounting base and if necessary take corresponding measures to ensure the stable installation of the brackets. If the mounting base is unstable, you may want to consult a specialist in your area.
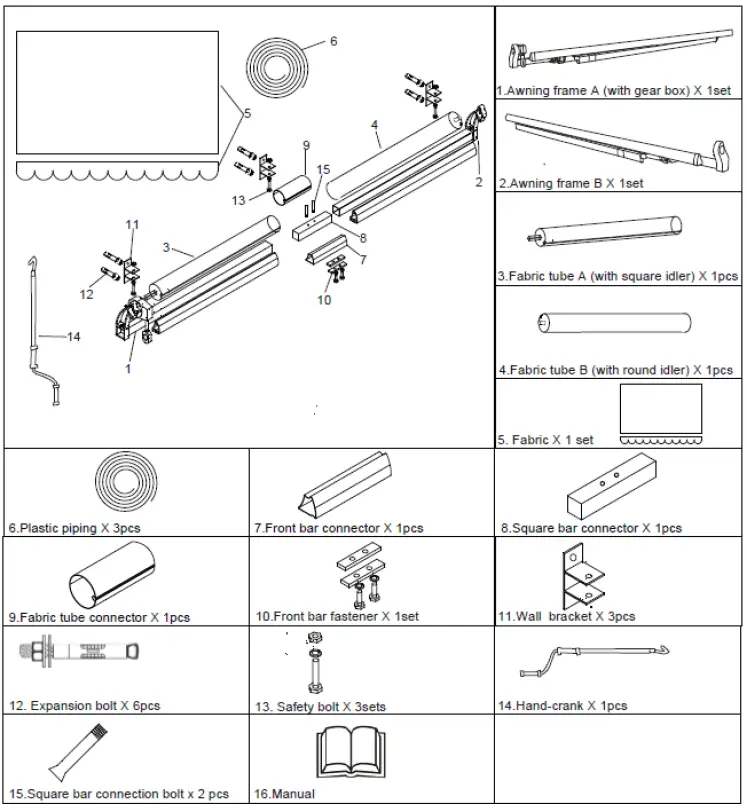
PARTS LISTS
Awning assembly steps
WARNING: DO NOT REMOVE THE SAFETY SLEEVES FROM THE ARMS UNTIL INSTRUCTED TO DO SO.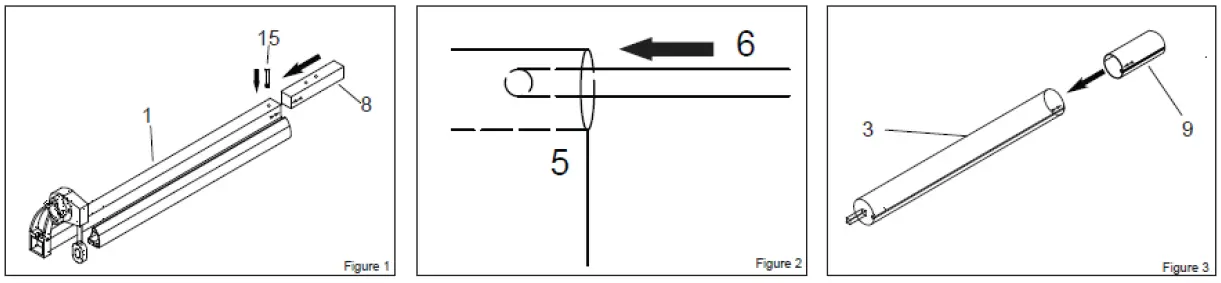
- Step 1: Insert the square bar connector(8) into the square bar on awning frame A (with gear box)(1), fasten them with one Square bar connection bolt(15)
- Step 2: Put the plastic pipings (6) into the two tunnels on each side of fabric (5).
- Step 3: Put fabric tube connector (9) into Fabric tube A (with square idler) (3).
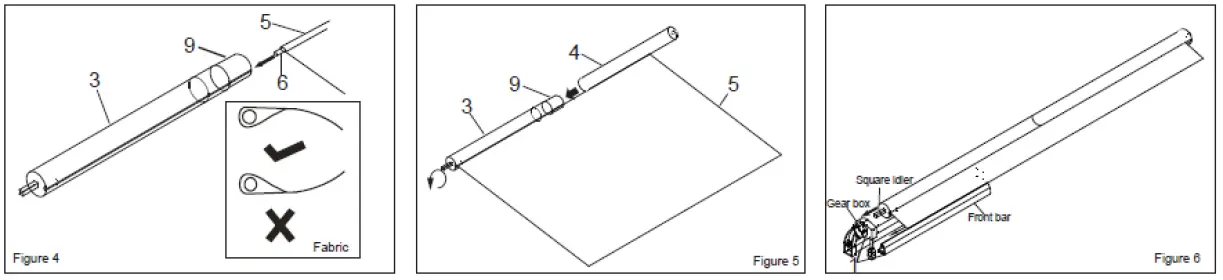
- Step 4: Insert one side of fabric into the fabric tube A (with square idler)(3). Please notice the fabric side as the picture shows.
- Step 5: Insert the left fabric into Fabric tube B (with round idler)(4), then connect Fabric tube B (with round idler) with fabric tube connector(4&9). After that roll counterclockwise the fabric tightly
- Step 6: Insert another side of the fabric bar on Awning frame A (with gearbox)(1), put the square idler (3) into the gearbox.
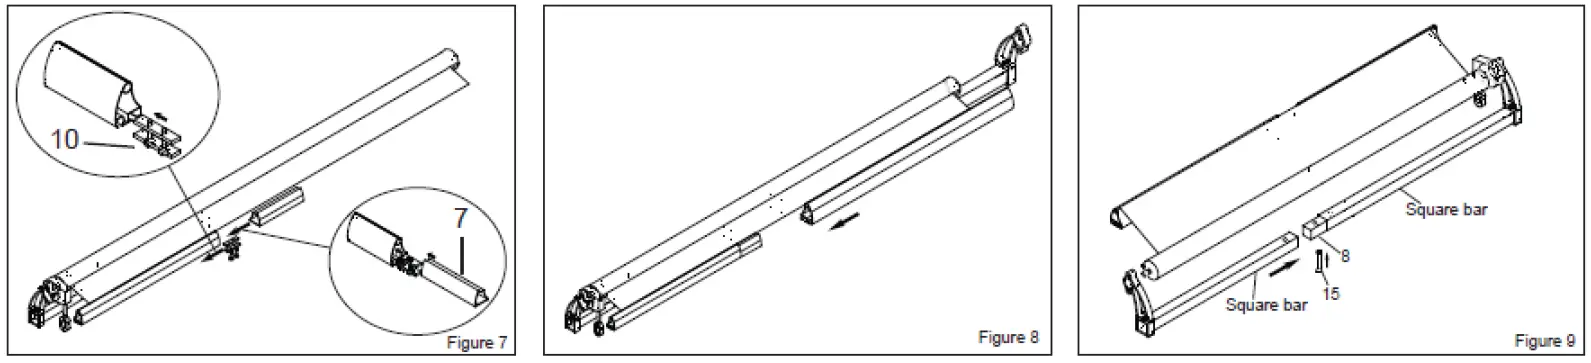
- Step 7: Put the front bar fastener(10) into the tunnel of the front bar on Awning frame A (with gearbox)(1). Put the front bar connector (7) into the front bar.
- Step 8: Insert the left fabric into another part of the front Bar.
- Step 9: Connect the two square bars with the square bar connector (8) and fasten them with another Square bar connection bolt (15).
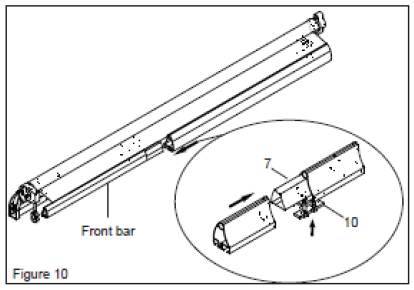
- Step 10: Tighten the front bar with the fastener.
Note: You could adjust the position of the two locking screws on two sides according to the fabric size, make sure they are closing to the fabric ends, to prevent the fabric from moving.
INSTALLATION

Step 1: Unboxing.
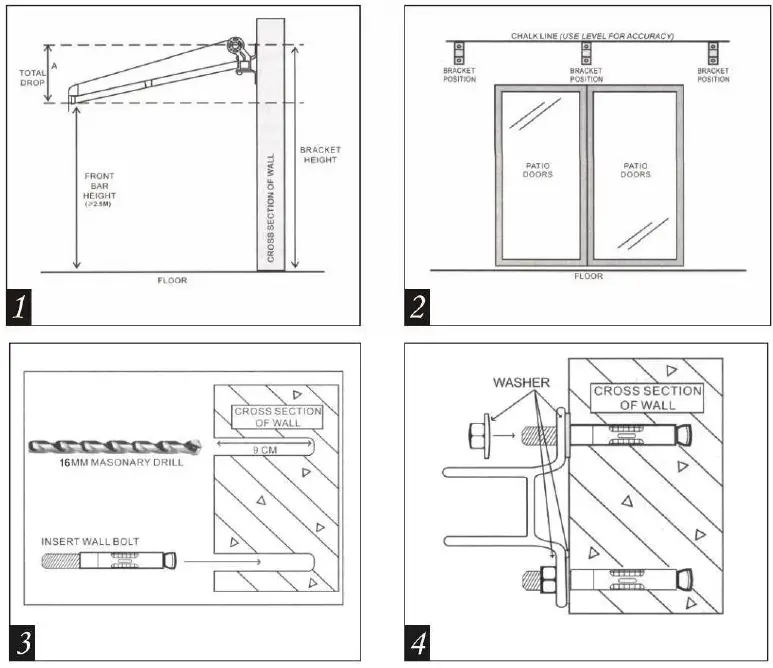
Carefully remove the awning from the box and remove the styrofoam protectors from the awning, remove the plastic bags and plastic guards from the awning and carefully place the awning aside to avoid having it damaged by scratches or otherwise damaged or soiled during assembly. Think about how you will be securing the awning to the wall ahead of time. In case you would like to mount it above a patio door, you should leave a space of at least 8 inches (20cm) above the door frame. If there is enough space available above the door frame. The approximate total drop area of the awning varies depending on the type:
Ensure that you also take this drop height into account in your decision on where to install the awning. The drop angle can and may only be changed minimally.
it shows the drop still be changed after assembly. The ideal drop angle, however, has already been set in the factory of the awning when it is fully extended. (Total drop, height of front bar more than 8 Feet ( ≥ 2.5 meters), cross-section of the wall, bracket height).
Step 2: Location of the wall brackets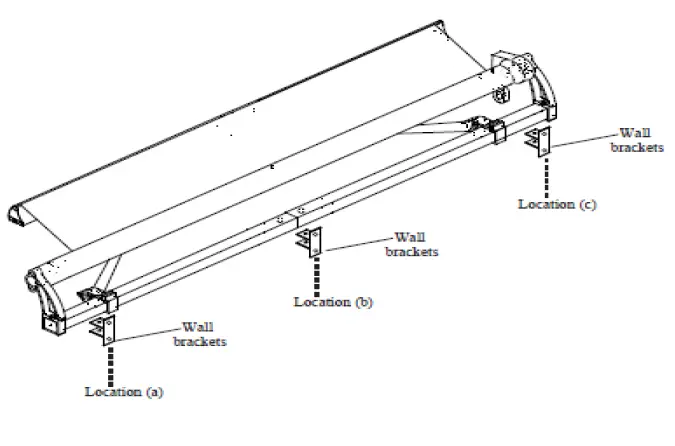
- Location (a) – Between the right end of the awning and the right Arm. (facing the awning) on the fabric tube.
- Location (b) – In the middle of the square bar, cover the seam of the connection.
- Location (c) – Between the left end of the awning and the left Arm.
Measure the width of the awning with a ruler and note the positions of wall brackets.
Draw a horizontal line at the height of the required areas as illustrated in the image and use a long ruler, a level and chalk for this purpose. Mark the corresponding places on the wall by running a pencil through the holes at the bottom of the brackets.
- CAUTION: PROPER LOCATION OF THE BRACKETS IS THE MOST IMPORTANT ASPECT OF THE AWNING INSTALLATION. IT IS CRITICAL THAT YOU FASTEN ALL THE MOUNTING BRACKETS TO STUDS, JOISTS, HEADERS OR OTHER MAJOR STRUCTURAL COMPONENTS.
- WARNING: FAILURE TO SECURELY FASTEN ALL THE BRACKETS TO THE WALL COULD RESULT IN THE COLLAPSE OF THE AWNING AND CAUSE PERSONAL INJURY OR DEATH.
Step 3: Drill the holes.
Use a 16 mm masonry drill bit to drill the holes for the brackets at the appropriate marks on the wall.
The holes should be 4 inches (9cm) deep in the wall and must be drilled through solid brick or concrete. Do not drill through mortar because this does not offer the support that is required for the awning.
Installation on timber houses and sheds:
The awning can also be installed on timber houses if their walls can carry the weight of the awning. In this case, ensure the brackets are firmly secured to the outside of solid wooden beams.
The anchor bolts from the delivered package are not suitable for mounting the awning to wooden beams. Instead buy carriage bolts of adequate length and of an appropriate diameter and secure the awning with them.
Step 4: Attachment brackets for wall:
After inserting the wall bolt, add the washers and then the wall brackets. Now place the washers on the bolt head and firmly tighten the 19mm nuts.
Note:
- It may be necessary to drive the anchor bolts in with a wooden mallet because they do not go in easily. Do not use a metal hammer for this purpose because this could damage the threads on the top of the bolts.
- If the bolts need to be driven into the wall with a hammer, we recommend initially placing the nut on the screw loosely (only placing it loosely on the bolt) because this avoids damaging to the bolt threads.
- Firmly tighten the bolts with a 19mm hex key: it is best to use a hex key with a closed end rather than an open end because this will avoid damaging to the nut of it should slip.
- As soon as they are fully inserted, the brackets must sit firmly in the wall. If they are still moving in some direction you must further tighten it.
- Do not try to secure the wall brackets to loose wall stones or any surfaces that are not absolutely firm.
- Ensure that the wall brackets are screwed firmly to the wall, so that they can in no case tear out when the awning is being installed.
Step 5: Now your awning can be secured to the wall brackets.
At least two ladders or chairs are required to install the awning in order to obtain the required height. Ensure that the ladders or chairs are firmly stay on the ground so that you can’t fall. Use ladders that are suitable for such assembly work.
Note:
In case the pole(wall bar) can’t be inserted into the wall brackets, you should slightly loosen the wall brackets screws and then try it again. This time, move the awning slightly forward and backward until the pole slips into the brackets. Then immediately insert the safety bolts on the front side of the wall brackets and tighten the nuts with a 19mm hex key. Ensure that the safety bolts for the wall brackets have been tightly secured.
Note: Now you could remove the safety sleeves from the arms.
Step 6: CHANGING THE PITCH
There is one final adjustment you might need to make. It is setting the pitch or angle of your awning. Fully open the awning. Are you happy with the height and level of the front bar? If so, great!
You are done with the installation. Relax, and enjoy your awning.
If not, you can adjust the pitch or angle of each arm separately.
- Fully open the awning using your crank or remote transmitter on motorized awning, unplug the power cord from the outlet after opening the awning.
- Using 17mm wrench to loosen the two locking nuts on the side, then use 14mm wrench to loose the jack bolt on the arm shoulder.
WARNING: RAISING THE FRONT BAR WILL REDUCE THE PITCH (ANGLE) OF THE FABRIC THUS INCREASING THE RISK OF RAIN WATER POOLING ON THE FABRIC.
TO PREVENT THE AWNING FROM COLLAPSING DUE TO RAIN WATER LOAD, YOU MUST RETRACT THE AWNING WHEN UNATTENDED. FAILURE TO DO SO COULD RESULT IN PERSONAL INJURY.
If you have any questions about installation or if you require spare parts, please contact your dealer.
BE SURE TO NOTE.
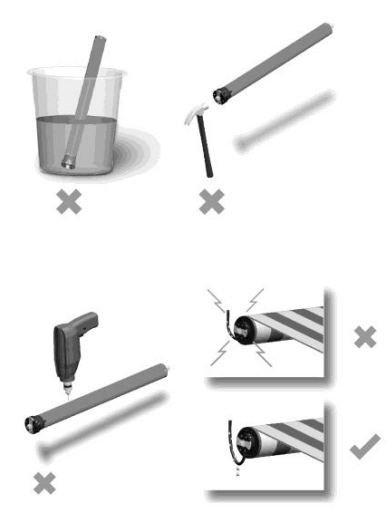
The awning’s gearbox does not have stop limits of the roller revolutions. Therefore, to avoid damaging of the fabric, it must always be properly roller up. The fabric should be stretched tightly.
ANY QUESTIONS OF MOTORIZED OPERATION OR WIND-SUN SENSOR, PLEASE REFER TO THE INSTRUCTION BELOW.
Ac Tubular Motor
When motor doesn’t work stop rotating red or white worm with regulator.
- Up limit seffing
- Switch on on
- Press up button one time
- Using special regulator to adjust”+” direction, and rotating white worm when need to increase the uD distance
- When up limit distance achieves the desired location, stop rotating the white worm and press the stoo button
- Up limit setting is ok
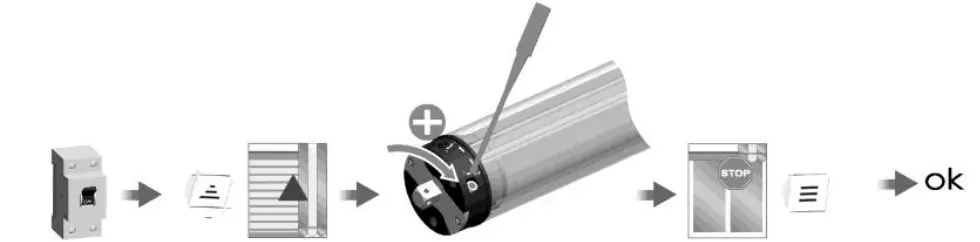
- Down limit setting
- Switch on
- Press down button one time
- Using special regulator to adjust”+ direction, and rotating red worm when need to increase the down distance
- When down limit distance achieves the desired location, stop rotating red worm and press the stop button
- Down limit setting is ok
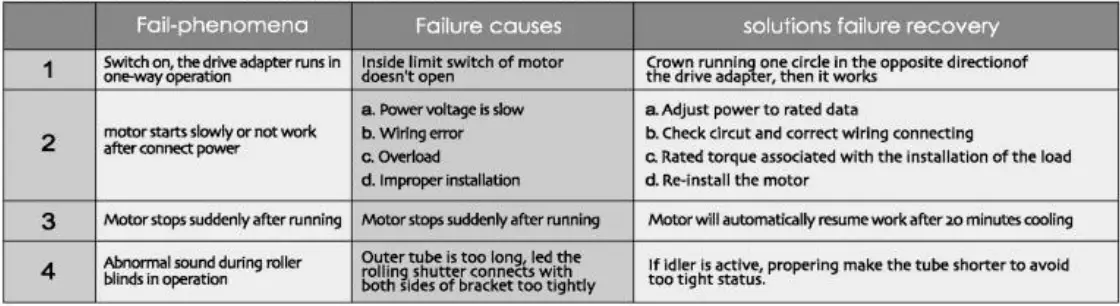
- Common failures and Solutions
Attention
- Motor working temperature: -10° C-50
- Motor working 110V-120V
DC116 Button specification
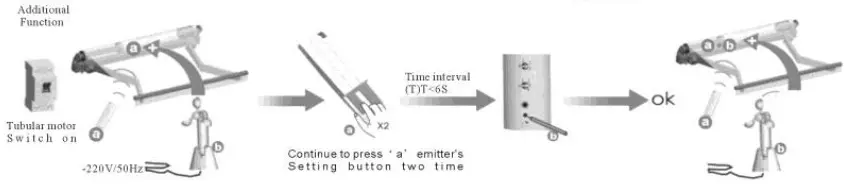
Matchable R/E/ED Tubular Motor Set up
- The interval of different buttons Must be within 6 seconds for all Settings. otherwise, the system will restore the original state
- One receiver stores 20 emitters channels At most, and one channel of emitter can control 20 receivers at most
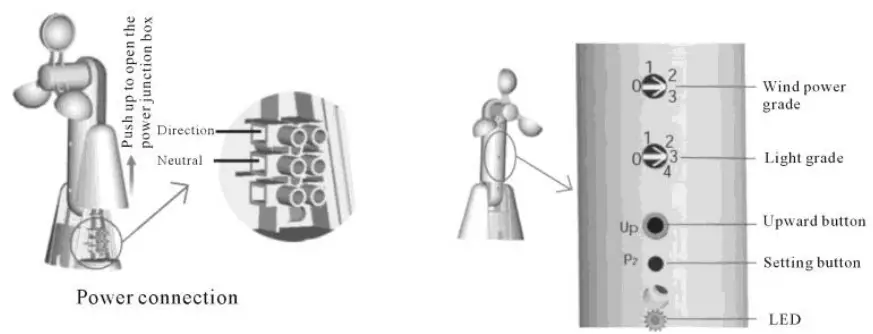
Wind-sun sensor grade adjusting reference
Additional Function
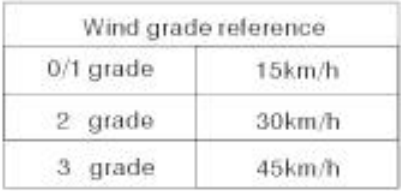
The above grades equal to
- When the grade is “0 1” ,the wind reaches over 15 km/h.the awning will fold,LED flashing
- When the grade is “2” the wind reaches Over 30 km/h.the awning will fold,LED flashing
- When the grade is “3 ,the wind reaches over 45 km/h.the awning will told,LED flashing
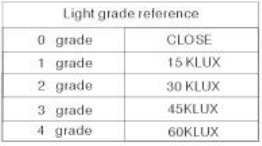
The above grades equal to
- When the grade is “0” the light will close
- When the grade is 1″ and the light reaches Over 15 KLUX, the awning will open, LED flashing
- When the grade is “2” , the light reaches over 30 KLUX, the awning will open,LED flashing
- When the grade is “3” the light reaches over 45 KLUX, the awning will open, LED flashing
- When the grade is “4 the light reaches over 60KLUX, the awning will open LED 1lashing
Installation
For proper operation, keep in mind that the sensor must be positioned in an area that is fully exposed to the sun, wind, and rain. To proceed with the installation, refer to the following figures.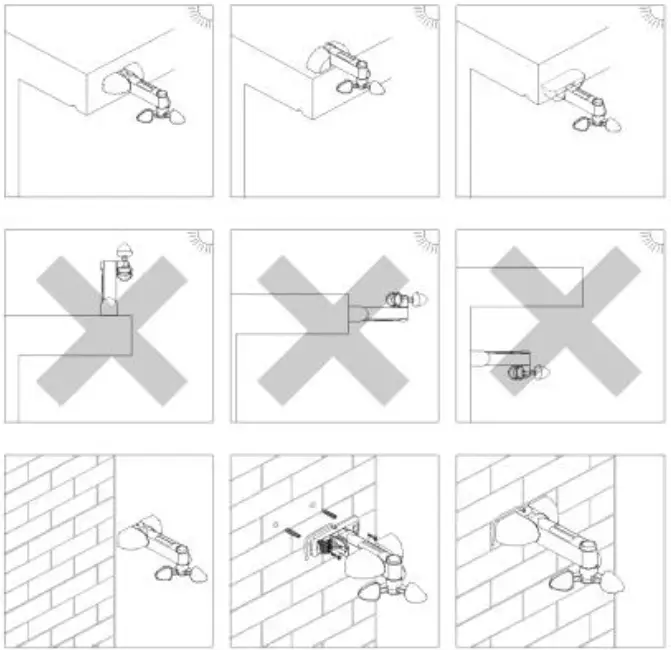
Notice:
- Above sensor signals, there will be 10 seconds to 20 seconds delay before the signalis actually operated.
- If users want to change the signal’s OPEN or CLOSE Position, just need to reverse the motor’s direction wires.
- For proper operation, keep in mind that the sensor must be positioned in an area that is fully exposed to the wind, sun and rain.
Repair Manual for Usual Malfunction
| No. | CASE OF MALFUNCTION | REASON | REPAIR METHOD |
| 1 | The awning does not work when operated by remote control | ①No power supply | ①Check the plug to see whether its properly connected |
| ②The residual current automatic circuit breaker is at “off” position | ②Call on the professionals to inspect | ||
| ③The voltage is too low | ③Call on the professionals to inspect the voltage whether it accords with the requests | ||
| 2 | When operated by remote control, the awning does not work although the received signal from remote receiver can be heard | ①Remote receiver and motor are switched or wire from motor disconnected with pin | ①Check two placed: fasten pins and screws. |
| ②The motor switched off due to overheat protection | ②The more will automatically resume operation after approx 20 minutes interval | ||
| 3 | Fabric s lax though the awning is extended entirely | Path length is incorrectly adjusted | Readjust path length according to the direction of the motor. |
| 4 | The cassette can’t be close completely | Connecting position between front bar and front beam moved | Adjust position of the front beam till the cassette entirely shuttered |
| 5 | Unwanted noise when operating | Screw loosened | Check all screws come ine view and fasten the loosened |
| 6 | When operated by remote control, the indicative lamp does not work and no signal from receiver. | ①Cell exhausted | ①Changed a new cell |
| ②Cell disconnected | ②Reset the cell |
For more information, parts and accessories Please visit our web site www.ALEKOPRODUCTS.com


