
![]() S300 Super Capacitor Jump Starter
S300 Super Capacitor Jump Starter
User Manual
Super Capacitor Jump Starter
Please read this manual carefully and use the product correctly in accordance with the operating instructions!
PRECAUTIONS
Please read the following precautions carefully before use to ensure the correct and safe use of this product!
- It is very important to carefully follow the instructions for use before each use of the emergency start power supply.
- For proper and safe operation. please follow our Instructions and the capacitor manufacturer’s instructions.
- Keep this product out of the reach of children.
- Non-professionals should not disassemble the machine, so as not to damage the machine or cause safety accidents.
- When using this product, keep the surroundings well-ventilated, do not block the cooling holes, and do not use it in the following environments:
• Wet places and places easily splashed by water.
• Where it is easy to fall.
• Places subject to vibration, corrosion, and dust. and chemical gas hazards.
• Places where flammable and explosive materials are stored. and near high-temperature heat sources. - If the product is damaged, do not continue to use it.
- When using, try to place the product away from the car battery.
- It is strictly forbidden to short-circuit the positive and negative poles of the start Output and output ports, and do not store them with metal objects or sharp objects (such as screws).knives) and so on together!
- Before use, please make sure your car has stopped and applied emergency braking.
- Turn off all battery devices in the vehicle.
- Under any circumstances, it is forbidden to short-circuit the positive and negative poles of the clip or connect the positive and negative poles of the clip to the car in reverse to avoid a safety. Total accident!
- Before use, please make sure the car key is in the OFF position, for the smart Car key button (one key start). make Sure The car is completely closed.
- Do not scrub with harsh chemicals such as soap or other cleaners containing Strong alkalis and acids.
- The battery indicator on the product and all the patterns used in this manual are for reference only, please refer to the actual product for details.
PRODUCT DETAIL ACCESSORIES DIAGRAM
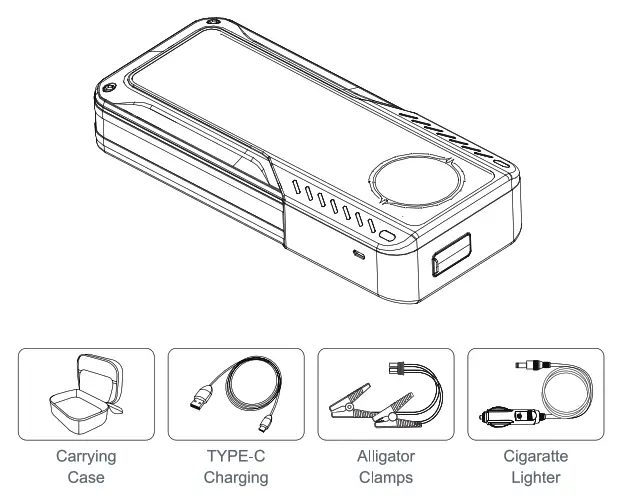
Note: The above pictures are for reference only, please refer to the actual product!
PRODUCT FUNCTION ILLUSTRATION
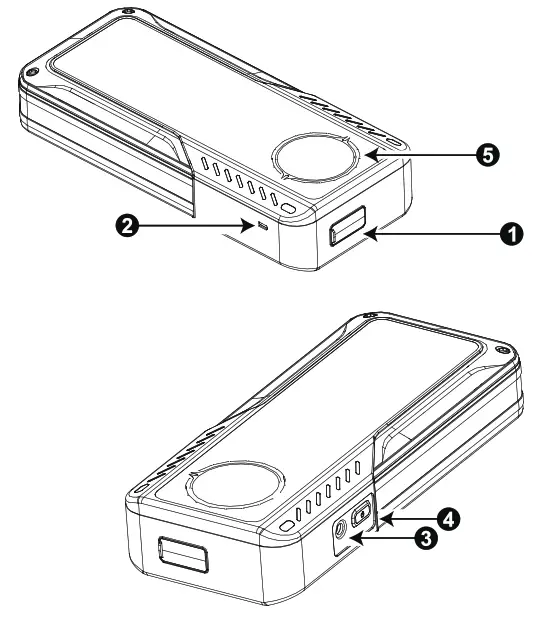
- Start the output port (CS port)
- Charging input port (DC5.5) 5. Screen Display
- Charging input port (TYPE-C)
- Button
OPERATION INSTRUCTIONS
Three operating methods to charge the startup power supply (do not use at the same time):
- Insert the TYPE-C plug of the charging cable into the charging input port,2i of the startup power supply, and plug the other end into the charger.
- Insert the DC plug of the car charger into the DC input port of the starting power supply i3), and insert the male end of the cigarette lighter into the car cigarette lighter mother seat.
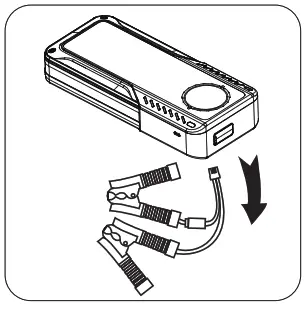
- Insert the battery dip plug into the starting output pod CD, and the red and black dips are respectively clamped to the positive and negative poles of the car battery. When the ‘IN” Icon on the display flashes, it means charging has started. when the icon stops flashing and displays 100%when it is fully charged.
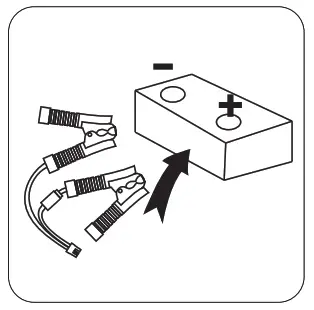
How to start the car:
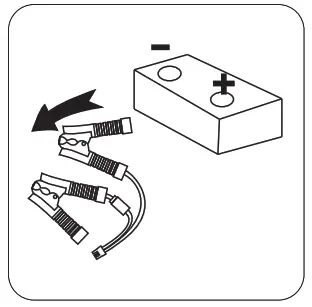
Clamp the red and black dips to the positive and negative poles of the car battery respectively (make sure the positive and negative poles of the clip winds are correctly connected and in contact with each other Good), and the product will automatically turn on. when the capacitor voltage is higher than 14.5V, it will automatically display the ignition mode prompt symbol “- – Press the power button, the countdown starts to enter 10 seconds (the buzzer beeps every 1 second), and the power is turned on after the countdown is over Start outputting current. Get into the cab during the countdown time and start the car after the countdown is over. (If when The output Is automatically turned off if It exceeds the 30S). After completing an ignition. you need to disconnect the clip and re-clip the clip. When the capacitor voltage is lower than 14.5V, it will automatically enter the charging mode, and when the battery Is fully charged to 100%. It will automatically display ON. The prompt symbol – -” in the ignition mode, repeat the above operations to start the car.
 | 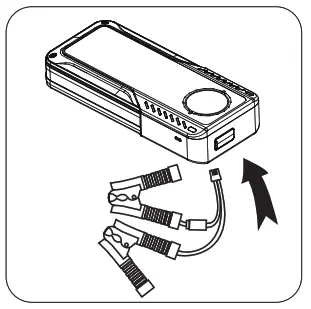 | 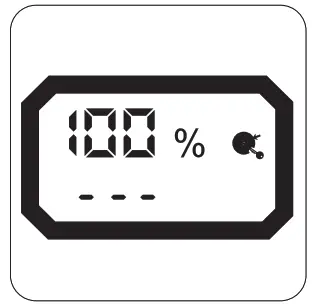 |
| 1. Attach clamps to the positive and negative of the Car Battery. | 2. Battery clip plug into the CS output port | 3. The battery power shows 100% |
 |  |  |
| 4.Star vehicle | 5. Unplug the battery clip | 6. Remove the clips From positive and negative of the battery Remove the clip |
How to force start the car:
Clamp the red and black clips to the positive and negative poles of the car battery respectively (make sure the positive and negative poles of the clip wires are correctly connected and in contact with each other. Good), when the product cannot enter the start mode, you can use the strong start function to start the vehicle.
In boot mode, When the “UVP” icon on the display goes out, start to long press the button, and don’t release it after the display goes out.
Press the button, wait for 10S, release the button after the product is turned on again, enter the start countdown mode at this time, the buzzer One beep every 1 second, after 10 beeps (10S), the relay closes and the buzzer sounds long, and it can be quickly ignited at this moment Start the car.
PRODUCT PARAMETERS
Product function parameters are subject to change without prior notice, the company reserves the right of final interpretation!
| Screen Display Content |  |
| 1%-100% | Display Capacitor Power |
| — – | Turn on the ignition mode prompt icon |
| E01-E06 | Exception prompt code |
| OV-15V | Display capacitor voltage value |
| IN | Charging prompt icon |
 | Startup power supply and car battery circuit connection success icon |
| UVP | The Undervoltage prompt icon when the capacitor voltage is lower than 14.5V |
PRODUCT PARAMETERS
Product exception description:
| Exception code | Exception information | Solution |
| E01 | Reverse polarity protection | Need to be re-operated |
| E02 | Failed to charge | Change the power supply or use another charging method |
| E03 | Input Undervoltage | Change the power supply or use another charging method |
| E04 | Input overvoltage | Change the power supply or use another charging method |
| E05 | Reverse charge protection | Turn it on and wait a while for the product to self-discharge |
| E06 | Over temperature protection | Wait a while for the product to cool |
Product information Description:
| Capacitors capacity | 400 F |
| Starting current | 600A |
| TYPE-C input | 5V |
| DC interface input | 12V |
| CS Interface input | 12V |
| Overall size | 254mm*110mm*49mm |
| Working temperature | -40°C-+70°C |
Importer:
Importer: APEX CE SPECIALISTS LIMITED
Address: 89 Princess Street, Manchester, M1 4HT, UK
Contact: Wells
Tel: +441616371080
E-Mail: [email protected]![]()
MADE IN CHINA


