![]()
![]()
VT-TR8HA Series
Transcendent Series 16 and 32 Channel
8.0 MegaPixel [4K] 5-In-1 HD-TVI / AHD / CVI /
CVBS / IP Digital Video Recorders
QUICK START GUIDE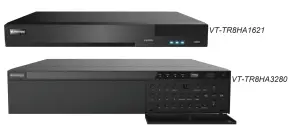
4K 8MP
KEY FEATURES:
- 16 or 32 Channel HD-TVI / AHD / CVI / CVBS BNC Inputs Supporting up to 8 MegaPixel + IP Camera Support with ability to substitute up to 32 (VT-TR8HA3280) 8 (VT-TR8HA1620) HDA inputs for IP cameras
- VT-TR8HA1621: Video Resolution (HDA): TVI/ AHD / CVI: 8MP@8fps, 8MP Lite@15fps, 5MP@12fps, 4MP/3MP@15fps, 4MPLite/1080P/720P/WD1 @30fps
- VT-TR8HA3280: Video Resolution (HDA): TVI/ AHD / CVI: 8MP@8fps, 5MP@20fps, 4MP/3MP/1080P/720P/WD1 @30fps
- Video Resolution (IP): Up to 8MP [4K] @30fps
- HDMI (4K), VGA, and BNC Spot Video Output
- Simple plug and play, point-to-point connection from camera to DVR
- Free VMS (Video Management Software) Lite and Standard versions available for organized viewing of multiple sites [For Enterprise version please contact your Vitek Reseller]
- H.265 / 264 Compression
- 2-Way Audio [Takes up 1 Ch. Audio In on VT-TR8HA1621]
- PTZ Control over RS-485 / Control over Coax (CoC)
- Pentaplex: Live Display / Record / Playback / Backup / Remote Access
- VT-TR8HA1621: 2 Internal SATA2/SATA3 HDD Slot supporting up to 24TB (2 x 12TB HDD)
- VT-TR8HA3280: 8 Internal SATA2/SATA3 HDD Slot supporting up to 96TB (8 x 12TB HDD)
- Applications for iOS & Android
- Remote Viewing over the Internet via Web Browser or LAN
- Mac OS® Client & CMS Central Management Software Included
- Supports both Dynamic and Static IP Addresses
- Control locally via USB Mouse or IR Remote cont
- 3-Year Warranty
SETUP & CONFIGURATION:
1. Notes
- Please read this instruction carefully for correct use of the product and preserve it for reference purposes.
- This manual is suitable for 4/8/16/32 CH HD Hybrid DVRs. All the examples and pictures used here are for reference only.
- There may be technically incorrect parts or printing errors in this manual. The updates will be added into the future versions of this manual. The contents of this manual are subject to change without notice.
- To prevent electric shocks and risk of fire hazards, do NOT use a power source other than that specified.
2. Check Package
Contents Please confirm that the device and all accessories are included in the package. If there is any damage, shortages or defects, please contact your distributor immediately.
- Transcendent Series DVR
- IR Remote Control
- Quick Start Guide
- Power Supply (16ch), 110V AC Power Cord (32ch)
- USB Mouse
- Rack Ears (32 Ch. Model Only)
3. Rear Panel Connections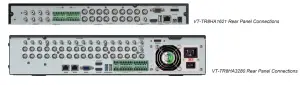
4. Startup & Shutdown
• Startup:
- Connect a monitor and the power.
- The device will boot up and the power indicator will display blue.
- A wizard window will pop up.
• Shutdown:
Go to “Main Menu” and then select the “Shutdown icon. This will bring up a shutdown window. The device will shut down by clicking the “OK” button. Then disconnect the power.
5. Login You must configure the wizard when you start the DVR for the first time. You can skip the settings of the wizard next time. The default username is “admin” and the password is set by you when you configure the wizard for the first time. Click “Start” and select “Login”. This will take you to a login box. The default username is “admin”, and the default password is “123456”. Enter username and password and click the “Login” button to go to the main menu setup.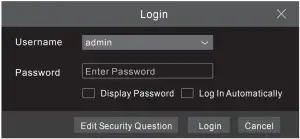 6. Analog Camera Connection First connect the cameras to the DVR. Then 90 to Start —. Settings Camera Manage Camera Signal Access Set to checkmark the video mode. The actual signal input shall correspond to the video mode. Please refer to User Manual for details.
7. Network Configuration & Adding IP Cameras
► LAN
1 Set the network of the DVR. Go to Start —. Settings —0 Network —TCP/IPv4. Input IP address, subnet mask, gateway, etc. If using DHCP, please enable DHCP in both the DVR and the router.
2 Go to Start Settings — Network —Port. Input HTTP port (the default value is 80), server port (the default port is 6036).
3 Click “Apply” to save the settings. 4 Go to Start —. Settings —Camera Add Camera. The DVR will automatically refresh the cameras searched. The IPC which supports the Onvif protocol may be added manually. If the IPC searched is not in the same local network as the DVR, you should select the device and click
![]() to modify the IP address.
to modify the IP address.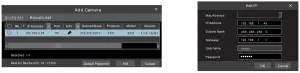 5 Highlight the device you want to add and then click the “Add” button. The DVR will automatically refresh the cameras and return to the “Edit Camera” interface. “Online” status means connecting the device successfully and you will see the live image. You may select the added device and click
![]() to modify channel, IP address, etc.
to modify channel, IP address, etc.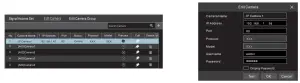
► WAN
1 Set the network of the DVR. Go to Start —) Settings —) Network TCP/IPv4. Input static IP address or enable PPPoE and then input the user name and password received from your ISP.
2 Go to Start —) Settings —) Camera. Click ‘Add Camera” and select °Manually Add” to add IP cameras. Input IP address server port, username and password of the IP camera. The IP camera must be connected over WAN. And here the IP address of the IP camera must be a WAN IP address
8. UPnP
You can use the UPnP function to enable a fast connection of the device to WAN via a router without port mapping.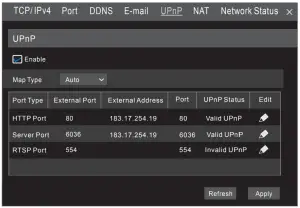
- Go to Start -Settings -) Network -) UPnP, and enable UPnP and then click “Apply button to save.
- Enable the UPnP function in the router.
- Click Refresh” button to refresh the UPnP status. If the UPnP status is still “Invalid UPnP” after refreshing it several times. the port would be wrong. Please change the mapping type to ‘Manual” and then dick
 to modify the port until the UPnP status turns to ‘valid UPnP’.
9. NAT
► NAT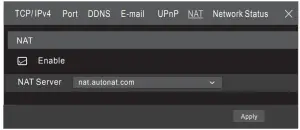
- Settings 1 Make sure the DVR is powered and connected to a network.
- Go to Start —) Settings —) Network TCP/IPv4. You can obtain the IP address subnet mask and gateway automatically. You can also manually enter them according to the actual network situation. Please make sure the network segment is the same as that of the network which is used.
- Set the preferred or alternative DNS Server. Click Apply” to save the parameters.
- Go to Start —. Settings —) Network NAT tab. Enable NAT and select the NAT Server (The default NAT Server is nat.auto-nat.com). Click “Apply” to save the parameters.
► NAT Access
After finishing the NAT settings, you can input www.autonat.com in the IE address bar and then press enter to go to the following interface. If this is the first time accessing the NAT, you need to download and install the Plug-in according to the popup tips. After installing the Plug-in successfully, it will display the login box. Device Serial Number: Click
 ![]() on the menu bar at the bottom of the live interface to check the serial number or go to Start —) Settings —) Network —) Network Status to check the serial number of the DVR). Username: The username of the DVR. (Default: admin) Password: The password of the DVR. (Default: 123456)
on the menu bar at the bottom of the live interface to check the serial number or go to Start —) Settings —) Network —) Network Status to check the serial number of the DVR). Username: The username of the DVR. (Default: admin) Password: The password of the DVR. (Default: 123456) 10. Playback
►Instant playback Click “Instant Playback” in the right-click menu of the camera’s preview window to select.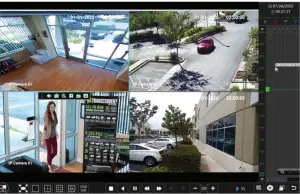 ►General playback
Click ![]() on the toolbar at the bottom of the live preview interface or click Start —. Playback to go to the playback interface as shown. You can also add the playback cameras manually. Clicklain the playback window to pop up the “Add Camera” window. Check + the cameras in the window and then click “Add” to add a playback camera. The recorded files of the added playback camera will be played in the playback interface.
on the toolbar at the bottom of the live preview interface or click Start —. Playback to go to the playback interface as shown. You can also add the playback cameras manually. Clicklain the playback window to pop up the “Add Camera” window. Check + the cameras in the window and then click “Add” to add a playback camera. The recorded files of the added playback camera will be played in the playback interface.
| Detailed Specifications Video Inputs Hybrid Inputs IP Camera Support, Hybrid Inputs Compression Analog Recording Network (IP) Recording Local Playback OS Video Output Multi Operation Audio Two-Way Audio Bit Rate Encode Quality Levels Recording Modes Search Function Alarm In/Out Alarm Modes Alarm Triggering Network Interface Remote Viewing Remote Playback Dual-stream Remote Users RS485 PTZ Protocol Network Protocols SATA HDD USB Accessories Power Consumption Power Supply Working Environment Dimensions (WxHxD) Weight | VT-TR8HA1621 16 Channels HD-TVI / AHD / CVI / Analog BNC Inputs Supporting up to 8 MegaPixel [4K] 8 HD Analog channels may be substituted for IP Cameras (plus 8 additional IP Cameras up to 8MP) for a complete Hybrid solution (up to 24 cameras) 8 MegaPixel @ 30fps Max H.265 High profile 8MP (4K): 8fps / 4K Lite: 15fps / 5MP: 12 fps / 5MP Lite: 20fps / 4/3MP: 15fps / 4MP Lite/1080P/720P/WD1: 30fps 8MP / 5MP / 4MP / 3MP / 1080P / 960P / 720P Real Time (30fps) 16 CH Embedded Linux 1 x HDMI (4K – 3840×2160, 1920×1080, 1280×1024) / 1 x VGA (1080p) / 1 x BNC Spot (Analog) Pentaplex: Live Display / Record / Playback / Backup / Remote Access Input: RCA x 8 / Output: RCA x 1 Yes – Takes Up One Ch. Audio In 32Kbps ~ 8Mbps VBR / CBR 6 level Manual, Timer, Motion, Sensor Time Sliced, Time, Event, Tag Management Play, Pause, FF, FB, Digital zoom 16 Alarm inputs / 4 Alarm Output Sensor, Motion, Video loss Record, PTZ move, Relay out, E-mail, etc RJ45: 10/100/1000Mbps × 1 CMS / Web Browser / Mobile Platforms 16CH Individual Network Video Stream and local recording stream, set separately 10 users online, dual stream RS485 x1 (for PTZ) Control over Coax (CoC) Pelco D / Pelco P TCP/IP, UDP, DHCP, DNS, PPPOE, DDNS, SMTP, RTSP, HTTP Up to 24TB (2 x 12TB) UBS 2.0 x 2 Remote controller, SATA cable, USB mouse 30W (Without HDD) DC: 12V 14ºF~122ºF (-10º~50ºC) / 10~90% RH 14.96” × 10.55” × 1.89” 4.08lbs (net), 6.72lbs (shipping) / 1.85kg (net), 3.05kg (shipping) |
| Detailed Specifications Video Inputs IP Camera Support Compression Analog Recording Network (IP) Recording Local Playback OS Video Output Multi Operation Audio (Compression) Two-Way Audio Bit Rate Encode Quality Levels Recording Modes Search Function Alarm In/Out Alarm Modes Alarm Triggering Network Interface / Bandwidth Remote Viewing Remote Playback Dual-stream Remote Users Remote Viewing RS485 PTZ Protocol Network Protocols SATA HDD RAID USB Accessories Power Consumption / Supply Working Environment Dimensions (WxHxD), Weight | VT-TR8HA3280 32 Channels HD-TVI / AHD / CVI / Analog BNC Inputs Supporting up to 8 MegaPixel [4K] Up to 8 MegaPixel @ 30fps Max, 32Ch IP Plus HDA Inputs may be substituted for IP for up to 64Ch IP H.265 / H.264 High profile 8MP@8fps, 8MP Lite@15fps, 5MP@12fps, 5MP Lite@20fps, 4MP/3MP@15fps, 4MP Lite/1080P/720P/WD1/D1@30fps 8MP / 5MP / 5MP Lite / 4MP / 3MP / 1080P / 960P / 720P Real Time (30fps) 16 CH Embedded Linux HDMI 1: 3840 × 2160 / 1920 × 1080 / 1280 × 1024, HDMI2: 1920 × 1080 / 1280 × 1024 / 1024 × 768 VGA: 1920 × 1080 / 1280 × 1024, BNC × 1: CVBS (used as the main or spot output) Pentaplex: Live Display / Record / Playback / Backup / Remote Access Input: RCA × 16 [2.0Vp-P, 1k ] / Output: 1[linear, 600 ] (RCA × 1 G.711A/U) Yes – RCA × 1 32Kbps ~ 10Mbps VBR / CBR 6 level Manual, Timer, Alarm linkage Time Slice, Time, Event, Tag Management Play, Pause, FF, FB, Digital zoom 16 Alarm inputs / 8 Alarm Output Sensor, Motion, Video loss Record, PTZ move, Relay out, E-mail, etc RJ45: 1000Mbps × 2 / Incoming: 160-360Mbps, Outgoing: 360Mbps CMS / Web Browser / Mobile Platforms 16CH Individual Network Video Stream and local recording stream, set separately 10 users online, dual-stream CMS / Web Browser / Mobile (iOS/Android) Yes (full-duplex), connectors for PTZ and keyboard Control over Coax (CoC) Pelco D / Pelco P TCP/IP, UDP, DHCP, DNS, PPPOE, DDNS, SMTP, RTSP, HTTP, ONVIF Up to 96TB (8 × 12TB) + E-SATA × 1 RAID 0, 1, 5, 6, 10 UBS 2.0 × 2, USB 3.0 × 1 Remote Control, SATA cable, USB mouse 70W (Without HDD) / ATX250W 14ºF~122ºF (-10º~50ºC) / 10~90% RH 17.52 x 3.54 x 17.12” (445 × 90 × 436mm), 13.79lbs (net), 16.01lbs (shipping) / [6.25kg (net) / 7.29kg (shipping)] |
CONSIDER THESE OTHER GREAT TRANSCENDENT PRODUCTS! 8MP HD OVER COAX CAMERAS WITH FIXED / MOTORIZED LENS CONFIGURATIONS
VTC-THB8RM
VTC-THT8RM
VTD-THD8RM
Transcendent 8.0 Megapixel [4K] Indoor/ Outdoor 4-IN-1 Motorized HDA Cameras![]()
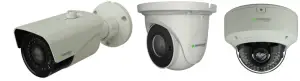
FEATURES
- 1/2.5” 8 MP[4K] Progressive Scan CMOS Image Sensor
- High Definition Analog (HDA) / HD-TVI / AHD / HD-CVI / CVBS
- 8MP@15fps, 5MP@20fps, 4MP@30fps High Res, True Color
- Supports OSD Menu
- 2.8~12mm Motorized Varifocal Lens
- 2 Matrix IRs with up to 165’ Range (VTC-THT8RM), 36 IRs with up to 100’ Range (VTC-THB8RM) 30 IRs with up to 100’ Range (VTD-THD8RM)
- Digital Wide Dynamic Range (D-WDR)
- True Mechanical Day/Night function by ICR
- XD-DNR (2D & 3D DNR) Noise Reduction
- IP67 Weather Resistance (VTC-THT8RM, VTD-THD8RM), IP66 (VTC-THB8RM), (+ IK10 for VTD-THD8RM)
- Supports Control over COAX Control (CoC)
- Over 1500’ HD Video Transmission (Depending on cable characteristics and integrity)
- Optional Junction Boxes, Wall, Pendant, and Semi-Flush Mounts available
- 12VDC Operation
- 3-Year Warranty
VTC-THB8R2
VTC-THT8R2
VTD-THD8R2
Transcendent 8.0 Megapixel Indoor/ Outdoor 4-IN-1 HDA Cameras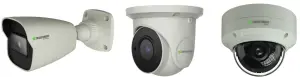
FEATURES
- 1/2.5” 8 MegaPixel [4K] Progressive Scan CMOS image sensor
- High Definition Analog (HDA) / HD-TVI / AHD / HD-CVI / CVBS
- 8MP@15fps, 5MP@20fps, 4MP@30fps High Res, True Color
- Supports OSD Menu
- 2.8mm Fixed Lens
- 1 Matrix IR with up to 100’ IR Range
- True Mechanical Day/Night function by ICR
- XD-DNR Noise Reduction
- IP67 Weather Resistance (+IK10 for VTD-THD8R2)
- Supports Up The COAX Control (CoC)
- Over 1500’ HD Video Transmission (Depending on cable characteristics and integrity)
- Optional Junction Boxes, Wall, Pendant, and SemiFlush Mounts available
- 12VDC Operation
- 3-year Warranty
Limited Product warranty
VITEK products carry a three (3) year limited warranty. VITEK warrants to the purchaser that products manufactured by VITEK are free of any rightful claim of infringement or the like, and when used in the manner intended, will be free of defects in materials and workmanship for a period of three (3) years, or as otherwise stated above, from the date of purchase by the end-user. This warranty is non-transferable and extends only to the original buyer or end-user customer of a VITEK Authorized Reseller.
The product must have been used only for its intended purpose, and not been subjected to damage by misuse, willful or accidental damage, caused by excessive voltage or lightning. The product must not have been tampered with in any way or the guarantee will be considered null and void. This guarantee does not affect your statutory rights.
Contact your local VITEK Reseller should servicing become necessary. VITEK makes no warranty or guarantees whatsoever with respect to products sold or purchased through unauthorized sales channels. Warranty support is available only if the product is purchased through a VITEK Authorized Reseller.
 https://vitekcctv.com/downloads/
![]() 28492 CONSTELLATION ROAD VALENCIA, CA 91355
28492 CONSTELLATION ROAD VALENCIA, CA 91355
WWW.VITEKCCTV.COM
Version 2.0
Sep. 2021


