Operation Manual for Android
Attention
- An abnormal situation occurs during operation, please press the reset key on the panel to restore factory settings.
- When the in-car temperature is much higher or lower, please adjust the temperature inside the car first before using this machine.
- Avoid strong shocks because they can damage the mechanical parts and structural components.
- This machine is composed of high-precision parts, please do not dismantle the machine cover or adjust any parts, if you need maintenance please go to the professional after-sales service center to accept the service.
- Please follow the instruction manual, the damage caused by the illegal operation is noting the warranty scope.
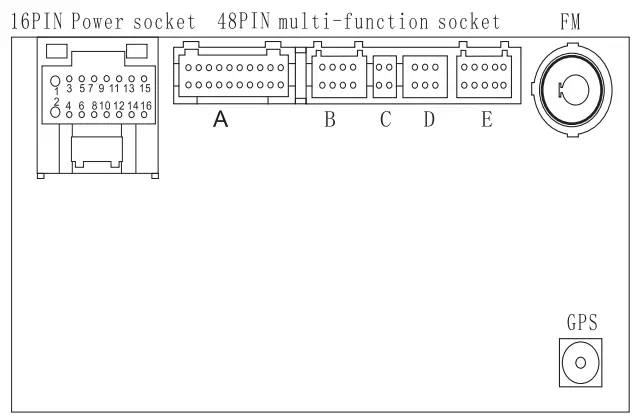
| 1 | Ground Wire(Black) | 5 | Parking Sensor Control wires (Pink) | 9 | Front Right (-)Speaker(GRAY/BLACK) | 13 | Front Left -Speaker (WHITEIBLACK) |
| 2 | 12V Constant Power Supply(Yellow) | 6 | brake line ( brown) OR NC | 1 0 | Rear Left(-)Speaker (GREENIIBLACK) | 1 4
| Rear Right +Speaker(VIOLET) |
| 3 | +12VAccessory/Switch(Rect | 7 | Steering wheel key control line orangei Black ORNC | 11 | Front Right + Speaker (GRAY) | 15 | Front Left+Speaker(WHITE) |
| 4 | high beamline ( orange ) OR NC | 8 | PowerAntenna/Amplifier Turn On (Blue) ORNC | 12 | Rear Left + Speaker (GREEN) | 16 | Rear Right-Speaker (VIOLETIBLACK) |
If you have any questions about radio compatibility, wiring, operation, or package, please contact Rimoody aftersale center [email protected] soon.
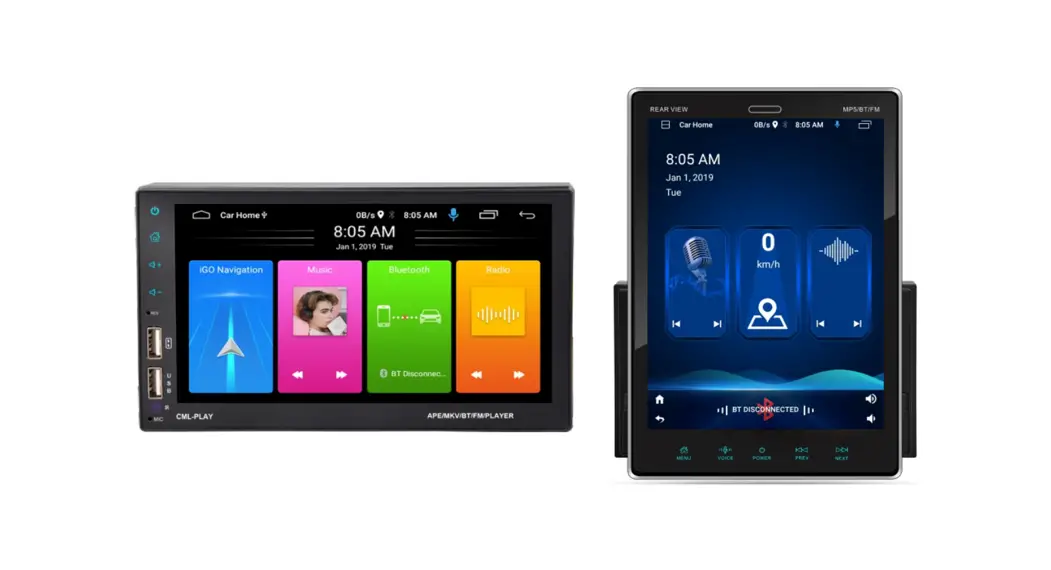
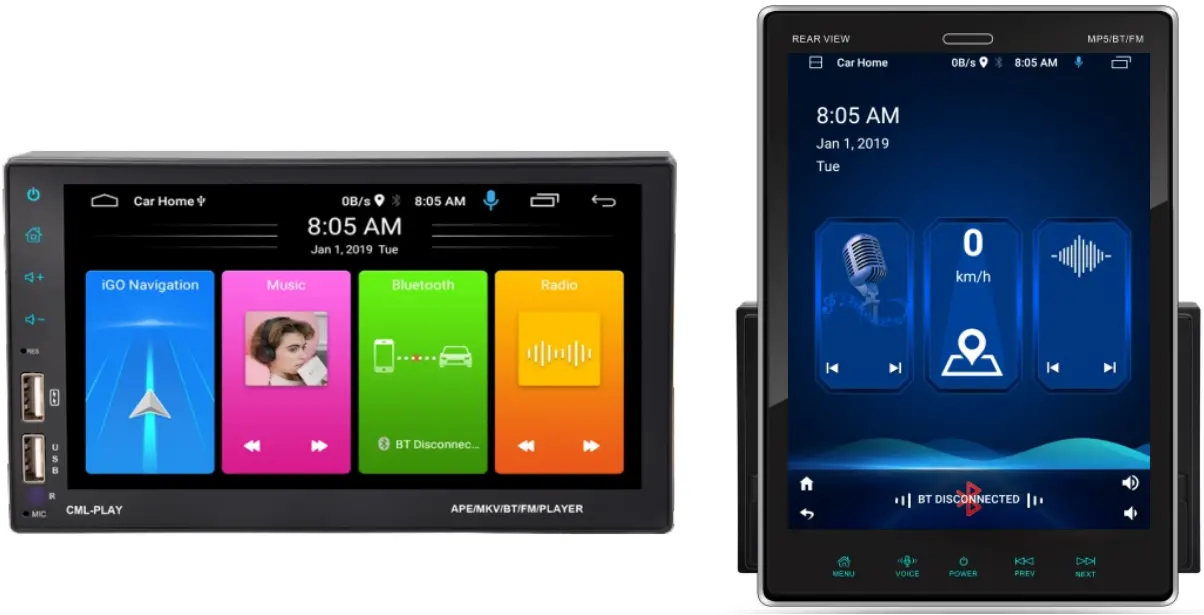
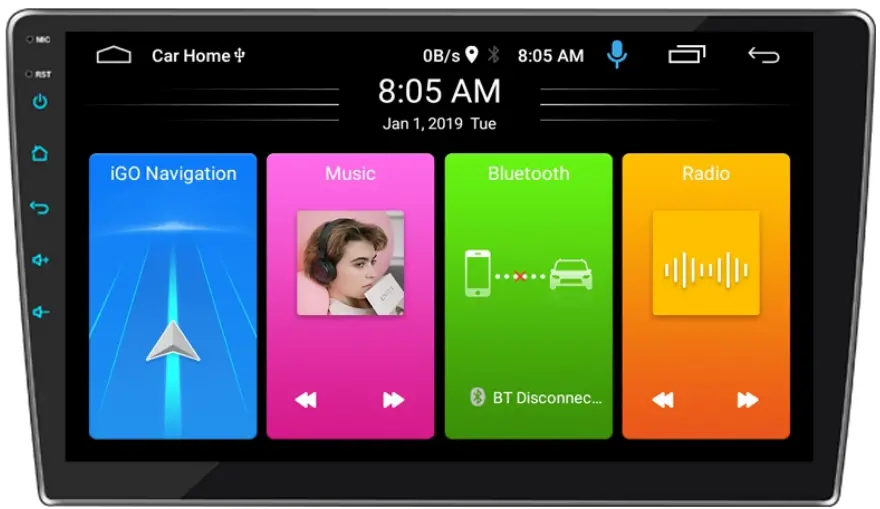
Main interface
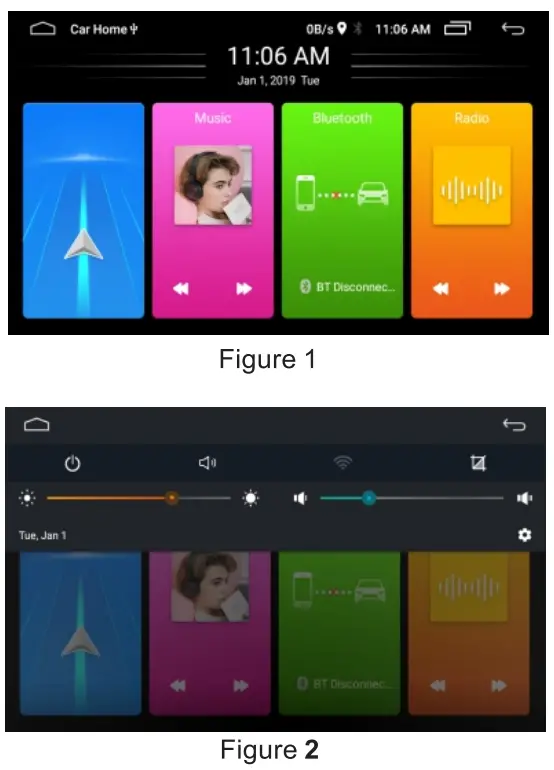
Figure 1: Top status bar, Back desktop button, interface name, network speed, GPS, Bluetooth, time, history task button, return button Intermediate Time Date Display, Click to adjust the time date, Four quick features below: navigation, music, Bluetooth, radio, click on the app
Figure 2: Task bar drop-down menu: power key, mute key, WIFI switch, screenshot function, brightness and volume adjustment.
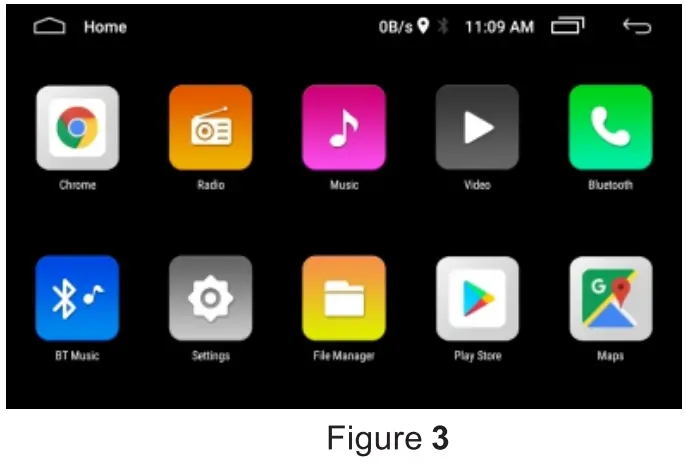
Figure 3: The main interface slides right into the main menu interface.
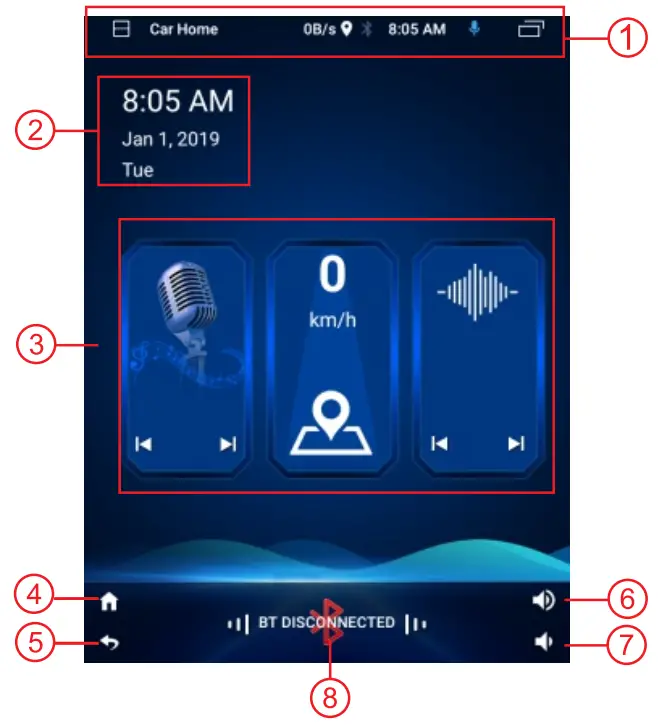
- Status bar, drop-down display task interface
- Time and date display
- Shortcut button: FM, GPS, previous program
- Desktop button
- Back button
- Volume+
- Volume-
- Bluetooth voice button
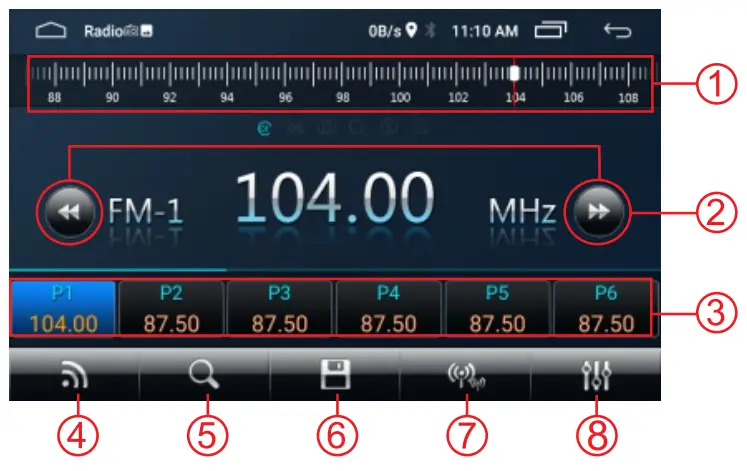
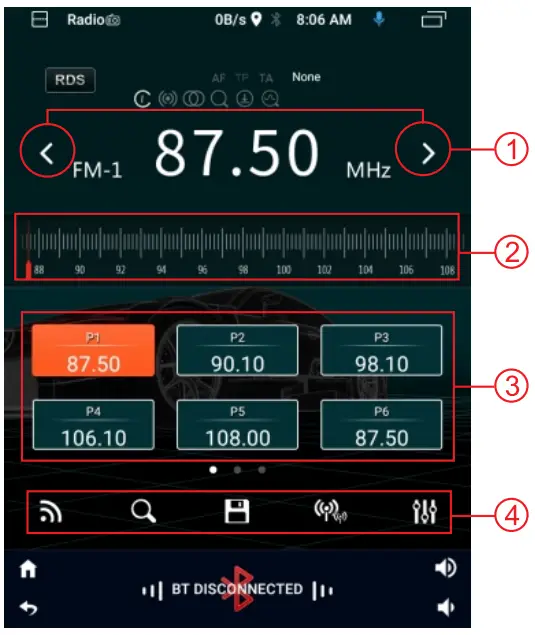
Radio mode
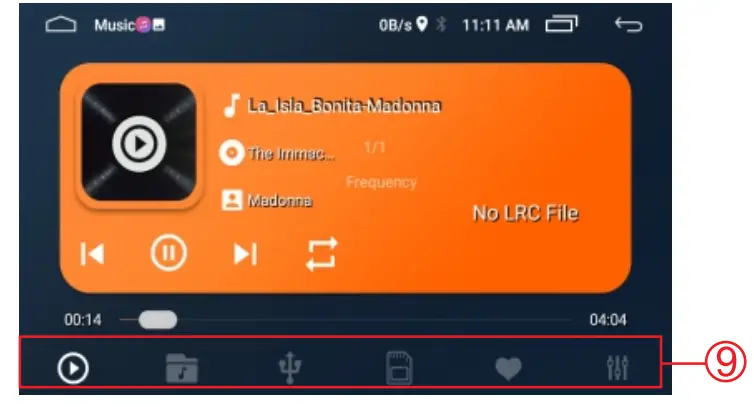
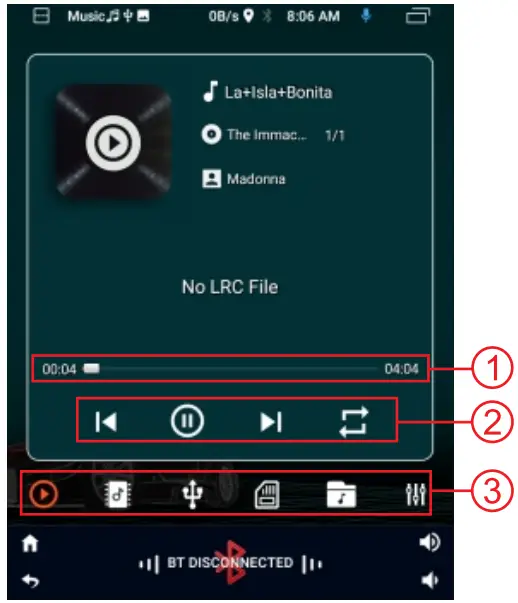
Music Mode
- Sliding slider to adjust radio frequency quickly
- Short press fine-tuning, long-press up/down the search
- Radio button, short press switch to a preset station, long-press save the current station
- Band switching: FM1/2/3/AM1/2
- Search
- Automatic search and save
- Far and near the switching
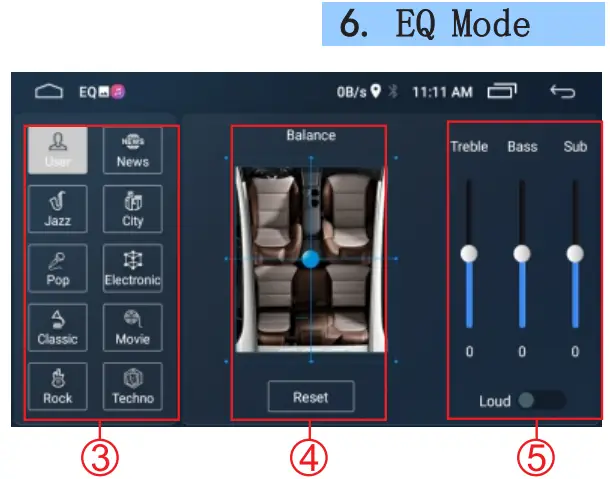
- EQ adjustments
- Six buttons from left to right: Play all, folders, U disks, memory cards, favorite, EQ settings
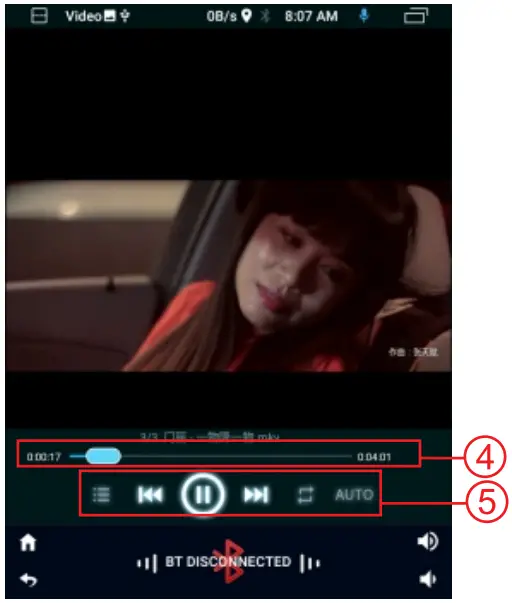
Video Mode
 C
C
Radio mode
- Short press to fine-tune, long press to search up / down
- Slide the slider to change the frequency quickly
- Radio button: Click to switch the station, Long press to save current channel
- 5 buttons from left to right: Band switching: Fl / 2 / 3 /AM1 / 2 Search Taiwan Auto search and save Long and short-range switching EQ adjustment
Music mode
video Mode
- Play the progress bar and drag to change the progress quickly
- Four buttons from left to right: previous song, play/pause, next song, loop play
- Six buttons from left to right: Play all, folders, U disks, memory cards, favorite, EQ settings
- Play the progress bar and drag to adjust the progress quickly 5. Five buttons from left to right: playlist, previous song, play/pause, next song, loop play
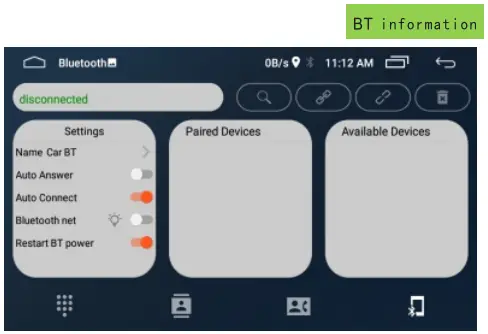
BT Mode
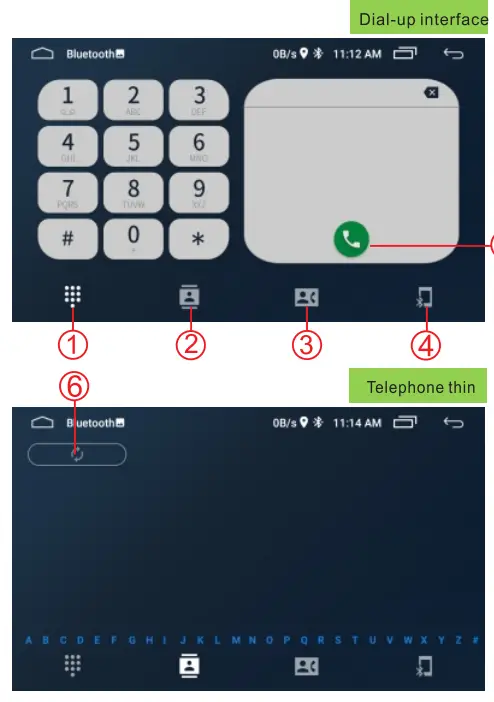
- dial
- Phone book
- Call record
- BT information
- Dial button
- Synchronize phone book
Remark
If you have already downloaded the call record, you can enter the call record list directly.
Setup interface

- WiFi switch: can turn on WiFi, turn on the flow display, turn on the hotspot
- Application: View recent applications and view all applications
- Storage: check the memory status of the machine
- Position information: open and close positioning
- Users and accounts: add and delete users
- Barrier free setting: text size, display brightness, voice broadcast Color adjustment
- Browser: set common properties of browser
- On board setting
- System: language setting, time and date setting, version view
- Radio area
- Reversing lens setting
- Selection of square control type
- Local control setting
- Suspension ball selection
- Four buttons from left to right: car settings,display settings, sound settings, initialization settings
5. BT Mode

- 4 buttons from left to right: no calls, answering calls, dialing calls, synchronizing calls records
- Play progress bar manually drags to change play progress
- Preset sound effect scheme, click select.
- Drag the ball to change the direction of sound output, click the button below to reset.
- Manually adjust the sound effect, below can increase
Vehicle Setup Interface
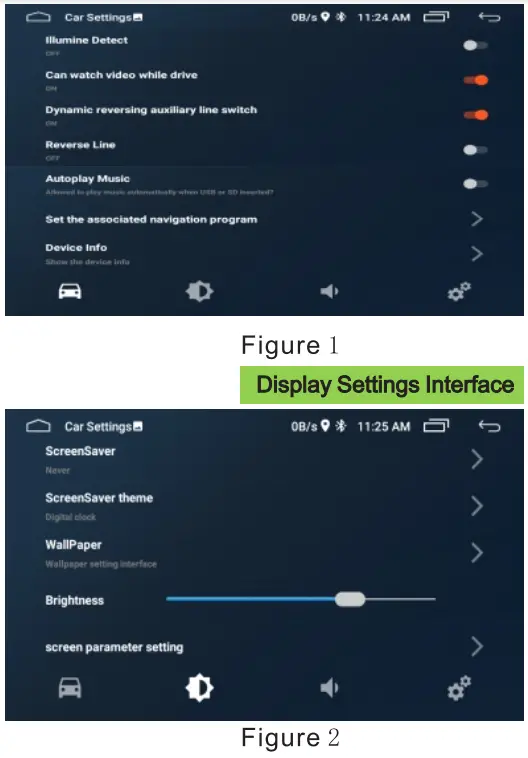
Figure 1: Headlamp detection switch Driving video switch Dynamic auxiliary line switch Reversing auxiliary line switch Autoplay music switch Navigation software settings system information
Figure 2: Screen saver switch Screen saver selection Wallpaper settings Brightness adjustment Display effect adjustment
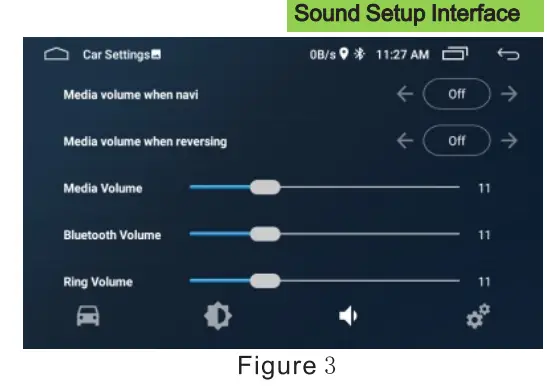
Figure 3: Media sound switch during navigation Media sound switch when reversing Media volume adjustment Bluetooth volume adjustment Ring volume adjustment
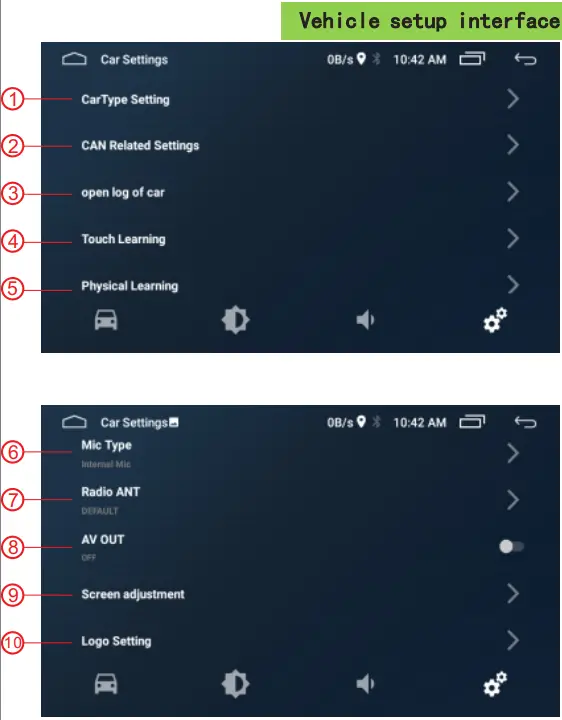
- Model setting
- Protocol-related settings
- Can data acquisition
- Touch the key to learn
- Physics key learning
- Microphone type
- Radio antenna setting
- AV output
- Screen parameter setting
- Boot logo settings
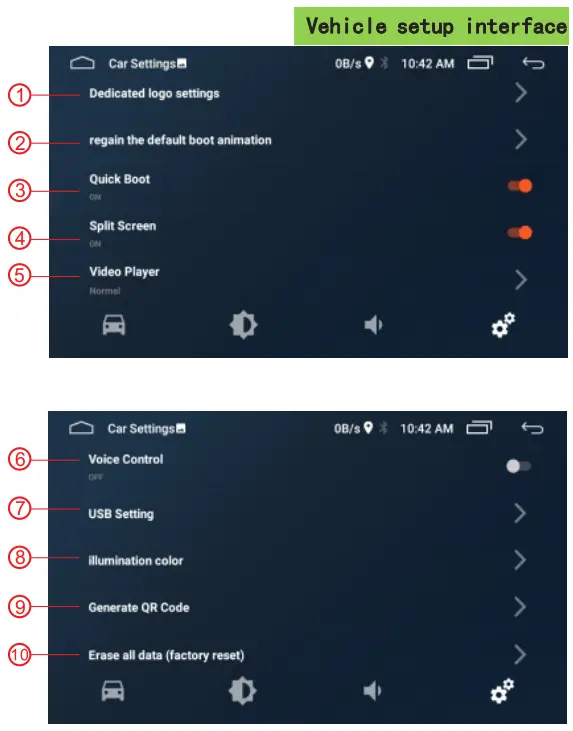
- Special logo setting
- Restore the default animation
- Quick start switch
- Split-screen switch
- Player settings
- Voice control switch
- USB settings
- Color lamp setting
- Generate QR code
- Restore factory settings
Mirror link
Support for multiple mirror link:connect data lines, Open USB debug, Mobile phone pop window trust authorization click allow. (If click error, reconnect data line)
Function panel presentation
- Remote window
- MIC
- Power key
- previous
- knob
- Next
- Return key
- Reset hole
- USB
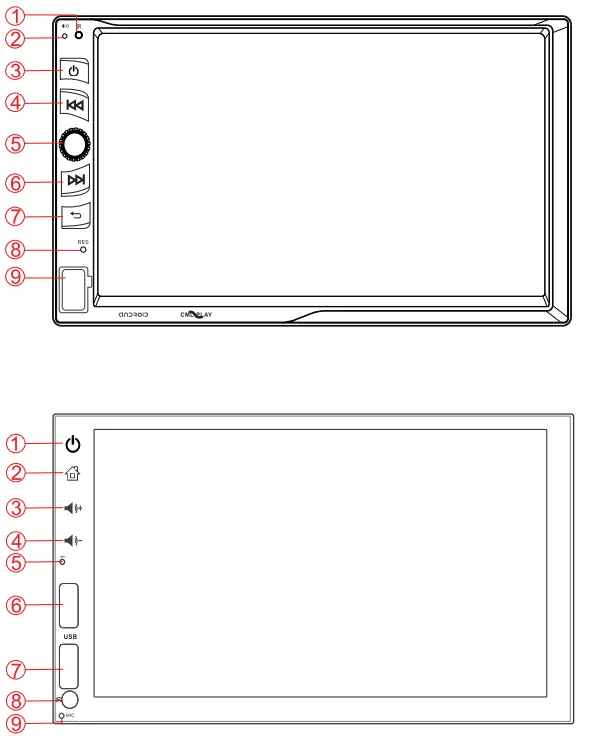
- Power key
- Back to Desktop
- VOL+
- VOL-
- Reset hole
- USB playback
- USB charging
- Remote window
- MIC
Plug-in one din main function introduction
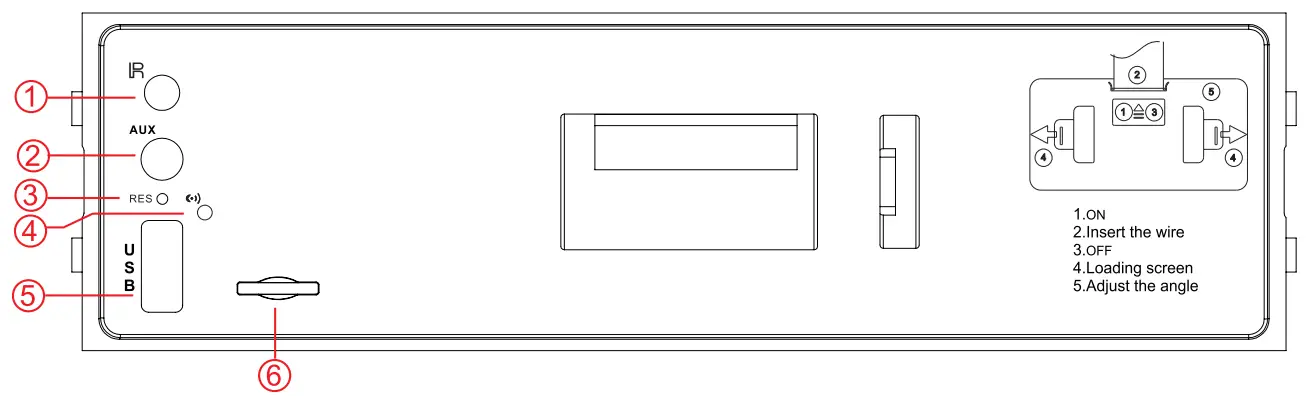
- Remote window
- Aux input
- Reset hole
- MIC
- USB
- Card slot
Introduction of single spindle external plug function
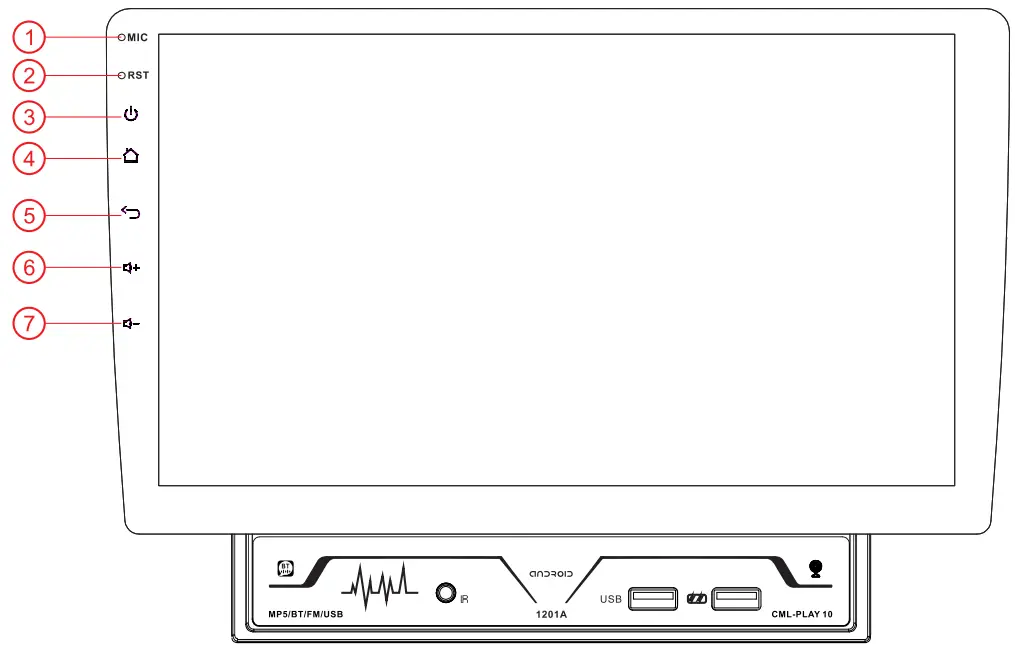
- M IC
- Reset hole
- Power key
- Back to Desktop
- Return key
- VOL+
- VOL-

- MENU
- VOICE
- POWER
- PREV
- NEXT
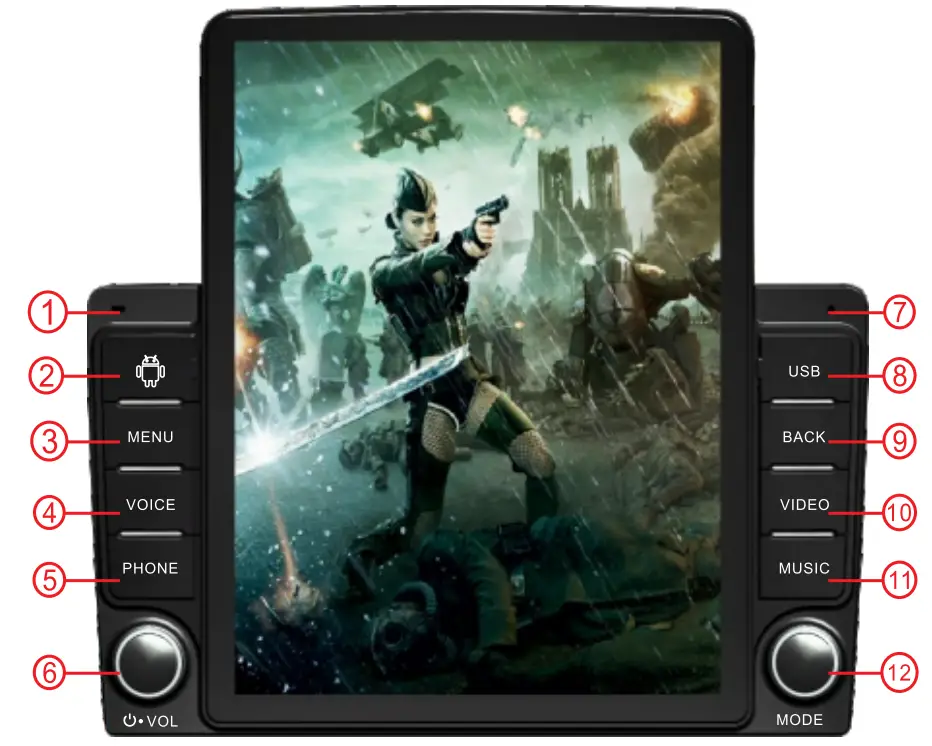
- MIC
- CARD
- MENU
- VOICE
- PHONE
- POWER/VOL/+/-
- RES
- USB
- BACK
- VIDEO
- MUSIC
- MODE
Screen installation method
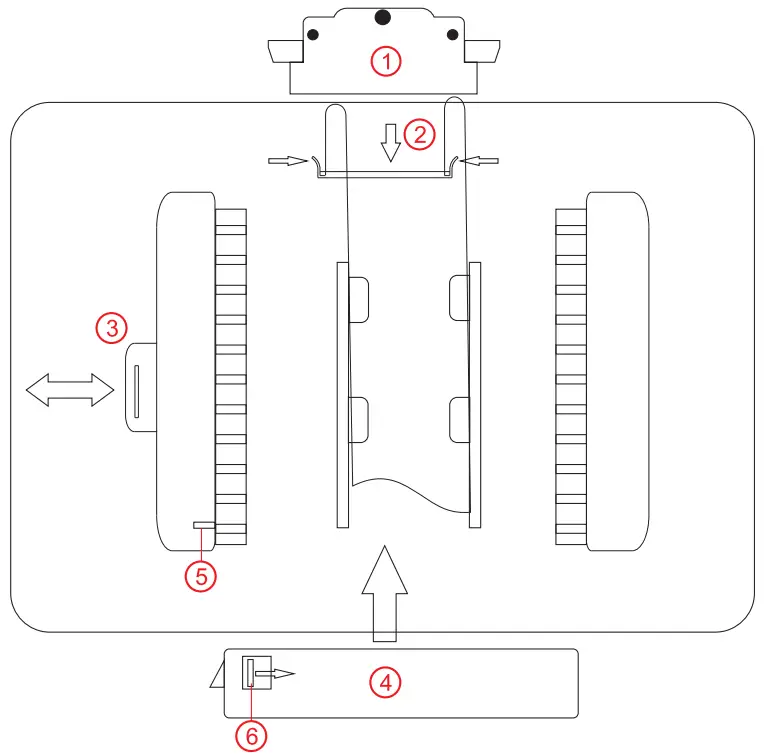
- Remove the cable cover The fingers are pulled straight out at the black spot above, Press the black spots on both sides during installation
- Insert the cable into the outlet Press down the flat wire by facing the winding mouth To take out the cable, you need to press the buckle on both sides and pull it outward
- Open the manual baffle
- Align the slots of the host and the screen, Then push the main engine up Push to the right position and then press the manual baffle
- Antiskid baffle
- Non slip buckle You need to push the buckle to remove the screen completely
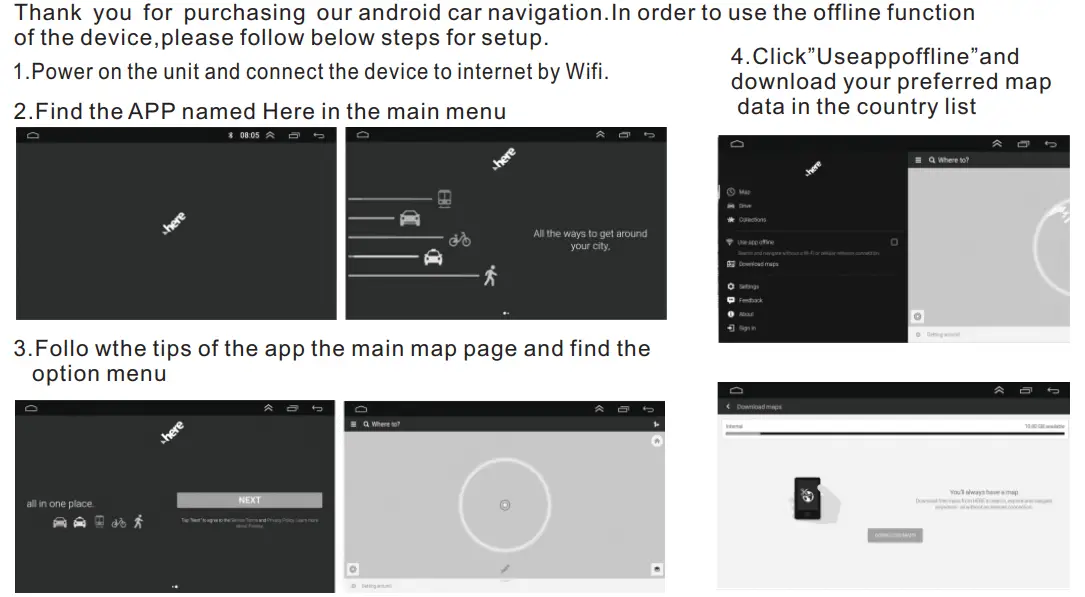
offline Map operation Guide
Operation Manual for Android
Thank you for your use!


