KAVAN 3D Aerobatic model
Product Information
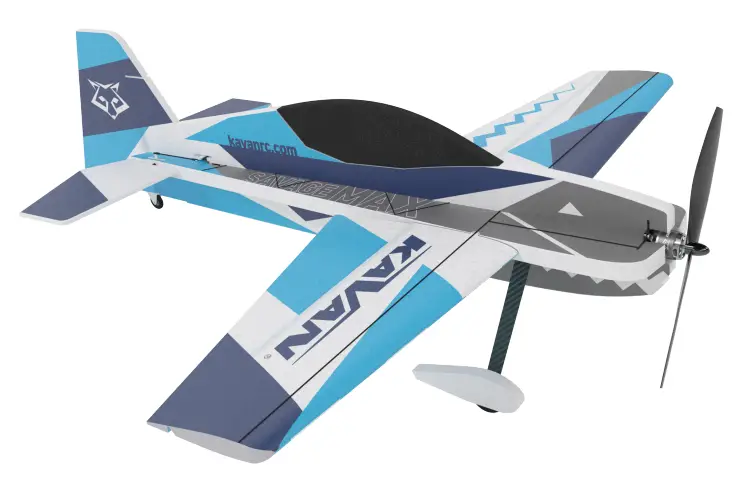
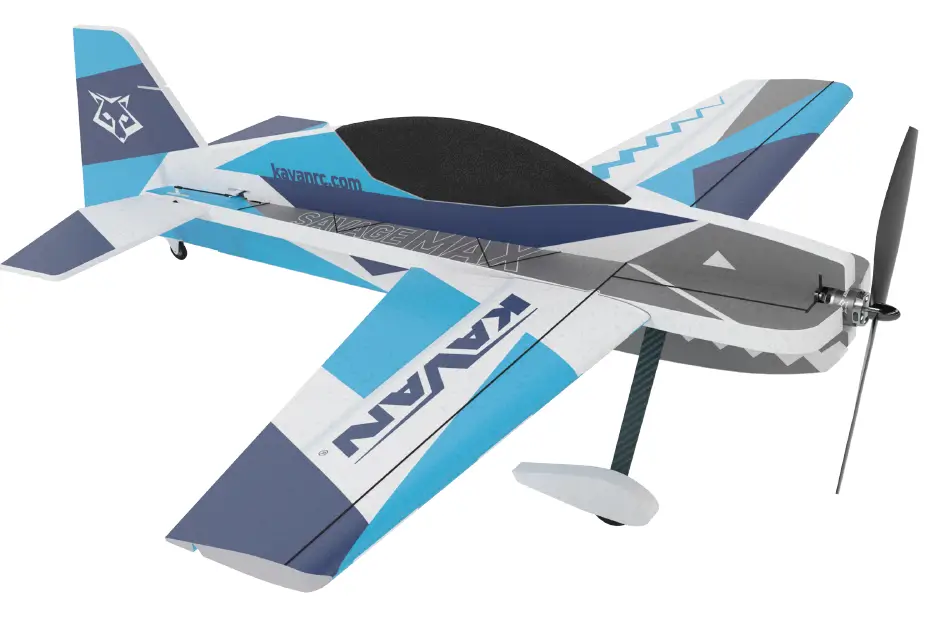
Product Name: SAVAGE MAX
Introduction: The SAVAGE MAX is a high-performance 3D aerobatic model made from virtually unbreakable EPP foam. It features a brushless motor and lightweight LiPo battery for powerful performance. This model is designed for experienced R/C pilots who have mastered flying a full house trainer.
Specifications:
- Wingspan: 1080 mm
- Length: 1200 mm
- All-up Weight: Approximately 850 g
Recommended Power Systems and Servos:
| Model | Motor | Propeller | ESC | Battery | Servos |
|---|---|---|---|---|---|
| Sunday Acro | KAVAN C3536-1250 | APC 10x5E | KAVAN R-40B | KAVAN LiPo 11.1V 1800mAh 30/60C | KAVAN GO-13MG, Hitec HS-65MG, HS-70MG |
| Sunday 3D | KAVAN C3536-1000 | APC 11×4.7SF | KAVAN R-40B | KAVAN LiPo 11.1V 1800mAh 40/80C | KAVAN GO-13MG, Hitec HS-65MG, HS-70MG |
| Acro | KAVAN PRO 3536-1150 | APC 9x5E | KAVAN PRO-40SB | KAVAN LiPo 14.8V 1300mAh 40/80C | KAVAN GO-1013MG, Hitec HS-5065MG, HS-5070MH |
| 3D | KAVAN PRO 3536-1000 | APC 10×4.7SF | KAVAN PRO-40SB | KAVAN LiPo 14.8V 1300mAh 40/80C | KAVAN GO-1013MG, Hitec HS-5065MG, HS-5070MH |
Product Usage Instructions
- If you are not an experienced R/C pilot, it is recommended to have a fully competent pilot check your completed model and assist you with your first flights.
- Assemble your model exactly according to the provided instructions. Do not attempt to modify or change your model as it may affect its flying characteristics.
- Before starting assembly, check the entire contents of the kit to ensure no parts are missing or damaged.
- Follow the step-by-step building manual on pages 9-19 for assembly instructions.
- Install the RC set and perform a preflight check according to the recommended throws for ailerons, elevator, and rudder.
- The test flying and fine-tuning process is straightforward for medium-advanced pilots who are familiar with this type of model.
PRECAUTIONS:
This R/C model is not a toy. Use it with care and strictly following the instructions in this manual.
Assemble this model following strictly these instructions. DO NOT modify or alter the model. Failure to do so, the warranty will lapse automatically. Follow the instructions in order to obtain a safe and solid model at the end of the assembly. Children under the age of 14 must operate the model under the supervision of an adult.
Assure that the model is in perfect conditions before every flight, taking care that all the equipment works correctly and that the model is undamaged in its structure.
Fly only in days with light breeze and in a safe place away from any obstacles.
INTRODUCTION
Congratulation on your purchase of the high performance 3D aerobatic SAVAGE MAX model! You are about to start the assembly of a model manufactured from virtually unbreakable EPP (extruded polypropylene) foam powered by a mighty
brushless motor and lightweight LiPo battery. Everybody who has already mastered flying a “full house” trainer – with aileron, elevator, rudder, and throttle control – will enjoy this beast!
BEFORE YOU START
- If you are not an experienced R/C pilot, plan to have a fully competent pilot check your completed model and help you with your first flights. Even though we have tried to provide you with a thorough instruction manual, R/C models are rather complicated and an experienced modeler can quickly check over your model to make sure your first flights are successful.
- Please assemble your model exactly according to these instructions. Do not attempt to modify or change your model in any way as doing so may adversely change its flying characteristics.
- Before you begin, please check the entire contents of this kit to make sure that no parts are missing or damaged. This will also help you to become familiar with each component of your plane. If you find that any of the parts are either missing or damaged, please contact your dealer immediately for replacement.
Note: Your dealer cannot accept kits for return if construction has begun. - Trial fit each part before gluing it in place. Make sure you are using the correct part and that it fits well before assembling. No amount of glue can make up for a poor fitting part.
- The manual contains drawing showing the default position of the Centre of Gravity (CG) and recommended control surface throws. Please note it is essential to keep the recommended CG position for the first flight other-wise the model could be unstable, hard to control or even unable to fly at all! Later you can fine tune the CG position to suit your flying style and skills.
SAFETY PRECAUTIONS AND WARNINGS
- An R/C aeroplane is not a toy! If misused, it can cause serious bodily harm and damage to property. Fly only on a safe place following all instructions and recommendations in this manual. Beware of the propeller! Keep loo-se items that can get entangled in the propeller away from the spinning propeller, including loose clothing, or other objects such as pencils and screwdrivers. Ensure that yours and other people’s hands, and face are kept away from the rotating propeller.
- As the user of this product, you are solely responsible for operating it in a manner that does not endanger yourself and others or result in damage to the product or the property of others. This model is controlled by a radio signal that is subject to interference from many sources outside your control. This interference can cause momentary loss of control so it is advisable to always keep a safe distance in all directions around your model, as this margin will help to avoid collisions or injury.
- Never operate your model with low transmitter batteries.
- Always operate your model in an open area away from power lines, cars, traffic, or people. Avoid operating your model in populated areas where injury or damage can occur.
- Carefully follow the directions and warnings for this and any optional support equipment (chargers, rechargeable batteries, etc.) which you use.
- Keep all chemicals, small parts and anything electrical out of the reach of children.
- Moisture causes damage to electronics. Avoid water exposure to all equipment not specifically designed and protected for this purpose.
- The model is mostly made of plastic – it is not fireproof. It may not be exposed to higher temperatures otherwise severe distortion of the foam airframe or other damage may occur.
SPECIFICATION
| Wingspan | 1080 mm |
| Length | 1200 mm |
| All-up Weight | ca 850 g |
YOU WILL ALSO NEED
- At least four channel RC set, a power unit with 3-4S LiPo flight pack and servos – refer to “RECOMMENDED POWER SYSTEMS AND SERVOS”.
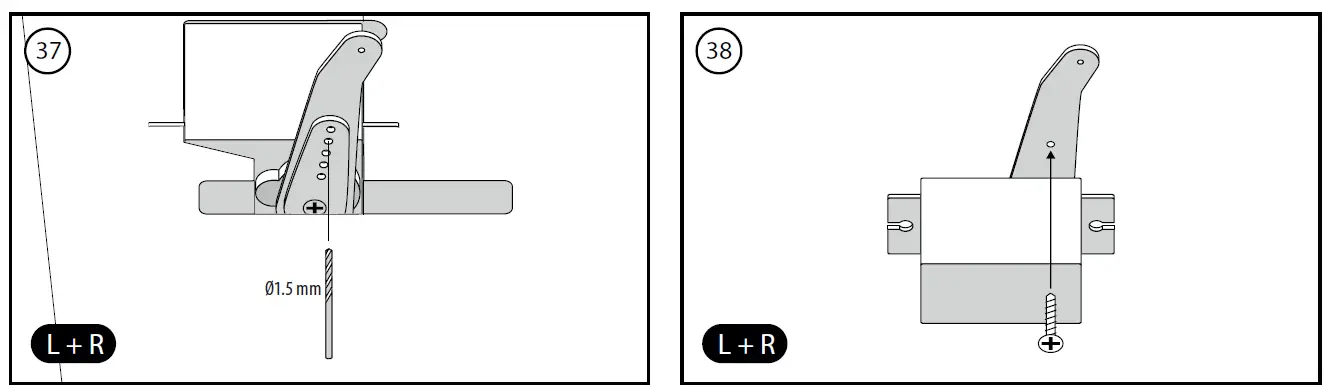
- Regular modeller‘s tools: modeller‘s knife, screwdrivers, pliers, electric drill with drill bits (1.5 mm, 1.6 mm, 2.0 mm, 3,0 mm), No. 180-360 sand-paper, etc.
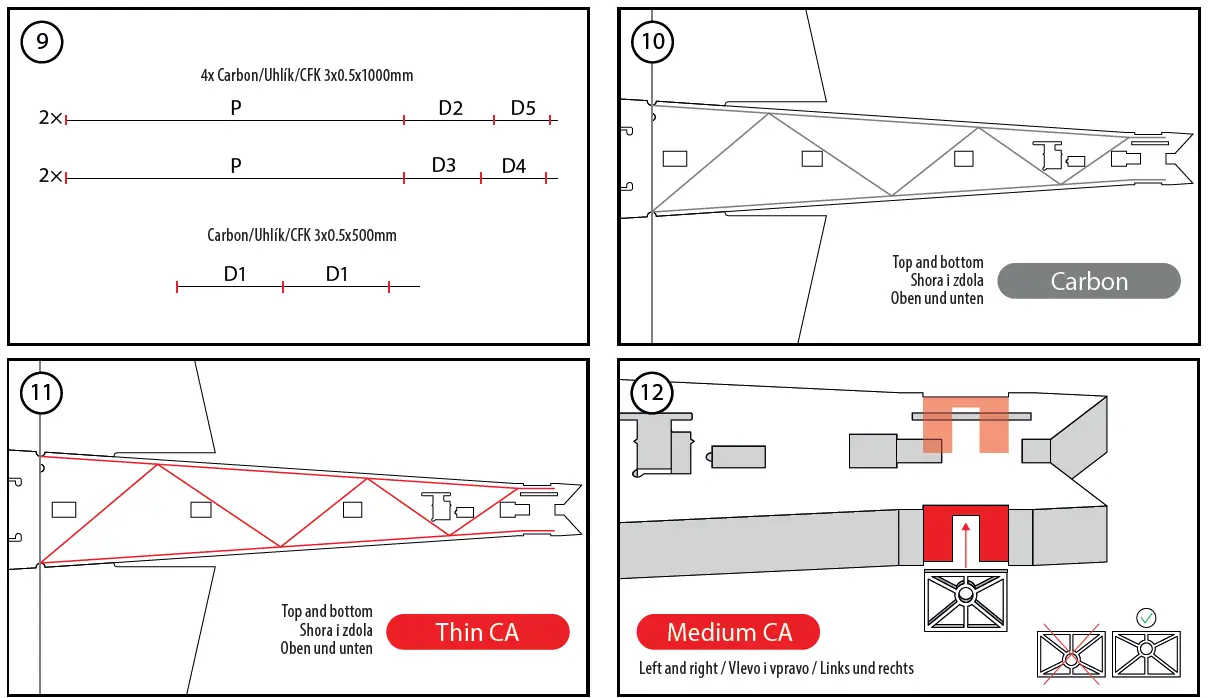
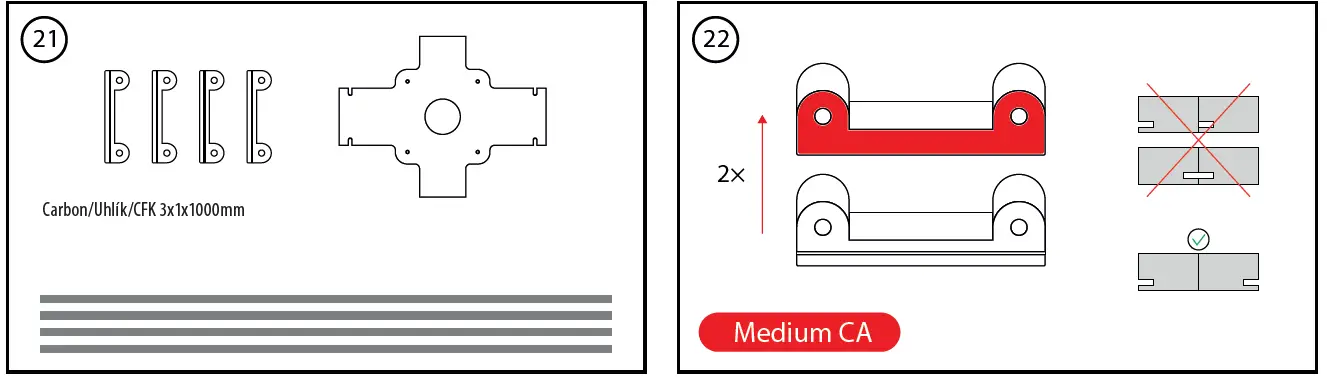
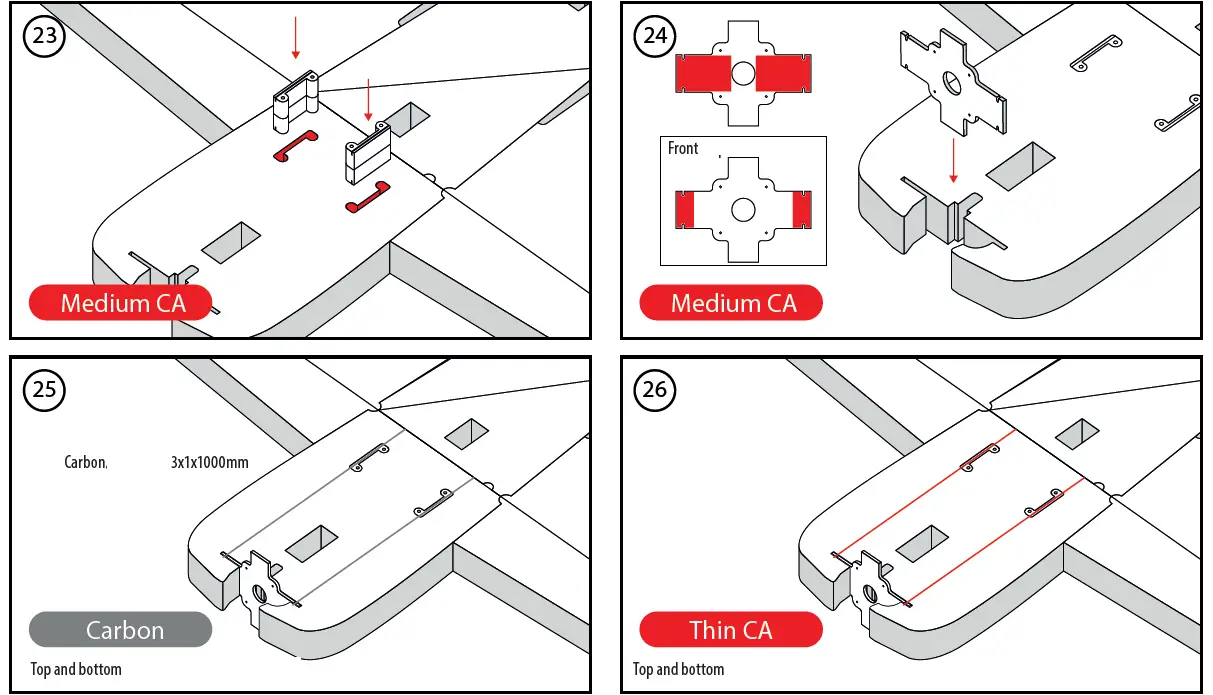
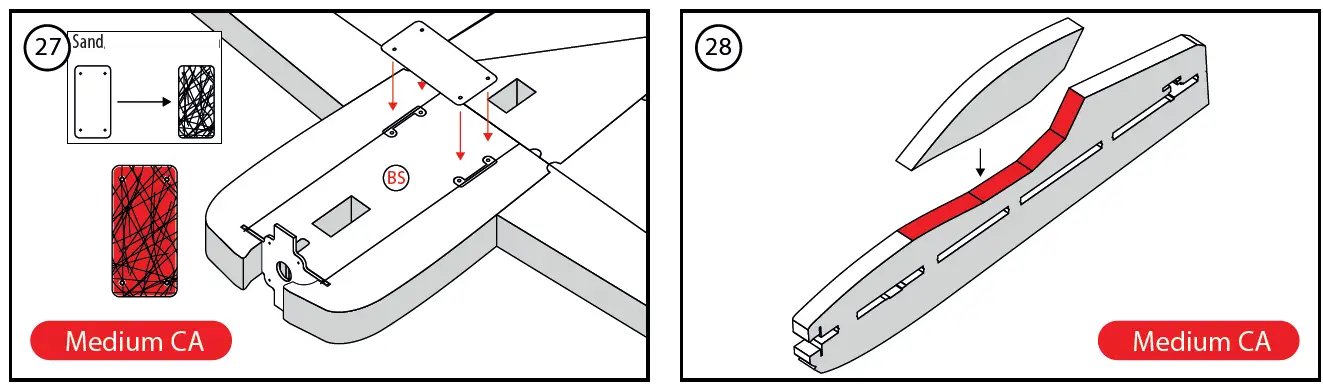
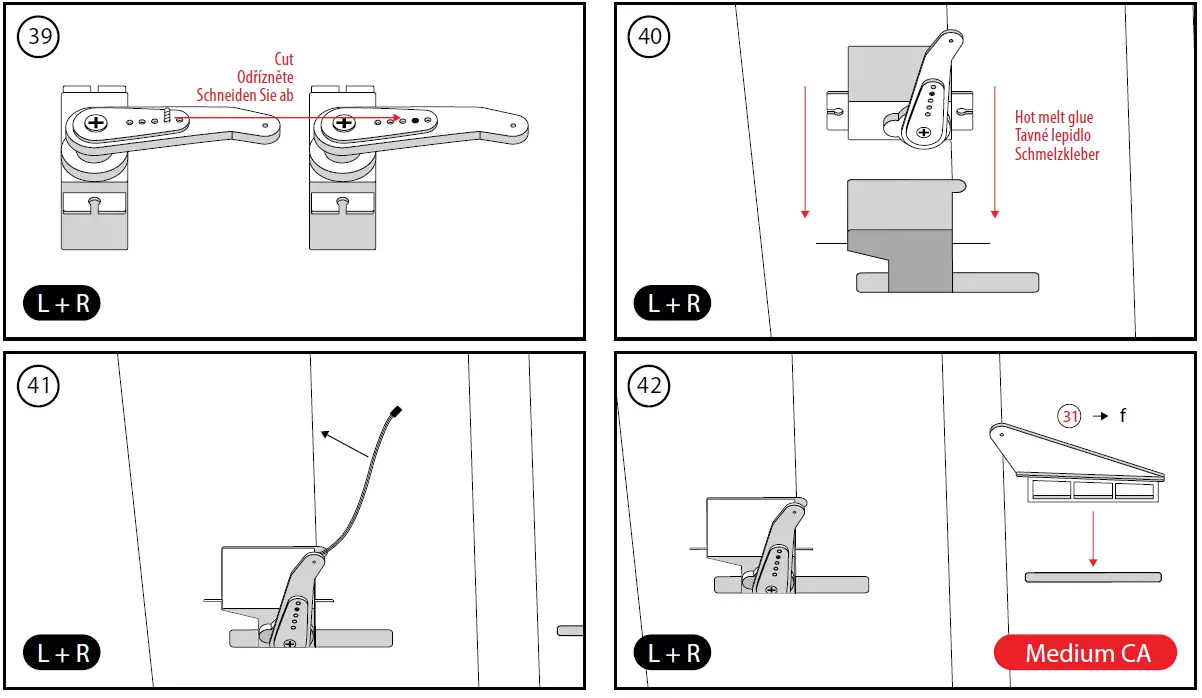
- Glue: medium and thin CA glue, accelerator for CA glue, hot melt glue.
RECOMMENDED POWER SYSTEMS AND SERVOS
- Sunday Acro: For aerobatic beginners and Sunday flyers; for everybody who prefers classic pattern aerobatics with a light and virtually unbreaka-ble foam model.
- Acro: For sporty flyers preferring pattern aerobatics.
- Sunday 3D: For 3D aerobatic beginners and Sunday flyers.
- 3D: For everybody who likes it hot and 3D.
Note: 40-45A ESC with a good linear BEC should be OK if you are using analog servos; however, if you are using high torque & speed digital servos, you should go for an ESC featuring powerful switching SBEC.
| 3S LiPo | Sunday Acro | Acro |
| Motor | KAVAN C3536-1250 | KAVAN PRO 3536-1150 |
| Propeller | APC 10×5“E | APC 10×5“E |
| ESC | KAVAN R-40B | KAVAN PRO-40SB |
| Battery | KAVAN LiPo 11.1V 1800mAh 30/60C | KAVAN LiPo 11.1V 1300mAh 40/80C |
| Servos | KAVAN GO-13MG, Hitec HS- -65MG, HS-70MG | KAVAN GO-1013MG, Hitec HS-5065MG, HS-5070MH |
| 3S LiPo | Sunday 3D | 3D |
| Motor | KAVAN C3536-1000 | KAVAN PRO 3536-1000 |
| Propeller | APC 11×4.7“SF | APC 11×4.7“SF |
| ESC | KAVAN R-40B | KAVAN PRO-40SB |
| Battery | KAVAN LiPo 11.1V 1800mAh 40/80C | KAVAN LiPo 11.1V 1300mAh 40/80C |
| Servos | KAVAN GO-13MG, Hitec HS- -65MG, HS-70MG | KAVAN GO-1013MG, Hitec HS-5065MG, HS-5070MH |
| 4S LiPo | Acro | 3D |
| Motor | KAVAN PRO 3536-1150 | KAVAN PRO 3536-1000 |
| Propeller | APC 9×5“E | APC 10×4.7“SF |
| ESC | KAVAN PRO-40SB | KAVAN PRO-40SB |
| Battery | KAVAN LiPo 14.8V 1300mAh 40/80C | KAVAN LiPo 14.8V 1300mAh 40/80C |
| Servos | KAVAN GO-1013MG, Hitec HS-5065MG, HS-5070MH | KAVAN GO-1013MG, Hitec HS-5065MG, HS-5070MH |
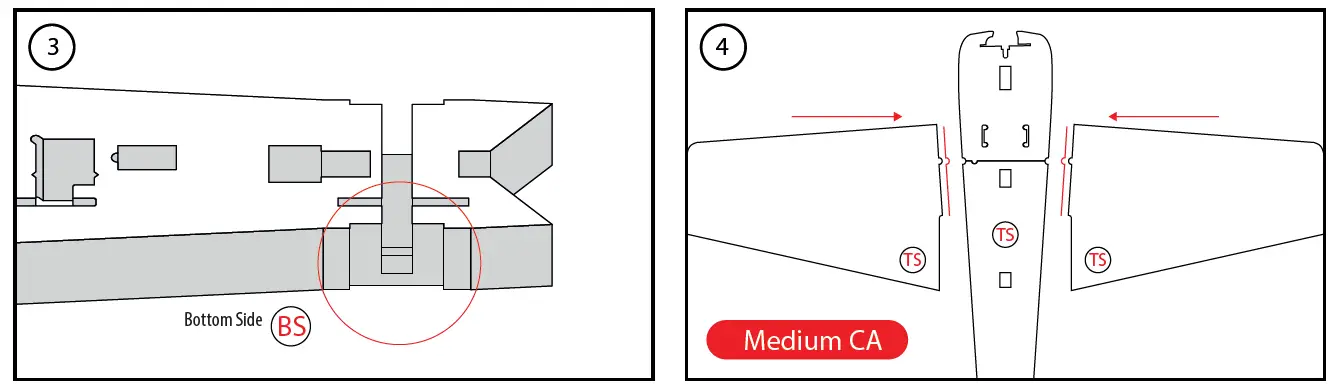
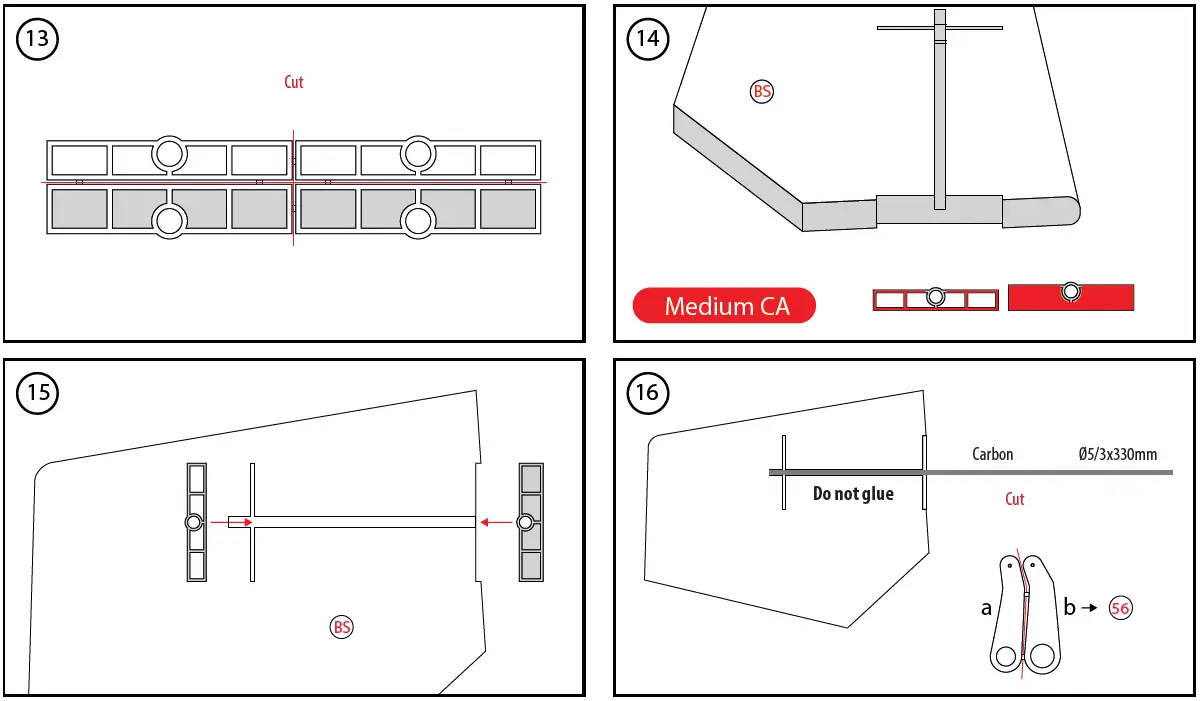
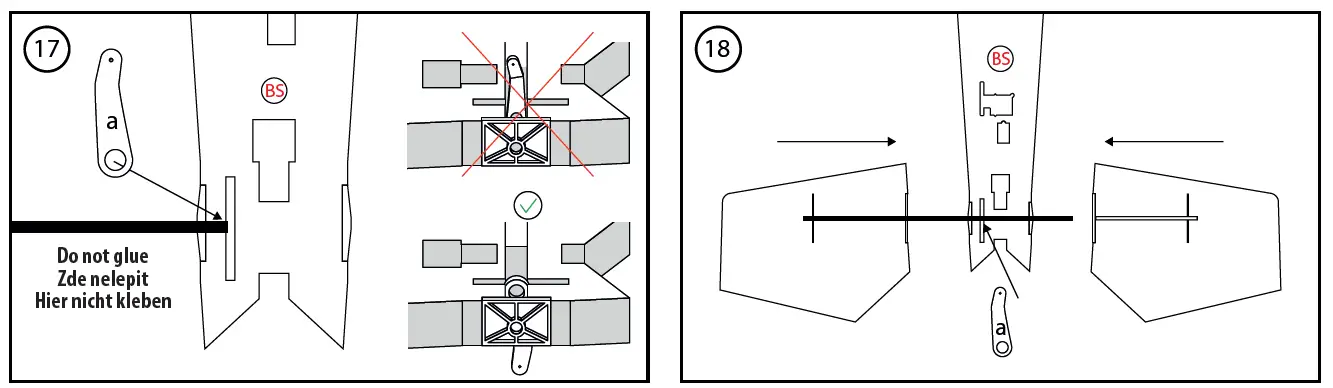
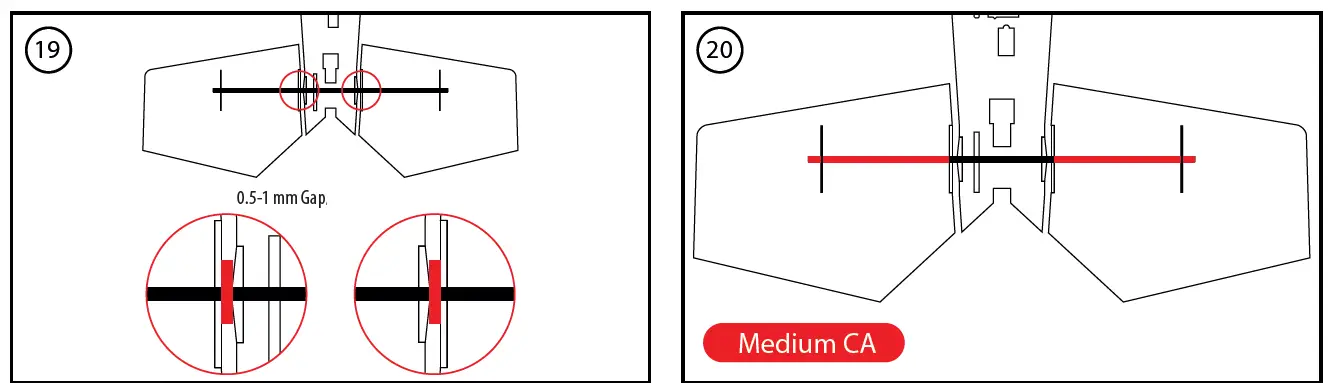
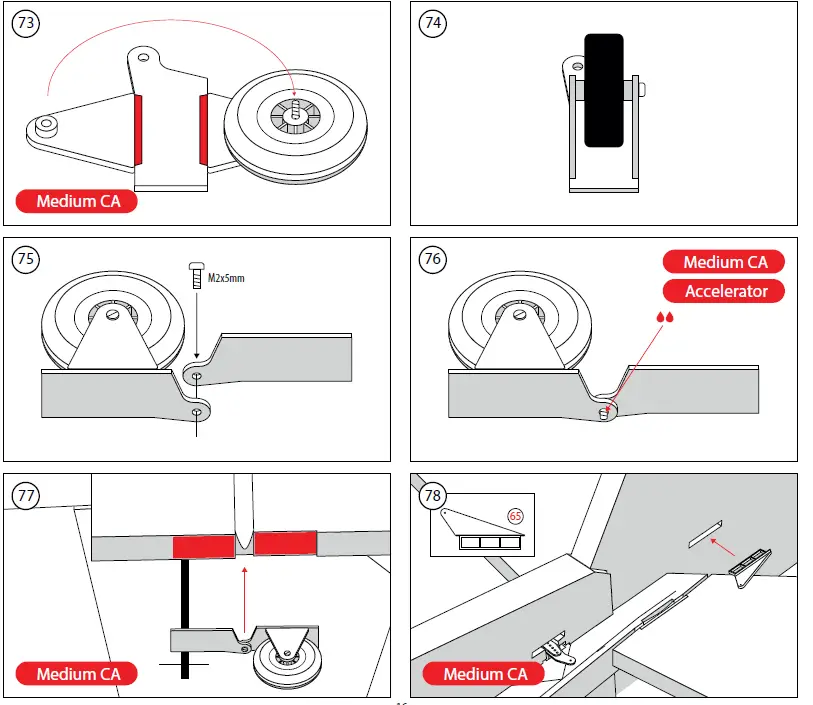
ASSEMBLY
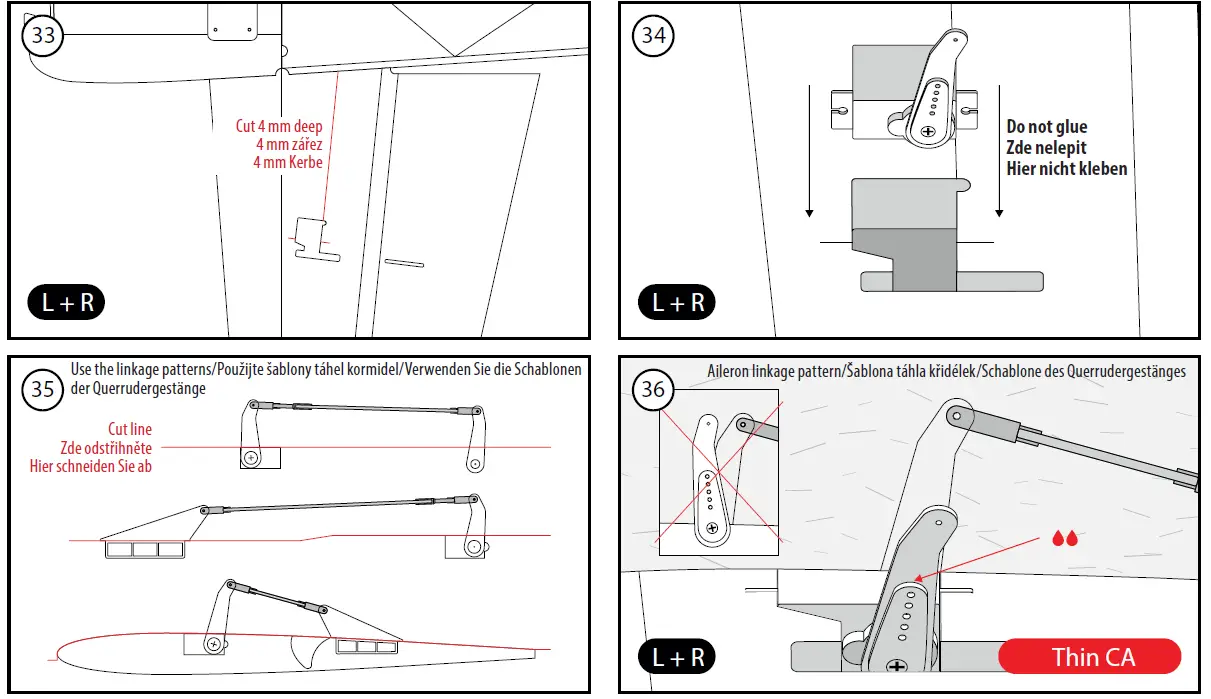
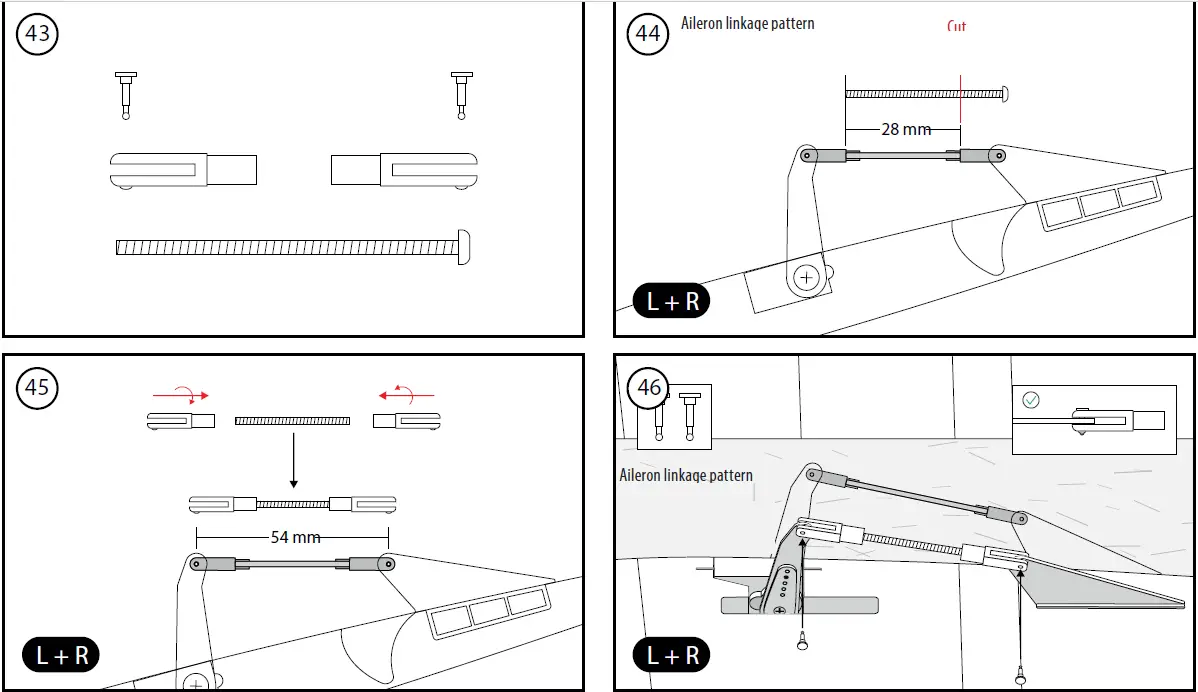
Follow the illustrated, step-by-step building manual on pages 9-19 please.
RC SET INSTALLATION AND PREFLIGHT CHECK
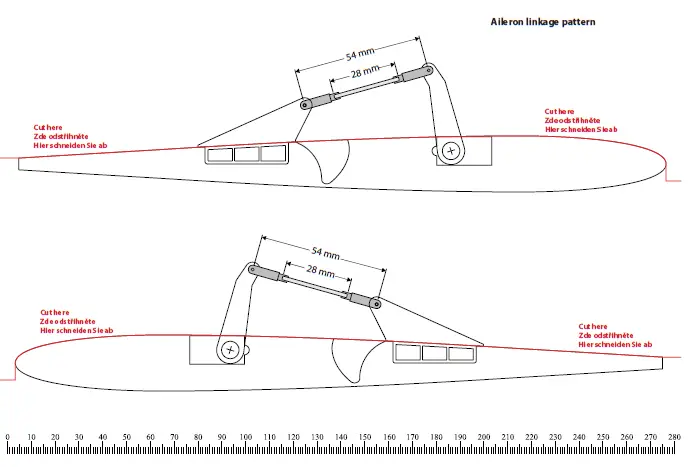
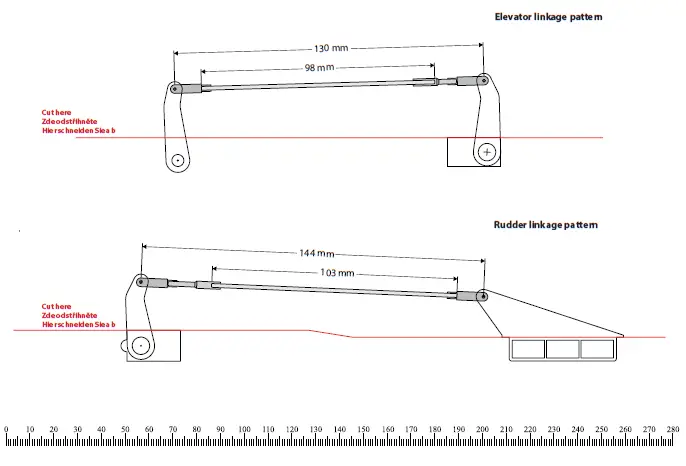
- Referring to the instruction manual of your radio carefully hook up the on-
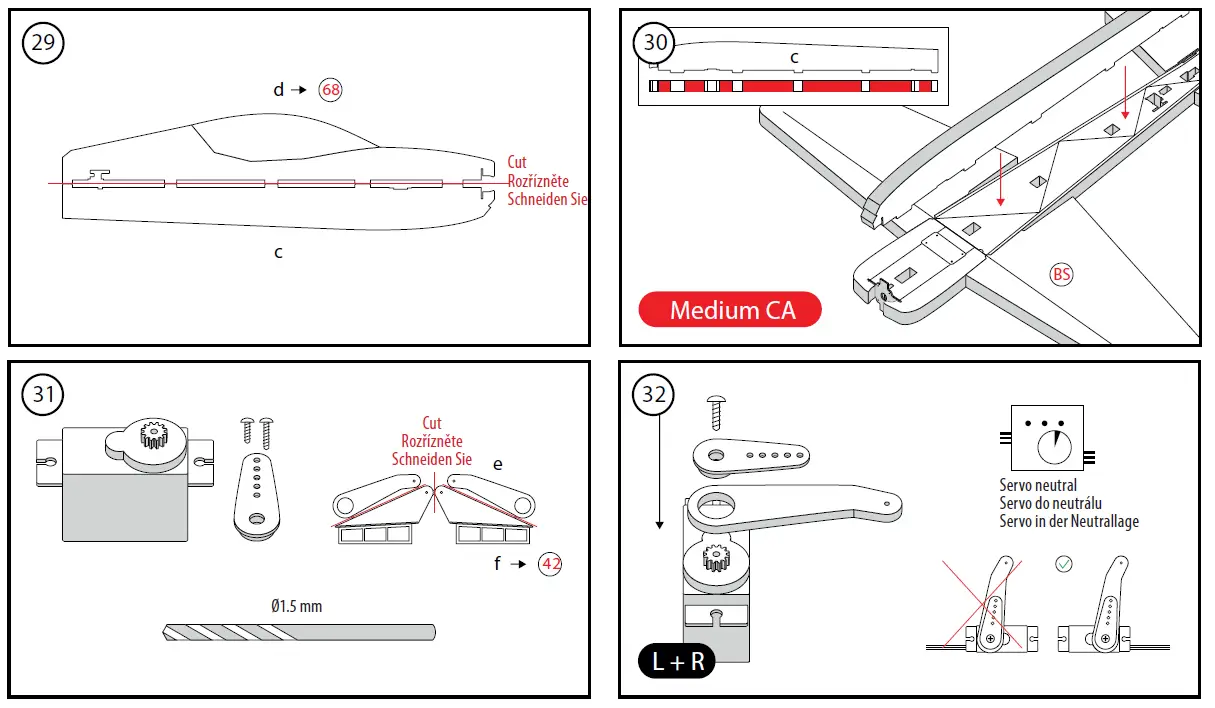
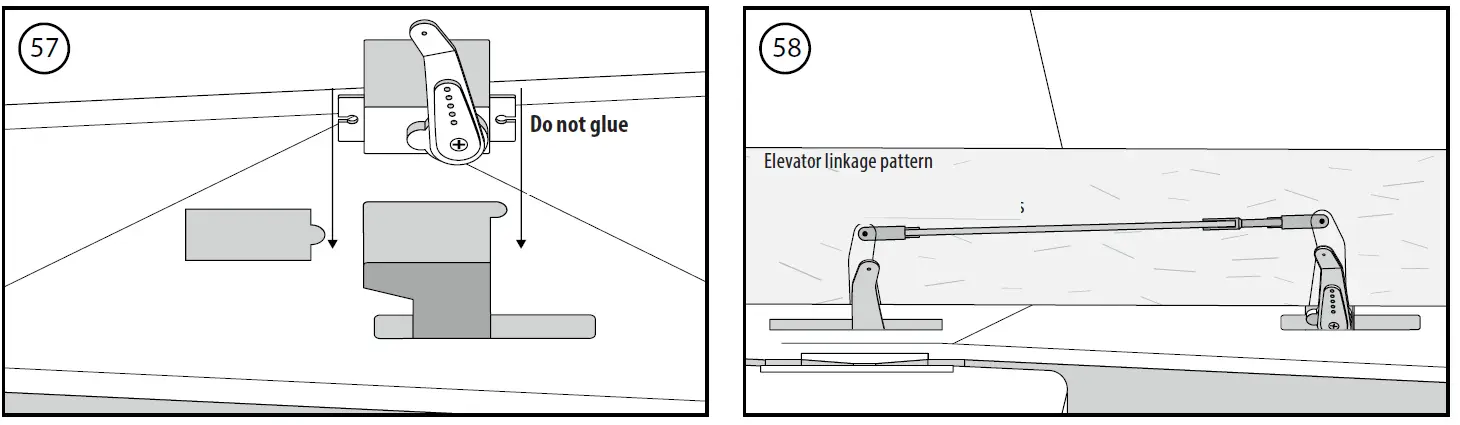
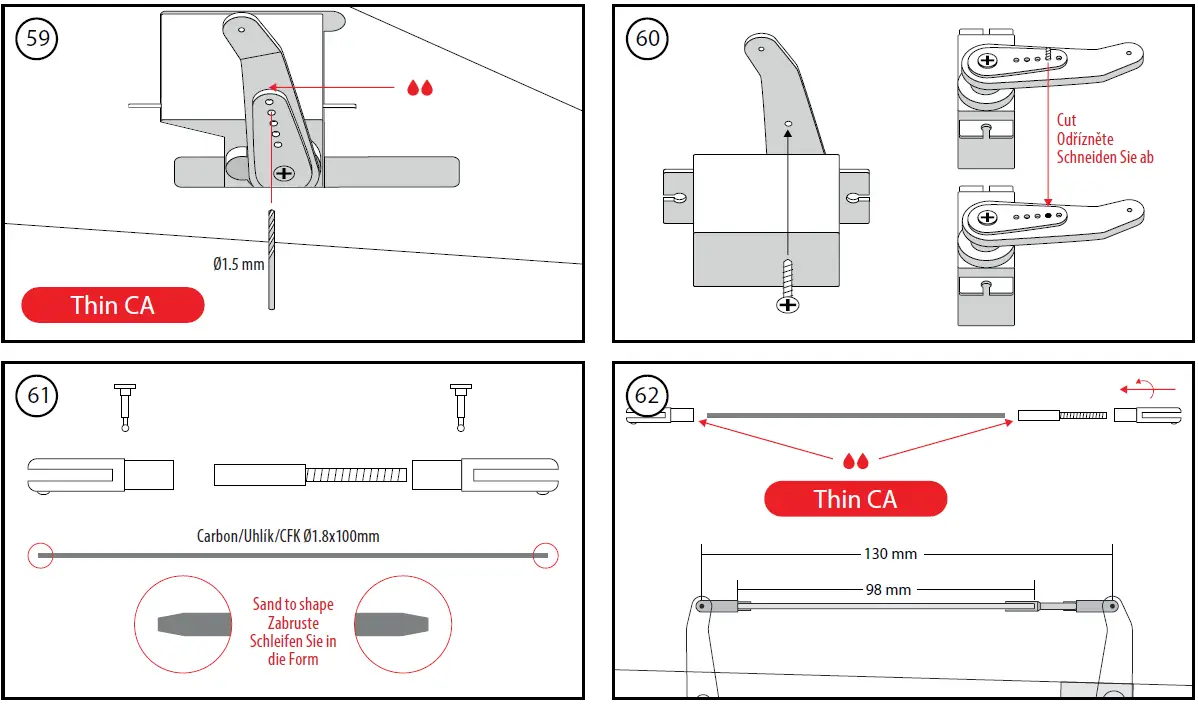
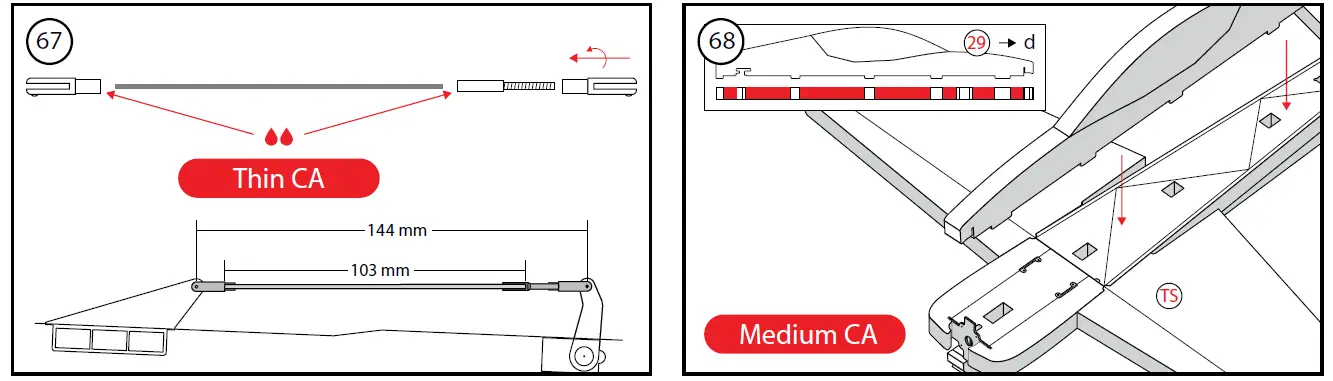
- Board electronics. The full-size patterns (pages 18-19) will help you setting the correct linkage length and control surface neutral position – refer to assembly steps 35-36, 46 and 58.
- Once everything has been correctly connected, turn on your transmitter and plug in the flight pack. Check the neutral positions and throws of all control surfaces. If you needed to make the control surface throws smaller, simply move the pushrod closer to the centre on the servo arm or move it far from the control surface on the control horn. And vice versa.
Recommen- ded Throws Low Rate High Rate Rate Expo Rate Expo Ailerons ±35° 45% ±50° or more 45% Elevator ±30° 45% ±50° or more 45% Rudder ±35° 50% ±47° 50% - The „Low Rate“ recommended control surface throws are suitable for a less skilled pilot and classic pattern aerobatics; the „High Rate“ setting is for 3D aerobatics and skilled pilots.
- Check the direction of rotation of the propeller. If it was incorrect, simply swap two of the tree wires between the ESC and motor or program the ESC (refer to the ESC manual).
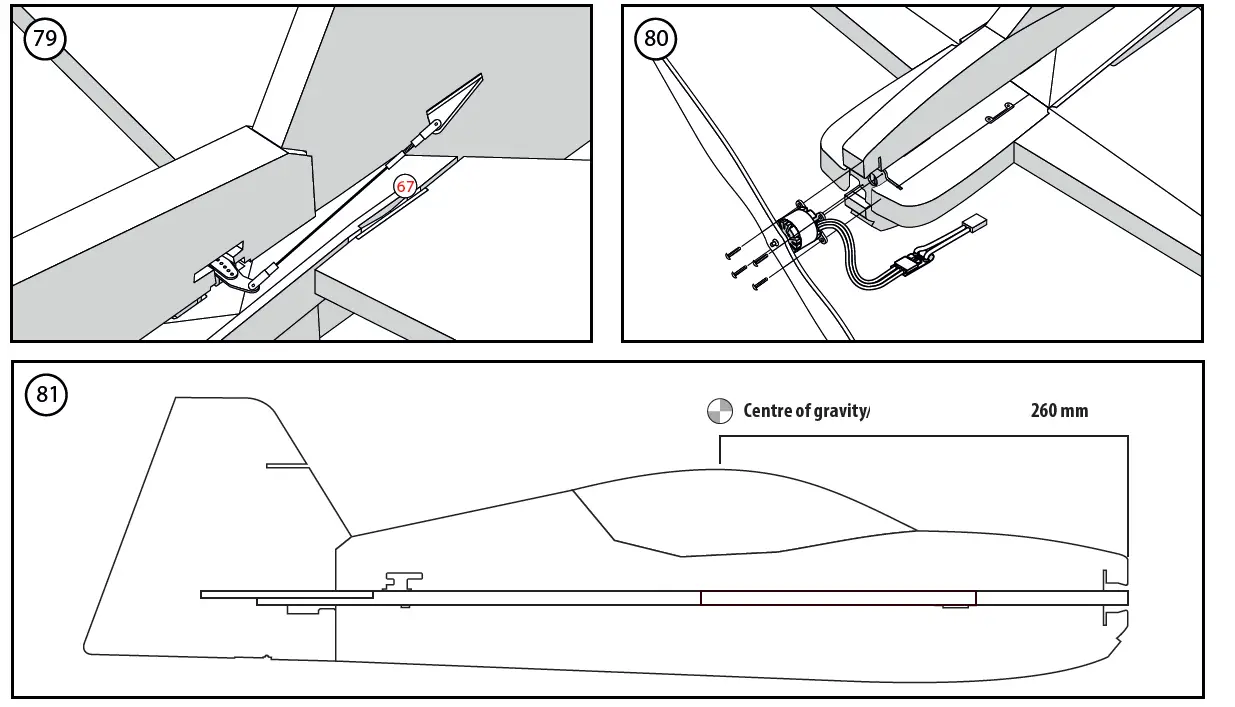
Attach the flight pack to the side of the bottom part of the fuselage using a strip of hook-and-loop tape to get the correct position of the centre of gravity (CG) 260 mm, refer to Fig. 81. You can fine tune the CG position later in order to suit your flying style.
Fully charge your flight pack and transmitter batteries, check the proper function of your radio and perform the range check of your radio according to its instruction manual. The range has to be almost the same with the motor off and at full throttle (no more than 10% decrease is acceptable). DO NOT try to fly unless the range check is 100% successful.
FLYING
The test flying and fine tuning is pretty much straightforward, there will be no surprise for a medium-advanced pilot that is supposed to fly this model.
PARTS LIST
The manual step No. will help you identify the part.
| Part | Qty | Material | Dimensions | Step No. | Part | Qty | Material | Dimensions | Step No. | ||
| Instruction Manual | 1 | paper | A4 | Tailplane Tube Holder | 1 set | plastic | 13 | ||||
| Fuselage – Top Vertical Part | 1 | EPP | 68 | Clevis | 8 | plastic | 43, 61, 65 | ||||
| Fuselage – Bottom Vertical Part | 1 | EPP | 28 | ||||||||
| Clevis Pin | 8 | brass | 43, 61, 65 | ||||||||
| Fuselage – Front Horizontal Part | 1 | EPP | 1 | ||||||||
| Aileron Push Rod | 2 | steel | M2x40 mm screw | 43, 44 | |||||||
| Fuselage – Rear Horizontal Part | 1 | EPP | 1 | M2 Threaded Coupler | 2 | brass | 61, 65 | ||||
| Wing – Left + Right | 1+1 | EPP | 4 | ||||||||
| Canopy | 1 | EPP | 28 | ||||||||
| Fin and Rudder | 1 | EPP | 69 | ||||||||
| All-moving Tailplane – Left + Right | 1+1 | EPP | 14 | ||||||||
| Wheel Pant | 2 | EPP | 51 | ||||||||
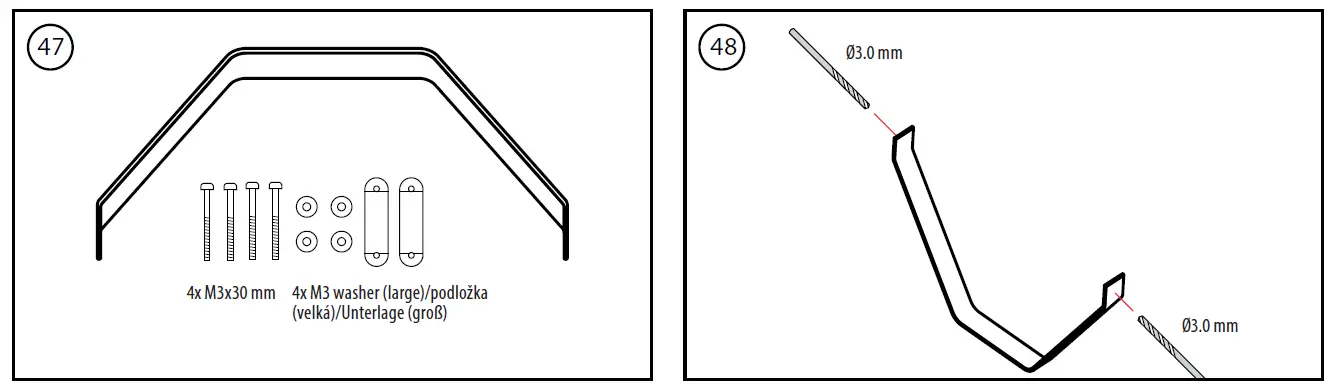
| Main Undercarriage | 1 | carbon | 47 | ||||||||
| Carbon Parts Bundle | |||||||||||
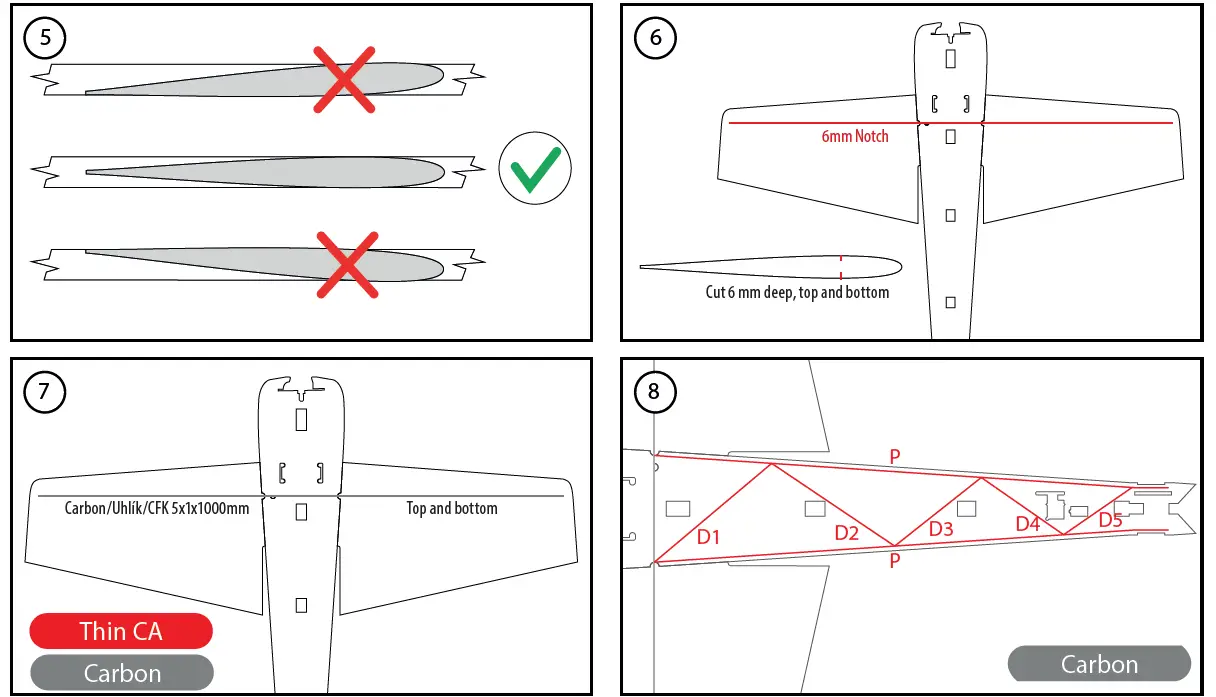
| Wing Spar | 2 | carbon | 5x1x1000 mm | 7 | |||||||
| Fuselage Reinforcement | 4.5 | carbon | 3×0.5×1000 mm | 8, 9 | |||||||
| All-moving Tailplane Tube | 1 | carbon | Ø5/3.5×330 mm | 16 | |||||||
| Nose Reinforcement | 1 | carbon | 3x1x1000 mm | 21 | |||||||
| Small Accessories Bag | |||||||||||
| Firewall | 1 | plywood | 3 mm | 21 | |||||||
| Elevator Push Rod | 1 | carbon | Ø1.8×100 mm | 61 | |||||||
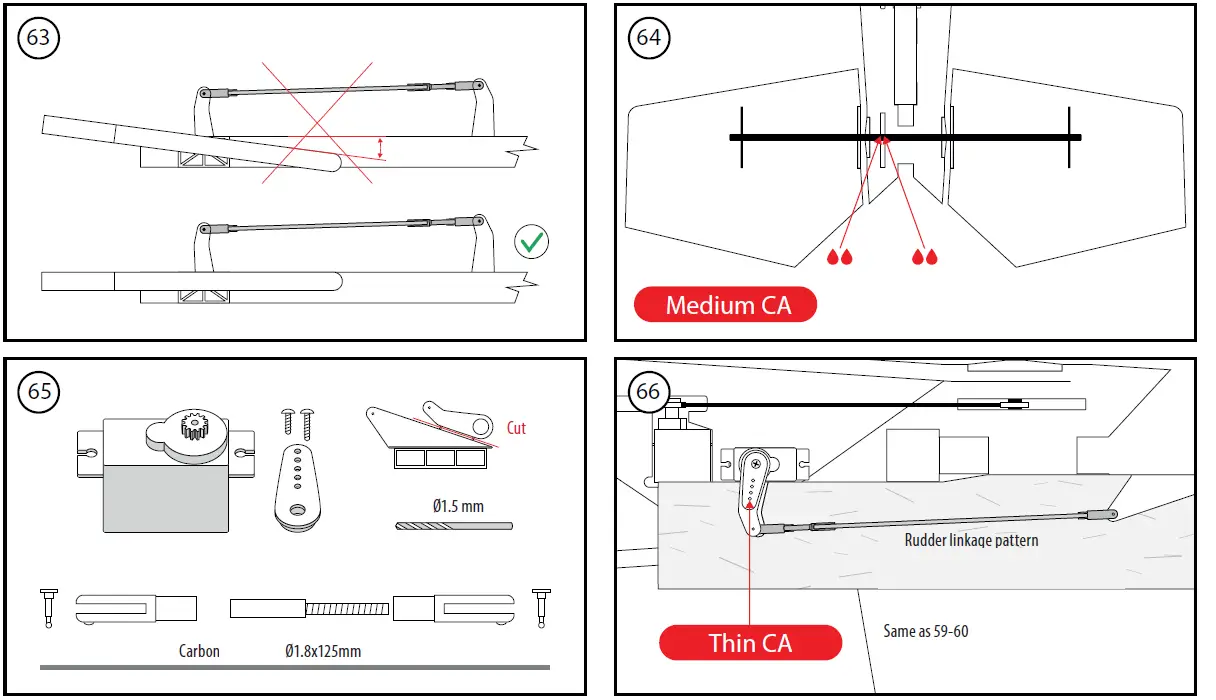
| Rudder Push Rod | 1 | carbon | Ø1.8×125 mm | 65 | |||||||
| Aileron Horns | 1 set | plastic | 31 | ||||||||
| Rudder Horn | 1 set | plastic | 65 | ||||||||
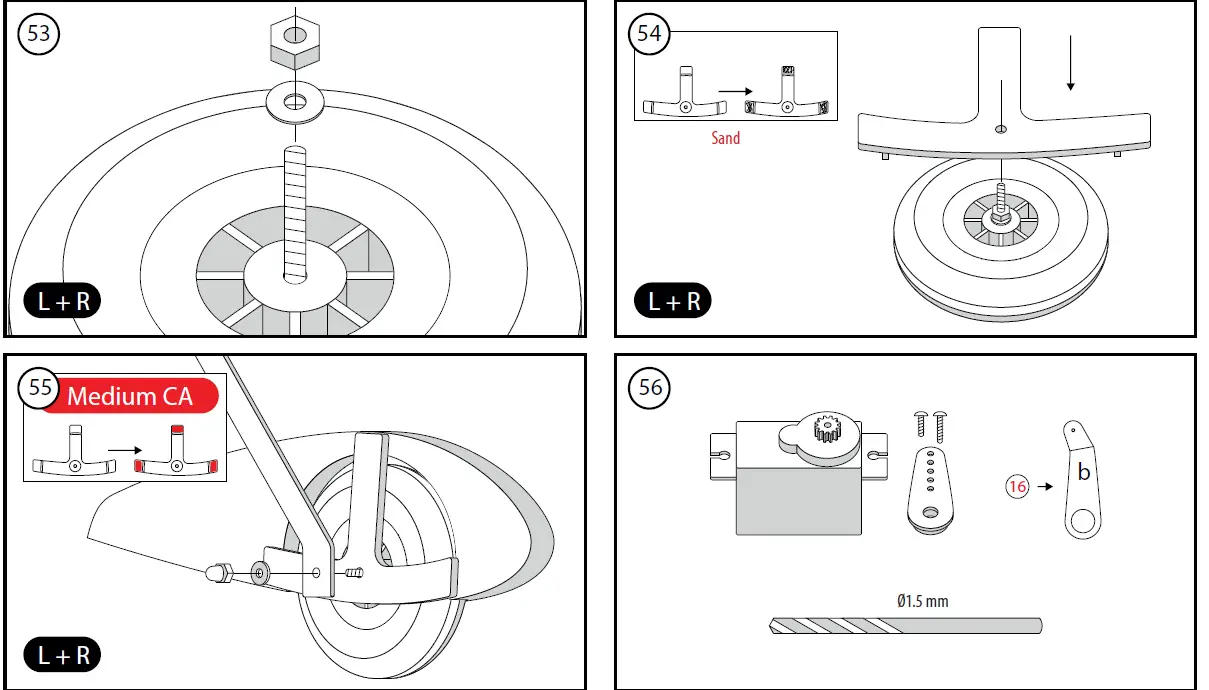
| Elevator Horn | 1 set | plastic | 16 | ||||||||
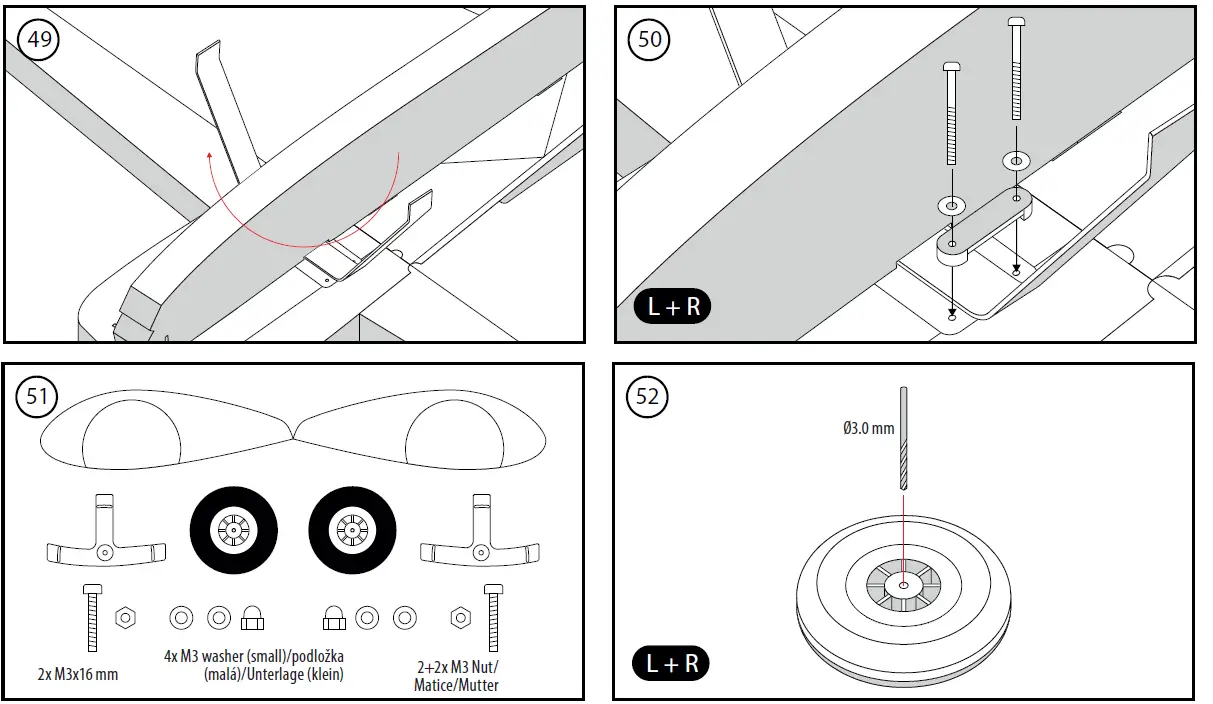
| Undercarriage Plate | 1 | fibreglass | 27 | ||||||||
| Wheel | 2 | plastic | Ø50 mm | 51 | |||||||
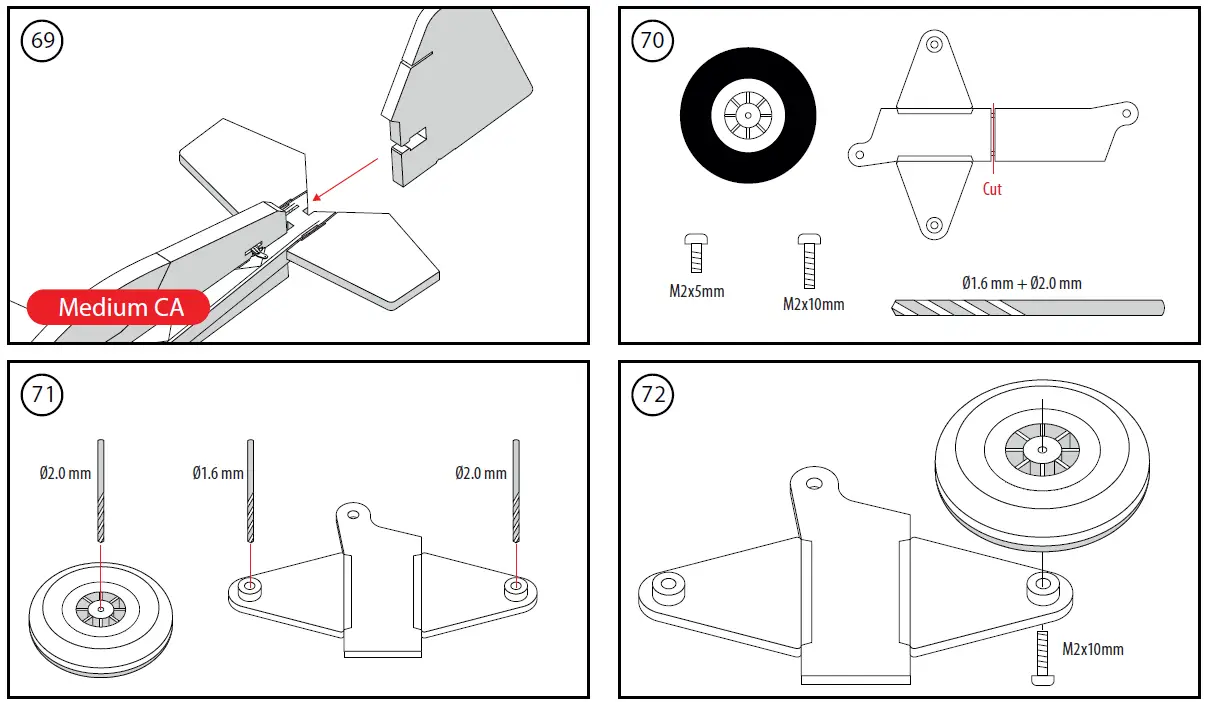
| Tailwheel | 1 | plastic | Ø25 mm | 70 | |||||||
| Wheel Pant Holder | 2 | plastic | 51 | ||||||||
| Wheel Axle | 2 | steel | M3x16 mm socket screw | 51 | |||||||
| M3 Nut | 4 | steel | M3 | 51 | |||||||
| M3 Nut Large | 2 | steel | M3 | 51 | |||||||
| M3 Washer Small | 4 | steel | Ø6 mm | 51 | |||||||
| M3 Washer Large | 4 | steel | Ø9 mm | 47 | |||||||
| Undercarriage Bolt | 4 | steel | M3x30 mm soc- ket screw | 47 | |||||||
| Undercarriage Bolt Holder | 4 | plastic | 21 | ||||||||
| Undercarriage Bracket | 2 | plastic | 47 | ||||||||
| Tailwheel Bracket | 1 set | plastic | 70 | ||||||||
| Tailwheel Axle | 1 | steel | M2x10 mm screw | 70 | |||||||
| Tailwheel Bracket Axle | 1 | steel | M2x5 mm screw | 70 | |||||||
| All-moving Tailplane Bearing | 2 | plastic | 12 | ||||||||

Guarantee
The Pelikan Daniel products are covered by a guarantee which fulfils the currently valid legal requirements in your country. If you wish to make a claim under guarantee, please contact the retailer from whom you first purchased the equipment. The guarantee does not cover faults which were caused in the following ways: crashes, improper use, incorrect connection, reversed polarity, maintenance work carried out late, incorrectly or not at all, or by unauthorised personnel, use of other than genuine Pelikan Daniel accessories, modifications or repairs which were not carried out by Pelikan Daniel or an authorised Peli-kan Daniel, accidental or deliberate damage, defects caused by normal wear and tear, operation outside the Specification, or in conjunction with equipment made by other manufacturers.
Please be sure to read the appropriate information sheets in the product documentation!
www.kavanrc.com
[email protected]
DE, CZ: +49 8374 259 2696
EN, CZ: +420 463 358 712
Made in Czech Republic


