
![]()
JBOD Enclosure
Software User Guide
User Guide
Document Version: 2
01/12/2021
Overview
About QNAP JBOD Enclosures
QNAP JBOD enclosures are a series of expansion units designed to increase the storage capacity of your NAS, computer, or server. JBOD enclosures offer a wide range of storage applications. You can manage drives independently or group them together in a software RAID configuration using a host NAS, computer, or server. QNAP offers JBOD enclosures with USB 3.2 Gen 2 Type-C or SFF interface ports to ensure quick and efficient data transfer between the JBOD enclosure and the host device.
QNAP JBOD Enclosure Types
| Enclosure Type | Description | Supported Platforms | Example Models |
| Single-controller SAS JBOD enclosure | A JBOD enclosure that uses SFF interface ports to connect to a NAS or server. These enclosures can only connect to a host device with an installed PCIe SAS storage expansion card. | Server: • Windows • Linux NAS: • QTS • QuTS hero | TL‑R1220Sep‑RP, TL‑R1620Sep‑RP |
| Dual-controller SAS JBOD enclosure | A JBOD enclosure with dual controllers that uses SFF interface ports to connect to a NAS or server. These enclosures can only connect to a host device with available Mini-SAS ports or an installed PCIe SAS storage expansion card. | Server: • Windows • Linux NAS: • QES | TL‑R1620Sdc |
| SATA JBOD enclosure | A JBOD enclosure that uses SFF interface ports to connect to a NAS or computer. These enclosures can only connect to a host device with an installed QNAP QXP host bus adapter. | Computer: • Windows • Linux NAS: • QTS • QuTS hero | • TL‑D400S, TL‑D800S, TL‑D1600S •TL‑R400S, TL‑R1200S‑RP |
| Enclosure Type | Description | Supported Platforms | Example Models |
| USB JBOD enclosure | A JBOD enclosure that uses USB 3.2 Gen 2 Type-C ports to connect to a NAS or computer. | Computer: • Windows • Linux • macOS NAS: • QTS • QuTS hero | • TL‑D800C • TL‑R1200C‑RP |
QNAP JBOD Manager
QNAP JBOD Manager is a utility for Windows, Linux, and macOS that enables you to view and configure connected QNAP JBOD enclosures.![]() Tip
Tip
To download QNAP JBOD Manager, go to https://www.qnap.com/utilities.
Home Screen
The home screen displays basic information about the selected device and provides access to several device management options.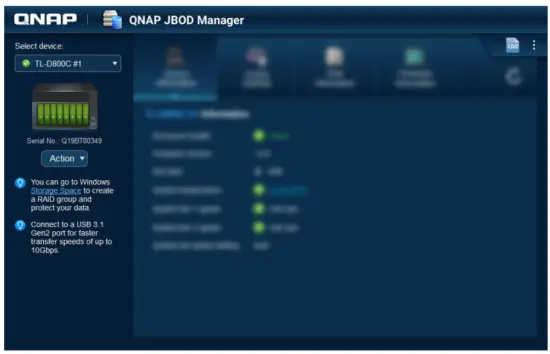
| UI Element | Description |
| Select device | Select a JBOD enclosure to manage. |
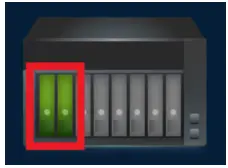 | View the status of each installed disk. • Green: The disk is healthy and operating normally. • Orange: The disk has encountered one or more issues. Click an installed disk to view S.M.A.R.T. information for the disk. |
| Action > Locate | Prompt the drive LEDs to blink and the enclosure to beep so that you can easily locate the device in a server room or on a rack. |
| UI Element | Description |
| Action > View Mapping Table (SATA JBOD only) | Open the SATA JBOD Mapping Table screen. This table shows which JBOD enclosures are connected to each QXP card. Each JBOD port can connect 4 JBOD enclosure disks to the host. |
| Action > View Topology (SAS JBOD only) | Open the View Topology screen. This topology shows which JBOD enclosures are connected to each QXP card, and the port statuses and zone groups in each JBOD enclosure. |
| Action > Rename (SATA JBOD only) | Modify the display name of your SATA JBOD enclosure. |
| Action > Edit Alert | Enable or disable audio alerts. |
This feature is only available when the JBOD enclosure’s audio alert switch is toggled on. For details, refer to the JBOD enclosure’s hardware user guide. | |
| • Action > Eject (Windows) • Action > Unmount Volumes (Linux/ macOS) | Disconnect the device from the host computer. |
 | View the system logs. For details, see System Logs. |
| Check for updates, view help, and modify the language or region settings. |
Device Information
This screen displays basic information about the selected JBOD enclosure.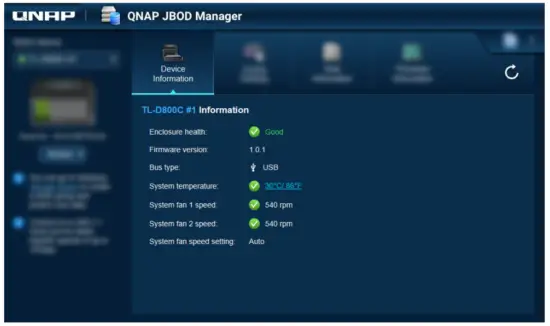
![]() Tip
Tip
Click ![]() to refresh enclosure information and statuses.
to refresh enclosure information and statuses.
Modifying the Device Temperature Threshold
QNAP JBOD Manager issues a temperature warning when the device’s internal temperature reaches the specified threshold.
- Open QNAP JBOD Manager.
- Go to Device Information.
- Click the system temperature.
The Device Temperature Threshold window appears. - Specify a temperature threshold between 55°C and 69°C.
- Click Apply.
Zoning Settings
This screen displays the zoning settings on the selected JBOD enclosure. You can group disks into different zones.
![]() Note
Note
These settings are only available to SAS JBOD enclosures and may require the installation of SAS expansion cards on the host device. For details, see the user guide for your JBOD enclosure model.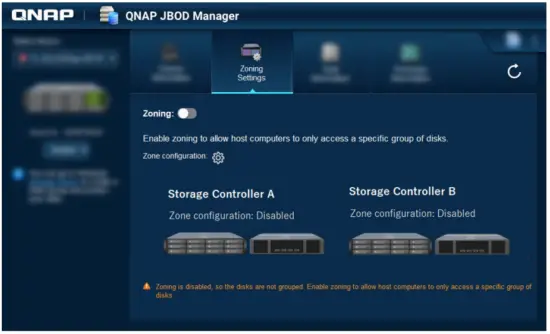 Enabling Zoning
Zoning allows you to limit host access to specific groups of disks.![]() Note
Note
These settings are only available to SAS JBOD enclosures and may require the installation of SAS expansion cards on the host device. For details, see the user guide for your JBOD enclosure model.
- Open QNAP JBOD Manager.
- Go to Zoning Settings.
- Next to Zoning, click
 to enable zoning.
 - Next to Zone configuration, click.

The Zone Configuration Settings window opens. - Select a zone configuration.
Zone Configuration Disk Groups Description 0 1 All installed disks and ports are treated as a single group. Disks are accessible through any port. 1 2 Installed disks and ports are divided into two groups. The disk group you can access depends on which port you connect to. For dual-controller JBOD enclosures, all ports on the same controller are in one group. Zone Configuration Disk Groups Description Customized User-defined Allows you to define your own disk and port groups.  Note
Note
This configuration is only available after running a command through the command-line interface
(CLI). For details, see the SAS JBOD CLI User Guide. - Click Apply Configuration.
A confirmation window appears. - Click Yes.
Disk Information
This screen shows basic disk information and the status of selected disks. You can choose to view information for a single disk or select All disks to view the installed disks as a list.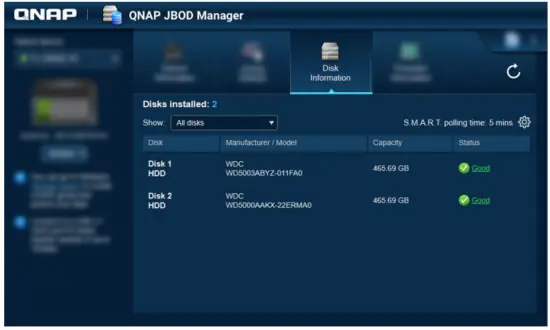
![]() Tip
Tip
Click on a disk status indicator to view detailed information about the disk, including any S.M.A.R.T. information.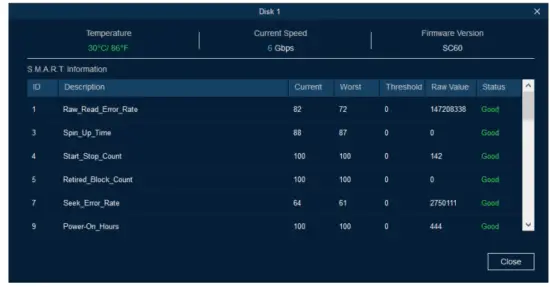 Modifying the S.M.A.R.T. Polling Time
You can specify how often the device checks disks for S.M.A.R.T. errors.
- Open QNAP JBOD Manager.
- Go to Disk Information.
- Next to S.M.A.R.T. polling time, click.
The S.M.A.R.T. Polling Time window appears. - Specify the S.M.A.R.T. polling time in minutes.
• Allowed values: 1 to 60
• Default value: 5 Important
High polling frequency may affect disk performance. - Click Apply.
Locating a Disk
- Open QNAP JBOD Manager.
- Under Select device, select the device where the disk is physically located.
- Go to Disk Information.
- Next to Show, select All disks.
- Identify a disk to locate.
- Click.
The Locate Disk window opens.
The disk LED starts blinking. - After you have located the disk, click Stop Blinking.
Enabling SSD Trim on a Solid-State Drive
SSD Trim cleans deleted data blocks on a solid-state drive to maintain write performance.
- Open QNAP JBOD Manager.
- Under Select device, select a device.
- Go to Disk Information.
- Next to Show, select an SSD.
- Next to SSD Trim, click Disabled.
The Enable SSD Trim window opens. - Click Yes.
- Click OK, or click Restart Now if prompted.
![]() Note
Note
Some operating systems may require a restart before SSD Trim can be enabled.
Firmware Information
This screen shows the current firmware version of your JBOD enclosure and provides options for updating the firmware.
| Firmware Update Method | Description |
| Automatic update | QNAP JBOD Manager automatically downloads and installs the latest version of the device firmware. For details, see Updating the Firmware Automatically. |
You can only select this option if a firmware update is available for the JBOD enclosure. | |
| Manual update | Update the firmware by uploading a local firmware IMG file from your computer. For details, see Updating the Firmware Manually. |
You can download firmware updates at https:// download.qnap.com. |
Updating the Firmware Automatically
![]() Important
Important
- All cables must be connected to the JBOD enclosure to update the firmware.
- Dual-controller JBOD enclosures require a multipath connection to the host to update the firmware.
- In macOS, the host device must be connected to power to update the firmware.
- QNAP recommends unmounting RAID groups from disks installed in the JBOD enclosure before updating the firmware.
- Open QNAP JBOD Manager.
- Go to Firmware Information.
- Select the devices to update.
- Under the Update method, select Automatically install the latest firmware version. Note
You can only select this option if a firmware update is available for the selected devices. - Click Update Firmware.
The Firmware Update window appears.
QNAP JBOD Manager downloads the firmware update file. - Restart the device.
QNAP JBOD Manager opens and installs the firmware. - Ensure that the firmware is updated.
a. Go to Firmware Information.
b. Verify that the Current firmware version matches the Latest firmware version.
![]() Important
Important
- All cables must be connected to the JBOD enclosure to update the firmware.
- Dual-controller JBOD enclosures require a multipath connection to the host to update the firmware.
- In macOS, the host device must be connected to power to update the firmware.
- QNAP recommends unmounting RAID groups from disks installed in the JBOD enclosure before updating the firmware.
- Open QNAP JBOD Manager.
- Go to Firmware Information.
- Select the devices to update.
- Under the Update method, select Select a local firmware file.
 Tip
Tip
You can download firmware updates at https://download.qnap.com. - Click Browse.
- Select the firmware update file from your computer.
- Click Update Firmware.
The Firmware Update window appears. - Restart the device.
QNAP JBOD Manager opens and installs the firmware. - Ensure that the firmware is updated.
a. Go to Firmware Information.
b. Verify that the Current firmware version matches the Latest firmware version.
System Logs
System logs are records of all the events that occur on a JBOD enclosure. You can filter, search, and
download logs for help with troubleshooting.![]() Tip
Tip
Click ![]() on the Home Screen to open the System Logs window.
on the Home Screen to open the System Logs window.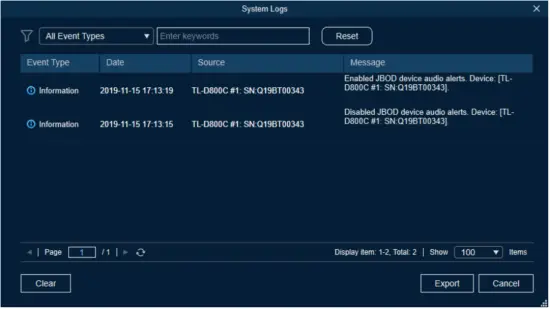
| UI Element | Description |
| Filter the log messages by event type or keyword. Select one of the following event types: • All Event Types • Information • Warning • Error | |
| Reset | Remove the filter and show all log messages. |
| Clear | Delete all log messages. |
| Export | Export all log messages to a CSV file. If a filter is applied, only the filtered logs are exported. |
| Cancel | Close the System Logs window. |
QTS JBOD Management
You can manage JBOD enclosures in QTS from the following locations in the Storage & Snapshots utility.
| Location | Description |
| Disks/VJBOD | View, manage and configure storage for attached JBOD enclosures. You can create storage pools, volumes, and RAID groups using disks installed in the JBOD enclosure. |
| External Storage | View and manage attached JBOD enclosures and installed disks. |
Disks/VJBOD
Open QTS and go to Storage & Snapshots > Storage > Disks/VJBOD to access JBOD enclosure storage configuration options.
For information on managing disks, including creating and managing storage pools, volumes, and other features, see the QTS User Guide.
| UI Element | Description |
| Device menu | Select a JBOD enclosure or disk to manage. |
| Performance test | QTS can test the sequential and random read speeds of your disks. For more information, see the QTS User Guide. |
| Recover > Recover Enclosure | Recover storage pools or static volumes on a JBOD enclosure that was accidentally disconnected from the NAS. For more information, see the QTS User Guide. |
| Recover > Reinitialize Enclosure IDs | Reset all expansion unit IDs, and then give each unit a new ID number starting from 1 based on the order that they are physically connected. Use this action if the expansion unit IDs appear out of sequential order in the enclosure list. |
| Recover > Attach and Recover Storage Space | Scan all free disks on the NAS and all connected expansion units for existing volumes, LUNs, and storage pools. Perform this action after moving disks between NAS devices. |
| RAID Group | Select and view RAID group details. |
JBOD Enclosure Actions
Go to Storage & Snapshots > Storage > Disks/VJBOD and select a JBOD enclosure to perform any of the following actions.
| Action | Description |
| Enclosure Info | View full hardware details of the expansion unit, including the model, serial number, firmware version, BUS type, CPU temperature, system temperature, power status, and fan speeds. |
| Action > Locate | Prompt the expansion unit chassis LEDs to blink, so that you can locate the device in a server room or rack. |
| Action | Description |
| Action > Safely Detach | Stop all activity and safely unmount the enclosure from the host NAS. |
| Action > Update Firmware | Update the expansion unit’s firmware. |
| Action > Rename Enclosure | Rename the selected expansion unit. |
| Action > View QXP Card Connections | View which enclosures and their disks are connected to which expansion cards on the NAS. |
JBOD Enclosure Disk Actions
Go to Storage & Snapshots > Storage > Disks/VJBOD and select a disk installed in a JBOD enclosure to perform any of the following actions.
| Action | Description |
| Disk Info | View full details of the installed disk, including the manufacturer, model, serial number, firmware version, and BUS type. |
| Disk Health | View detailed information about the health of the installed disk, including health summary and S.M.A.R.T. information. You can also run a S.M.A.R.T. test and modify disk settings. For more information, see the QTS User Guide. |
| Action > Scan for Bad Blocks | Scan the installed disk for bad blocks and other disk errors. |
| Action > Locate | Prompt the drive LED to blink so that you can easily locate the disk in a server room or on a rack. |
| Action > Secure Erase | Permanently delete all data on the disk to ensure that the data is not recoverable. Performing this action also restores the disk’s performance to its original factory state. For more information, see the QTS User Guide. |
| Action > New Volume | Create a new static volume or RAID group using the disks installed in the JBOD enclosure. For more information, see the QTS User Guide. |
| Action > Detach | Safely disconnect the disk containing a storage pool or static volume. |
| Action > Set as Enclosure Spare | Assign the disk as a global hot spare for all RAID groups within the same enclosure (NAS or expansion unit). |
External Storage
Go to Storage & Snapshots > Storage > External Storage to view installed disks and partitions in the JBOD enclosure. To manage a device, disk, or partition, select one and then click Actions.
External Storage Device Actions
| Action | Description |
| Erase | Delete all data and partitions on the device. |
| Eject | Safely unmount the external storage device from the NAS, so that you can disconnect it. |
External Storage Disk Actions
| Action | Description |
| Full Disk Format | Format the disk. For details, see Formatting an External Storage Disk or Partition. |
| Secure Erase | Permanently erase all data on a disk. For more information, see the QTS User Guide. |
External Storage Partition Actions
| Action | Description |
| Storage Information | Display details about the selected partition, including partition name, capacity, used space, and file system type. |
| Format | Format the partition. For details, see Formatting an External Storage Disk or Partition. |
| Encryption Management | Manage encryption on a previously encrypted device. You can lock or unlock the device, change the encryption password, or download the encryption key. |
| Eject | Unmount the partition. The external storage device and any stored partitions will continue working. |
Formatting an External Storage Disk or Partition
- Go to Storage & Snapshots > Storage > External Storage .
- Select a disk or partition.
- Click Actions, and then select Full Disk Format or Format.
The Full Disk Format or Format Partition window opens. - Select a file system.
File System Recommended Operating Systems and Devices NTFS Windows HTS+ macOS FAT32 Windows, macOS, NAS devices, most cameras, mobile phones, video game consoles, tablets
Important
The maximum file size is 4 GB.exFAT Windows, macOS, some cameras, mobile phones, video game consoles, tablets
Important
Verify that your device is compatible with exFAT before selecting this option.EXT3 Linux, NAS devices EXT4 Linux, NAS devices - Specify a label.
The label must consist of 1 to 16 characters from any of the following groups:
• Letters: A to Z, a to z
• Numbers: 0 to 9
• Special characters: Hyphen “-“ - Optional: Enable encryption.
a. Select an encryption type.
Select one of the following options:
• AES 128 bits
• AES 192 bits
• AES 256 bits
b. Specify an encryption password.
The password must consist of 8 to 16 characters from any of the following groups:
• Letters: A to Z, a to z
• Numbers: 0 to 9
• All special characters (excluding spaces)
c. Confirm the encryption password.
d. Optional: Select Save encryption key.
Select this option to save a local copy of the encryption key on the NAS. This enables the system to automatically unlock and mount the encrypted storage space when the NAS starts up. If the encryption key is not saved, you must specify the encryption password each time the NAS restarts. Warning
• Saving the encryption key on the NAS can result in unauthorized data access if unauthorized personnel are able to physically access the NAS.
• If you forget the encryption password, the storage space will become inaccessible and all data will be lost. - Click Format.
A warning message appears. - Click OK.
Updating JBOD Enclosure Firmware in QTS
- Open Storage & Snapshots.
QTS periodically checks for the latest firmware for each connected enclosure on login. If a new firmware update is available, QTS opens the Start Firmware Update window. - Follow the instructions to install the firmware update.
Depending on the model you may be asked to power off then power on the device or disconnect then reconnect the device.
QTS re-detects the device and displays a notification message. - Wait for confirmation that the firmware update has finished.
- Go to Storage & Snapshots > Storage > Disks/VJBOD .
- Click Recover, and then select Attach and Recover Storage Pool.
QuTS hero JBOD Management
You can manage JBOD enclosures in QuTS hero from the following locations in the Storage & Snapshots utility.
| Location | Description |
| Disks/VJBOD | View, manage and configure storage for attached JBOD enclosures. You can create storage pools, shared folders, and RAID groups using disks installed in the JBOD enclosure. |
| External Storage | View and manage attached JBOD enclosures and installed disks. |
Disks/VJBOD
Open QuTS hero and go to Storage & Snapshots > Storage > Disks/VJBOD to access the JBOD enclosure storage configuration options.
For information on managing disks, including creating and managing storage pools, shared folders, and other features, see the QuTS hero User Guide.
| UI Element | Description |
| Device menu | Select a JBOD enclosure or disk to manage. |
| Performance test | QuTS hero can test the sequential and random read speeds of your disks. For more information, see the QuTS hero User Guide. |
| Recover > Reinitialize Enclosure IDs | Reset all expansion unit IDs, and then give each unit a new ID number starting from 1 based on the order that they are physically connected. Use this action if the expansion unit IDs appear out of sequential order in the enclosure list. |
| Recover > Attach and Recover Storage Pool | Scan all free disks on the NAS and all connected expansion units for existing shared folders, LUNs, and storage pools. Perform this action after moving disks between NAS devices. |
| RAID Group | Select and view RAID group details. |
JBOD Enclosure Actions
Go to Storage & Snapshots > Storage > Disks/VJBOD and select a JBOD enclosure to perform any of the following actions.
| Action | Description |
| Enclosure Info | View full hardware details of the expansion unit, including the model, serial number, firmware version, BUS type, CPU temperature, system temperature, power status, and fan speeds. |
| Action > Locate | Prompt the expansion unit chassis LEDs to blink, so that you can locate the device in a server room or rack. |
| Action > Safely Detach | Stop all activity and safely unmount the enclosure from the host NAS. |
| Action | Description |
| Action > Update Firmware | Update the expansion unit’s firmware. |
| Action > Rename Enclosure | Rename the selected expansion unit. |
| Action > View QXP Card Connections | View which enclosures and their disks are connected to which expansion cards on the NAS. |
JBOD Enclosure Disk Actions
Go to Storage & Snapshots > Storage > Disks/VJBOD and select a disk installed in a JBOD enclosure to perform any of the following actions.
| Action | Description |
| Disk Info | View full details of the installed disk, including the manufacturer, model, serial number, firmware version, and BUS type. |
| Disk Health | View detailed information about the health of the installed disk, including health summary and S.M.A.R.T. information. You can also run a S.M.A.R.T. test and modify disk settings. For more information, see the QuTS hero User Guide. |
| Action > Scan for Bad Blocks | Scan the installed disk for bad blocks and other disk errors. |
| Action > Locate | Prompt the drive LED to blink so that you can easily locate the disk in a server room or on a rack. |
| Action > Secure Erase | Permanently delete all data on the disk to ensure that the data is not recoverable. Performing this action also restores the disk’s performance to its original factory state. For more information, see the QuTS hero User Guide. |
| Action > Detach | Safely disconnect the disk containing a storage pool or static volume. |
| Action > Set as Enclosure Spare | Assign the disk as a global hot spare for all RAID groups within the same enclosure (NAS or expansion unit). |
External Storage
Go to Storage & Snapshots > Storage > External Storage to view installed disks and partitions in the JBOD enclosure. To manage a device, disk, or partition, select one and then click Actions.
External Storage Device Actions
| Action | Description |
| Erase | Delete all data and partitions on the device. |
| Eject | Safely unmount the external storage device from the NAS, so that you can disconnect it. |
External Storage Disk Actions
| Action | Description |
| Full Disk Format | Format the disk. For details, see Formatting an External Storage Disk or Partition. |
| Secure Erase | Permanently erase all data on a disk. For more information, see the QuTS hero User Guide. |
External Storage Partition Actions
| Action | Description |
| Storage Information | Display details about the selected partition, including partition name, capacity, used space, and file system type. |
| Format | Format the partition. For details, see Formatting an External Storage Disk or Partition. |
| Encryption Management | Manage encryption on a previously encrypted device. You can lock or unlock the device, change the encryption password, or download the encryption key. |
| Eject | Unmount the partition. The external storage device and any stored partitions will continue working. |
Formatting an External Storage Disk or Partition
- Go to Storage & Snapshots > Storage > External Storage .
- Select a disk or partition.
- Click Actions, and then select Full Disk Format or Format.
The Full Disk Format or Format Partition window opens. - Select a file system.
File System Recommended Operating Systems and Devices NTFS Windows HTS+ macOS FAT32 Windows, macOS, NAS devices, most cameras, mobile phones, video game consoles, tablets Important
The maximum file size is 4 GB.exFAT Windows, macOS, some cameras, mobile phones, video game consoles, tablets Important
Verify that your device is compatible with exFAT before selecting this option.EXT3 Linux, NAS devices EXT4 Linux, NAS devices - Specify a label.
The label must consist of 1 to 16 characters from any of the following groups:
• Letters: A to Z, a to z
• Numbers: 0 to 9
• Special characters: Hyphen “-“ - Optional: Enable encryption.
a. Select an encryption type.
Select one of the following options:
• AES 128 bits
• AES 192 bits
• AES 256 bits
b. Specify an encryption password.
The password must consist of 8 to 16 characters from any of the following groups:
• Letters: A to Z, a to z
• Numbers: 0 to 9
• All special characters (excluding spaces)
c. Confirm the encryption password.
d. Optional: Select Save encryption key.
Select this option to save a local copy of the encryption key on the NAS. This enables the system to automatically unlock and mount the encrypted storage space when the NAS starts up. If the encryption key is not saved, you must specify the encryption password each time the NAS restarts.
Warning
• Saving the encryption key on the NAS can result in unauthorized data access if
unauthorized personnel are able to physically access the NAS.
• If you forget the encryption password, the storage space will become inaccessible and all data will be lost. - Click Format.
A warning message appears. - Click OK.
Updating JBOD Enclosure Firmware in QuTS hero
- Open Storage & Snapshots.
QuTS hero periodically checks for the latest firmware for each connected enclosure on login. If a new firmware update is available, QuTS hero opens the Start Firmware Update window. - Follow the instructions to install the firmware update.
Depending on the model you may be asked to power off then power on the device or disconnect then reconnect the device.
QuTS hero re-detects the device and displays a notification message. - Wait for confirmation that the firmware update has finished.
- Go to Storage & Snapshots > Storage > Disks/VJBOD .
- Click Recover, and then select Attach and Recover Storage Pool.


 Usb Host User Guide")
