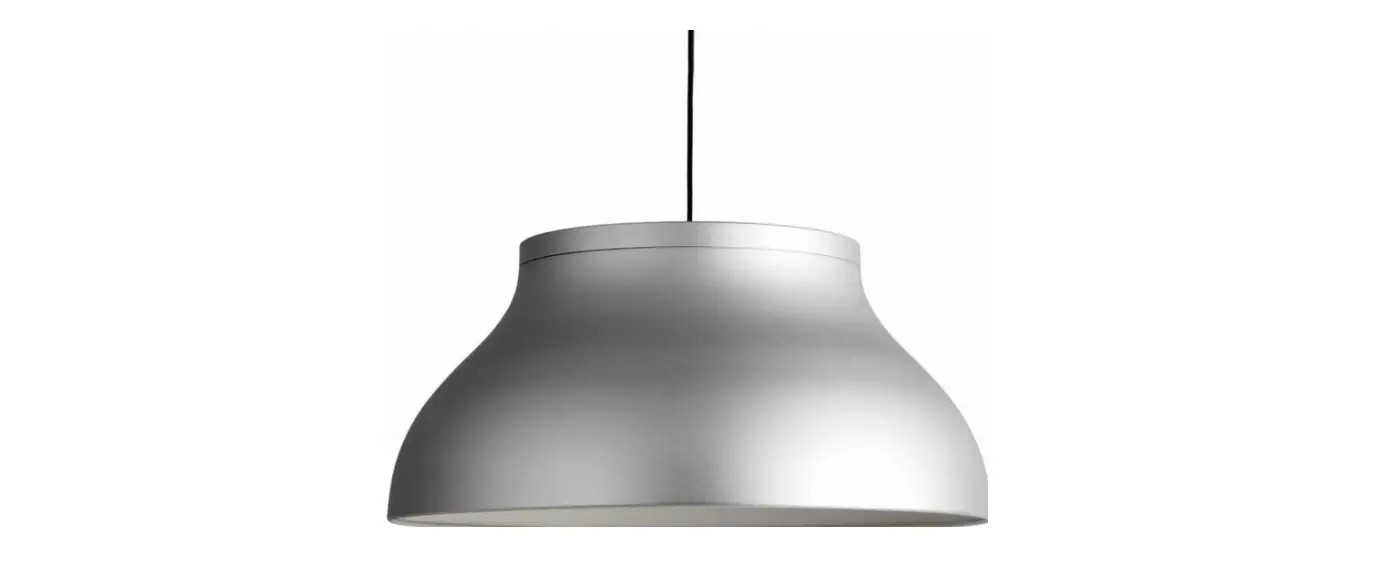
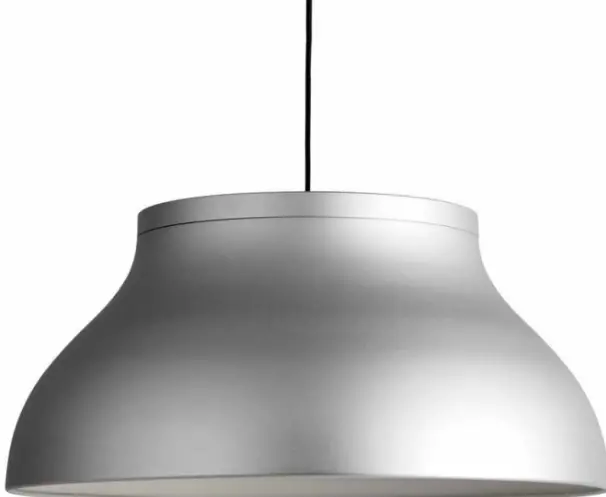
HAY PC Pendant Lamp Aluminum
TECHNICAL DATA
This product is fitted with three E27, or one E27, or one G9 bulb fitting. HAY recommends using this product with LED bulbs. For dimming, please check which LED bulbs are compatible with your wall mounted dimmers.
- LARGE Ø60 CM
FITTING TYPE | E27
POWER W | 1113W
COLOUR TEMPERATURE | warm white - MEDIUM Ø40 CM
FITTING TYPE | E27
POWER W | 1113W
COLOUR TEMPERATURE | warm white - SMALL Ø25 CM
FITTING TYPE | G9
POWER W | 3.55W
COLOUR TEMPERATURE | warm white
HAY will not accept any responsibility for any accidents, injuries or damages that occur due to the use of incorrect bulbs. - ATTENTION
Ensure that the power supply to the circuit has clearly been turned OFF before installing the product. In some countries, electrical installation must be carried out by authorised electricians/contractors; please check with your local authority for guidance.
The product must not be modified in any way. HAY accepts no responsibility for any products that have been modified or tampered with. If the external flexible cable or cord of this luminaire is damaged, it should be exclusively replaced by a qualified electrician in order to avoid an electrical hazard. This lamp is designed for indoor use only.
CARE AND MAINTENANCE
The product can be cleaned with a soft damp cloth and mild detergent, or a dry microfibre cloth. Do not use alcohol or any other solvents to clean the product and avoid using abrasive or rough sponges. Ensure that the power supply has been turned OFF before cleaning the product.
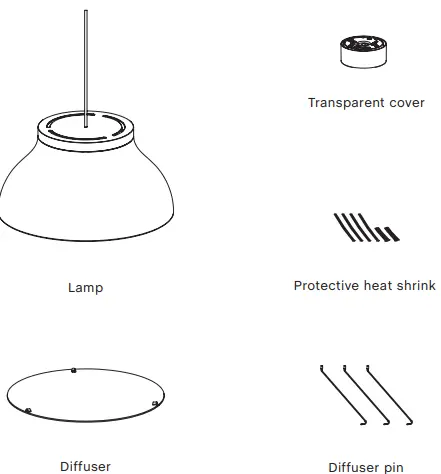
PARTS
NOTICE
The PC pendant is designed to be used with LED based light sources only. Halogen or incandescent light sources should never be used, as it may cause damage to the lamp. HAY accepts no responsibility for any damage due to the use of incorrect light sources.
INSTALLATION
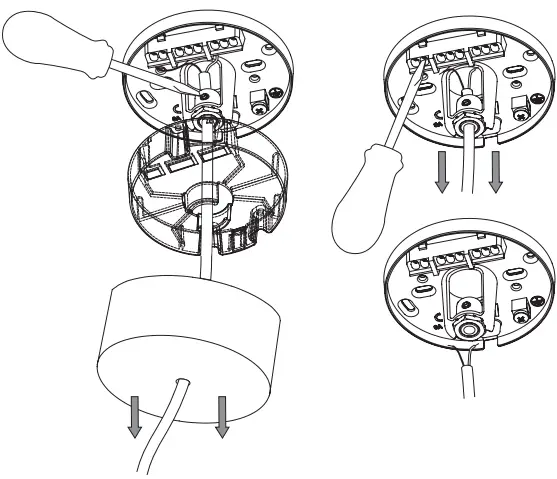
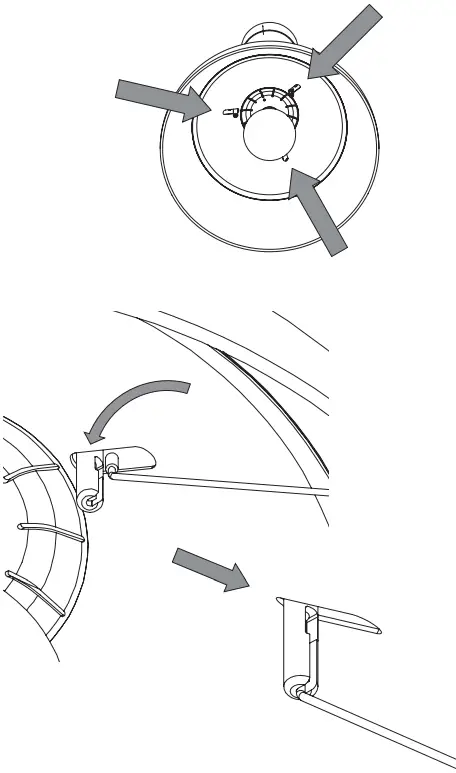
- Unpack all the parts and check that you have received all the parts listed. Pull the ceiling cap away from the internal magnetic bracket. Loosen the transparent cover and cable grip with a screwdriver and gently remove the cable, pulling it through the cord grip carefully. Remember to also loosen the terminal block connections if the connecting wires are fixed in place there, before pulling the cable through the cord grip.
- With a pencil, mark fixing holes either side of the cable exit hole in the ceiling.
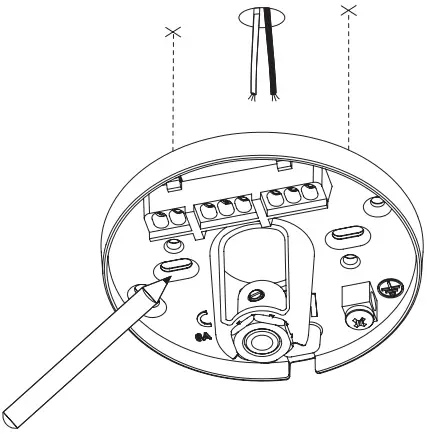
- Drill holes and insert wall plugs. Ensure you use the correct type of wall plug for the material you are drilling into.
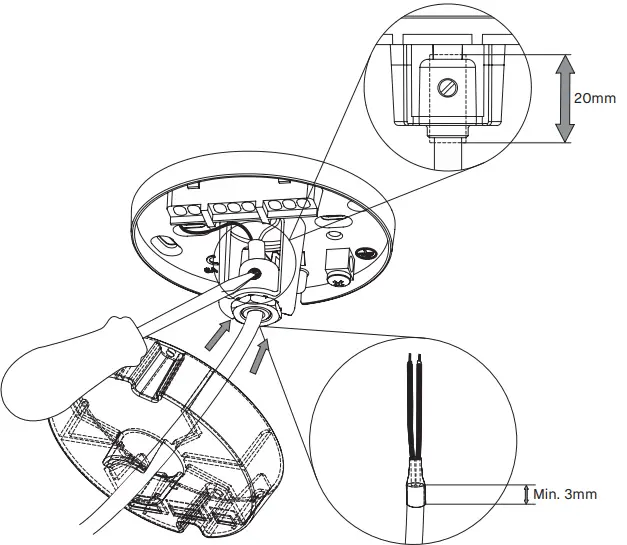
- Trim the cable to the desired length, leave 35 mm of basic single insulation exposed for wiring.
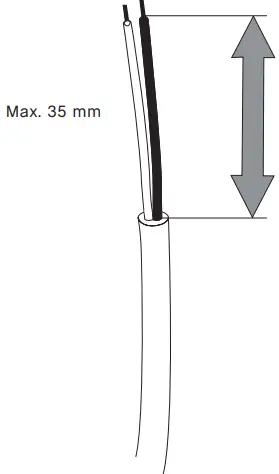
- There is a 5 mm wire strip guide provided on the internal transparent cover, as shown below. Strip 5 mm of exposed wire carefully, ensuring both layers of insulation are intact and not damaged.

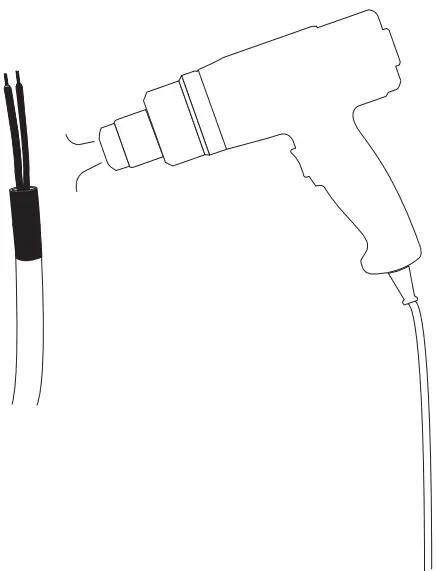
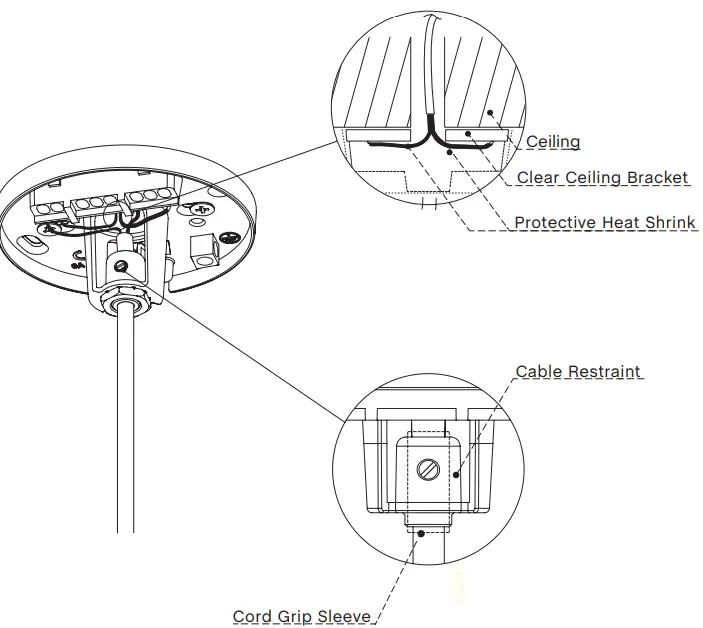
- It is advised that any wire exposed with just a single basic layer of insulation is covered with the protective heat shrink provided. (Two sleeves for the basic insulated wire and one sleeve for covering the opening of the pendant cable).

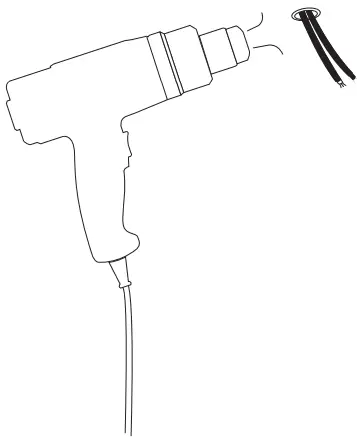
- A heat gun can be used to shrink and fix this protective insulation in place, as shown below.
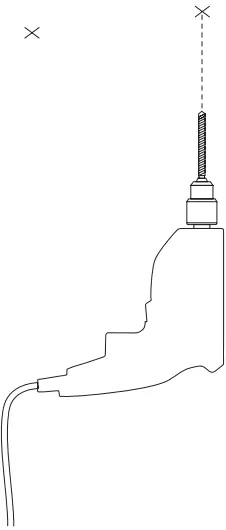
- Replace the pendant´s cable at the desired length, fix the cord grip sleeve in place and tighten the cord grip, as shown on the clear ceiling bracket. Ensure there is a distance of at least 3 mm between the opening of the pendant cable and the opening of the sleeve.
- It is advised that any wire exposed with just a single basic layer of insulation is covered with the protective heat shrink provided. (Two sleeves for the basic insulated wire and one sleeve for covering the opening of the source cable).
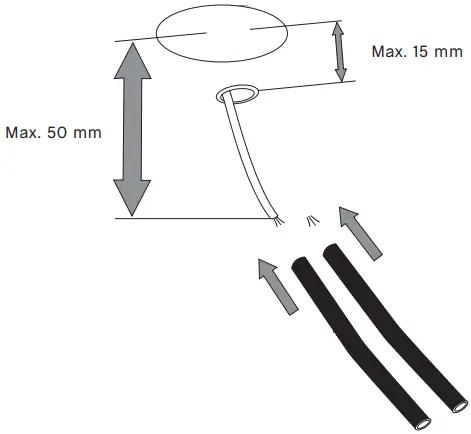
- A heat gun can be used to shrink and fix this protective insulation in place, as shown below.
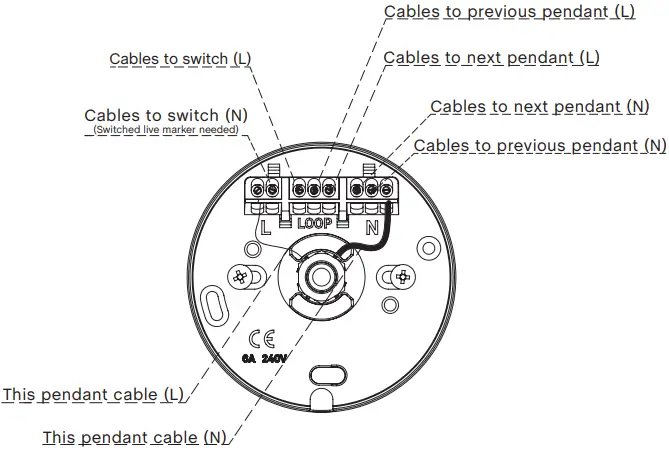
- Screw the clear ceiling bracket into the ceiling, ensuring there is enough cable exposed to connect both positive and neutral connections into the terminal block. Use the integrated terminal block on the clear ceiling bracket to connect the live and neutral wires. Both Live (L) and Neutral (N) are clearly marked on the clear ceiling bracket. The Ground (E) connection is only to be used for connecting the source Ground connection to, and is separate from the integrated terminal block, as shown below.
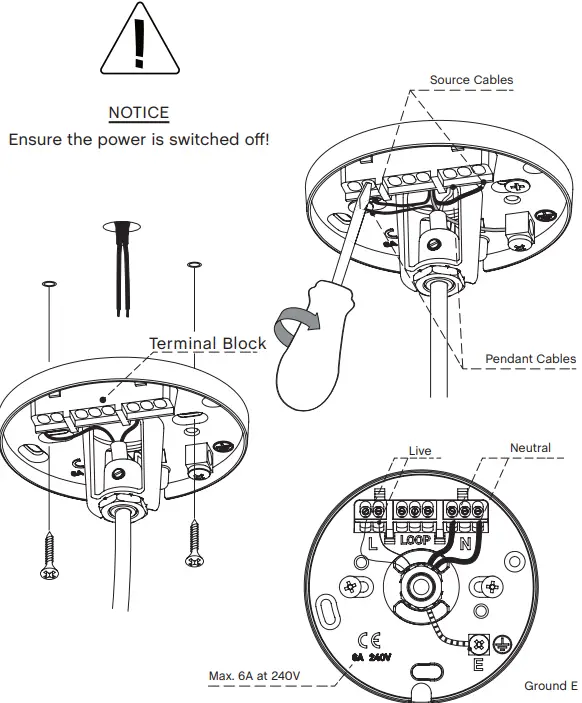
- The terminal blocks of the clear ceiling bracket are integrated into a junction box with a loop-in feature. This can be utilised in a number of different ways
to optimise the wiring of electrical fittings used in your environment, either for single light fixtures and switches, multiple light fixtures to a single switch or even lamps and ceiling fans connected to a single switch. The below illustration is one example of how this feature can be used to connect multiple light fixtures to a single switch. Max. 3 of the luminaires can be interconnected.
(Max. current for looping: 0.2056A)
NOTICE
it is advised that a qualified electrician installs multiple light fittings or ceiling fans that utilise this loop-in feature of our ceiling canopy. - Check to ensure that the protective heat shrink, the cable restraints and cord grip sleeve are still in place after fitting all wires. Check that all of the Live, Neutral and Ground connections are securely connected before switching the power back on at the mains. Ensure there are no loose cables, exposed bare wires and that the clear ceiling bracket is securely fixed to the ceiling.
- If utilising the mouse hole cable exit, please note the internal cable restraint and integrated cable clamp. The cable clamp tab can be removed and cut to length to suit the cable thickness used, if this is larger than what is already provided. For the source cable, it is advised that any wire exposed with just a single basic layer of insulation is covered with the protective heat shrink provided (Steps 4 – 7). Replace the cable clamp tab, slotting it back into the mouse hole exit.
This will clamp the cable tightly when the cover is screwed in place. Please note that the transparent cover may be located in a separate bag in the box.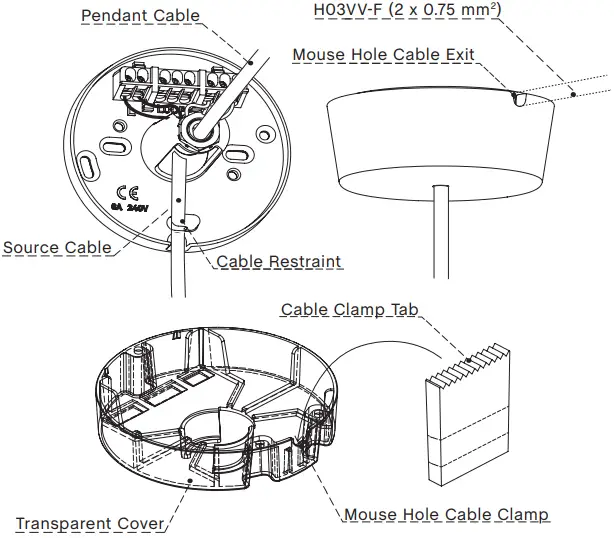
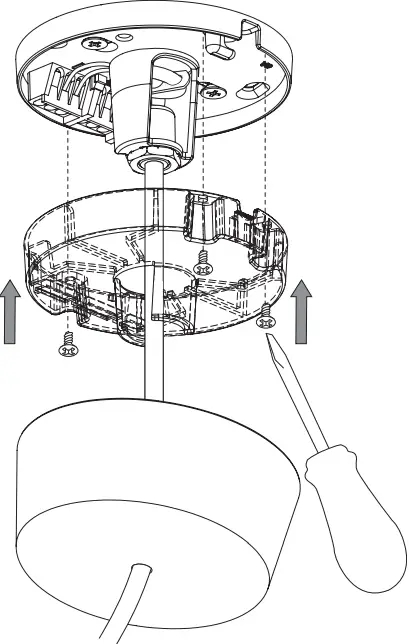
- Replace the protective transparent cover over the terminal and clear ceiling bracket, screwing it in place with the three fixings provided. This will isolate the internal electrics during use. Replace the outer magnetic ceiling cap over the assembly, ensuring the mouse hole exits are lined up with the bracket and cap if you inted to utilise this feature.
- Insert the recommended bulb into the bulb holder. Make sure that it is securely in place and can power on before fitting the diffuser.
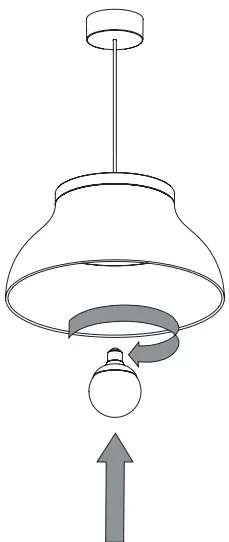
- Locate the diffuser supports and place them into the slots, as shown below. The support wires must be securely in place before moving on to the next step.
- Once the diffuser supports are securely in place, the diffuser can be installed. Place the diffuser into the shade and then gently hook the diffuser supports into the corresponding holes on the reverse side of the diffuser, as shown below.
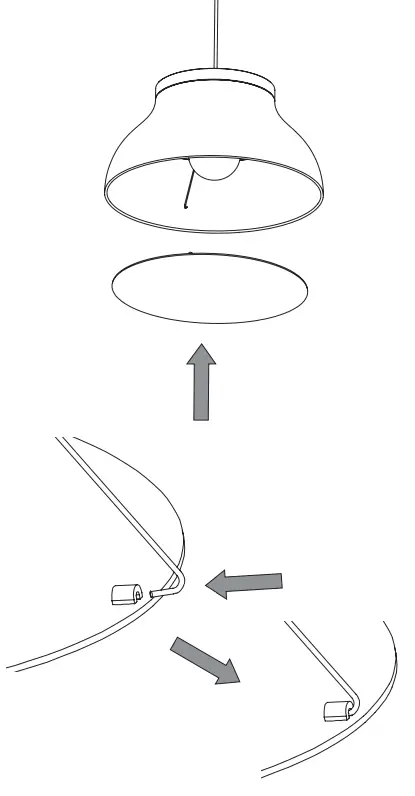
- Once all the steps have been carried out, the lamp is ready for use.
Please note that there are several alternative configurations for hanging your PC pendant or pendants other than directly below the supplied ceiling canopy, if the power supply is not conveniently located. Once again, please note that it is recommended that a qualified electrician installs your pendant lamps.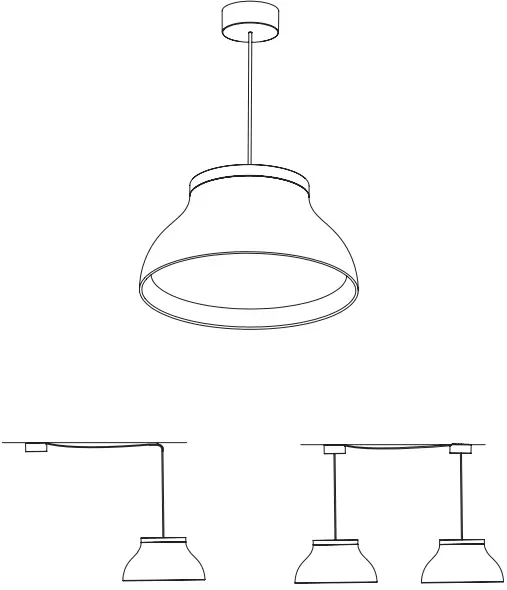
CARE & MAINTENANCE
Our Care & Maintenance offers guidance for optimal maintenance of your HAY product. It includes advice and instructions on cleaning and caring for specific materials to prolong the life of your lighting.

Please find our Care & Maintenance guide by scanning the QR code

You can find more relevant information on PC Pendant by scanning the QR code
You can also find the same information here hay.dk/downloads
Havnen 1 8700 Horsens Denmark
+45 4282 0282 / [email protected]
www.hay.com


