![]() DAS-ASVF Series Valve
DAS-ASVF Series Valve
Instruction Manual
DAS-ASVF Series Valve
Before Installation
- Install master valves and pressure regulators as needed.
- A pressure regulator is required if water pressure exceeds 150 PSI (recommended over 80 PSI).
- Flush the system thoroughly until water runs clear.
- Shut off the main water supply.
Installation Notes
- Aniti-Siphon valves must be installed a minimum of 6″ above ground and the highest outlet in the zone supplied by the valve.
- Do not use this anti-siphon valve as a main line backflow device, nor as a master valve.
- This valve is not designed nor approved to be under constant water pressure on both sides of the valve.
- Do not install any other valves downstream. If installed incorrerctly with constant pressure on both sides of valve, it is possible the valve will fail or burst.
- This valve must not be operated continuously for more than twelve (12) hours.
- The device shall not be installed where the venting of water from the device during its normal functioning causes damage.
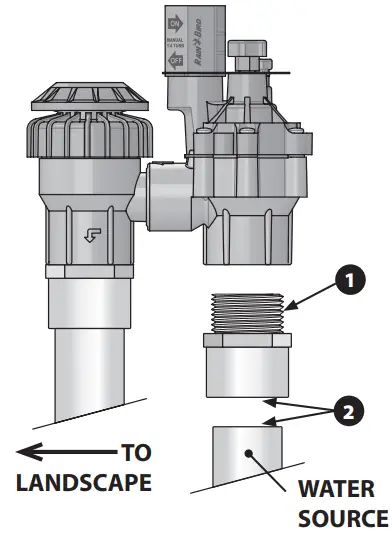
Connect Valve to Pipes
- Apply PTFE thread-seal tape to the male threads on the adapters, screw into the valve and hand-tighten. (do not use PVC glue or pipe dope on adapter threads).
- Apply primer and then PVC cement to the ends of the pipe and inside the adapters per manufacturer’s instructions.
- Ensure the valve arrows face in the direction of water flow, and push valve onto inlet and outlet pipes until secure. Follow PVC cement instructions for cure time.

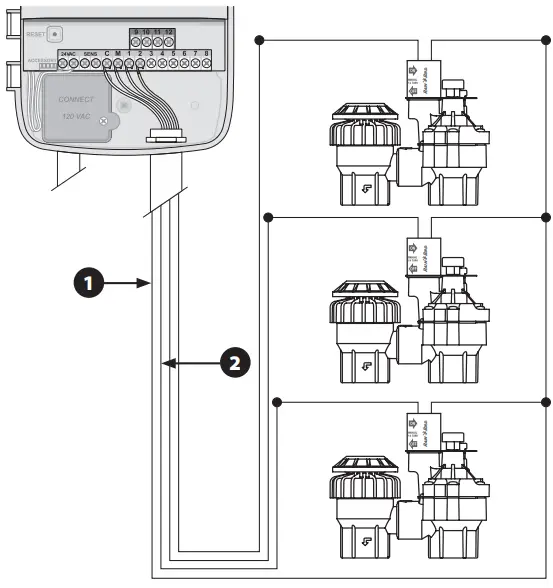
Connect Valve Wires
NOTE: Use watertight connectors and direct burial wire for all connections.
- Connect one solenoid wire to a common wire (usually white). All valves can share the same common wire.
- Connect the second solenoid wire to a power wire (usually colored).

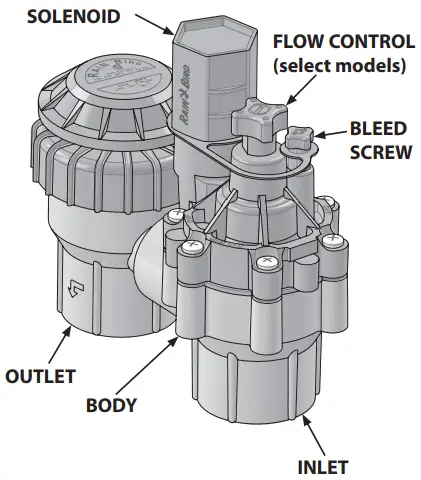
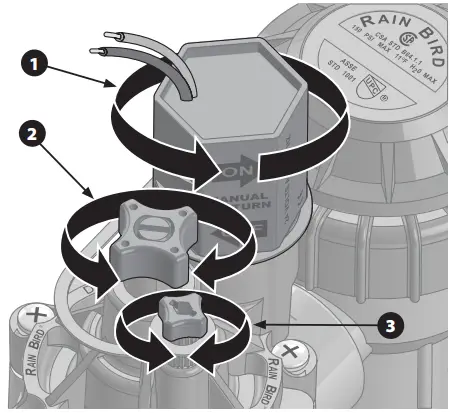
Valve Operation
Manual Operation:
- Manual on: Turn the solenoid counter-clockwise 1/4 turn. Do not unscrew completely. To close, hand tighten clockwise.
- Flow control (select models only): Turn clockwise to restrict flow. Turn counter-clockwise to open flow.
- Flush valve to clear debris: Turn the bleed screw counterclockwise ONLY 1 turn. Flush one minute and turn clockwise to close.
First Use: - Open the main water supply and flush one minute with bleed screw to clear debris.
- Test wiring by using the Manual Water feature on the irrigation controller.
- Adjust the flow control to reduce over-spray. (select models).

Pressure Loss Chart
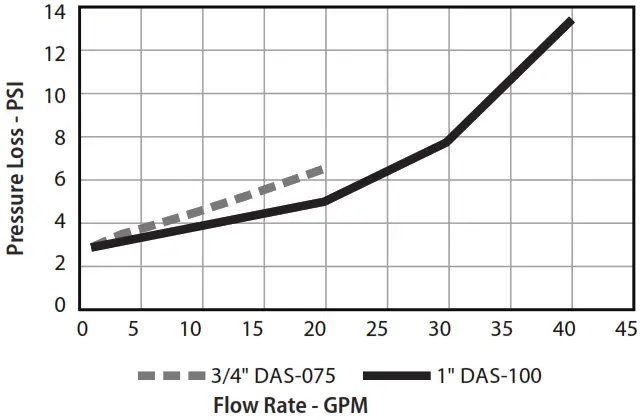
Operating Ranges
| DAS/ASVF-075 | DAS/ASVF-100 | |
| Flow² | 0.2 – 22 GPM | 0.2 – 40 GPM |
| Pressure | 15 – 150 PSI | 15 – 150 PSI |
![]() NOTE: For flows below 3 GPM (0.75 m³/h), or any drip application, use a 200 mesh filter upstream and a pressure regulating filter downstream from the valve. 40 psi for 1″ and 30 psi for 3/4″ drip lines.
NOTE: For flows below 3 GPM (0.75 m³/h), or any drip application, use a 200 mesh filter upstream and a pressure regulating filter downstream from the valve. 40 psi for 1″ and 30 psi for 3/4″ drip lines.
Troubleshooting
| Symptom | Solution |
| Valve Won’t Turn On when Solenoid is Turned | Make sure flow control is open (select models) |
| Check that main water supply is on | |
| Make sure piping is connected properly and not blocked | |
| Valve Won’t Turn On at the Timer | Verify timer settings are correct |
| Check and repair wiring and connections as needed | |
| Check and replace valve solenoid as needed | |
| Verify timer power output | |
| Valve Won’t Shut-off | Verify timer settings are correct |
| Hand tighten solenoid and bleed screw if needed | |
| Valve Won’t Turn On at the Valve | Incorrect timer settings |
| Check wiring | |
| Check solenoid | |
| Timer not supplying power to the valve | |
| Make sure the Flow Control stem is not turned all the way closed | |
| Leaks at sprinkler heads | Clear debris by opening the bleed screw and flushing 1 minute |
| Remove and clean the diaphragm. Replace if needed. | |
| Leaks around the valve | Check pipe fittings connection and glue, repair or replace as needed |
| Hand tighten solenoid and bleed screw if needed | |
| If vacuum breaker is leaking (anti-siphon models) remove cap, gasket, and internal piston gasket to clean and reassemble | |
| Turn off main water supply, relieve pressure on the valve by opening the bleed screw and tighten the jar top bonnet |
![]() NOTE: During winter, shutdown and drain the system to protect valves from freezing. Failure to properly drain the lines can result in damage to the valves, which is not covered under the customer satisfaction policy.
NOTE: During winter, shutdown and drain the system to protect valves from freezing. Failure to properly drain the lines can result in damage to the valves, which is not covered under the customer satisfaction policy.
Questions?
In the USA or Canada, call Rain Bird toll free Technical Support at 1-800-724-6247 or visit our valves support web site
 http://www.rainbird.com#mmm_antisiphon-valves/index.htm
![]() Rain Bird Corporation
Rain Bird Corporation
Consumer Products Division
6991 East Southpoint Rd.
Tucson, AZ 85756
Tel.: 1-800-RAINBIRD (800-724-6247)
www.rainbird.com
©2020 Rain Bird Corporation
®Registered trademark of Rain Bird Corporation
182194 Rev.12/20


