![]()
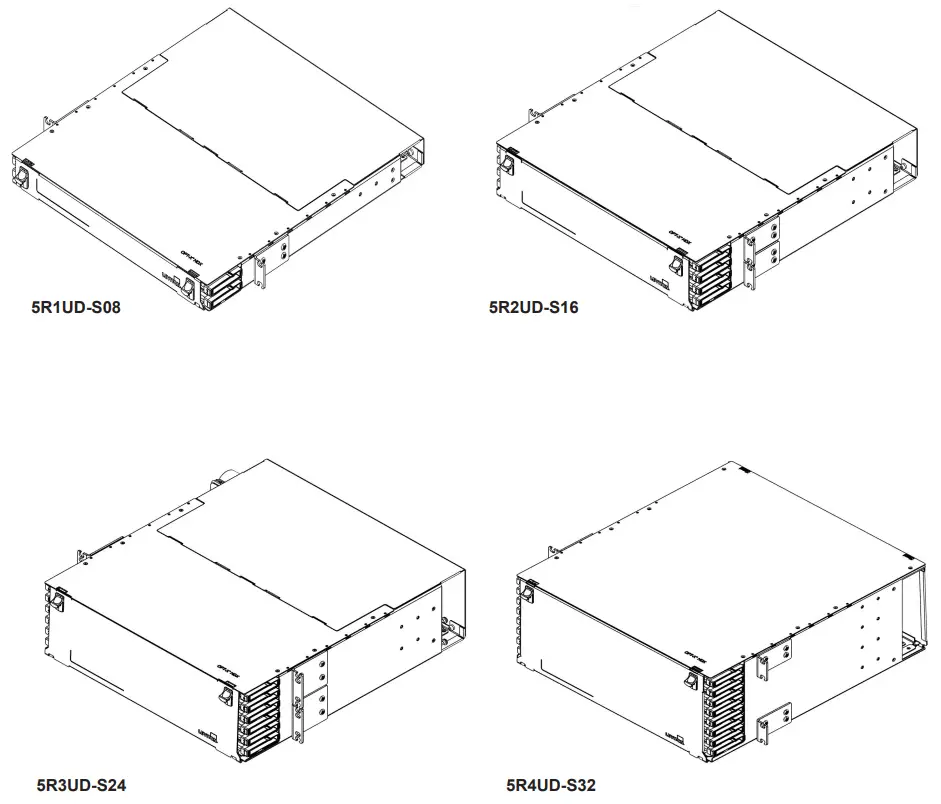
5R1UD-S08/5R2UD-S16
5R3UD-S24/5R4UD-S32
Instructions for Use – Opt-X®
HDX Fiber Optic Enclosure
FIBER CONNECTOR SAFETY WARNINGS
SAFETY INFORMATION
- Always wear safety glasses.
- Isopropyl alcohol is flammable and may cause eye irritation. In case of contact with eyes, flush with water for at least 15 minutes. When using isopropyl alcohol, always assure proper levels of ventilation. In case of ingestion, consult a physician immediately.
- Never look directly into a laser light source, point source at a person’s eyes, or point source at reflective surfaces.
- When working on a fiber link, always turn laser source off, or disconnect completely.
- Always dispose of fiber debris properly, preferably using sticky tabs.
- Do not place food or beverages in the vicinity of the work area.
- Thoroughly wash face and hands after terminating fiber.
- Carefully remove any fiber debris that may have been stuck to clothing, or left in work area, and dispose of properly.
TIPS AND RECOMMENDATIONS
- Using isopropyl alcohol, thoroughly clean exposed fiber and buffer ensuring both are free from dust, oil, and debris.
- Do not lay ferrule dust covers on a dirty or dusty surface.
- Always use proper tools and/or accessories to terminate fibers and clean connector tips
TABLE OF CONTENTS
The following instructions will help you quickly install your Leviton Opt-X® HDX High Density System Enclosure for use in your equipment cabinet or rack. For detailed information on each step, go to the page number listed below.
| Safety and Installation Instructions | Pg. 2 |
| Table of Contents | Pg. 2 |
| Standard Accessories | Pg. 3 |
| Optional Accessories | Pg. 3 |
| Equipment Overview | Pg. 3 |
| Product Views | Pg. 4 |
| Mounting, Front Door Operation, and Rear Door Operation | Pg. 5 |
| Cable Installation – Preparation | Pg. 6 |
| Cassette Installation and Removal | Pg. 7 |
| Cable Installation – Applications | Pg. 8 |
| Front side patch cable routing, Opt-X® HDX High Density System Labeling | Pg. 9 |
STANDARD ACCESSORIES (Included with Opt-X HDX™ Enclosure)
Prior to installing your Leviton Opt-X HDX Enclosure, please refer to the table below. This will help ensure that you have all the items shipped with the unit, and/or any additional items that may be required for proper installation.
| Description | Image | Quantity in 1RU Kit | Quantity in 2RU Kit | Quantity in 3RU Kit | Quantity in 4RU Kit |
| ID Card Label | 1 | 1 | 1 | 1 | |
| Velcro Tie | 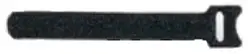 | 6 | 6 | 8 | 8 |
| Rack Mnt Screw | 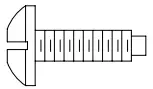 | 4 | 4 | 4 | 4 |
OPTIONAL ACCESSORIES
| Description | Part Number |
| Universal Opt-X Cable Clamp Kit, Single Cable Grommet (for enclosure mounting) | 5RCMP-KIT |
| Universal Opt-X Cable Clamp Kit, Multiple Cable Grommet (for enclosure mounting) | 5RCMP-KT2 |
| Universal Opt-X Cable Clamp Kit, Single and Multiple Cable Grommet (for rack/post mounting) | 5RCMR-KIT |
| 1RU Mounting Ear for 23″ Rack | 5REAR-023 |
| Grounding Kit | DPGRD-KIT |
| 1RU Brush Guard (Bag of 2) | 5RBSH-1UN |
| 2RU Brush Guard (Bag of 2) | 5RBSH-2UN |
EQUIPMENT OVERVIEW
Description
The HDX Enclosure is an ultra-high density optic system designed for use with HDX cassettes, adapter plates and blanks.
Provided Parts
- (1) 1RU, 2RU 3RU or 4RU HDX Fiber Optic Enclosure
- (2, 4, 6 or 8) Slide Out Trays respectively.
- (1) Rear lid on 1RU 2RU and 3RU models
- (2) Mounting ears with screws on 1RU, (4) Mounting ears with screws on 2RU 3RU and 4RU
- (1) 12/24×0.5L” screw kit assembly
- (1) Accessory Kit
- (1) Label Designation Card kit
PRODUCT VIEWS
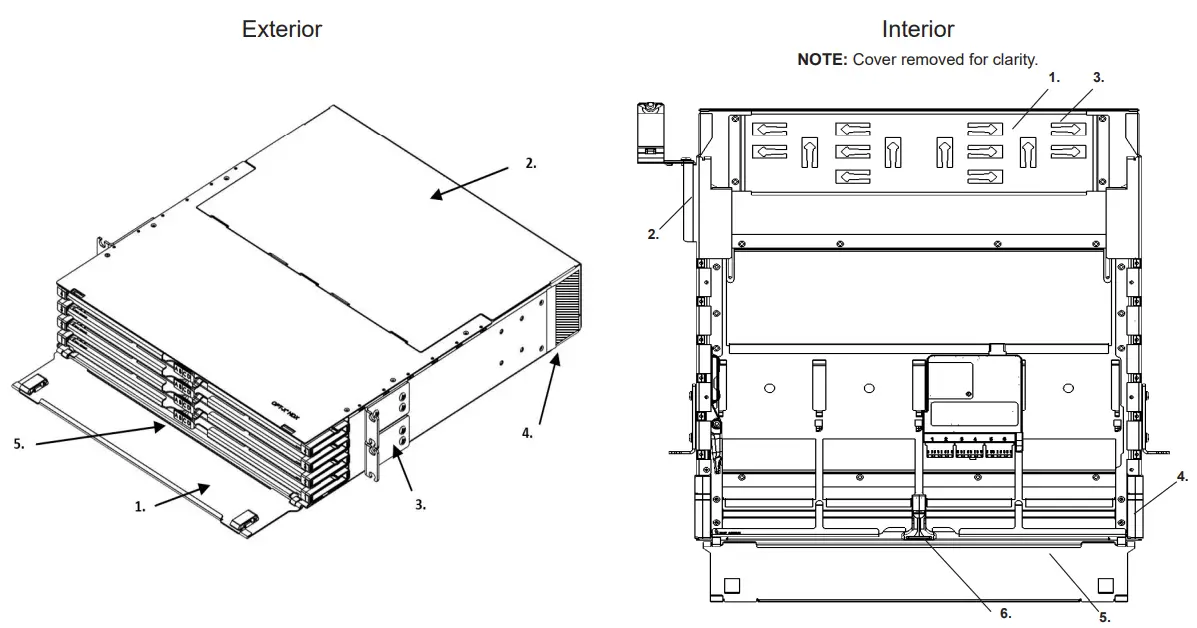
| 1. Front Door 2. Rear Lid (Removable on 1RU and 2RU only) 3. Mounting Ears 4. Brush Guard (Sold Seperately) 5. Front Grab Bar (pull to slide each tray forward) | 1. Rear Cable Management mesh 2. Opt-X Clamp Kit (Sold Seperately) 3. Hook and Loop lacing points 4. Cable Management Guides 5. Sliding termination tray 6. Front Grab Bar (pull to slide each tray forward) |
SIDE VIEW (2RU Shown)
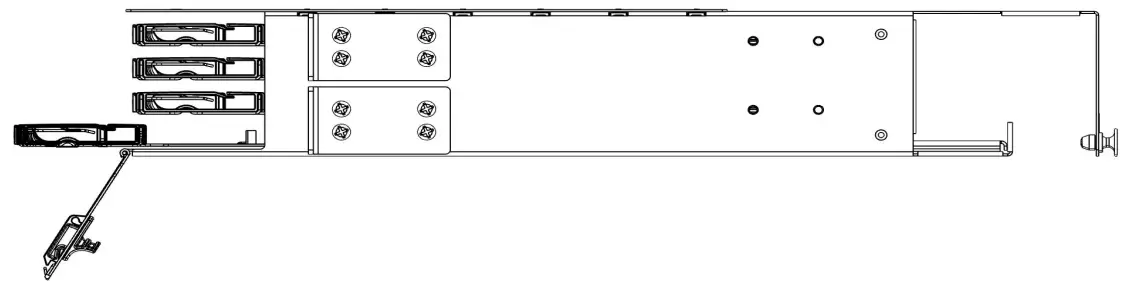
- 19” rack mount brackets
- Cable Clamp kit mounting points
NOTE: Optional 23″ RM kit also available for 1RU. See Optional Part Number list (see page 4).
MOUNTING AN ENCLOSURE
NOTE: Thread each screw a minimum of three full rotations before mounting

FRONT DOOR OPERATION
NOTE: Rear Door on 4RU enclosure operates identically
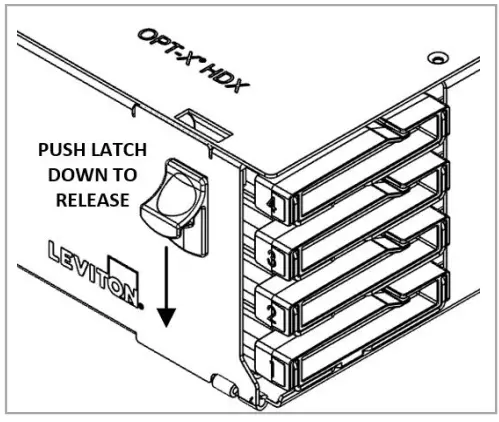 To open the Front Door:
- Push Release Latches downward
- Open Door
REAR DOOR OPERATION (1RU, 2RU and 3RU ONLY)
NOTE: Ensure plungers are dis-engaged prior to installation of lid

To remove the Rear Door:
- Pull plungers out to dis-engage
- Remove lid rearward
CABLE INSTALLATION – PREPARATION
Top View: Tray to Front
NOTE: Tray in forward position, covers are removed for clarity.
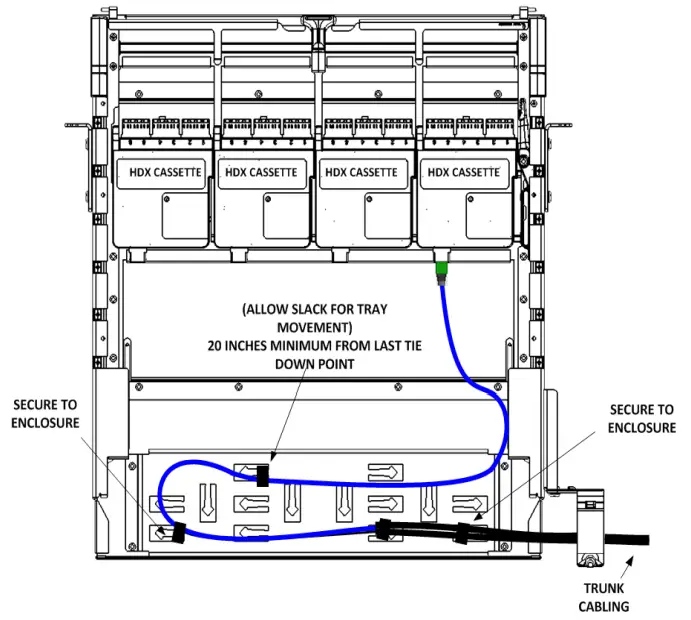
Pictured: Removable tray to facilitate field termination
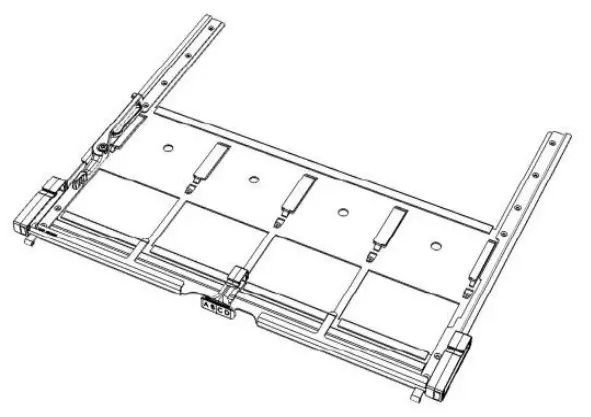
COMMENTS:
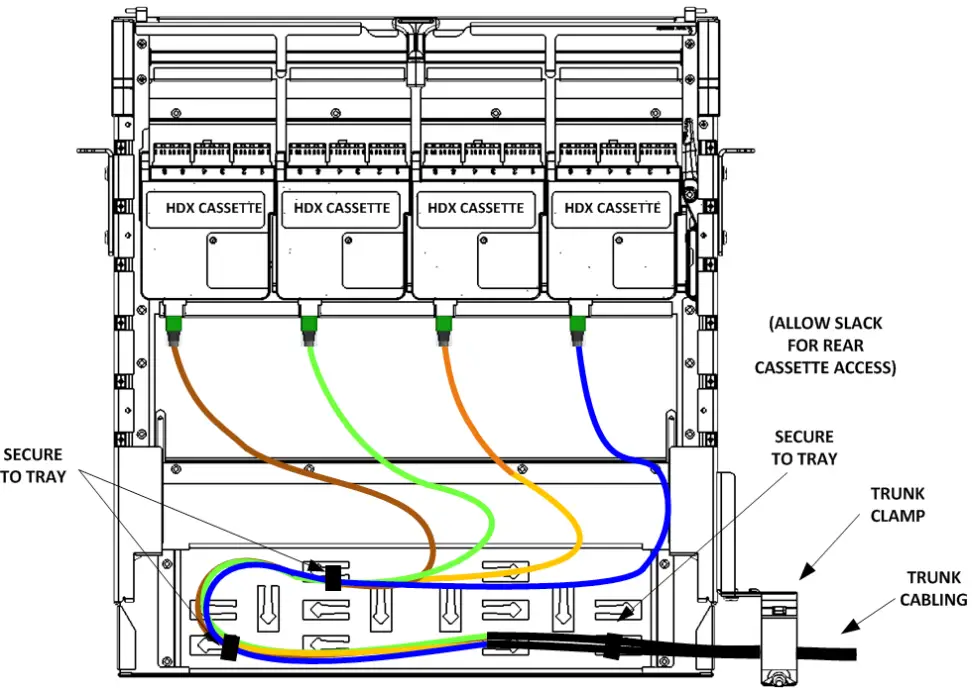
- Route cable to tray through grommet on the opposite side of slide tray tie down point
- Assure cable slack for tray movement.
- Recommended trunk breakout length is 36 inches.
- A minimum of 20 inches of free slack is required to each cassette for bend radius compliant accessibility from the front side.
To remove tray from enclosure, slide tray fully forward stop position. Press release lever and slide tray out to remove.
Caution – Damage may occur to cabling if tray is removed beyond the stop point when loaded.
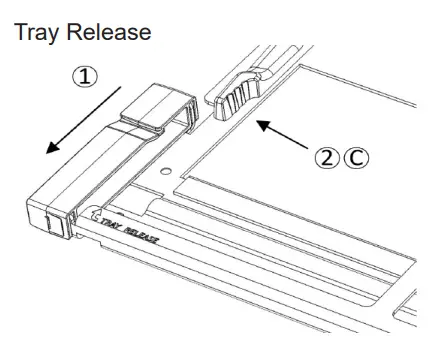
To Remove a tray: (see diagram)
- Pull the tray forward to the stop point
- Press the release lever toward the outside of the enclosure and remove the tray from the tray guides.
To Install a tray:
A. Insert the tray into the target position
B. Slide the tray inward until the first stop point is reached.
C. Press the release lever toward the outside of the enclosure and continue sliding the tray inward to the fully enclosed position.
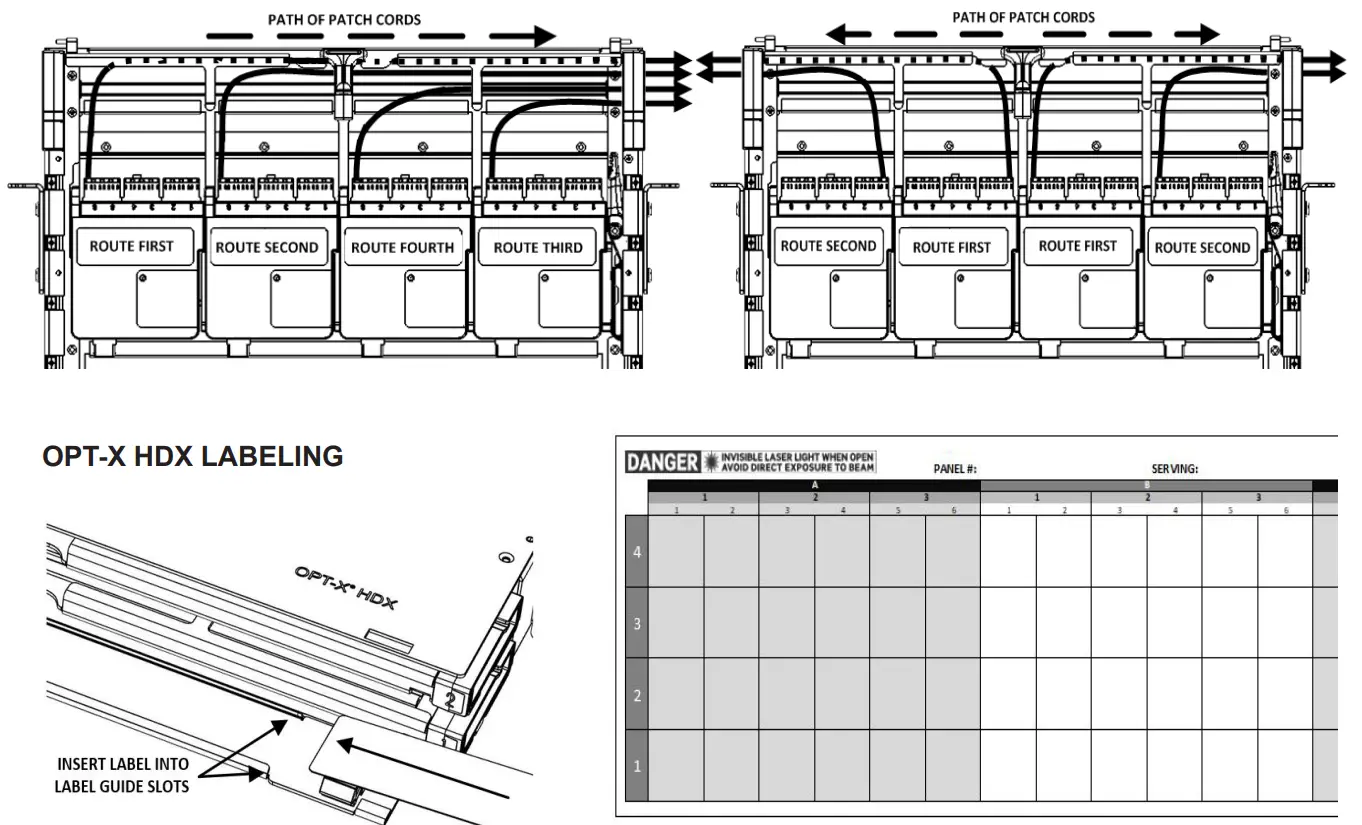
CASSETTE INSTALLATION AND REMOVAL
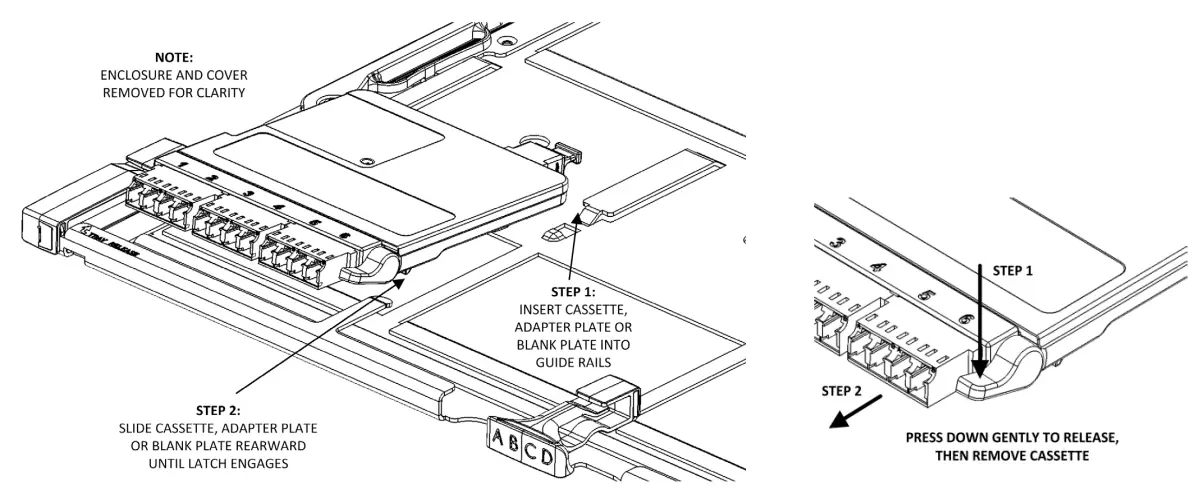
Insert HDX Cassettes, Adapter Plates or Blank Plates from the front into the receiving guide of the target location.

CABLE INSTALLATION – APPLICATIONS
Rear Routing Guide Right
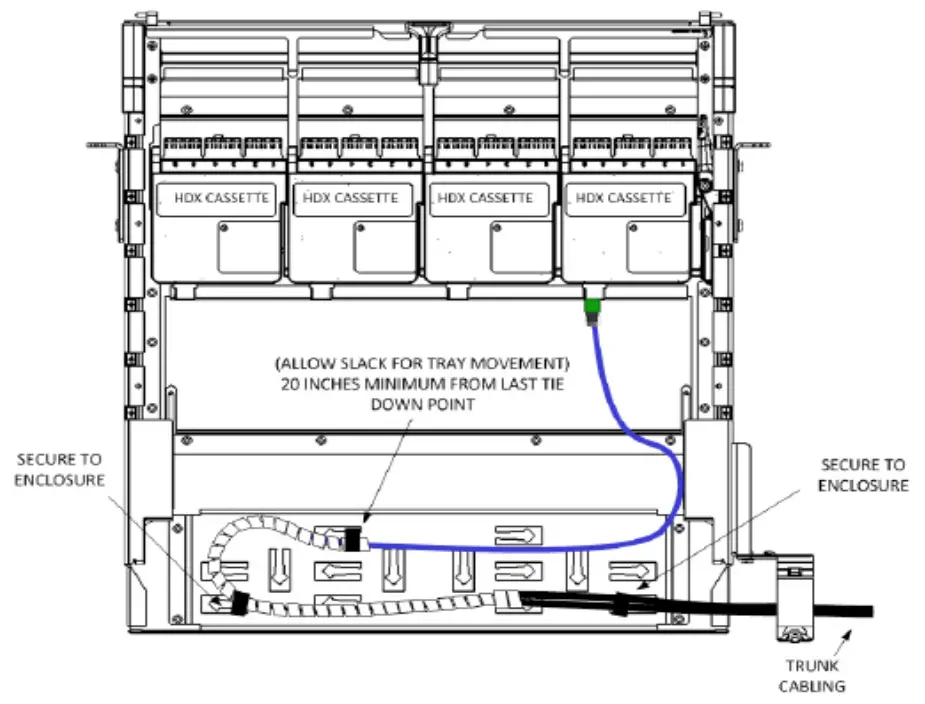
Rear Routing Guide Breakout
FRONT SIDE PATCH CABLE ROUTING
To maintain proper bend radius and protect from damage during movement of sliding trays, follow the recommended patch cord load orders as shown.
| Label Printing Organization by Fiber Cassette or Adapter Panel Type | ||||||||||
| Per Column | Number Scheme | |||||||||
| Port Spacing | No. of Ports | |||||||||
| Duplex SC (3 pack) | 1. | 6 | 1 | 2 | 3 | 4 | 5 | 6 | ||
| Quad LC (3 pack) | 1. | 12 | 1-2 / 3-4 | 5-6 / 7-8 | 9-10 / 11-12 | |||||
| MTP (3 port) | 1. | 3 | 1 | Space | 2 | Space | 3 | |||
| MTP (6 port) | 1. | 6 | 1 | 2 | 3 | 4 | 5 | 6 | ||
Excel based label templates are available at www.leviton.com
Patents covering this Product, if any, can be found on Leviton.com/patents
![]()
Network Solutions
Leviton Manufacturing Co., Inc.
2222 222nd ST SE
Bothell, WA 98021, USA
Technical Support: 800-824-3005
ARTWORK PRINT SPECIFICATIONS