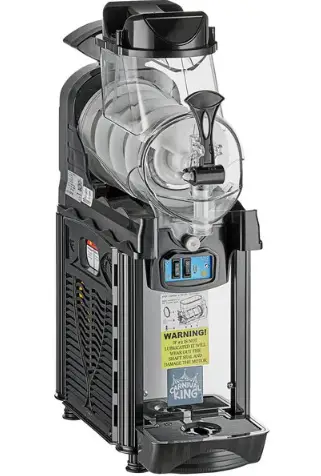
CARNIVAL KING 382SMM1 Single 1.6 Gallon Pourover Granita
Safety
This instruction manual is an integral part of the machine and must be kept for any further consultation.
- This machine is a cold drink dispenser.
- This machine should be used only for the purpose for which it was designed. Any other use is inappropriate and therefore dangerous.
- The manufacturer will not be held responsible for any damage caused by improper use.
- Before installing and operating the machine, read this instruction manual carefully.
- Basic safety rules:
- DO NOT touch the machine when hands or feet are wet.
- DO NOT use the machine when barefoot.
- This appliance should only be used by persons who have the knowledge, experience, and capability to operate it in a safe way.
- DO NOT allow children to play with or use the appliance, or allow untrained persons to use the appliance.
- DO NOT leave the machine outdoors.
- DO NOT pull on the electrical cord to unplug the machine.
Components, Features & Controls
Main Components
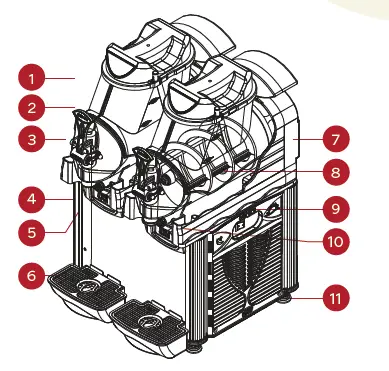
- Lid
- Bowl
- Tap Lever
- Product Supply
- Bowl Switch Box
- Drip Tray
- Thickness Control
- Spiral Blade
- Main Switches
- Bowl Fixing Knob
- Rubber Leg
Technical Features
| 382SMM1 | 382SMM2 | 382SMM3 | |
| BOWLS | 1 | 2 | 3 |
| CAPACITY | 1 x 1.6 Gal | 2 x 1.6 Gal | 3 x 1.6 Gal |
| GAS | R134a | ||
| WIDTH | 8.6 in | 17.3 in | 23.9 in |
| DEPTH | 19.2 in | ||
| HEIGHT | 27.9 in | ||
| WEIGHT | 53 lb | 88 lb | 132lb |
| POWER | 350W | 850W | 1250W |
| VOLTAGE | 120V | ||
| ACOUSTIC PRESSURE | < 70 dB (A) | ||
| CLASS | N | ||
Serial Plate
The technical features of the machine are reported on the serial plate attached on the frame.
- ITEM: 382SMM1
- SPECS: 1 x 1.6 GAL
- VOLTAGE: 120V WATTAGE: 350W
- GAS/Q.TY: R513 – Gr. 140
- PRESSURE: HIGH – 186 PSI; LOW – 88 PSI
- SERIAL #:
WARNING! Improper installation, adjustment, alteration, service or maintenance can cause property damage, injury or death.
Read the installation, operating, and maintenance instructions thoroughly before installing or servicing this equipment.
WARNING! Disconnect from electric supply before adjustment, alteration, service, or maintenance.
WARNING! Commercial use only, not intended for household use.
Main Controls
Positioned on the right side of the machine.
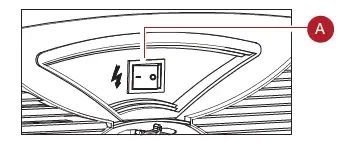
Bowl Controls
Positioned underneath each bowl.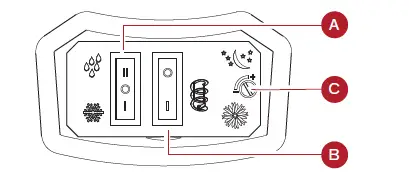
- A – Beverage Type Control Switch
- 0: Cooling OFF
- I: Slush/Frozen Cream Mode
- II: Cold Drink Mode
- B – Spiral Blade Switch
- 0: Spiral Blade OFF
- I: Spiral Blade ON
- C – Thermostat Control
Controls the temperature of the product when the Beverage Type Control Switch is set to II.
Installation
Unpacking
- Remove the carton box and the plastic bag.
- Make sure that the machine is intact and has not been damaged during transport.
- Dispose of any packaging materials properly, keeping any that you may need for future moves.
Positioning
- Place the machine on a sturdy horizontal surface.
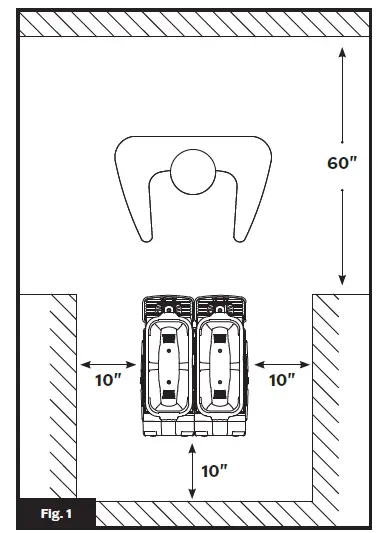
- For improved ventilation, maintain a distance of 10 in. between the unit and walls or other obstacles. Increase the distance if the obstacles are a heating source. (Fig. 1)
- Leave 60 in. of free space in front of the machine to allow for easy use and maintenance. (Fig. 1)
- Leave 10 in. of free space above the machine to allow for removal of lids. (Fig. 1)
- When the machine is in place, adjust the rubber legs to level.
CAUTION
When lifting or transporting, DO NOT GRAB THE MACHINE BY THE CYLINDRICAL EVAPORATORS. The manufacturer is not responsible for any damage caused by improper handling.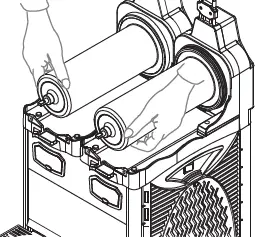
Electric Connection
If in doubt, consult a specialized electrical technician. Before inserting the plug into the electric outlet, carefully verify the following:
- Set the Main Power Switch to OFF (0).
- Verify that the machine is properly grounded.
- Verify the voltage of the outlet matches what is indicated on the serial plate.
- Verify the current available is sufficient for the maximum required by the machine.
- Inspect the cord for damage. If any is present DO NOT plug into the outlet.
- DO NOT use an extension cord or adapter to connect the machine to the electric supply.
Main Safety Information
- DO NOT touch the machine with wet hands or feet.
- DO NOT operate when barefoot.
- DO NOT allow the machine to be operated by children or untrained persons.
- DO NOT leave the machine outside.
- DO NOT pull the cable to disconnect the machine from the electric supply.
- DO NOT place the machine near flammable or explosive materials.
- DO NOT place the machine nearby any heat source or heating element.
Operation
CAUTION
Before using the machine, all food contact surfaces and components must be cleaned and sanitized in accordance to the Washing & Sanitizing section of this manual.
Preparing The Product Concentrate
In order to obtain a homogeneous mix, the product will need to be premixed before being added to the machine. Follow the manufacturer’s recommendations for mixing.
Ready-to-Use & Premixed Concentrates
- Turn the machine OFF and unplug from power supply.

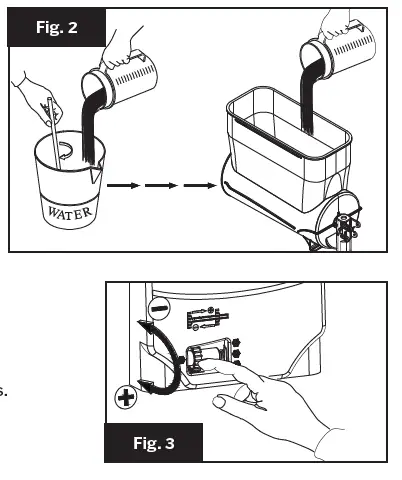
- Pour liquid into the bowl. (Fig. 2)
- DO NOT pour below the MIN Level.
- DO NOT pour above the MAX Level.
Frozen Beverages
In order to obtain a slush consistency, the mixture must have a minimum sugar content of 13° BRIX (13g sugar to 100g solution).
A lower concentration may damage the spiral blades and gear motors.
- Position the Beverage Type Control Switch to I (Slush/Frozen Cream Mode).
- Position the Spiral Blade Switch to I (ON).
- Wait for the mixture to freeze and test consistency. If consistency is good, continue to step 5. If not, continue
to step 4. - Thickness Control Knob is found behind the back panel of the machine. The machine is set for optimal slush thickness by the factory. Turn the screw L to R to increase thickness, R to L to decrease thickness. (Fig. 3)
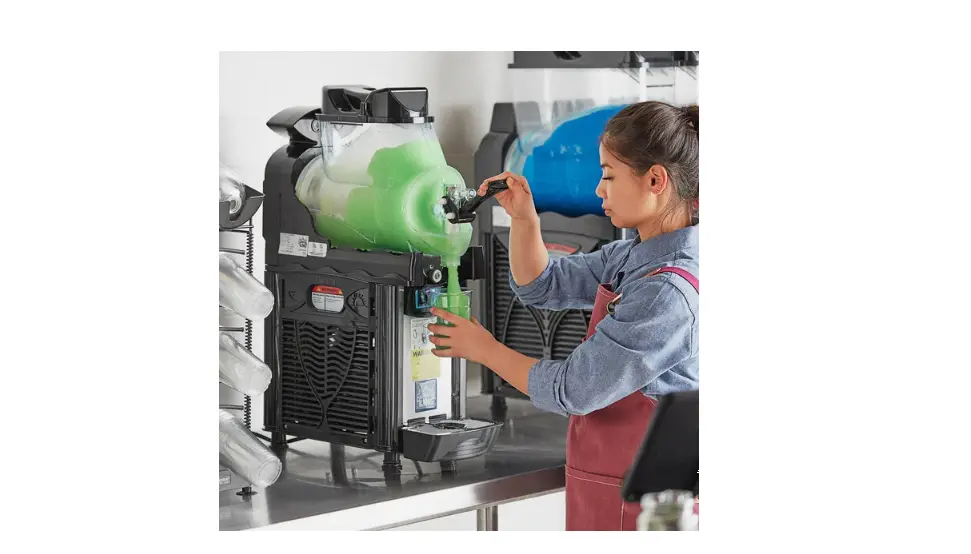
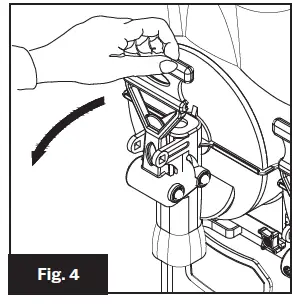
- Dispense the beverage by pulling the tap lever. (Fig. 4

CAUTION
Over-icing and spiral blade jamming can be caused by the wrong thickness setting.
Cold Drinks
Prepare the product separately before proceeding. It is recommended to maintain a product level above the cylinder evaporators for consistent cooling. (Fig. 5)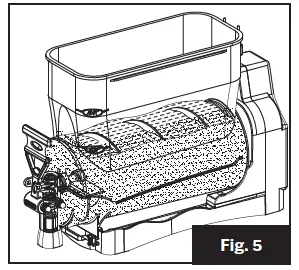
- Position the Beverage Type Control Switch to II (Cold Drink Mode).
- Position the Spiral Blade Switch to 0 (OFF).
- The optimal drink temperature has been set by the factory.
Use the Thermostat Control to adjust the temperature of the drink. - To set temperature, open the transparent screen on the front panel below the bowl and turn the Thermostat Screw.
- Dispense the beverage by pulling the tap lever. (Fig. 4)
Cleaning
CAUTION
The machine must be turned OFF and unplugged from the power source before cleaning.
Empty the Bowl
(Skip this step if this is the initial cleaning)
- Use the tap lever to empty any remaining liquid into a container.
- DO NOT proceed without emptying the bowl.
Disassembly
Dispensing Tap (Fig. 6)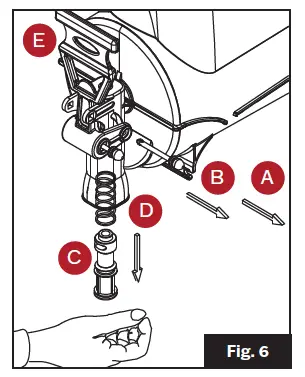
- Place hand beneath the dispensing outlet to catch pieces as they are released.
- Pull the Lever Pin (A) to disconnect the Tap Valve (C) and Spring (D).
- If the Tap Lever (E) is to be washed, remove Lever Pin (B).
Lid (Fig. 7)
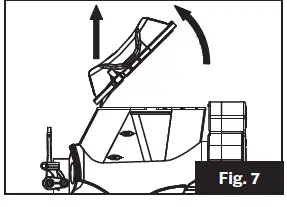
- Rotate the lids towards the front.
- Lift the lid upwards.
Bowl (Fig. 8-12)
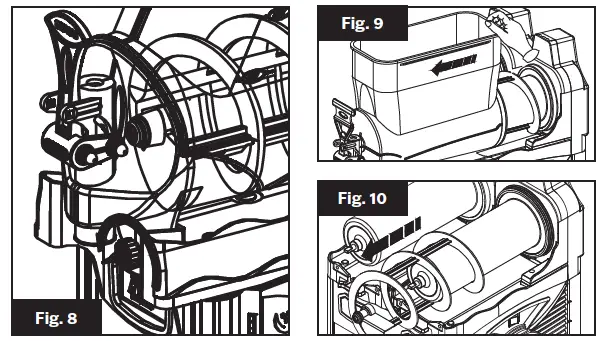
- Remove the (2) Front Fixing Knobs by unscrewing them counter-clockwise. (Fig. 8
- Remove the bowl from its seat. (Fig. 9)
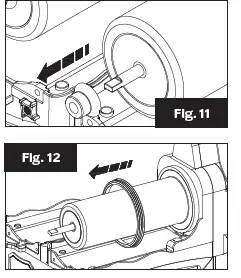
- Gently pull on the spiral blades to remove from the cylindrical evaporators. (Fig. 10)
- Gently pull on the Spiral Blade Gasket to remove. (Fig. 11)
- Gently pull on the Bowl Gasket to remove. (Fig. 12)

Drip Tray (Fig. 13)
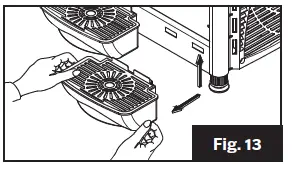
- Lift upward and then away from the machine to unseat the hooks.
- Wash with warm water and dry.
- Reinsert the hooks into their holes and push down.
Washing & Sanitizing
To maintain health standards and product quality, the machine must be cleaned daily. Failing to clean daily will void this warranty.
CAUTION
DO NOT wash any components of the machine in the dishwasher.
Washing
- Fill a basin with lukewarm water (Approx. 104°F) and a neutral detergent suitable for plastic items.
- DO NOT use abrasive powders which might affect the bowl’s transparancy.
- Wash all components (except the lid) in the basin.
- DO NOT wash the lid by dipping in water. Doing so may damage electric components.
- Use a wet, soft cloth.
- Rinse all parts carefully with clean lukewarm water to remove any residual soap.
- Dry all parts with a soft cloth.
- If the machine will not be in use for an extended period, cover and keep it away from dust.
Sanitizing
Sanitizing must be done before the initial use of the machine or if it is not used for an extended period of time.
- Follow washing instructions.
- Make a solution of lukewarm water (Approx. 104°F) and hypochlorite (bleach) with a 10g to 1L ratio.
- Use a soft cloth or brush to apply the solution
to all components. - Rinse all parts carefully with clean lukewarm water to remove any residual solution.
- Dry all parts with a soft cloth.
Condenser Cleaning
Regular maintenance of the condenser ensures the quality of the product and efficiency of the machine. This cleaning should be performed at least once a month.
CAUTION
The machine must be turned OFF and unplugged from the power source before cleaning.
382SMM1, 382SMM2, 382SMM3 (Fig. 14)
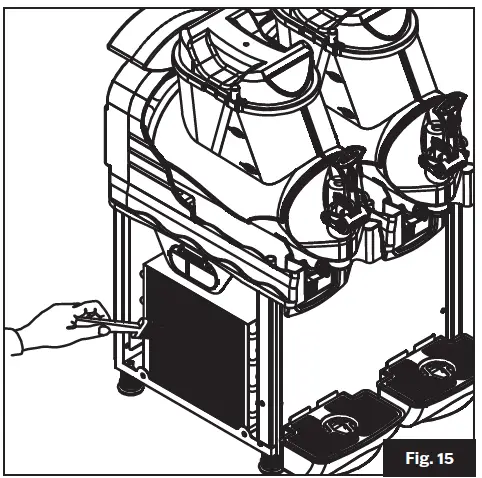
- Remove the left side stainless steel panel by unscrewing the Fixing Knob.
- Use a soft and dry brush to remove the dust from the condenser fins.
- When cleaning is complete, replace the side panel and secure with Fixing Knob.
Reassembly
All washed and/or sanitized parts must be completely dry before being carefully reassembled. Some components must be lubricated in order to work efficiently. A tube of lube is included with each machine.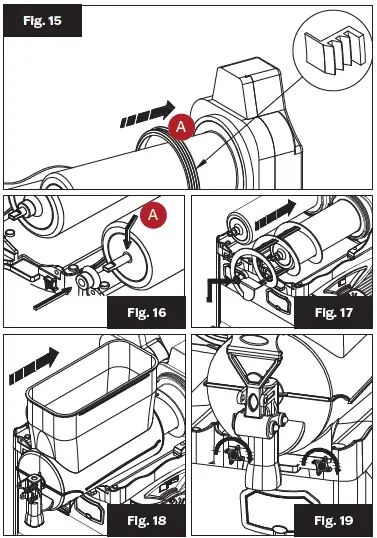
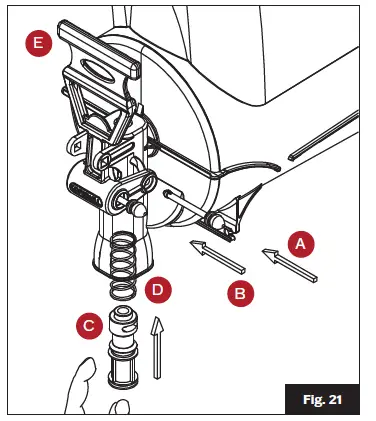
Dispensing Tap (Fig. 21)
- Place the Lever (E) in place so Pin (B) lines up correctly. Insert Pin (B) and secure.
- Lubricate the Tap Valve (C).
- Insert the Spring (D) into the product supply hole, followed by the lubricated Tap Valve (C) and secure with Pin (A).
CAUTION
When cleaning or lifting, DO NOT GRAB THE MACHINE BY THE CYLINDRICAL EVAPORATORS.Bowl (Fig. 16-20)
- Place the Bowl Gasket at the bottom of the Cylinder Evaporator, lubricating the upper part (A). (Fig. 16)
- Lubricate the surface of the cylinder in the zone of the transmission shaft outlet (A). (Fig. 17)
- Place the Spiral Blade Gasket (B), lubricating both the internal and external surfaces. (Fig. 17)
- Insert the Spiral Blade so that the head joins the transmission shaft. (Fig. 18)
- Lubricate the external part of the head of the Spiral Blade (A). (Fig. 18)
- After all bowl components are properly positioned and lubricated, slide the Bowl into position. (Fig. 19)
- Secure the bowl by screwing the Bowl Fixing Knobs clockwise. (Fig. 20)
Lid (Fig. 21)
- Insert the sloping lid into the bowl.
- Rotate the back of the lid into position.
Rinse Cycle
After cleaning, it is necessary to run a rinse cycle before loading product.
- Fill the bowl with clean water to the MAX Fill Line.
- Turn the Main Power Switch ON (I).
- Turn the Spiral Blade ON (I).
- Let the machine run for 5 minutes.
- Empty the bowl through the Dispensing Tap.
- Turn the Main Power Switch OFF (0).
- Use a soft towel to dry the inside of the bowl.
Replacement Schedule
| CYCLE (MONTHS) | ITEM |
| 6 | Replace bowl gasket |
| 6 | Replace spiral blade gasket |
| 6 | Inspect auger shaft for abnormal wear |
| 6 | Replace tap valve |
| 6 | Lubricate the motor shaft |
| Monthly | Clean condenser air filter |
| 6 or as needed | Clean condenser coil |
| 6 or as needed | Inspect and clean condenser fan |
| 6 | Inspect, clean, or replace bowl drain tubes |
- Failing to perform required maintenance will void the warranty.
- Cleaning must be performed daily for optimal performance.
Disposal
When the machine is no longer of use, dispose of it properly. Or if still operational, sell off through an authorized organization or company.
Useful Information
- The cooling performance of the machine is influenced by:
- External temperature
- Initial product temperature
- Sugar percentage in the product
- Thickness/Temperature settings
- In order to reduce startup time, it is strongly recommended that you not fill the bowl with warm or room temperature products. It is recommended to chill the product beforehand.
- When refilling or topping off a product, it is highly recommended that you chill the added product beforehand.
- If the product is a mixture of water and concentrate, it needs to be mixed before adding to the bowl.
Troubleshooting
CAUTION
Problems marked with this symbol must be handled by a specialized technician.
| PROBLEM | CAUSE | SOLUTION |
|
THE MACHINE DOES NOT TURN ON | The Main Switch is not set to I | Set the Main Switch to I |
| The machine is not plugged in | Plug the machine into the outlet | |
| Electric cable defective | Replace the electric cable | |
| The Main Switch is defective | Replace the switch | |
|
THE MACHINE DOES NOT MAKE THE PRODUCT INTO SLUSH | The Spiral Blade Switch is set to 0 | Set the Spiral Blade Switch to I |
| The Beverage Type Control Switch is not set to I | Set the Beverage Type Control Switch to I | |
| Product has too high of a sugar content | Remove product and dilute in a separate container | |
| Wrong Thickness Control setting | Set Thickness Control correctly (see Fig. 3) | |
| Insufficient ventilation or nearby heat source | Move the machine so it has adequate ventilation and is far away from heat sources (see Fig. 1) | |
| Leaking refrigerant | Restore and recharge the cooling system | |
| Dust accumulation on condenser | Clean the condenser (see Fig. 14/15) | |
| The micro-switch of the Thickness Control is defective | Clean or replace the micro-switch | |
| THE SPIRAL BLADE DOES NOT TURN | Spiral Blade Switch set to 0 | Set Spiral Blade Switch to I |
| Ice accumulation in bowl | Switch the Main Switch OFF and wait for ice to melt | |
| Spiral Blade Switch is defective | Replace the Spiral Blade Switch | |
| THE SPIRAL BLADE MAKES NOISE | Insufficient lubrication | Lubricate all areas correctly (see Fig. 16-18) |
| DISPENSING TAP IS LEAKING | Dispensing Tap Valve (C) is defective | Replace the Tap Valve (C) |
| Insufficient lubrication | Lubricate Tap Valve (C) correctly (see Fig. 22) | |
| DISPENSING TAP DOES NOT DISPENSE PRODUCT | Ice accumulation in bowl | Switch the Main Switch OFF and wait for ice to melt |
Electrical Diagrams
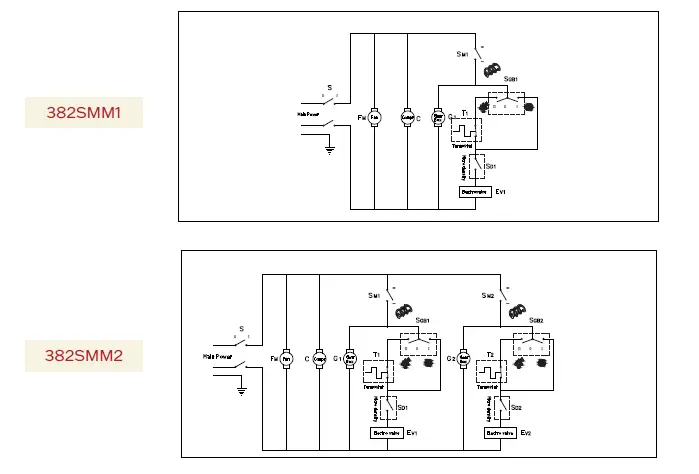

| S | Main power switch |
| G 1,2 | Motor-gearbox |
| FM | Fan motor |
| C | Compressor |
| T 1,2 | Drink thermostat |
| SD 1,2 | Thickness micro-switch |
| EV 1,2 | Electro valve |
| SM 1,2 | Spiral blade switch |
| SGB 1,2 | Slush/drink switch |
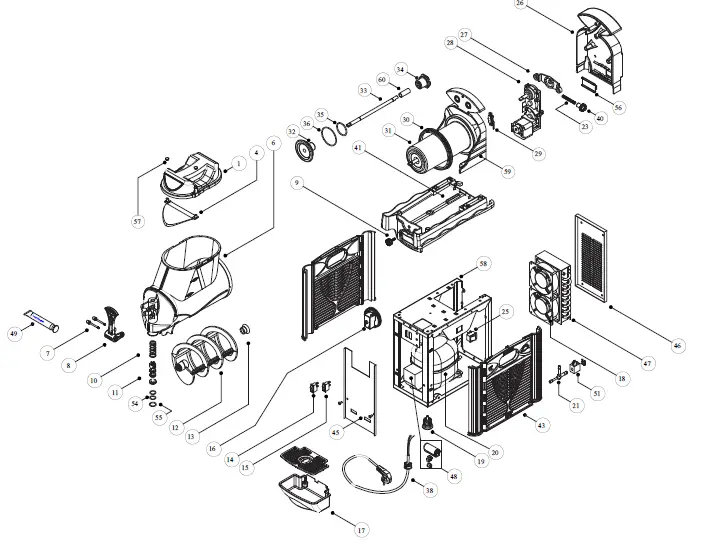
Parts Diagram – SMM1
| NO. | CODE | DESCRIPTION |
| 1 | 3016 | Lid |
| 4 | 3014 | Curved Profile |
| 6 | 3015 | Bowl |
| 7 | 2150 | Rotation Pin |
| 8 | 2117 | Tap Lever |
| 9 | 2149 | Fixing Knob |
| 10 | 2120 | Tap Spring |
| 11 | 3004 | Tap Valve |
| 12 | 3003 | Spiral Blade |
| 13 | 2115 | Spiral Blade Gasket |
| 14 | 2137 | Slush/Drink Switch |
| 15 | 56 | Spiral Blade Switch |
| 16 | 2160 | Thermostat |
| 17 | 0666 | Complete Drip Tray |
| 18 | 182 | Fan Motor 220-240V • 50/60Hz |
| 18 | 68 | Fan Motor 115V • 60Hz |
| 19 | 0159 | Rubber Leg H=35 |
| 20 | * | Compressor 220-240V • 50/60Hz |
| 20 | * | Compressor 115V • 60Hz |
| 21 | * | Electrovalve |
| 23 | 2157 | Thickness Control Spring |
| 25 | 57 | Main Switch |
| 26 | 2108 | Back Support Cover |
| 27 | 2131 | Motor-Gearbox Support |
| 28 | * | Motor-Gearbox 220/115V • 50/60Hz |
| 29 | 2168 | Micro-Switch |
| 30 | 2116 | Bowl Gasket |
| 31 | 3005 | Evaporator |
| 32 | 2145 | Evaporator Cover |
| 33 | 3007,01 | Transmission Shaft |
| 34 | 2111 | Metal Ring M25 |
| 35 | 2123 | Evaporator Cover Inner OR (Small) |
| 36 | 154 | Evaporator Cover Inner OR (Large) |
| 37 | 2159 | Complete Lid |
| 38 | * | Cable Cord |
| 40 | 2169 | Thickness Control Knob |
| 41 | 3017 | Evaporator Plate |
| 43 | 3008 | Side Panel |
| 45 | 3021 | Front Panel |
| 46 | 3024 | Back Panel |
| 47 | 2175,01 | Condenser |
| 48 | * | Electric Parts Kit |
| 49 | 2118 | Lubricant Tube |
| 51 | 2105 | Coil 220V • 50/60Hz |
| 51 | 2183 | Coil 115V • 50/60Hz |
| 54 | 3004,01 | Tap Valve OR (Small) |
| 55 | 3004,02 | Tap Valve OR (Large) |
* Mention Compressor Model & Voltage
Parts Diagram – SMM2

| NO. | CODE | DESCRIPTION |
| 1 | 3016 | Lid |
| 4 | 3014 | Curved Profile |
| 6 | 3015 | Bowl |
| 7 | 2150 | Rotation Pin |
| 8 | 2117 | Tap Lever |
| 9 | 2149 | Fixing Knob |
| 10 | 2120 | Tap Spring |
| 11 | 3004 | Tap Valve |
| 12 | 3003 | Spiral Blade |
| 13 | 2115 | Spiral Blade Gasket |
| 14 | 2137 | Slush/Drink Switch |
| 15 | 56 | Spiral Blade Switch |
| 16 | 2160 | Thermostat |
| 17 | 0666 | Complete Drip Tray |
| 18 | 182 | Fan Motor 220-240V • 50/60Hz |
| 18 | 68 | Fan Motor 115V • 60Hz |
| 19 | 0159 | Rubber Leg H=35 |
| 20 | * | Compressor 220-240V • 50Hz |
| 20 | * | Compressor 115V • 60Hz |
| 21 | * | Electrovalve |
| 23 | 2157 | Thickness Control Spring |
| 25 | 57 | Main Switch |
| 26 | 2108 | Back Support Cover |
| 27 | 2131 | Motor-Gearbox Support |
| 28 | * | Motor-Gearbox 220/115V • 50/60Hz |
| 29 | 2168 | Micro-Switch |
| 30 | 2116 | Bowl Gasket |
| 31 | 3005 | Evaporator |
| 32 | 2145 | Evaporator Cover |
| 33 | 3007,01 | Transmission Shaft |
| 34 | 2111 | Metal Ring M25 |
| 35 | 2123 | Evaporator Cover Inner OR (Small) |
| 36 | 154 | Evaporator Cover Inner OR (Large) |
| 37 | 2159 | Complete Lid |
| 38 | * | Cable Cord |
| 40 | 2169 | Thickness Control Knob |
| 41 | 3017 | Evaporator Plate |
| 43 | 3008 | Side Panel |
| 45 | 3021 | Front Panel |
| 46 | 3024 | Back Panel |
| 47 | 2175,01 | Condenser |
| 48 | * | Electric Parts Kit |
| 49 | 2118 | Lubricant Tube |
| 51 | 2105 | Coil 220V • 50/60Hz |
| 51 | 2183 | Coil 115V • 50/60Hz |
| 54 | 3004,01 | Tap Valve OR (Small) |
| 55 | 3004,02 | Tap Valve OR (Large) |
* Mention Compressor Model & Voltage
[email protected] | CarnivalKingSupplies.com


