
wizarPOS PDF417 Cloud POS Scanner Instruction Manual
Introduction
Purpose
This document describes the instruction of using Scan Service, including interface description, parameter description, and methods of calling the services.
User
The reader of this document is a developer who uses the Scan Service.
Project Background
Overview
The smart POS currently use enhanced and customized Android system as the OS, and as for the scan function, the Android system does not come with the barcode scan/2D barcode scan function, but use open source services, such as Zxing/Zbar. Many of the Android Apps that are used on smart POS devices, have already realized a very quick scan function.
However, there are many other applications are developed based on smart POS, not ready-made commercial applications. And many of the smart POS developers also have POS industry background, not professional Android developers. So when they start developing applications, they want to be provided with a convenient scan API , instead of learning Zxing/Zbar themselves.
From the hardware point of view, the scan parts used on smart POS, are not necessarily the standard camera, there will be some transformation. In some cases, the scan part will be required to be a specialized hardware. Therefore, the direct use of Zxing /Zbar is not really applicable for the smart POS, but need some modification and customization.
For the reasons above, we consider to develop Scan Services to facilitate the third-party developers in developing applications with scan function.
Scan Service Usage
The scan service is an app and started by using AIDL. The third-party app’s custom their UI through by transfer some parameters.
Interface and parameter description
Interface description
ScanBarcode
This interface is a synchronous call interface.
When the application calls the interface, the scan service opens the camera as defined by the scan parameter and starts the scan. After the scan, the camera is turned off and the results are returned immediately
ScanResult scanBarcode(ScanParameter parameter);
- Parameter: ScanParameter
- Return: ScanResult
Start Scan
This interface is an asynchronous call interface, indicating the continuous scan is started.
When the application calls this interface, the scan service opens the camera as defined by the scan parameter and starts the scan. After each scan, the results will be returned during the callback. After each callback is done, the next scan process starts.
void startScan(ScanParameter parameter, IScanCallBack callBack); Parameter: ScanParameter, IScanCallBack
Return: void
FoundBarcode in IScanCallBack
When calling startScan(), the parameter IScanCallBack must be implement. The caller can get the ScanResult through this interface. When this interface is called, the scan service is in the pause state, and after the call is returned, the next scan action will be continued.
You can turn off the scan service that is in pause with “stopScan”.
oid foundBarcode(ScanResult result);
Parameter: ScanResult
Return: Void
StopScan
Stop the continuous scan, and turn off the scan service’s UI. After stop, other callers can call startScan, or scanBarcode interface.
Return:
Boolean, true/false.
getScanType(int index)
Get scanner type.
String getScanType(int index);
Parameter:
Int 0 or 1;
Return:
String “Scanner” or “Camera” or “Error”;
Parameter Description
ScanParameter
ScanParameter is a parameter object, it defines the parameters that need by the scanner service. method: set(String key, String value) (Value Not case sensitive)
| Key | Value Type | Value | Description | ||||
| window_top | int | Default: 0, Range: >0 | The distance to the screen top. Effect in overlay mode. (dp) | ||||
| window_left | int | Default: 0, Range: >0 | The distance to the screen left. Effect in overlay mode. (dp) | ||||
| window_width | int | Default: screen width Range: >0 | Screen mode. (dp) | width. | Effect | in | overlay |
| window_height | int | Default: screen height Range: >0 | Screen height. Effect in overlay mode. (dp) | ||||
| enable_scan_sectio n | boolean | Default: true Range: true/false | false: all the display window is the area for scanner, remove the scanner frame. true: customize the area of the scanner, has a scanner frame, the other part is semitransparent, the scanner frame is in center, can adjust the width or the height of the scanner frame. | ||||
| scan_section_width | int | Default: 300dip Range: >0 | The width of the scanner frame. | ||||
| scan_section_heigh t | int | Default: 300dip Range: >0 | The height of the scanner frame. | ||||
| display_scan_line | String | Default: moving Range: No/fixed/moving | Display the red line in scanner area. NO: Not display Fixed: In center Moving: Move up and down | ||||
| enable_flash_icon | boolean | W1 上 Default:true Q1 上 Default:false | Whether to display the hover button of controlling the flash. | ||||
| Range: true/false | |||||||
| enable_switch_icon | boolean | Default: true Range: true/false | Whether to display the hover button of switching camera. | ||||
| enable_indicator_lig | boolean | Default: false | Whether to display the indicator | ||||
| ht | Range: true/false | light buton, only supported in Q1. | |||||
| decodeformat | String | Default: BARCODE_ALL | Decode format range. Default is BARCODE_ALL, the formats are separated by “,”. | ||||
| decoder_mode | int | Default: 2 Range: 0/1/2 | Decode mode: 0: mode1 1: mode2 2: mode3 | ||||
| enable_return_imag e | boolean | Default: false Range: true/false | Whether image. | to | return | the | scanned |
| camera_index | int | Default: 0 Range: 0/1/2 | 0: main scanner(fixed camera). 1: second scanner(zomm camera). 2:customer display camera. | ||||
| scan_time_out | long (ms) | Default: -1 Range: >0 | <=0:scan forever >0:scan with timeout, when timeout, return timeout error, only effected in synchronized interface. | ||||
| scan_section_bord er_color | int | Default: Color.WHITE | The color of scan border, use Color.argb | ||||
| scan_section_corne r_color | int | Default: Color.argb(0xFF, 0x21, 0xDB, 0xD5) | The color of the scan corner | ||||
| scan_section_line_ color | int | Default: Color.RED | The color of the scan line | ||||
| scan_tip_text | String | Default: auto scan when grab the scanned picture | The tip text under the scan border | ||||
| scan_tip_textSize | int | Default: 15 | The size of the tip text Unit: sp | ||||
| scan_tip_textColor | int | Default: Color.WHITE | The color of the tip text | ||||
| scan_tip_textMargi n | int | Default: 30 | The distance between the tip text and the bottom of the screen Unit: dp | ||||
| flash_light_state | boolean | Default: false | Initial state of flash light true: opened false: closed | ||||
| indicator_light_state | boolean | Default: false | Initial state of indicator light true: opened false: closed | ||||
| scan_mode | String | Default: dialog | Scanner window mode dialog: activity with specified UI overlay:only has scanner window, without UI titles, UI buttons, the scanner window on top of other UI activities |
| scan_camera_expo sure | int | Default:0 | Camera exposure compensation for zoom camera |
| scan_time_limit | int | Default:50 | The max decode time |
| enable_mirror_scan | boolean | Default:false | Enable mirror scan Default is false, closed |
| enable_hands_free | boolean | Default:true | Enable handsfree will start motion detecting and motion illumination. Generally, when scan continually should enable it. Only for Zebra scanner. |
| enable_ui_by_zebr a | boolean | Default:true | true: display UI, false: hide UI. If hide UI, the speed of start scanner will faster. Only for Zebra scanner. |
| enable_mobile_pho ne_screen_mode | boolean | Default:false | true: improves bar code reading performance on mobile phones and electronic displays, but may increase decode time. So if don’t need to scan code from phone, please set it false. Only for Zebra scanner. |
| enable_upca_count ry | boolean | Default:true | true: after UPC_A decoding, show country code at the first place; false: after UPC_A decoding, hide country code at the first place. Only for Zebra scanner. |
| enable_decoding_ill umination | boolean | Default:true | Enabling illumination usually results in superior images. The effectiveness of illumination decreases as the distance to the target increases. true: Enable Decoding Illumination, the decoder turns on illumination every image capture to aid |
| decoding. false: Disable Decoding Illumination, the decoder does not use decoding illumination. Only for Zebra scanner. | |||
| enable_motion_illu mination | boolean | Default:false | true: turns on motion illumination in hands-free and auto aim trigger modes. false: turns off motion illumination. This parameter only applies to hands-free mode. Only for Zebra scanner. |
Scanner mode
In dialog mode, the scanner UI has drawed by the camera scanner service, the third app don’t need to consider about the UI.
In overlay mode, the camera scanner service only provide the scanner window, the window will display on top of the third app UI. So the third app can draw the UI by itself, such as the title, the buttons. In this mode, if the app need to switch the camera, the flash light, the indicator light, it must use the broadcast like belows:
- Camera:
Broadcast Action : com.cloudpos.scanner.setcamera
Broadcast Key: overlay_config
value: 0 Fixed camera;1 zoom camera; 2 customer display camera - Flash light:
Broadcast Action : com.cloudpos.scanner.setflashlight Broadcast Key: overlay_config
Value: true opened; false closed - Indicator light:
Broadcast Action : com.cloudpos.scanner.setindicator Broadcast Key : overlay_config
Value: true opened; false closed
Sample Code:
// open the flash light
Intent intent = new Intent();
intent.setAction(ScanParameter.BROADCAST_SET_FLASHLIGHT);
intent.putExtra(ScanParameter.BROADCAST_VALUE, true);
sendBroadcast(intent);
Zebra Scanner
Zebra scan requires the following conditions:
- Exist Zebra
- Set the parameter “camera_index” to 0- main
- When screen black, the imager can not
- Set the parameter “enable_ui_by_zebra” to false- hide the default UI from syestem
ScanResult
| Field | Type | Description |
| resultCode | Int | >=0: Success <0: Failure See also Error Code |
| text | String | The text result, return null when error occurred, the format of the text is UTF-8, if need the other format, please get the raw buffer and change by yourself. |
| rawBuffer | Byte[] | The raw buffer |
| bitmap | Bitmap | The scanned image, it will return when set the parameter enable_return_image is true. |
| barcodeFormat | String | barcodeFormat, see Appendix |
Error Code
| Value | Description |
| 1 | Success |
| 0 | Cancel |
| 2 | The scan UI fully display |
| -1 | The service has been occupied |
| -2 | Can not open the camera |
| -3 | Scan timeout |
| -4 | Illegal parameter |
Usage
Scanner service integration
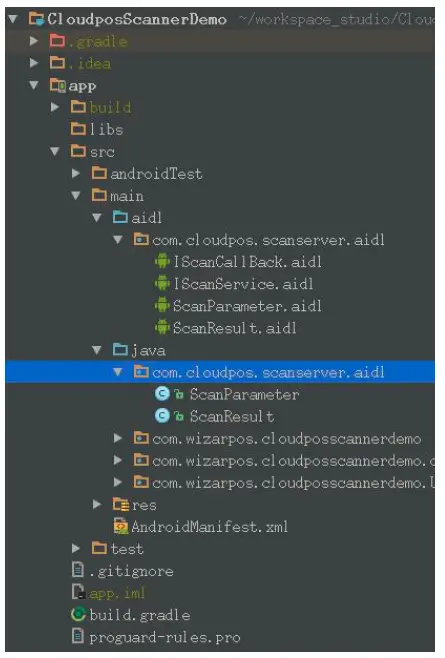
The scanner service use AIDL, so the third-party apps must include the AIDL files( get from \source\aidl from barcode SDK package). The follows are described the methods of integrating in Eclipse and Android Studio.
The files includes: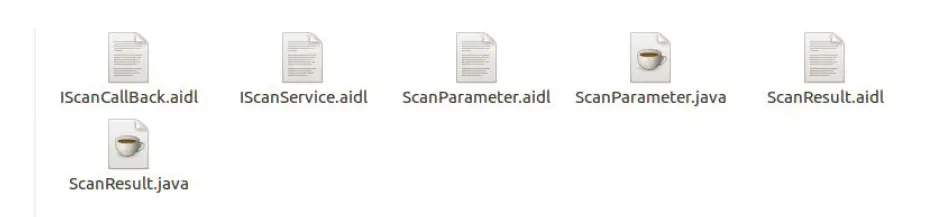
In Eclipse, put all the files in to the package: com.cloudpos.scanserver.aidl.
In Android Studio, firstly put the AIDL files in the package(com.cloudpos. scanserver.aidl) , the package is in folder (src—main—aildl), if the package and the folders are not existed, please make them first.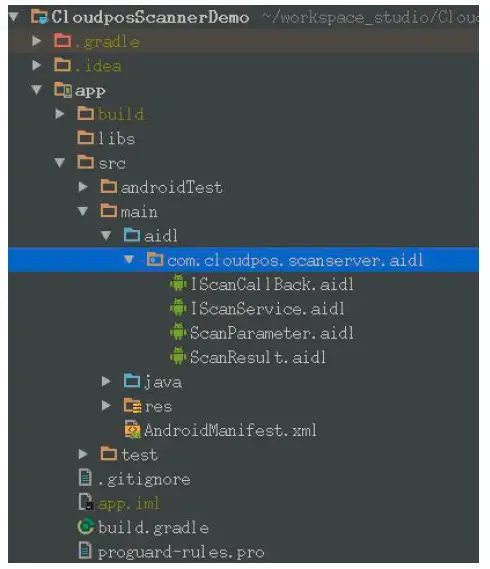
And then, put the two java files in the package(com.cloudpos.scanserver.aidl), the package is in folder(src—main–java), if the package and the folders are not existed, please
make them first.
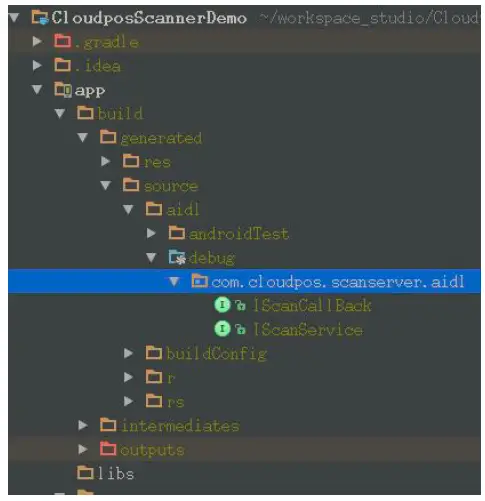
clean project, if compiled success in folder: build—generated—source—aidl—debug, then the app can call the scanner service successfully.
Bind service
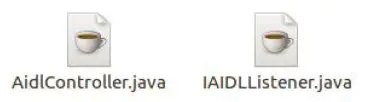
We have provided the API for bind service. Put the interface and the implement in any package. Get from \source\aidlControl from barcode SDK package.
- Use the follow method to bind service:
AidlController.getInstance().startScanService(this, this); - Implement the interface IAIDLListener. Get the scanner service, use the service to call the functions. private IScannService scanService; //Scanner service
private ServiceConnection scanConn;
@Override
public void serviceConnected(Object objService, ServiceConnection connection) {if(objService instanceof IScannService){scanService = (IScannService) objService; scanConn = connection;}}
Use this function to unbind service.
if(scanService != null){this.unbindService(scanConn); scanService = null; scanConn = null;}
Please see also the demo project for detail.
Appendix
Barcode Format
Example:
ScanParameter parameter = new ScanParameter(); parameter.set(ScanParameter.KEY_DECODEFORMAT, ” SymbologyType_Aztec, ITF “);
| compound barcode format | ||
| BARCODE_ALL | Includes all the barcodes in the table | |
| BARCODE_1D | Includes all the 1D barcodes in the table | |
| BARCODE_2D | Includes all the 2D barcodes in the table | |
| Barcode format | ||
| AZTEC | 2D barcode | |
| DATAMATRIX | 2D barcode | |
| QR | 2D barcode | |
| MAXICODE | 2D barcode | |
| PDF417 | 2D barcode | |
| CODABAR | 1D barcode | |
| CODE39 | 1D barcode | |
| CODE93 | 1D barcode | |
| CODE128 | 1D barcode | |
| EAN8 | 1D barcode | |
| EAN13 | 1D barcode | |
| ITF | 1Dbarcode(Interleaved Two of Five) | |
| RSS_14 | 1D barcode | |
| RSS_EXPANDED | 1D barcode | |
| UPCA | 1D barcode | |
| UPCE | 1D barcode | |
| CODE11 | 1D barcode | |


