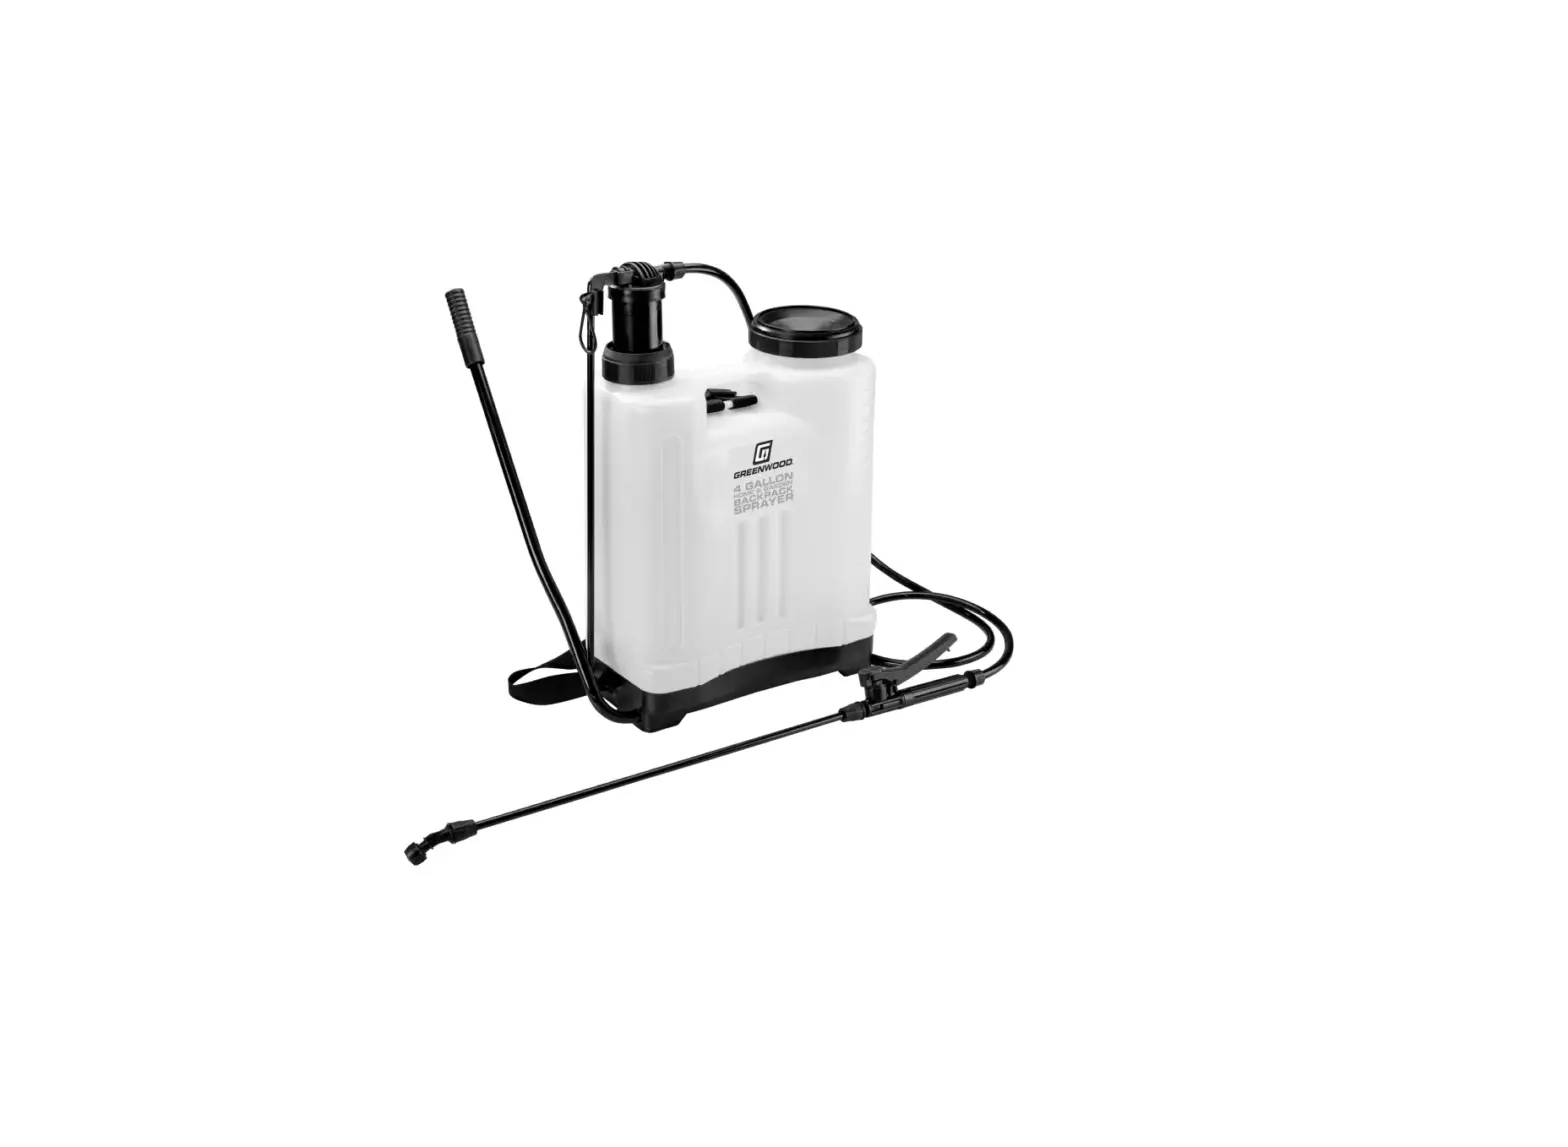
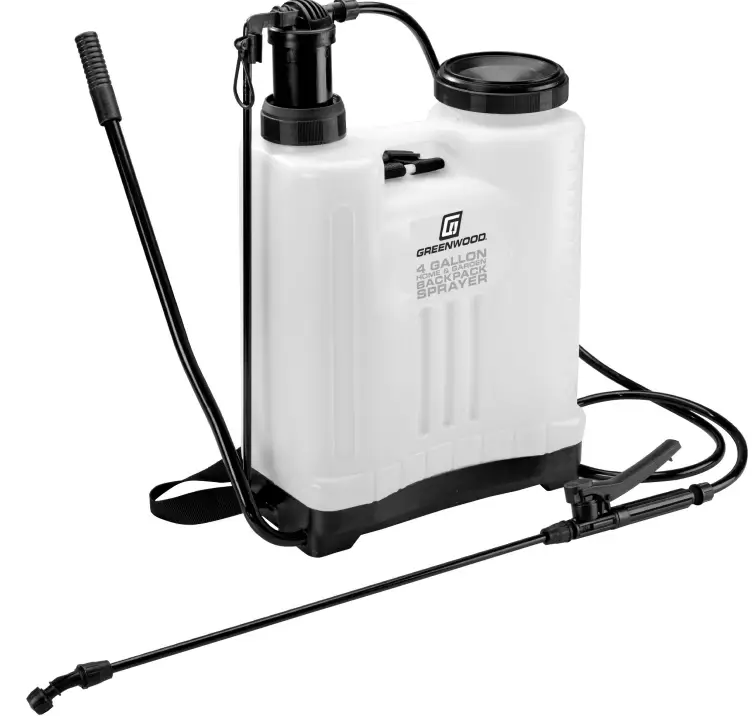
GREEWOOD 63092 4 gallon Backpack Sprayer Instruction Manual
Save This Manual Keep this manual for the safety warnings and precautions, assembly, operating, inspection, maintenance and cleaning procedures. Write the product’s serial number in the back of the manual (or month and year of purchase if product has no number). Keep this manual and the receipt in a safe and dry place for future reference.
Visit our website at: http://www.harborfreight.com
Email our technical support at: [email protected]
When unpacking, make sure that the product is intact and undamaged. If any parts are missing or broken, please call 1-888-866-5797 as soon as possible.
Safety
| WARNING SYMBOLS AND DEFINITIONS | |
| This is the safety alert symbol. It is used to alert you to potential personal injury hazards. Obey all safety messages thatfollow this symbol to avoid possible injury or death. | |
| Indicates a hazardous situation which, if not avoided, will result in death or serious injury. | |
| Indicates a hazardous situation which, if not avoided, could result in death or serious injury. | |
| Indicates a hazardous situation which, if not avoided, could result in minor or moderate injury. | |
| Addresses practices not related to personal injury. | |
IMPORTANT SAFETY INSTRUCTIONS
![]() WARNING
WARNING
Read all safety warnings and all instructions.
Failure to follow the warnings and instructions may result in serious injury
Save all warnings and instructions for future reference.
Personal Safety
- Dress Properly – Do not wear loose clothing or jewelry. They can be caught in moving parts. Use of rubber gloves and substantial footwear is recommended when working outdoors. Wear protective hair covering to contain long hair.’
 Wear ANSI-approved safety goggles and heavy-duty work gloves. Use face or dust mask if operation is dusty
- Follow all guidelines regarding chemicals sprayed, including MSDS instructions and EPA regulations.
- If the amount of weight you can lift safely is limited, do not fill the Tank completely to prevent strain and injury.
- Do not Overreach – Keep proper footing and balance at all times.
- Stay Alert – Watch what you are doing. Use common sense. Do not operate appliance when you are tired.
Work Area
- Keep your work area clean and well lit. Cluttered dark areas invite accidents.
- The work area should have adequate drainage to reduce the possibility of a fall due to slippery surfaces.
- Keep bystanders, children, and visitors away while operating the Sprayer. Distractions can cause you to lose control.
Gardening Appliance Use and Care
- Use only for water or water-based fertilizers, herbicides, pesticides and sealers. Do not use to spray combustible chemicals such as, but not limited to gasoline, kerosene, mineral oil, etc., or to spray corrosive chemicals such as but not limited to bleach, vinegar, etc.
- Do not point the Sprayer at yourself, other people or animals.
- Industrial applications must follow OSHA requirements.
- Make sure the liquid used in the Sprayer is not dirty or sandy.
- This product is not a toy. Do not allow children to play with or near this item.
- Use as intended only. Inspect before every use; do not use if parts are loose or damaged.
- Maintain product labels and nameplates. These carry important safety information. If unreadable or missing, contact Harbor Freight Tools for a replacement.
- The warnings and cautions discussed in this manual cannot cover all possible conditions and situations that may occur. The operator must understand that common sense and caution are factors that cannot be built into this product, but must be supplied by the operator.
Service
- Have your Sprayer serviced by a qualified repair person using only identical replacement parts. This will ensure that the safety of the tool is maintained.
- Store idle tools and equipment out of reach of children and other untrained people. Tools and equipment are dangerous in the hands of untrained users.
- Maintain the Sprayer with care. Keep this product clean. A properly maintained Sprayer is easier to control.This will ensure that the safety of the tool is maintained.
- Store idle tools and equipment out of reach of children and other untrained people. Tools and equipment are dangerous in the hands of untrained users.
- Maintain the Sprayer with care. Keep this product clean. A properly maintained Sprayer is easier to control.
![]() SAVE THESE INSTRUCTIONS.
SAVE THESE INSTRUCTIONS.
Setup
Specifications
| Tank Capacity | 4 Gallons |
| Empty Weight | 6.4 lb |
| Full Weight | 40.4 lb |
Set Up Instructions
![]() Read the ENTIRE IMPORTANT SAFETY INFORMATION section at the beginning of this manual including all text under subheadings therein before set up or use of this product.
Read the ENTIRE IMPORTANT SAFETY INFORMATION section at the beginning of this manual including all text under subheadings therein before set up or use of this product.
Operation
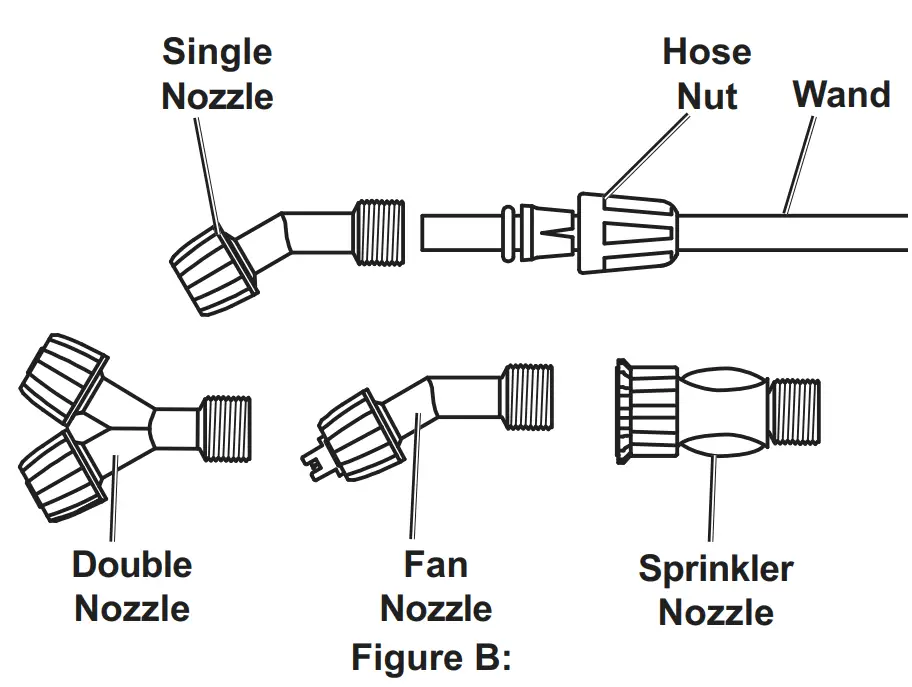
Assembling the Wand
- Insert end of Wand into end Wand Handle Assembly.
- Slide Hose Nut (27) over threaded end of Handle, then tighten Hose Nut securely


Maintenance
Changing the Nozzle
- Loosen Hose Nut (27) and remove Single Nozzle (52) from end of Wand.
- Choose another Nozzle:
- (a).Double Nozzle (53)
- (b). Fan Nozzle (54)
- (c). Sprinkler Nozzle (55)
- Slide Nozzle over end of Wand, slide Hose Nut over threads of Nozzle, then tighten Hose Nut securely

Safety
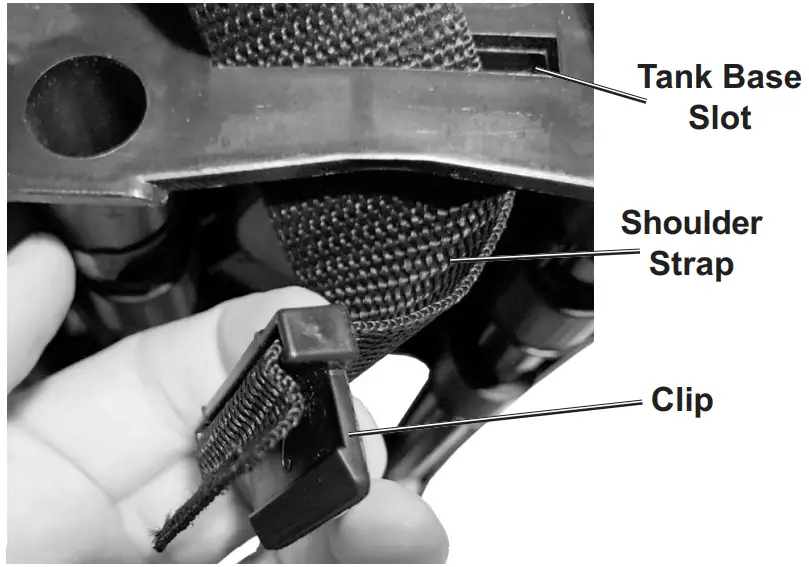
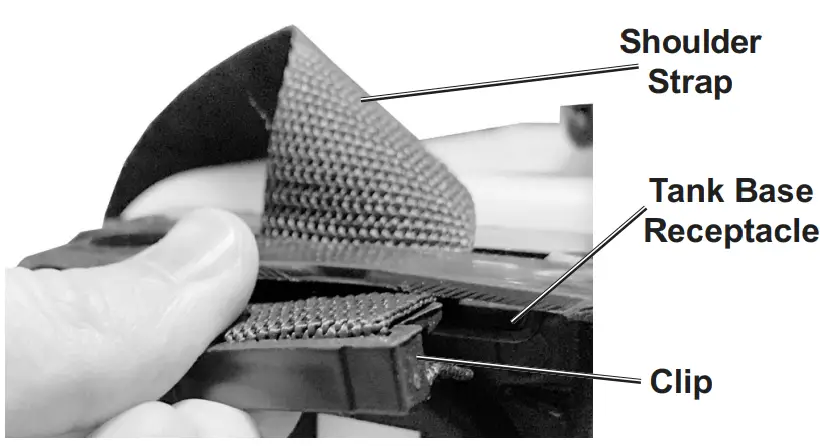
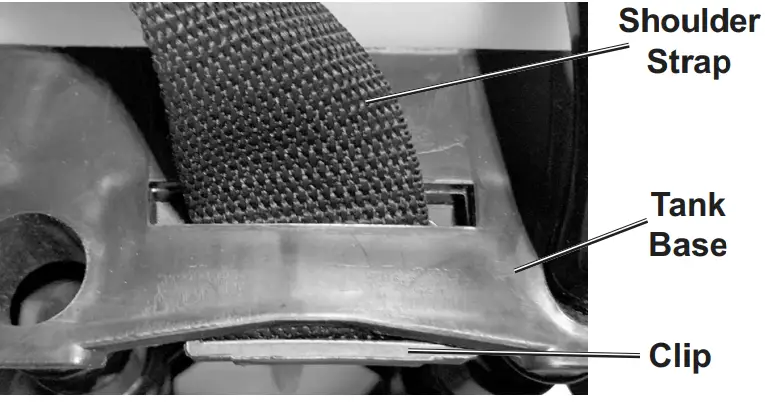
Strap Attachment
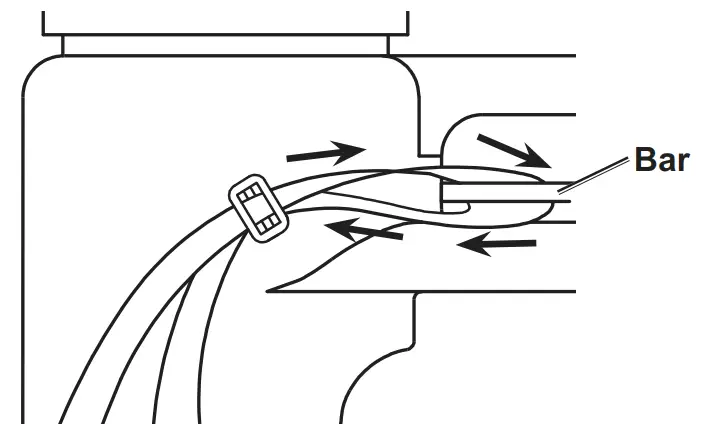
To attach or remove straps from the Sprayer:
- Pass the end of the Shoulder Strap over the bar and through the back of the Buckle. Repeat for the second Shoulder Strap

- Route the Shoulder Strap through the Slot in the Tank Base and through the Clip.

- Rotate the Clip with its Shoulder Strap and insert the Clip into the Receptacle on the Tank Base as illustrated

- Push the Clip fully into the Tank Base Receptacle until it clicks into place.

Operation
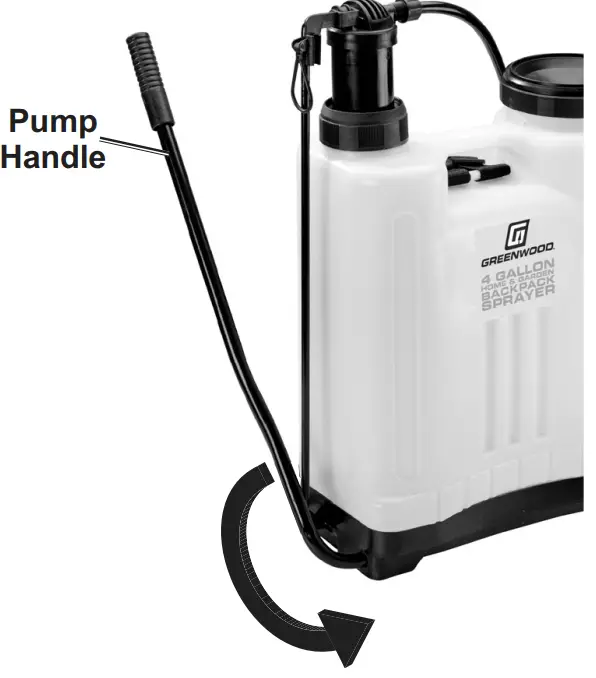
Pump Handle Orientation
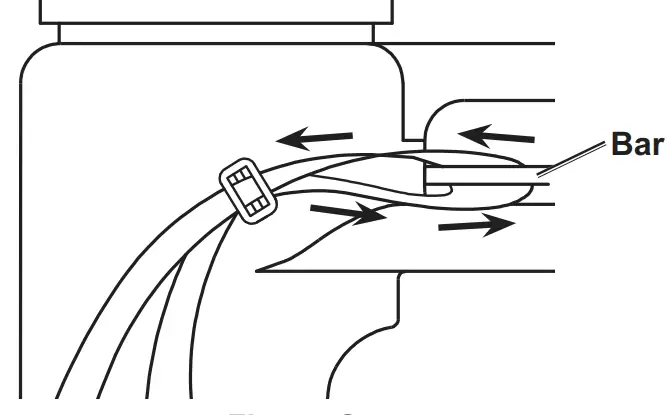
To change the side that the Pump Handle is on:
- Pass the end of the Shoulder Strap through the back of the Buckle, then around the bar until it is free.
- Route the Shoulder Strap to the other side of the Tank, then reattach the Shoulder Strap. Repeat for the second Shoulder Strap.

- Rotate the Pump Handle downwards and back up to the other side.

Safety
Functions
Safety
Operating Instructions
![]() Read the ENTIRE IMPORTANT SAFETY INFORMATION section at the beginning of this manual including all text under subheadings therein before set up or use of this product.
Read the ENTIRE IMPORTANT SAFETY INFORMATION section at the beginning of this manual including all text under subheadings therein before set up or use of this product.
Setup
General Operation
WARNING! Follow all guidelines regarding chemicals sprayed, including MSDS instructions and EPA regulations.
CAUTION! If the amount of weight you can lift safely is limited, do not fill the Tank completely to prevent strain and serious injury.
- Remove Tank Lid and fill Tank through a strainer (sold separately) no higher than top fill line. Replace Tank Lid.
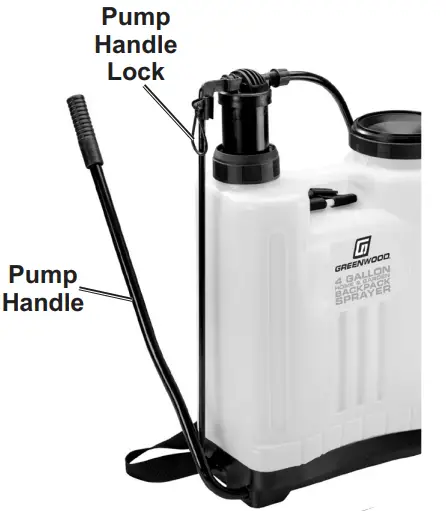
- Disengage the Pump Handle from the Pump Handle Lock.

- Strap the Sprayer to your back.
- Adjust Shoulder straps as needed.
- Raise and lower the Pump handle to build up sufficient pressure.
- Point the Nozzle toward the area to be sprayed, then depress the Trigger to begin spraying.
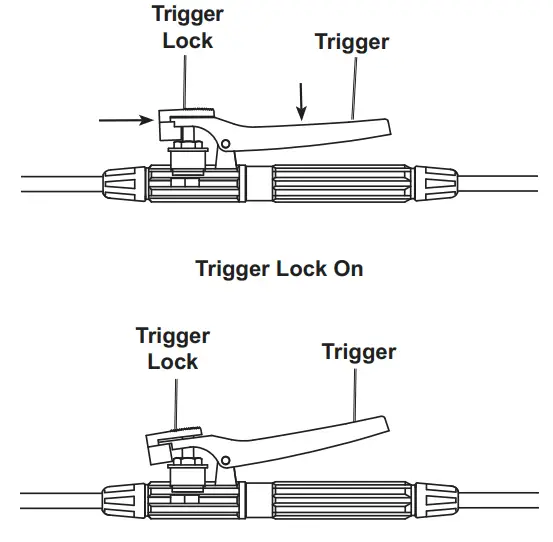
- For continuous spray, press the Trigger down and push the Trigger Lock back, then release the Trigger. To stop continuous spray, press the Trigger down and push the Trigger Lock forward, then release the Trigger.

- As you spray, the Sprayer will depressurize. When decreased pressure is affecting spray pattern, pump the Pump Handle until proper pressure is achieved, then resume spraying, or pump the Pump Handle continuously, maintaining a steady rhythm to maintain pressure while spraying.
- When finished spraying:
a. Point Wand is safe direction and depressurize the Tank by pressing down on the Trigger.
b. Dispose of liquid according to manufacturer guidelines.
c. Clean the Sprayer according to Maintenance Instructions.
Safety
Maintenance and Servicing
![]() Procedures not specifically explained in this manual must be performed only by a qualified technician
Procedures not specifically explained in this manual must be performed only by a qualified technician
![]() WARNING
WARNING
TO PREVENT SERIOUS INJURY FROM PRODUCT FAILURE:
Do not use damaged equipment. If abnormal noise, vibration, or leaking air occurs, have the problem corrected before further use. Follow all guidelines regarding chemicals sprayed, including MSDS instructions and EPA regulations.
- BEFORE EACH USE, inspect the general
condition of the Sprayer. Check for:- loose hardware,
- misalignment or binding of moving parts,
- cracked or broken parts, and
- any other condition that may affect its safe operation.
- AFTER EVERY USE, Clean the Sprayer:
a. Flush with water.
b. Clean Nozzle, Wand Handle Filter (33) and Tank Filter (21).
c. Rinse with water and allow to air-dry with the Tank Lid open.
Note: It is important to flush with water as certain products can build up which may lead to an unsafe working condition / environment - PERIODICALLY, lubricate all moving parts of the pump assembly with petroleum jelly.
- Store the Sprayer in a safe, dry, clean location out of reach of children and out of sunlight.
- BEFORE EACH USE, inspect the general
Safety
Troubleshooting
| Problem | Possible Causes | Likely Solutions |
| Unit does not spray | 1. Not enough liquid in tank.2. Sprayer not pressurized.3. Tank Lid loose.4. Hose Nuts loose.5. Pump Lid (12) loose.6. Spray fluid contains particles or sand. 7. Nozzle and/or Filter clogged with mineral buildup. | 1. Add liquid to tank.2. Pump Handle to pressurize Sprayer.3. Tighten Tank Lid.4. Tighten Hose Nuts.5. Tighten Pump Lid.6. Disassemble, clean, then reassemble Nozzle and/or Wand Handle and Tank Filters. Empty, clean, then refill Tank with properly strained fluid.7. Disassemble, clean, then reassemble Nozzle and/or Wand Handle and Tank Filters. |
| Spray pattern is undesirable | 1. Spray fluid contains particles or sand. 2. Nozzle and/or Filter clogged with mineral buildup. | 1. Disassemble, clean, then reassemble Nozzle and/or Wand Handle and Tank Filters. Empty, clean, then refill Tank with properly strained fluid.2. Disassemble, clean, then reassemble Nozzle and/or Wand Handle and Tank Filters. |
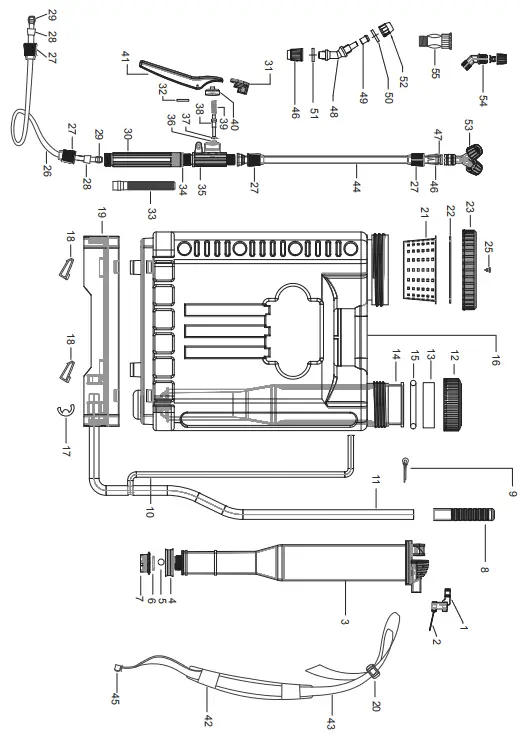
Parts List and Diagram
PLEASE READ THE FOLLOWING CAREFULLY
THE MANUFACTURER AND/OR DISTRIBUTOR HAS PROVIDED THE PARTS LIST AND ASSEMBLY DIAGRAM IN THIS MANUAL AS A REFERENCE TOOL ONLY. NEITHER THE MANUFACTURER OR DISTRIBUTOR MAKES ANY REPRESENTATION OR WARRANTY OF ANY KIND TO THE BUYER THAT HE OR SHE IS QUALIFIED TO MAKE ANY REPAIRS TO THE PRODUCT, OR THAT HE OR SHE IS QUALIFIED TO REPLACE ANY PARTS OF THE PRODUCT. IN FACT, THE MANUFACTURER AND/OR DISTRIBUTOR EXPRESSLY STATES THAT ALL REPAIRS AND PARTS REPLACEMENTS SHOULD BE UNDERTAKEN BY CERTIFIED AND LICENSED TECHNICIANS, AND NOT BY THE BUYER. THE BUYER ASSUMES ALL RISK AND LIABILITY ARISING OUT OF HIS OR HER REPAIRS TO THE ORIGINAL PRODUCT OR REPLACEMENT PARTS THERETO, OR ARISING OUT OF HIS OR HER INSTALLATION OF REPLACEMENT PARTS THERETO.
Parts List
| Part | Description | Qty | Part | Description | Qty | ||
| 1 | Pump Handle Clip | 1 | 30 | Wand Handle | 1 | ||
| 2 | Pump Handle Lock | 1 | 31 | Trigger Lock | 1 | ||
| 3 | Pump | 1 | 32 | Trigger Pin | 1 | ||
| 4 | Bowl | 1 | 33 | Wand Handle Filter | 1 | ||
| 5 | Sealing Ball | 1 | 34 | Sealing Ring | 1 | ||
| 6 | O-Ring (15.5 x 2.5) | 1 | 35 | Trigger Body | 1 | ||
| 7 | Sealing Ball Seat | 1 | 36 | Trigger Sealing Pad | 1 | ||
| 8 | Pump Handle Cover | 1 | 37 | Valve Core O-Ring | 1 | ||
| 9 | Split Pin | 1 | 38 | Valve Core | 1 | ||
| 10 | Connecting Rod | 1 | 39 | Spring | 1 | ||
| 11 | Pump Handle | 1 | 40 | Trigger Nut | 1 | ||
| 12 | Pump Lid | 1 | 41 | Trigger | 1 | ||
| 13 | Pump Sealing Washer | 1 | 42 | Shoulder Pad | 2 | ||
| 14 | Pump Cylinder | 1 | 43 | Shoulder Strap | 2 | ||
| 15 | O-Ring (57 x 3.1) | 1 | 44 | Wand | 1 | ||
| 16 | Tank | 1 | 45 | Shoulder Strap Clip | 2 | ||
| 17 | E Clip | 1 | 46 | Split Sleeve | 2 | ||
| 18 | Lock Pin | 2 | 47 | O-Ring | 2 | ||
| 19 | Tank Base | 1 | 48 | Joint | 1 | ||
| 20 | Shoulder Strap Buckle | 2 | 49 | Nozzle Sealing Ring | 2 | ||
| 21 | Tank Filter | 1 | 50 | Divider Plate | 1 | ||
| 22 | Gasket | 1 | 51 | Nozzle Plate | 1 | ||
| 23 | Tank Lid | 1 | 52 | Single Nozzle | 1 | ||
| 25 | Air Intake Plug | 1 | 53 | Double Nozzle | 1 | ||
| 26 | Hose | 1 | 54 | Fan Nozzle | 1 | ||
| 27 | Hose Nut | 4 | 55 | Sprinkler Nozzle | 1 | ||
| 28 | Hose Cover | 2 | 56 | Spare Parts Kit (Includes Parts2, 17, 27, 47×2, not shown) | 1 | ||
| 29 | Hose Insert | 2 | |||||
| 57 | Seal Kit (not shown) | 1 |
Record Product’s Serial Number Here:
Note: If product has no serial number, record month and year of purchase instead.
Note: Some parts are listed and shown for illustration purposes only, and are not available individually as replacement parts. Specify UPC 193175477422 when ordering part
Safety
Assembly Diagram
Limited 90 Day Warranty
Harbor Freight Tools Co. makes every effort to assure that its products meet high quality and durability standards, and warrants to the original purchaser that this product is free from defects in materials and workmanship for the period of 90 days from the date of purchase. This warranty does not apply to damage due directly or indirectly, to misuse, abuse, negligence or accidents, repairs or alterations outside our facilities, criminal activity, improper installation, normal wear and tear, or to lack of maintenance. We shall in no event be liable for death, injuries to persons or property, or for incidental, contingent, special or consequential damages arising from the use of our product. Some states do not allow the exclusion or limitation of incidental or consequential damages, so the above limitation of exclusion may not apply to you. THIS WARRANTY IS EXPRESSLY IN LIEU OF ALL OTHER WARRANTIES, EXPRESS OR IMPLIED, INCLUDING THE WARRANTIES OF MERCHANTABILITY AND FITNESS.
To take advantage of this warranty, the product or part must be returned to us with transportation charges prepaid. Proof of purchase date and an explanation of the complaint must accompany the merchandise. If our inspection verifies the defect, we will either repair or replace the product at our election or we may elect to refund the purchase price if we cannot readily and quickly provide you with a replacement. We will return repaired products at our expense, but if we determine there is no defect, or that the defect resulted from causes not within the scope of our warranty, then you must bear the cost of returning the product. This warranty gives you specific legal rights and you may also have other rights which vary from state to state.


