![]()
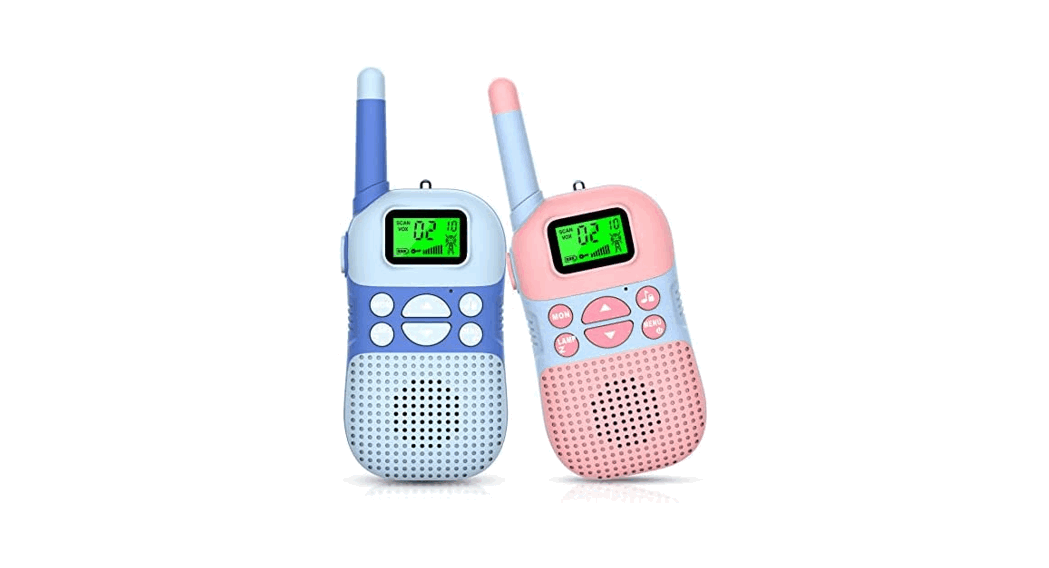
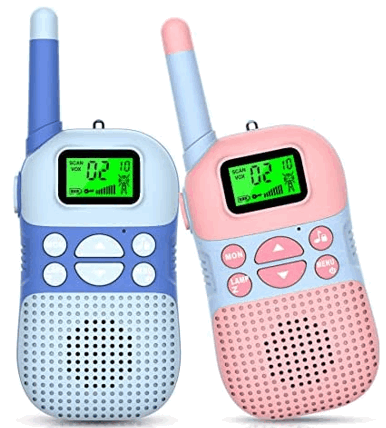
WALKIE TALKIES FOR KIDS
User Manual
WTK 188
This toy contains batteries that are nonreplaceable. Risk of fire or explosion if the battery is replaced by an incorrect type.
- About Letscool Walkie Talkie for Kid This walkie talkie is suitable for children aged 3 years old and above, having fun in families, kindergartens, and other places.
- Warranty Any defects or parts missing, please feel free to contact us for a full refund or free replacement via the amazon store or after-sale service email: [email protected] We will address your issue within 24 hours
- Product Safety Guide For your safe and efficient use of this walkie-talkie, please read the following information carefully.
- When in use, do not hold the antenna with your hands. Holding the antenna will affect the effective talking distance of the wireless walkie-talkie.
- When the portable walkie-talkie is transmitting, keep the walkie-talkie in a vertical position and keep the microphone about 2 inches away from the mouth.
- Keep the walkie-talkie antenna at least 1 inch away from the head or body when transmitting.
- The maintenance work of the walkie-talkie can only be carried out by professional and technical personnel, please do not disassemble the walkie-talkie by yourself.
- Please turn off the walkie-talkie before entering the flammable and explosive environment or the area with a detonator.
- minors are strictly forbidden to charge this machine, Do not charge the battery in a flammable and explosive environment.
- Please put it in a place that children can’t reach when charging to avoid potential safety hazards.
- Do not expose the walkie-talkie to direct sunlight for a long period of time or put it near the heating devices.
- If the battery is abnormally hot during use, charging, or storage, please stop using it.
- Do not use walkie-talkies with a damaged antenna, as the damaged antenna may cause slight burns on the contacted skin.
- This machine is not equipped with a power adapter (charger), which is sold separately. Available charger specifications: DC 5V-1A or below.
Introduction to the Walkie-Talkie
1) LCD Instruction
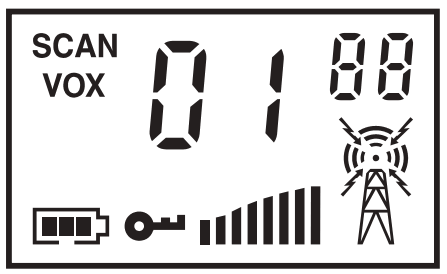
Indicator | Name | Content |
SCAN | Scanning Channel | Display when the two-way radio is turned on, disappear when turned off |
VOX | Voice Control | Displayed when it is in voice control operation mode |
| Battery | Battery Consumption | |
| Keyboard Lock | Display when the keyboard of this machine is locked (PTT, switch lights, switch machine, and MON buttons are not restricted when locked) | |
 | Channel | The current channel is displayed, press the [MENU] button, then press UP or DOWN to change |
| Volume | Volume display | |
 | Code Channel | Display current CTCSS/ DCS code (with a total of 99) |
 | Transmitting and Receiving | When receiving, |
2)Overview of the Walkie Talkie
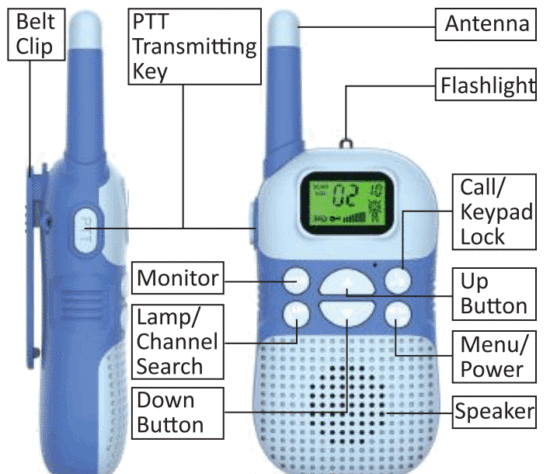
 | when the signal is weak, press this key to enter the monitoring state | |
 | [LAMP/SCAN] | Short press this button once to turn on the flashlight function and the flashlight light will stay on; long press to scan the channel. |
 | Up /Down Button | Press this key to use the adjustment parameters. Press this button in the standby mode to adjust the volume output |
 | Call/ Keyboard lock | In the standby state, short press this key to emit CALL sound, and long-press the key to lock (note: when locked, PTT, MON, switch machine, on/off light function can be used normally.) |
 | MENU/POWER | Short press or press the button continuously to select the menu item; in the menu, press the button to change the current menu settings; Long press to turn on/off |
 |
| When pressing this key, the walkie-talkie is in a transmitting state, speak into the microphone to call the other party. After releasing the key, the call will be ended, and the walkie-talkie is in a receiving state |
Basic operation
- Power ON and OFF

• In the shutdown state, press and hold the key for more than 2 seconds to turn on the radio. The radio will beep, and all icons will be displayed on the screen instantly. Then display the current channel 2/10 (channel/compression audio)
• In the power-on state, press and hold the key for more than 2S to turn off the radio.
Tips: Etiquette for using wireless walkie-talkies Press the [LAMP] key to check the channel activity. If you hear quiet noise after pressing the [LAMP] key, it means that the channel is free for use. - Communication (transmitting and receiving)

When using wireless walkie-talkies to talk to each other, the walkie-talkies of the same group must be set to the same channel and interference cancellation mute code (1 to 99). When talking with other groups without interference cancellation mute code, please set the interference cancellation mute code to OF.
•To improve the clarity of the call, speak about 5 to 7.5 cm /2″-3″ away from the microphone.
• Press and hold the call button [PTT], when the intercom is in the transmitting state, speak in a normal tone.
• Release the call key [PTT] to end the call, the machine will emit a “boom” ringtone, and the walkie-talkie is in the receiving state.
Tips: In order to achieve the best performance, it is recommended to stay at least 1.5 meters (five feet) away from each other when using the walkie-talkie to communicate. The best call range: flat and open area. - 8-level Digital Volume Adjustment

• In the standby mode, short press the [▲] key to enter the volume adjustment mode, the current volume level is displayed on the screen, press the keys to volume up or down.
Tips: Level 1 has the lowest volume and level 8 has the highest volume. - Key lock function

•The key lock function can lock the [MENU] key, the up and down buttons, and the LAMP key. It helps prevent accidental changes to the settings of the walkie-talkie. Once locked, you can only use the power key (to turn it on and off), PTT transmission function, switch on and off function, and light on and off function.
•To activate the key lock function, press and hold the lock key 0 for 3 seconds to activate the key lock function, you can see the icon appears on the screen. - Monitoring Function

• In the standby mode, when the signal is weak, long-press the [MON] key to turn on the monitoring mode, to tell if there is a call, the squelch circuit is turned off, and you will hear background noise (a beep); release the [MON] key to turn off Monitor, you cannot hear background noise. - Scanning Function
• Long press the [LAMP] key, and the machine will automatically detect the activity of the channel, when the scanned channel has a signal, the walkie-talkie will automatically stay on this channel for conversation. 5 seconds after the signal disappears, it will continue to scan the next channel. - MINI Flashlight Function
• In the power-on state, short press the [LAMP] key to turn on the flashlight function; short press the [LAMP] key again to turn it off. - Battery Level Display
• There is a battery indicator in the lower-left corner of the display to show the battery level. When the voltage drops to a preset value, the walkie-talkie will automatically shut down to protect the battery. When the battery level is indicated, the two-way radio will play a sound alert every 10 minutes or every time you release the call button to remind you to recharge the walkie-talkie.
Advanced Operation
- Set the Working Channel
1.1 In standby mode, press the [MENU] key once to enter the channel selection menu, and the current channel number starts to flash.
1.2 Press the [▲l or [▼] key to set a new channel number. 1.3 Press the [MENU] key to enter the next menu, or press the [PTT] key to save the new setting.
Note: This machine has 22 channels, the channel number is 1-22. - CTCSS Code Selection CTCSS code allows for the minimization of interference. The setting steps are as follows:
2.1 In the standby state, press the [MENU] key twice to enter the CTCSS anti-interference code setting, the LCD screen displays the current code number and flashes, and the CTCSS icon lights up;
2.2 Press [▲] or [ ▼ ] key to select 1-38 (CTCSS)
2.3 After selection, press [MENU] key to confirm and enter the next menu, or press [PTT] key to save the new setting.
Tips: You can set a special interference cancellation mute code for each channel. When talking with other groups without interference cancellation mute code, please set the interference cancellation mute code to OF - DCS Code Selection The DCS code allows you to minimize interference. The setting steps are as follows:
3.1 In the standby state, press the [MENU] key twice to enter the DCS anti-interference code setting, the LCD screen displays the current code number and flashes, and the DCS icon lights up;
3.2 Press [▲l or [▼] key to select from 39-99 (DCS); 3.3 After selection, press [MENU] key to confirm and enter the next menu, or press [PTT] key to save the new setting.
Tips: The interference cancellation mute codes of this machine include CTCSS (analog sub-audio) and DCS (digital sub-audio). - VOX Voice Control
allows you to communicate without pressing the TALK launch button, it can be invoked by talking. When you stop talking, the walkie-talkie will automatically stop transmitting and wait for the reception. The setting steps are as follows. 4.1 In standby mode, press the [MENU] key 3 times to enter the VOX voice control function setting, and the LCD screen displays VOX. 4.2 Press [▲ ] or [ ▼] key to select: OF/01/02/03 4.3 After selection, press [MENU] key to confirm and enter the next menu, or press [PTT] key to save the new setting.
Tips: After turning on the VOX voice control function, the screen will display the VOX icon. According to the noise of the use environment, select the parameters appropriately: 3=High sensitivity, use under low background noise 2=Medium sensitivity, suitable for most applications 1=Low sensitivity, use under high background noise
Note: It is recommended for you to not use VOX in noisy or windy environments. - CaII Tone Selection
The call tone is used for notifying the members of the walkie-talkie group that someone wants to speak. Press the key, and the users in the group with the same settings will hear your calling tone. This wireless walkie-talkie has 10 types of calling tones to choose from, the setting steps are as follows:
5.1 In the standby mode, press the [MENU] key 4 times to enter the call tone selection, the LCD screen displays the current call tone type, and the current call tone type continuously flashes
5.2 Press [▲] or [ ▼ ] key to select CALL tone type, 01-10 5.3 Press the [MENU] key to confirm and enter the next menu, or press the [PTT] key to save the new setting. - Keypad Tone Settings
This function allows you to turn on/off the keypad tone. The steps are as follows: 6.1 In standby mode, press the [MENU] key 5 times to enter the key tone setting, the LCD screen displays, and ON/OFF flashes.
6.2 Press [▲l or [ ▼ ] key to select keypad tone to turn on (ON) or turn off (OF).
6.3 After selection, press [MENU] key to confirm and enter the next menu, or press [PTT] key to save the new setting. - CaII End Tone
Once you turn on this function when you end the call, the walkie-talkie will emit a unique sound to let others know that you have finished speaking. The setting steps are as follows:
7.1 In standby mode, press the [MENU] key 6 times to enter tone selection: LCD screen displays, ON/OFF flashes 7.2 Press [▲l or [▼] key to select the call end tone to turn on (ON) or off (OF)
7.3 After selection, press [MENU] key to confirm and enter the next menu, or press [PTT] key to save the new setting.

 6.1 In standby mode, press the [MENU] key 5 times to enter the key tone setting, the LCD screen displays, and ON/OFF flashes.
FCC Warning:
Any changes or modifications not expressly approved by the party responsible for compliance could void the user’s authority to operate the equipment.
This device complies with part 15 of the FCC Rules. Operation is subject to the following two conditions: (1) This device may not cause harmful interference, and (2) this device must accept any interference received, including interference that may cause undesired operation.
Note: This equipment has been tested and found to comply with the limits for a Class B digital device, pursuant to part 15 of the FCC Rules. These limits are designed to provide reasonable protection against harmful interference in a residential installation. This equipment generates, uses, and can radiate radio frequency energy and, if not installed and used in accordance with the instructions, may cause harmful interference to radio communications. However, there is no guarantee that interference will not occur in a particular installation. If this equipment does cause harmful interference to radio or television reception, which can be determined by turning the equipment off and on, the user is encouraged to try to correct the interference by one or more of the following measures:
—Reorient or relocate the receiving antenna.
—Increase the separation between the equipment and receiver.
—Connect the equipment into an outlet on a circuit different from that to which the receiver is connected.
—Consult the dealer or an experienced radio/TV technician for help.
Safety Information for Radios Your wireless handheld portable transceiver contains a low-power transmitter. When the talk button is pushed, it sends out radio frequency (RF) signals. The device is authorized to operate at a duty factor not to exceed 50%. In August 1996, the Federal Communications Commission (FCC) adopted RF exposure guidelines with safety levels for handheld wireless devices.
Important FCC RF Exposure Requirements: For body-worn operation, this radio has been tested and meets the FCC RF exposure guidelines when used with accessories supplied or designated for this product. The use of other accessories may not ensure compliance with FCC RF exposure guidelines. Use only the supplied antenna. Unauthorized antennas, modifications, or attachments could damage the transmitter and may violate FCC regulations. Normal Position Hold the transmitter approximately 25 mm from your face and speak in a normal voice, with the antenna pointed up and away.
Manufacturer:
Shenzhen WenChuangFu Electronic Plastic Co., Ltd.
FL.lst Building E HongGuoXiang Industrial Area XinNan Community Pinghu Shenzhen 518000 China

MADE IN CHINA


