![]() AW01W03 52 Inch Ceiling Fan
AW01W03 52 Inch Ceiling Fan
User Guide
Safety Information
READ AND SAVE THESE INTSTRUCTIONS
- To reduce the risk of electric shock, ensure the electricity has been turned off at the circuit breaker or fuse box before you begin.
- All wiring must be in accordance with the National Electrical Code ANSI/ NFPA 70-1999 and local electrical codes. Electrical installation should be performed by a qualified licensed electrician.
- The weight of the fan is 9.6kg (21.2lb). to reduce the risk of fire, electric shock, or personal injury, mount to outlet box marked acceptable for fan support of 22.6 kg (50 lbs) or less and use mounting screws provided with the outlet box. most outlet boxes commonly used for the support of luminaires are not acceptable for fan support and may need to be replaced. consult a qualified electrician If In doubt.
- The fan must be mounted with a minimum of 7 ft. (2.1 m) clearance from the trailing edge of the blades to the floor.
- Do not operate the reversing switch while the fan blades are in motion. You must turn the fan off and stop the blades before you reverse the blade direction.
- Do not place objects in the path of the blades.
- To avoid personal injury or damage to the fan and other items, use caution when working around or cleaning the fan.
- Electrical diagrams are for reference only. Light kits that are not packed with the fan must be UL listed and marked suitable for use with the model fan you are installing. Switches must be UL General Use Switches. Refer to the instructions packaged with the light kits and switches for proper assembly.
- After making electrical connections, spliced conductors should be turned upward and pushed carefully up into outlet box. The wires should be spread apart with the grounded conductor and the equipment-grounding conductor on one side of the outlet box.
- All setscrews must be checked and retightened where necessary before installation.
![]() WARNING: To Reduce The Risk Of Personal Injury, Do Not Bend The Blade Brackets When Installing The Brackets, Balancing The Blades, Or Cleaning The Fan. Do Not Insert Foreign Objects In Between Rotating Fan Blades.
WARNING: To Reduce The Risk Of Personal Injury, Do Not Bend The Blade Brackets When Installing The Brackets, Balancing The Blades, Or Cleaning The Fan. Do Not Insert Foreign Objects In Between Rotating Fan Blades.![]() WARNING: Remove the rubber motor stops on the bottom of the fan before installing the blades or testing the motor.
WARNING: Remove the rubber motor stops on the bottom of the fan before installing the blades or testing the motor.![]() WARNING: To reduce the risk of fire or electric shock, do not use this fan with any solid-state speed control device.
WARNING: To reduce the risk of fire or electric shock, do not use this fan with any solid-state speed control device.![]() WARNING: To avoid possible electrical shock, turn the electricity off at the main fuse box before wiring. If you feel you do not have enough electrical wiring knowledge or experience, contact a licensed electrician.
WARNING: To avoid possible electrical shock, turn the electricity off at the main fuse box before wiring. If you feel you do not have enough electrical wiring knowledge or experience, contact a licensed electrician.![]() WARNING: Electrical diagrams are for reference only. Optional use of any light kit shall be UL-listed and marked suitable for use with this fan.
WARNING: Electrical diagrams are for reference only. Optional use of any light kit shall be UL-listed and marked suitable for use with this fan.![]() WARNING: To reduce the risk of fire or electric shock, this fan should only be used with fan speed control part no.
WARNING: To reduce the risk of fire or electric shock, this fan should only be used with fan speed control part no.![]() WARNING: To reduce the risk of electric shock, this fan must be installed with an isolating wall switch.
WARNING: To reduce the risk of electric shock, this fan must be installed with an isolating wall switch.![]() WARNING: Check that the outlet box is securely and the ceiling-suspended fan is mount to put let box marked acceptable for fan support of 22.6 kg ( 50 lbs ) or less.
WARNING: Check that the outlet box is securely and the ceiling-suspended fan is mount to put let box marked acceptable for fan support of 22.6 kg ( 50 lbs ) or less.![]() CAUTION: To reduce the risk of personal injury, use only the screws provided with the outlet box.
CAUTION: To reduce the risk of personal injury, use only the screws provided with the outlet box.
This equipment has been tested and found to comply with the limits for a Class B digital device, pursuant to Part 15 of the FCC Rules. These limits are designed to provide reasonable protection against harmful interference in a residential installation. This equipment generates, uses and can radiate radio frequency energy and, if not installed and used in accordance with the instructions, may cause harmful interference to radio communications. However, there is no guarantee that interference will not occur in a particular installation. If this equipment does cause harmful interference to radio or television reception, which can be determined by turning the equipment off and on, the user is encouraged to try to correct the interference by one or more of
- Reorient or relocate the receiving antenna.
- Increase the separation between the equipment and receiver.
- Connect the equipment into an outlet on a circuit different from that to which the receiver is connected.
- Consult the dealer or an experienced radio/TV technician for help.
![]() CAUTION: Any changes or modifications not expressly approved by the grantee of this device could void the user’s authority to operate the equipment. This device complies with Part 15 of the FCC Rules. Operation is subject to the following two conditions:
CAUTION: Any changes or modifications not expressly approved by the grantee of this device could void the user’s authority to operate the equipment. This device complies with Part 15 of the FCC Rules. Operation is subject to the following two conditions:
- This device may not cause harmful interference, and
- this device must accept any interference received, including interference that may cause undesired operation.
Warranty
There is no express warranty contained herein and supplier disclaims any and all warranties, including but not limited to those of merchantability and fitness for a particular purpose to the extent permitted by law. The supplier shall not be liable for incidental, consequential, or special damages arising out of or in connection with product use or performance except as otherwise provided by law.
Pre-Installation
SPECIFICATIONS
| Fan Size | Speed | Volts | Amps | Watts | RPM | CFM | N.W | G.W. | C.F. |
| 52″ | Level 1 | 120 | 0.24 | 11 | 65 | 1550 | 21.2Ib 9.6kg | 24.9Ib 11.3kg | 3.72cu.ft |
| Level 2 | 0.35 | 24 | 105 | 3200 | |||||
| Level 3 | 0.49 | 55 | 168 | 4964 |
![]() NOTE: These are approximate measures. They do not include amps and wattage used by the light kit.
NOTE: These are approximate measures. They do not include amps and wattage used by the light kit.
TOOLS REQUIRED
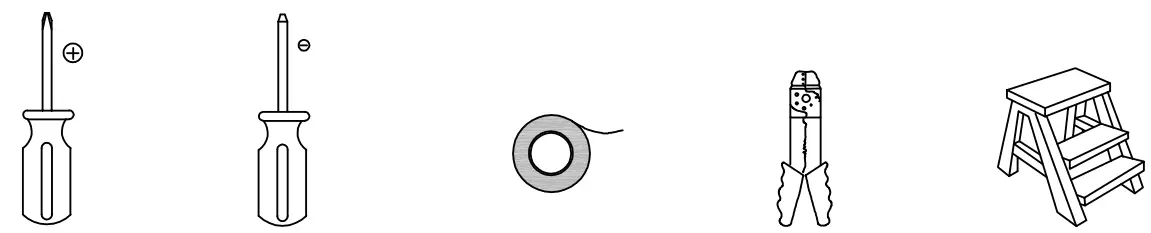 | ||||
| Phillips screwdriver | Flatblade screwdriver | Electrical tape | Wire stripper | Step ladder |
HARDWARE INCLUDED![]() NOTE: Hardware not shown to actual size.
NOTE: Hardware not shown to actual size.
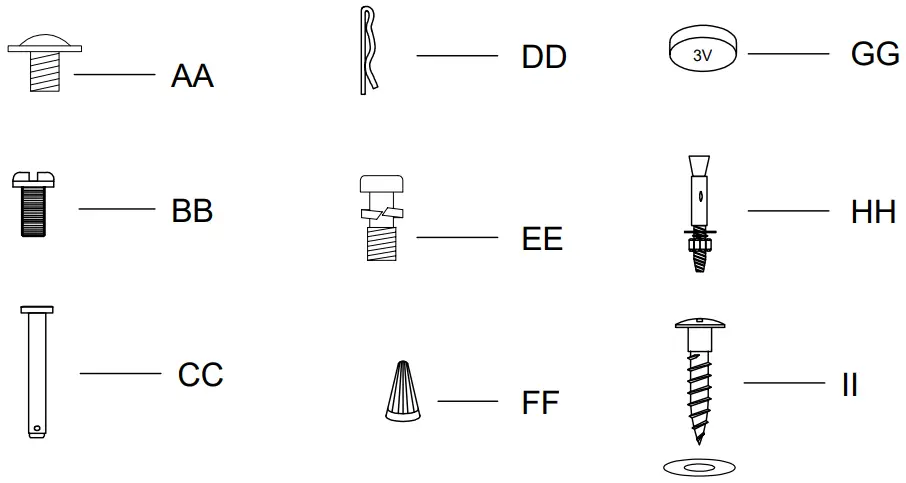
| Part | Description | Quantity |
| AA | Blade attachment hardware | 16 |
| BB | Screws (preassembled) | 5 |
| CC | Clevis pin (preassembled) | 1 |
| DD | Cotter pin (preassembled) | 1 |
| EE | Extra blade bracket hardware | 10 |
| FF | Wiring cap | 3 |
| GG | CR2032 aneroid battery 3V | 2 |
| HH | Expansion bolt(not to scale) | 2 |
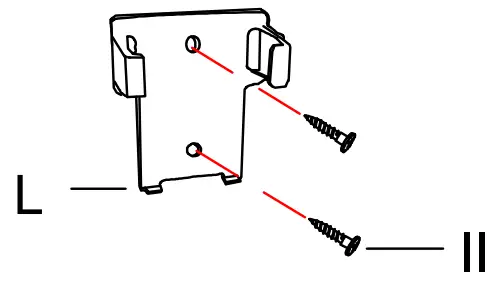
| II | Hanger bracket mounting screws (not to scale) | 4 |
PACKAGE CONTENTS
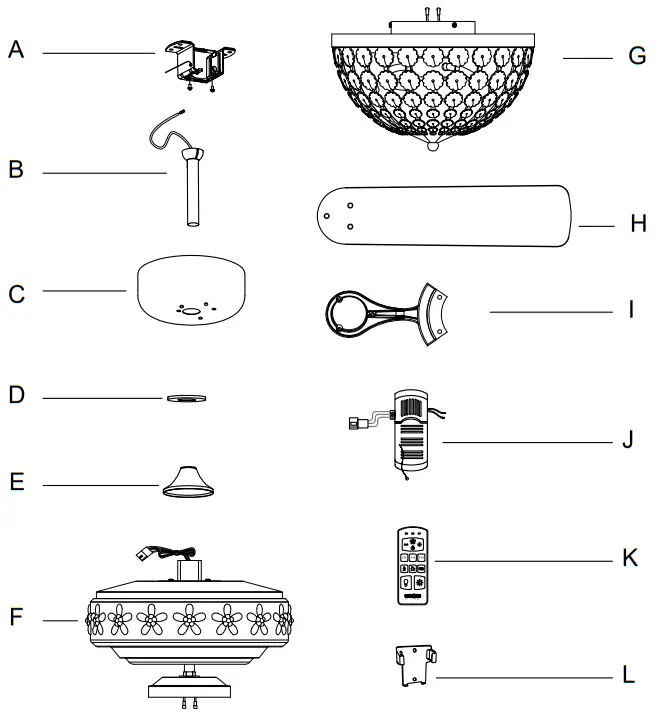
| Part | Description | Quantity |
| A | Mounting bracket (preassembled) | 1 |
| B | Hanger ball/downrod assembly | 1 |
| C | Canopy | 1 |
| D | Canopy ring (preassembled) | 1 |
| E | Coupling cover | 1 |
| F | Fan-motor assembly | 1 |
| G | Light kit | 1 |
| H | Blade | 5 |
| I | Blade bracket (flange), screws pre-installed | 5 |
| J | Receiver | 1 |
| K | Remote control | 1 |
| L | Remote control holder | 1 |
Installation
MOUNTING OPTIONS![]() WARNING: To reduce the risk of fire, electric shock, or personal injury, mount the fan to an outlet box marked acceptable for fan support using the screws provided with the outlet box. An outlet box commonly used for the support of lighting fixtures may not be acceptable for fan support and may need to be replaced. If in doubt, consult a qualified electrician.
WARNING: To reduce the risk of fire, electric shock, or personal injury, mount the fan to an outlet box marked acceptable for fan support using the screws provided with the outlet box. An outlet box commonly used for the support of lighting fixtures may not be acceptable for fan support and may need to be replaced. If in doubt, consult a qualified electrician.
If your ceiling fan does not have an existing UL-listed mounting box, then install one using the following instructions:
- Disconnect the power by removing the fuses or turning off the circuit breakers.
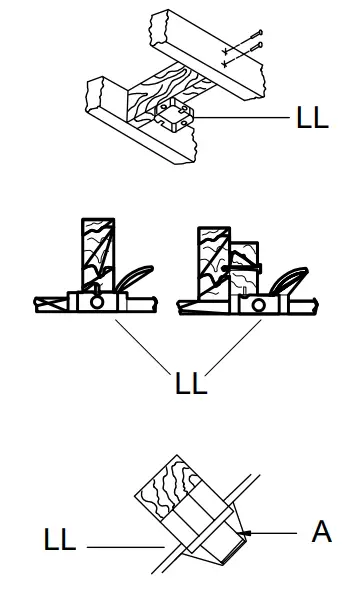
- Secure the outlet box (LL) (not included) directly to the building structure. Use appropriate fasteners and materials (not included). The outlet box and its bracing must be able to fully support the weight of the moving fan (at least 60 lbs.). Do not use a plastic outlet box.
The illustrations below show three different ways to mount the outlet box (LL) (not included).
![]() NOTE: You may need a longer downrod to maintain proper blade clearance when installing on a steep, sloped ceiling. the maximum angle allowable is 18° away from horizontal. lf the canopy (C) touches the hanger ball/downrod assembly (D), then remove the decorative canopy bottom cover and turn the canopy (C) 180° before attaching the canopy (C) to the mounting bracket (A).
NOTE: You may need a longer downrod to maintain proper blade clearance when installing on a steep, sloped ceiling. the maximum angle allowable is 18° away from horizontal. lf the canopy (C) touches the hanger ball/downrod assembly (D), then remove the decorative canopy bottom cover and turn the canopy (C) 180° before attaching the canopy (C) to the mounting bracket (A).
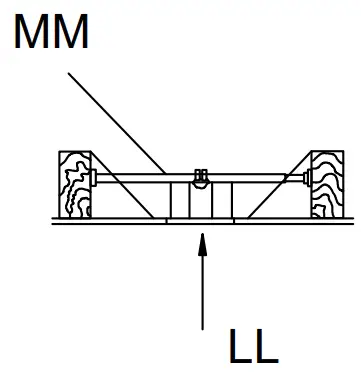
To hang your fan where there is an existing fixture but no ceiling joist, you may need an installation hanger bar (MM) (not included) as shown above.
Assembly
- Install the suspension system components
1. Insert the ball/downrod (B) through the canopy (C) and canopy bottom cover (D), and then slide the decorative motor collar cover (E) onto the end of the ball/downrod (B). Make sure the slots on the canopy (C) are on top.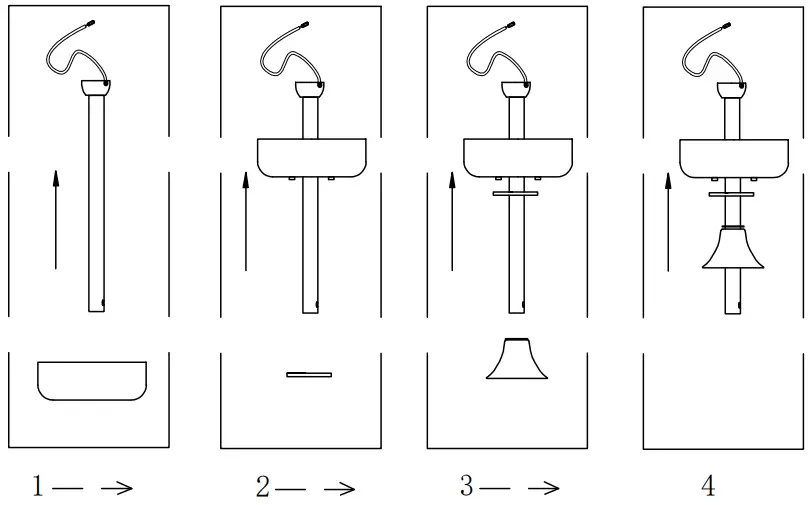
- Assembling the fan
 WARNING:
Failure to properly install the locking pin could result in the fan becoming loose and possibly falling.
1. Route the wires exiting the top of the fan motor assembly (F) through the downrod as shown.
2. Loosen, but do not remove, the setscrew on the collar (P) on top of the motor housing.
3. Align the holes at the bottom of the downrod (B) with the holes in the collar (P) on top of the motor housing.
4. Carefully insert the hanger pin (CC) through the holes in the collar (P) and downrod (B). Be careful not to jam the hanger pin (CC) against the wiring inside the downrod (B).
5. Insert the locking pin (DD) through the hole near the end of the hanger pin (CC) until it snaps into its locked position.
6. Re-tighten the setscrews on the collar (P) on Re-tighten the setscrews on the collar (P) on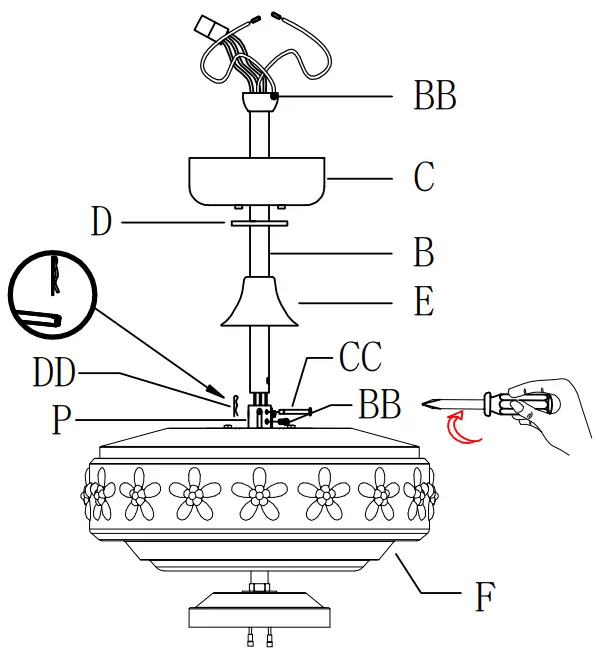 Assembly — Hanging the Fan
 - Description of mounting bracket
1. Lessen the two outlet box screws in the outlet box.
2. Pass the 120-Volt supply wires through the center hole in the mounting bracket (A).
3. Fix the mounting bracket (A) to the outlet box (LL)Note that the plane of mounting bracket (A) is oriented towards the outlet box (LL).
4. Tighten the two mounting screwsWARNING: To reduce the risk of fire, electric shock or other personal injury, mount the fan only to an outlet box or supporting system marked acceptable for fan support and use the mounting screws provided with the outlet box.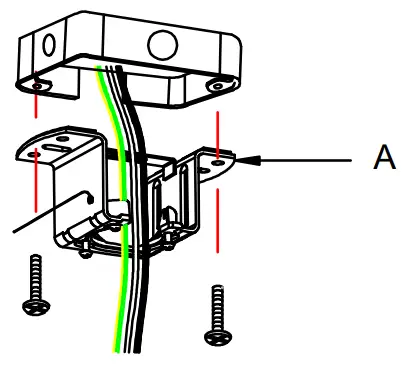 MOUNTING OPTIONS
For wooden ceiling, use wood screw to drill on the wooden beam or the “junction box” to fix the hanging bracket (selection is made according to actual requirements of the customers).
STEP 1A-WOODEN CEILING
SEITCH OFF THE ELECTRICAL MAINS AT THE CIRCUIT BREAKER FUSE BOX.
1. Use the Mounting Bracket (A) as a guide, mark the spots where the 4 Self Tapping Screws (II) will be drilled.
2. Remove the Mounting Bracket (A), drill 4 holes for 3MM diameter, install the mounting bracket onto wooden ceiling with the 4 Self Tapping Screws (II) & Washers.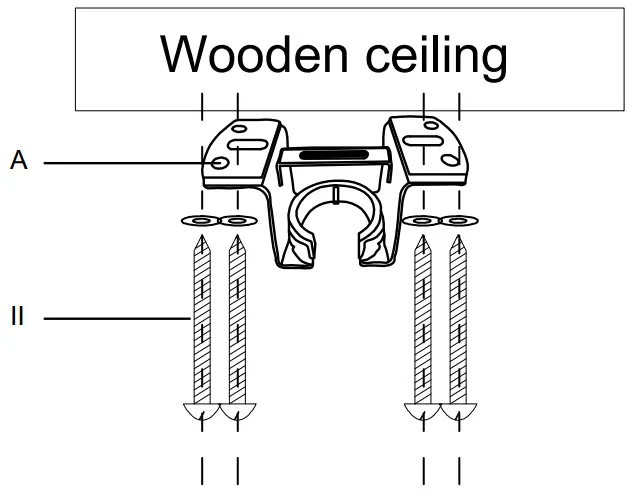 IMPORTANT: SCREWS MUST BE TIGHTENED TILL SNUG
For concrete ceiling, use the percussion bit with diameter 6mm to drill holes according to the length of expansion screws. Then use the attached expansion screws to fix the hanging bracket onto the ceiling (selection is made according to actual requirements of the customers).
STEP 2A-CONCRETE CEILING
SEITCH OFF THE ELECTRICAL MAINS AT THE CIRCUIT BREAKER FUSE BOX.
1. Use the Mounting Bracket (A) as a guide, mark the spots where the 2 Expansion Bolts (II) will be drilled.
2. Remove the Mounting Bracket (A), drill 2 holes and insert 2 Expansion Bolts Bolts (2) into the concrete ceiling, install the mounting bracket and secure with Flat Washere, Spring Washers and Nuts.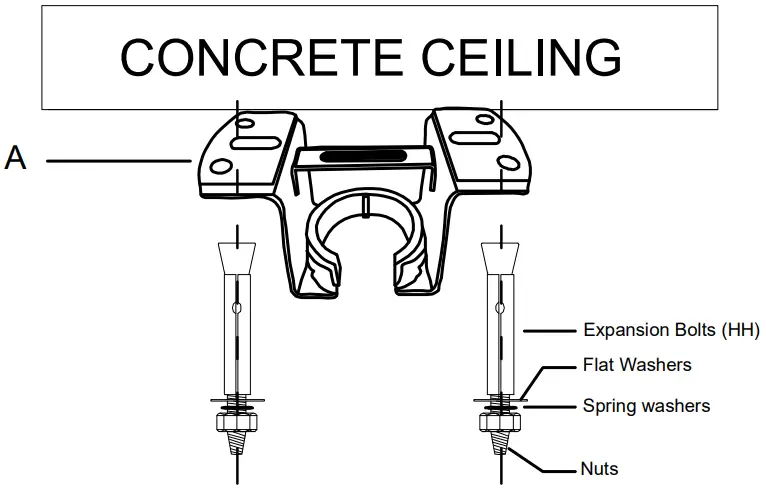 IMPORTANT: SCREWS MUST BE TIGHTENED TILL SNUGNote: according to different ceiling materials, the bracket is fixed with different screws. The ceiling of the fixed bracket shall not be less than 12mm to prevent danger caused by screw loosening. After the suspension support is completed, it shall be able to safely withstand the tensile test of more than 35kg.
 - Hanging the fan to the mounting bracketWARNING: to reduce the risk of electric shock, please operate after starting to disconnect the power supply of circuit breaker or fuse box.
1. Carefully lift the fan motor assembly (F) up to the mounting bracket (A) and seat the hanger ball/downrod assembly (B) in the mounting bracket (A) socket. Make sure the tab on the mounting bracket (A) socket is properly seated in the groove in the hanger ball/downrod assembly (B). This will help to balance the ceiling fan.
2. Insert the receiver (K) into the mounting bracket (A) with the flat side of the receiver (K) facing the ceiling.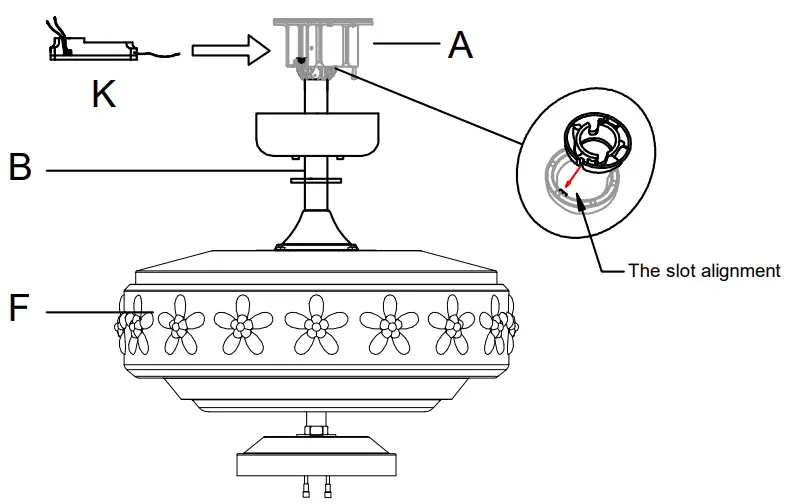
- Attaching the blades to the blade brackets
1. Attach a blade (H) to a blade bracket (I) by inserting screws (AA) into the holes in the blade and through the blade bracket. Note that the rubber washers are pre-attached to the blade bracket.
2. Tighten each screw securely.
3. Repeat these steps for each blade (H) and blade bracket (I).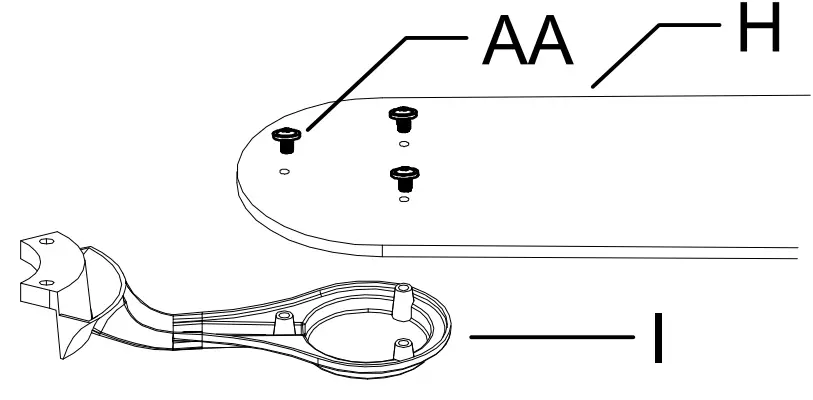
- Fastening the blade assemblies to the motor
1. Fasten the blade assembly to the motor (F) by inserting the alignment post into the slot on the bottom of the motor and tightening the blade bracket (I) screws. The blade bracket screws are pre-installed into the blade bracket (I).
2. Repeat this step for the remaining blade assemblies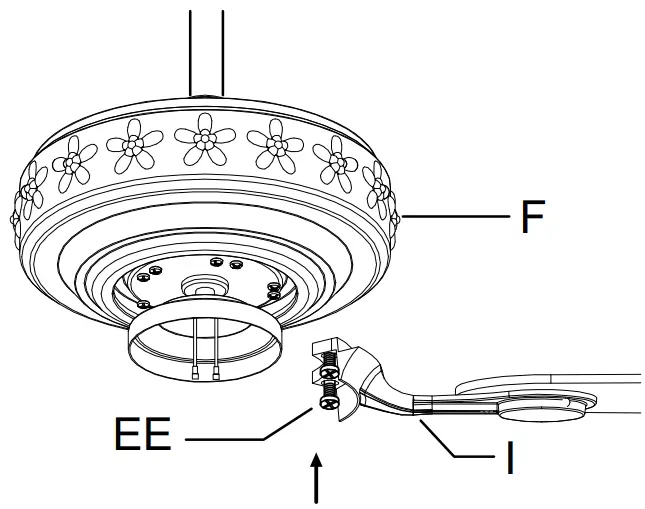
- Making the electrical connectionsWARNING: To avoid possible electrical shock, turn the electricity off at the main fuse box before wiring. If you feel you do not have enough electrical wiring knowledge or experience, contact a licensed electrician.CAUTION: Do not use with a wall light dimmer switch.WARNING: Check to see that all connections are tight, including ground, and that no bare wire is visible at the connect Terminal blocks, except for the ground wire.
 NOTE: The fan must be installed at a maximum distance of 20 ft. from the remote control for proper signal transmission between the remote control and the fan’s receiving unit.
Motor to receiver electrical connections:
1. Connect the fan wire with receiver wire by connect terminal.
Receiver to house supply wires electrical connections:
1. Connect the receiver white wire marked “AC in N” to the household white wire (neutral) using a wire terminal block.
2. Connect the receiver Red wire marked “AC in L” to the household Red wire (hot) using a wire terminal block.
3. Using a wire connecting nut, Connect the ground wire of (fan motor, slide-on mounting bracket and household) together.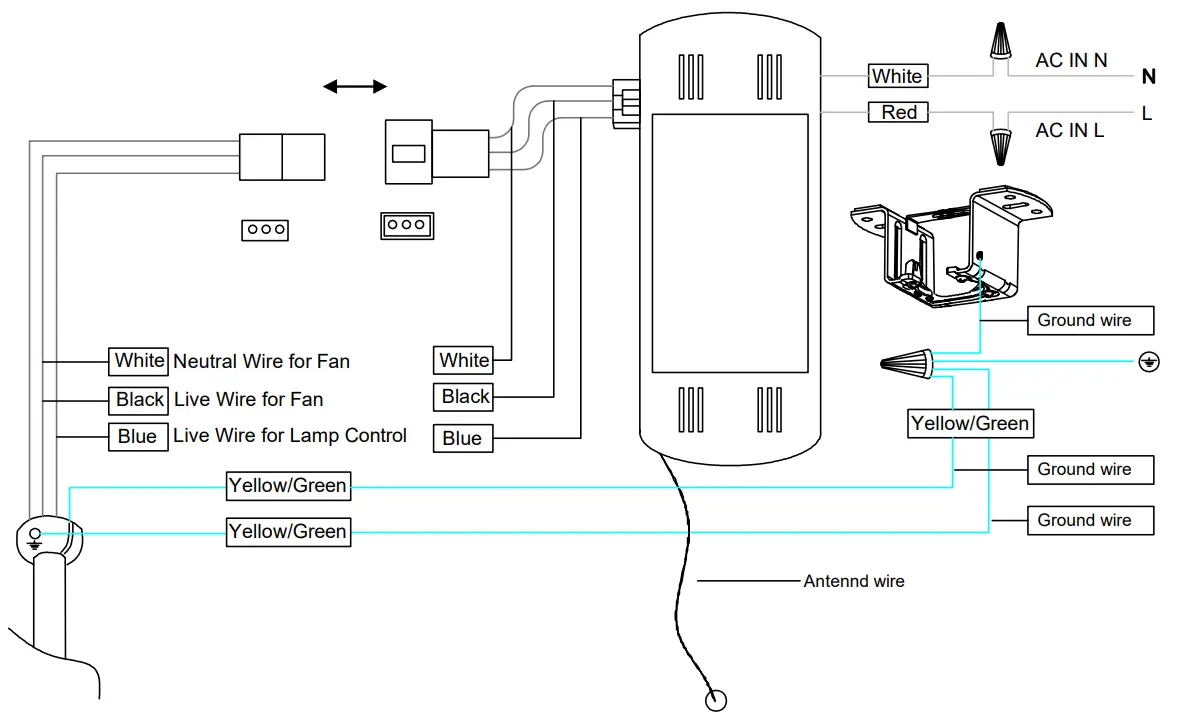
- Attaching the light kit fitter assembly and the bulbsWARNING: to reduce the risk of electric shock, please operate after starting to disconnect the power supply of circuit breaker or fuse box.WARNING: E26 The light bulb, MAX25W TYPE A BULB* 2PCS.
1. Install the three E12 bulbs by screwing them into the light bulb sockets.
2. Remove the three mounting screws (JJ) on the switch cup cover of the light kit fitter assembly(F).
3. Connect the wires from the light kit fitter assembly(F) to the wires from switch cup of the fan motor assembly by connecting the molded adaptor plugs together (Blue to Blue, white to white).
Carefully tuck all wires and splices into the switch cup.
4. Align the holes in the light kit fitter assembly(G)with the holes in the switch cup below the fan motor assembly (F) and install the light kit mounting screws (JJ) that were removed in the second step above.
5. Align the top cover(C) with hole knob of the mounting bracket and tighten with two screws.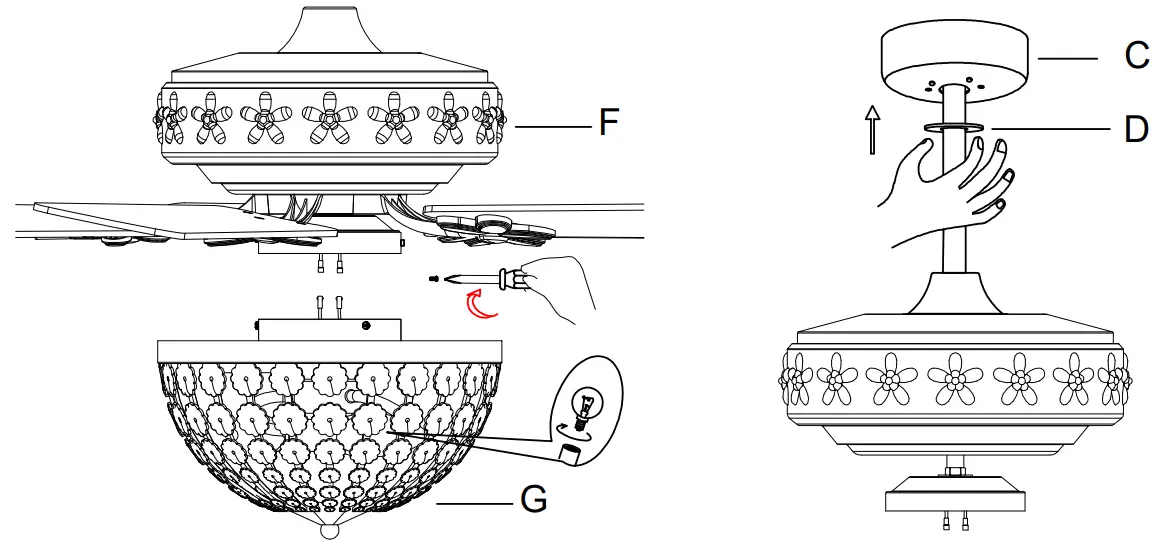
Operation
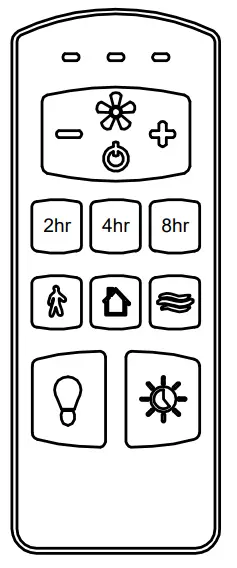
REMOTE CONTROL OPERATING INSTRUCTIONS
- Fan function
 Press and release the button to tum the fan on or off.
 Fan off. The fan memory function will store the current setting for the next time the fan is in use.
 - Speed functions
 Press + to increase the desired speed of the fan from low, medium, high.
 Press – to decrease the desired speed of the fan from high, medium, low.
 - Timer functions
 Auto off after 2 hours.
 Auto off after 4 hours.
 Auto off after 8 hours.
 - Light functions
 Press and release button one time will turn the light on.
 Press and release button one time will turn the light off.
 Walk away delay Turns light off after 60 seconds.
 Safe Home Randomly turns the fan’s light on and off to simulate use while away from home. Make it look like someone’s home while you are away.
 Nature Breeze Randomly cycles the fan speeds to simulate naturally occurring air movement.
INSTALLING THE REMOTE CONTROL HOLDER
- Remove two remote control holder plugs from the remote control holder (I). Note that the plugs have unique tabs that allow them to fit only in one hole.
- Attach the remote control holder (I) with the tew remote control holder mounting screws (II).
REVERSE SWITCH OPERATING INSTRUCTIONS
The reverse switch is located on the top of the motor housing. Slide the switch to the right for warm weather operation. Slide the switch to the left for cool weather operation.
NOTE: Wait for the fan to stop before reversing the direction of the blade rotation.
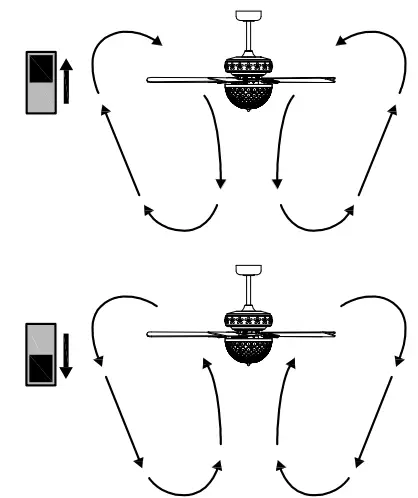
Warm weather – (Clockwise Direction) A downward air flow creates a cooling effect. This allows you to set your air conditioner on a warmer setting without affecting your comfort.
Cool weather – (Counterclockwise Direction) An upward air flow moves warm air off the ceiling. This allows you to set your heating unit on a cooler setting without affecting your comfort.
Care and Cleaning
![]() WARNING: Make sure the power is off before cleaning your fan.
WARNING: Make sure the power is off before cleaning your fan.
Do
- Check the support connections, brackets, and blade attachments twice a year. Make sure they are secure. Because of the fan’s natural movement, some connections may become loose over time. It is not necessary to remove the fan from the ceiling.
- Clean your fan periodically. Use only a soft brush or lint-free cloth to avoid scratching the finish. The plating is sealed with a lacquer to minimize discoloration or tarnishing. (Optional) Cover small scratches with a light application of shoe polish.
Do not
- Use water when cleaning. Water could damage the motor, or the wood, or possibly cause an electrical shock.
- Apply oil to your fan or motor. The motor has permanently-lubricated sealed ball bearings.
Troubleshooting
![]() WARNING: Make sure the power is off at the electrical panel box before you attempt any repairs. Refer to step 7 “Making the electrical connections” on page 11.
WARNING: Make sure the power is off at the electrical panel box before you attempt any repairs. Refer to step 7 “Making the electrical connections” on page 11.
| Problem | Solution |
| The fan will not start. | o Check the main and branch circuit fuses or breakers. |
| o Check the line wire connections to the fan and switch wire connections in the switch housing. | |
| o Check to make sure the frequency switches from the remote control and receiver are set to the same frequency. | |
| The fan sounds noisy. | o Make sure all motor housing screws are snug. |
| o Make sure the screws that attach the fan blade to the motor hub are tight. | |
| o Make sure the wire nut connections are not rattling against each other or the interior wall of the switch housing. | |
| o Allow a 24-hour “breaking-in” period. Most noises associated with a new fan disappear during this time. | |
| o Make sure there is a short distance from the ceiling to the canopy. It should not touch the ceiling. | |
| o Make sure your ceiling box is secure and that rubber isolator pads are used between the mounting bracket and outlet box. | |
| The remote control is not working. | o Do not connect the fan with wall mounted variable speed control(s). |
| o Make sure the frequency switches are set correctly |
![]()


