![]() Operating Instructions
Operating Instructions
Projection Lens Commercial Use
Model No.
ET-D3LEU100
ET-D3LEW200
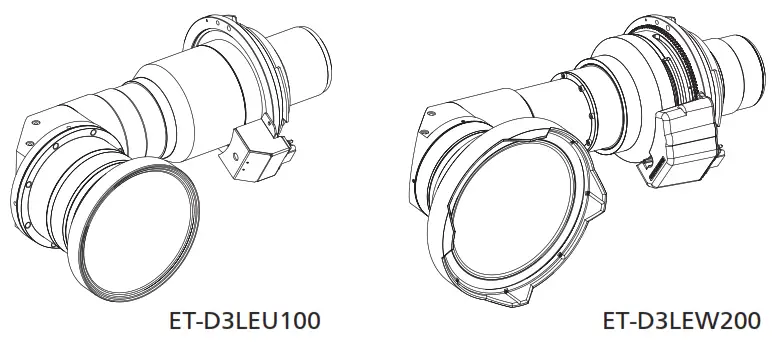
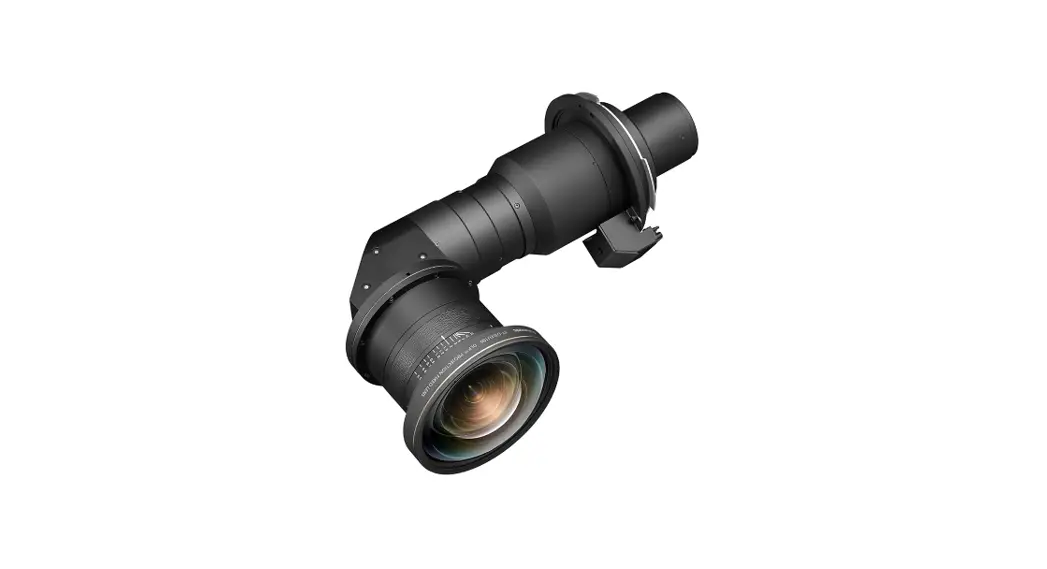
ET-D3LEU100 Projection Lenses
Read before use
This document is intended for the various projection lenses that can be attached to and used in conjunction with Panasonic projectors.
For Model No. and model names, refer to the product list (![]() page 4).
page 4).
Thank you for purchasing this Panasonic product.
- To ensure correct use of this lens, please read the operating instructions supplied with the lens and the projector carefully.
- Before using this product, be sure to read “Read this first!” (
 Page 3).
 - Please save this manual for future use.
Read this first!
WARNING:
Always follow these precautions
Do not look at or place your skin into the light emitted from the lens while the projector is being used.
Doing so can cause burns or loss of sight.
- Strong light is emitted from the projector’s lens. Do not look at or place your hands directly into this light.
- Turn off the power when moving away from the projection lens or projector.
Do not project an image with the lens cover attached. - Doing so can cause fire.
CAUTION:
Before replacing the projection lens, be sure to turn off the power and disconnect the power plug from the wall outlet.
- Unexpected projection of light may cause injury to eyes.
- Replacing the projection lens without removing the power plug may result in electric shock.
Do not stand in front of the lens while the projector is being used.
Doing so can cause damage and burns to clothing.
- Strong light is emitted from the projector’s lens.
Do not place objects in front of the lens while the projector is being used.
Doing so can cause fire, damage to the object, or malfunction of the lens and projector.
- Strong light is emitted from the projector’s lens.
Do not open the desiccant bag. Do not eat the contents.
Inadvertently ingesting desiccant could be harmful.
- If the desiccant gets into your eyes or mouth, immediately rinse with plenty of water and seek medical attention.
- Keep desiccant out of the reach of children.
Before Use
Product list
The product names and model numbers of the projection lenses covered by this manual are as follows.
| Product name | Model number | Description |
| Fixed-focus lens | ET-D3LEU100 | Projection lens equipped with an EEPROM*1. |
| Zoom lens | ET-D3LEW200 | Projection lens equipped with an EEPROM*1 and stepping motor. |
*1 EEPROM: Electrically erasable programmable read-only memory
Projectors supported by each projection lens
ET-D3LEU100:
PT-RQ32K / PT-RZ31K / PT-RS30K / PT-RQ22K / PT-RZ21K / PT-RS20K / PT-RQ13K / PT-RZ12K / PT-RS11K / PT-DZ21K2 / PT-DS20K2 / PT-DW17K2 / PT-DZ16K2 / PT-DZ13K / PT-DS12K / PT-DW11K / PT-DZ10K ET-D3LEW200: PT-RQ32K / PT-RZ31K / PT-RS30K / PT-RQ22K / PT-RZ21K / PT-RS20K Note
- Some of the alphabet letters at the end of projector model numbers may be omitted in this manual.
- Models other than the above may also be supported. Refer to the operating instructions for your projector or the website (https://panasonic.net/cns/projector/).
- If the projector you are using is PT-RQ32K / PT-RZ31K / PT-RS30K / PT-RQ22K /
PT-RZ21K / PT-RS20K, you may not be able to use the projection lens depending on main version of the firmware. If main version of the firmware is the version number shown below, update to the latest firmware before use.- PT-RQ32K: Earlier than 3.16
- PT-RZ31K / PT-RS30K: Earlier than 3.09
- PT-RQ22K: Earlier than 1.05
- PT-RZ21K / PT-RS20K: Earlier than 2.07
For details on the update procedure, refer to the latest firmware information on the website (https://panasonic.net/cns/projector/pass/).
- The main version of the firmware can be checked in the [STATUS] screen.
Supplied Accessories
Make sure that the following has been provided.
| Part name | Appearance |
| Lens cover | 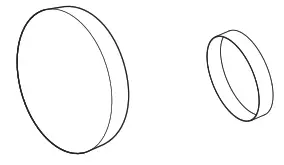 • The product is delivered with a lens cover attached. • The product is delivered with a lens cover attached.• The shape and size of the lens caps are different for each product. • each for front and rear |
Preparation
Before replacing the projection lens
Return the projection lens to the home position before replacing or removing it.
For details on how to return the lens to the home position, refer to the operating instructions of the projector.
Attention
- Make sure that the projector power supply is switched off before attaching or detaching the projection lens.
- After removing the projection lens, store it safely away from vibration or impacts.
- Do not touch the electrical contacts of the projection lens with your fingers. Dust and dirt on the contacts may cause contact malfunctions, while static electricity may damage the unit.
- Do not touch the surface of the lens with bare hands. Finger prints and dirt on the surface of the lens will be magnified by the lens and lower the quality of the projected image. Place the supplied lens cover on the zoom lens when the projector is not in use.
- The lens is made of glass. The lens could be damaged if brought into contact with or rubbed against hard objects. Handle the lens carefully.
- Use a clean, soft and dry cloth to wipe away dust and dirt from the projection lens.
Do not use fluffy cloths containing oil, water or dust for cleaning. The lens is easily damaged, so do not apply excessive pressure when wiping it. - Use of the ET-PLF20 lens fixed attachment is recommended.
However, it does not support PT-DZ21K2 / PT-DS20K2 / PT-DW17K2 / PT-DZ16K2 / PT-DZ13K / PT-DS12K / PT-DW11K / PT-DZ10K projectors. - The ET-PLF10 lens fixed attachment cannot be used.
- When using the ET-PLF20 lens fixed attachment, it may not be possible to attach the mounting brackets of the attachment without returning the lens to the home position.
Attaching and Detaching the Lens
For details on attaching and detaching the projection lens, refer to the operating instructions of the projector.
Peripheral focus adjustment function
When you change the size of the projected image, the focal balance between the center and peripheral areas of the screen may shift. This shift in balance tends to increase proportionally with smaller throw ratios.
The ET-D3LEU100 / ET-D3LEW200 is equipped with a peripheral focus adjustment function to correct the shift in focal balance between the center and peripheral areas of the screen.
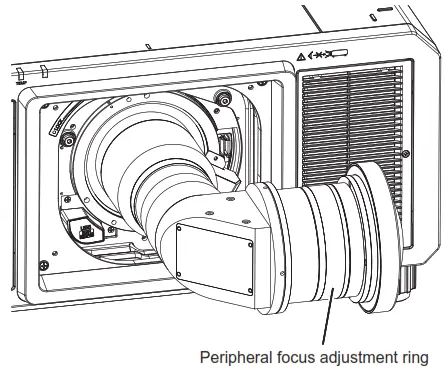
The illustrations in this procedure depict attachment of the ET-D3LEU100 onto the PT-RZ21K.
Adjusting the focus
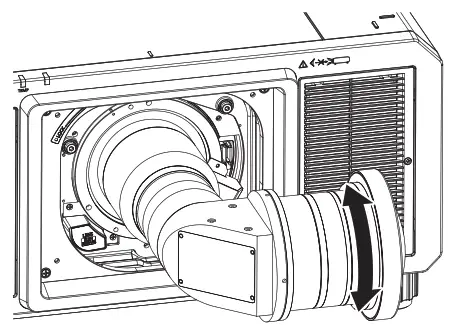
- Turn the peripheral focus adjustment ring in the direction of the arrow to match the projection distance displayed on the lens to the actual distance from the lens to the screen.
- Operate the projector to align the focus of the center of the projected image.
Note
- The projection distances displayed on the lens are approximate guides.
- The lens focus is not stable immediately after powering on due to the affect of heat produced by the light from the light source.
It is recommended that the focus be adjusted after the image has been projected for approximately 1 hour.
Lens calibration
Perform lens calibration after attaching the lens.
The lens calibration procedure differs depending on the projector you are using and the main version of the firmware.
- PT-RQ32K / PT-RZ31K / PT-RS30K / PT-RQ22K / PT-RZ21K / PT-RS20K Refer to “Case 1” (x page 7).
- PT-RQ13K / PT-RZ12K / PT-RS11K / PT-DZ21K2 / PT-DS20K2 / PT-DW17K2 / PT-DZ16K2 / PT-DZ13K / PT-DS12K / PT-DW11K / PT-DZ10K
Refer to “Case 2” (x page 9).
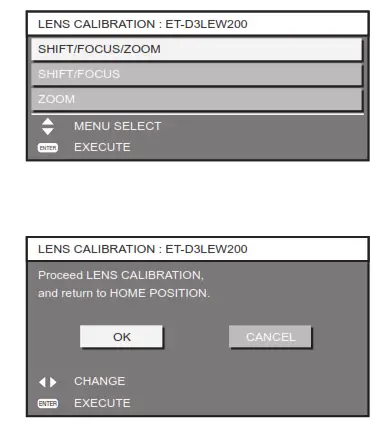
Case 1
- PT-RQ32K (main version of the firmware is 3.16 or later)
- PT-RZ31K / PT-RS30K (main version of the firmware is 3.09 or later)
- PT-RQ22K (main version of the firmware is 1.05 or later)
- PT-RZ21K / PT-RS20K (main version of the firmware is 2.07 or later)
The illustrations in this procedure depict use of the ET-D3LEW200 as an example.
- Press the <MENU> button.
- Use the ▲ and ▼ buttons to select [PROJECTOR SETUP], and press the <ENTER> button.
• The [PROJECTOR SETUP] screen appears. - Use the ▲ and ▼ buttons to select [LENS], and press the <ENTER> button.
• The [LENS] screen appears
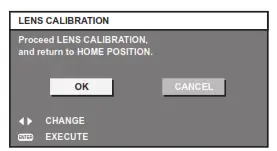
- Use the ▲ and ▼ buttons to select [LENS CALIBRATION], and press the <ENTER> button.
• The [LENS CALIBRATION] screen appears.
• When the ET-D3LEU100 is attached, a confirmation screen appears when the <ENTER> button is pressed. In such cases, proceed to step 6.
5) Use the ▲ and ▼ buttons to select [SHIFT/FOCUS/ZOOM], and press the <ENTER> button.
• The confirmation screen appears.
(ET-D3LEW200 only)
- Use the ▲and ▼ buttons to select [OK], and press the <ENTER> button.
• Lens calibration starts.
• The projection lens moves to the home position after adjustment range calibration is complete.
Note
- If lens calibration is not performed, the available zoom range of the ET-D3LEW200 will become narrowed.
- If ET-D3LEU100 is used on the PT-RQ32K / PT-RZ31K / PT-RS30K, part of the image will be obscured when in the home position. Adjust the lens shift within the lens shift range as described on page 12.
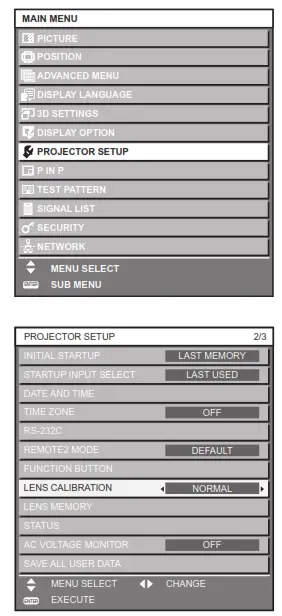
Case 2
- PT-RQ13K / PT-RZ12K / PT-RS11K
- PT-DZ21K2 / PT-DS20K2 / PT-DW17K2 / PT-DZ16K2
- PT-DZ13K / PT-DS12K / PT-DW11K / PT-DZ10K
- Press the <MENU> button.
- Use the ▲ and ▼ buttons to select [PROJECTOR SETUP], and press the <ENTER> button.
• The [PROJECTOR SETUP] screen appears.
- Use the ▲ and ▼ buttons to select [LENS CALIBRATION].
- Use the ▲ and ▼ buttons to select [NORMAL], and pressthe <ENTER> button.
• The confirmation screen appears. - Use the ▲ and ▼ buttons to select [OK], and press the <ENTER> button.
• Lens calibration starts.
• The projection lens moves to the home position after adjustment range calibration is complete.
Note
- If ET-D3LEU100 is used on the PT-DZ21K2 / PT-DZ16K2, part of the image will be obscured when in the home position. Adjust the lens shift within the lens shift range as described on page 12.
Projection relationships
The dimensional relationship between the screen and the projector is shown below.
Dimensional relationship diagram
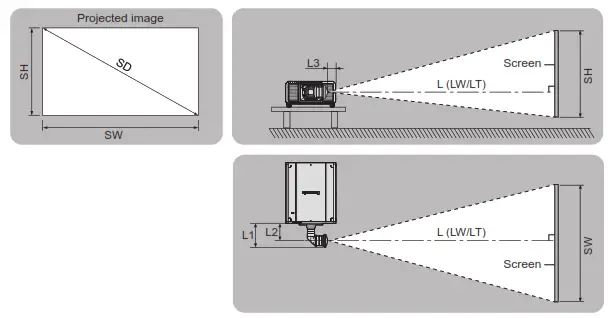
Note
- This diagram assumes that the size and position of the projected image will be adjusted so that the image fills the entire screen.
- This illustration is not drawn to scale.
| L | Projection distance | |
| LW | Minimum distance | |
| LT | Maximum distance | |
| L1 | Distance from front of projector to edge of lens | |
| L2 | Distance from front of projector to center of lens | |
| L3 | Distance from side of projector to center of lens | |
| SH | Projected image height | |
| SW | Projected image width | |
| SD | Projected image size | |
Dimension for L1 (approximate values)
| Projector model | Dimension for L1 (approximate value) | |
| ET-D3LEU100 | ET-D3LEW200 | |
| PT-RQ32K / PT-RZ31K / PT-RS30K | 0.26 | 0.32 |
| PT-RQ22K / PT-RZ21K / PT-RS20K | 0.29 | 0.35 |
| PT-RQ13K / PT-RZ12K / PT-RS11K | – | |
| PT-DZ21K2 / PT-DS20K2 / PT-DW17K2 / PT-DZ16K2 | – | |
| PT-DZ13K / PT-DS12K / PT-DW11K / PT-DZ10K | – | |
Dimension for L2 (approximate values)
| Projector model | Dimension for L2 (approximate value) | |
| ET-D3LEU100 | ET-D3LEW200 | |
| PT-RQ32K / PT-RZ31K / PT-RS30K | 0.18 | 0.23 |
| PT-RQ22K / PT-RZ21K / PT-RS20K | 0.21 | 0.26 |
| PT-RQ13K / PT-RZ12K / PT-RS11K | – | |
| PT-DZ21K2 / PT-DS20K2 / PT-DW17K2 / PT-DZ16K2 | – | |
| PT-DZ13K / PT-DS12K / PT-DW11K / PT-DZ10K | – | |
Dimension for L3 (approximate values)
| Projector model | Dimension for L3 (approximate value) | |
| ET-D3LEU100 | ET-D3LEW200 | |
| PT-RQ32K / PT-RZ31K / PT-RS30K | 0.15 | 0.18 |
| PT-RQ22K / PT-RZ21K / PT-RS20K | 0.10 | 0.13 |
| PT-RQ13K / PT-RZ12K / PT-RS11K | 0.09 | – |
| PT-DZ21K2 / PT-DS20K2 / PT-DW17K2 / PT-DZ16K2 | 0.11 | – |
| PT-DZ13K / PT-DS12K / PT-DW11K / PT-DZ10K | 0.07 | – |
Note
- The illustrations of projectors in this manual are for informational purposes only and do not represent a specific projector model. Configurations may vary with the model.
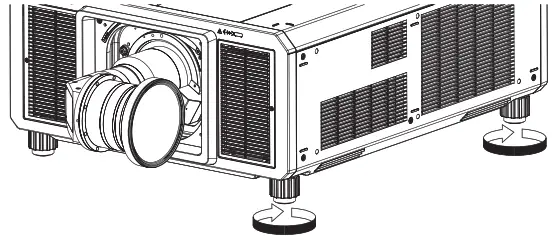
- z If the screen is tilted downward, extend the adjustable feet on the sides of the projector until the projected image is rectangular.
If the projector is inclined horizontally, adjust the adjustable feet until the projector is level.
You can extend the adjustable feet by turning them as shown in the diagram. To return the feet to the original position, turn them in the opposite direction.
Attention
- To prevent obstruction of the intake and exhaust vents, install the projector with a clearance at least 500 mm (1 ft. 7 in.) from walls and objects.
If you are installing the projector in a sealed space, be sure to provide additional air conditioning equipment and ventilation equipment. Insufficient ventilation will result in an accumulation of heat and may activate the projector’s protection circuit. - Avoid setting up in places which are subject to sudden temperature changes, such as near an air conditioner or lighting equipment (studio lamps, etc.).
Dimensional relationship
For details on the projection distance (L), refer to “Projected image size and Projection distance” and “Projection distance formulas” in the Appendix.
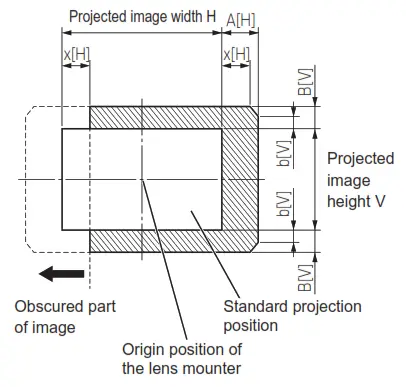
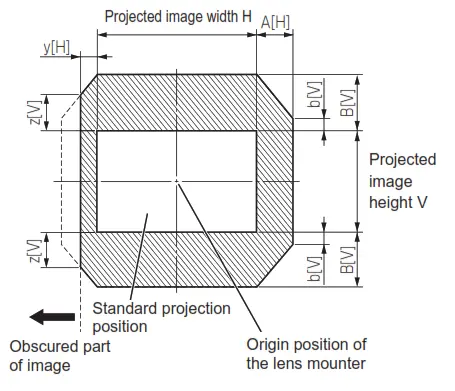
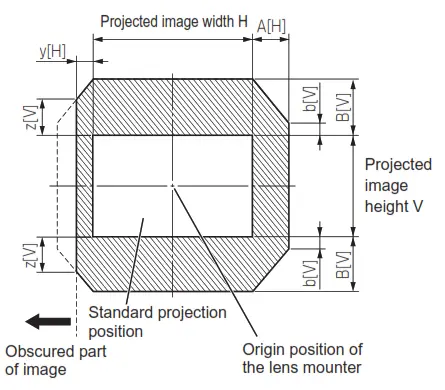
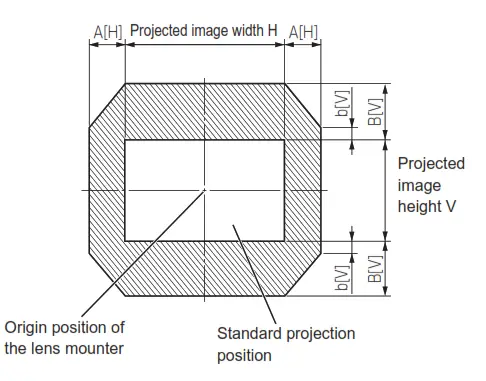
Lens shift ranges
After moving the lens to the home position according to “Lens calibration” on page 7, you can use the position of the projected image at that position (i.e., the standard
projection position) as a basis, and use the lens shift adjustment function on the projector to adjust the position of the projected image within the respective lens shift ranges.
Perform lens shift adjustment within the ranges shown in the following illustrations. Moving the lens outside of the adjustment ranges may alter the focus. This occurs due
to limitations in lens movement that are intended to protect the optical components. The following illustrations depict lens shift ranges for floor installations of the projector.
- ET-D3LEU100
| Projector model | A | B | b | x |
| PT-RZ31K | 0.25 | 0.24 | 0.12 | 0.18 |
| PT-DZ21K2 | 0.45 | 0.05 | ||
| PT-RQ32K | 0.29 | 0.35 | 0.15 | 0.15 |
| PT-RS30K | 0.3 | 0.3 | 0.1 | 0.15 |
| PT-DZ16K2 | 0.2 | 0.48 | 0.15 | 0.05 |
* Part of the image will be obscured when in the home position.
| Projector model | A | B | b | y | z |
| PT-RZ21K | 0.25 | 0.55 | 0.12 | 0 | 0.55 |
| PT-RZ12K | 0.05 | 0.45 | |||
| PT-DZ13K | 0.18 | 0.24 | |||
| PT-DZ10K | 0.18 | 0.24 | |||
| PT-RQ22K | 0.29 | 0.59 | 0.15 | 0.05 | 0.5 |
| PT-RQ13K | 0.09 | 0.45 | |||
| PT-RS20K | 0.3 | 0.5 | 0.1 | 0.05 | 0.43 |
| PT-RS11K | 0.05 | 0.43 | |||
| PT-DS12K | 0.25 | 0.15 | |||
| PT-DS20K2 | 0 | 0.5 | |||
| PT-DW17K2 | 0.3 | 0.7 | 0.2 | 0 | 0.7 |
| PT-DW11K | 0.27 | 0.25 |
 ET-D3LEW200
| Projector model | A | B | b | y | z |
| PT-RZ31K | 0.15 | 0.48 | 0.12 | 0.05 | 0.35 |
| PT-RQ32K | 0.19 | 0.56 | 0.24 | 0.1 | 0.39 |
| PT-RS30K | 0.18 | 0.4 | 0.12 | 0.14 | 0.18 |
| Projector model | A | B | b |
| PT-RZ21K | 0.15 | 0.48 | 0.12 |
| PT-RQ22K | 0.19 | 0.56 | 0.24 |
| PT-RS20K | 0.18 | 0.4 | 0.12 |
Note
- The home position of the projector a point of origin position for the lens shift (i.e., vertical and horizontal positions of the lens) based on the results of lens calibration. It is not the optical center position of the screen.
Specifications
Check the specifications of each projection lens, and use the appropriate lens for your intended use.
| Model No. | ET-D3LEU100 | ET-D3LEW200 | |
| F value | 2.5 | 2.5 | |
| Focal Length (f) | 8.0 mm (5/16″) | 13.8 mm (17/32″) – 18.1 mm (23/32″) | |
| Supported screen size | 200″ to 600″ | ||
| Dimensions | Width | 275 mm (10-13/16″) | 250 mm (9-27/32″) |
| Height | 154 mm (6-1/16″) | 193 mm (7-19/32″) | |
| Depth | 428.7 mm (16-7/8″) | 495.0 mm (19-1/2″) | |
| Net Weight | Approx. 8.0 kg (17.6 lb) | Approx. 9.0 kg (19.8 lb) | |
Dimensions
| Model number | Dimensions |
| ET-D3LEU100 | 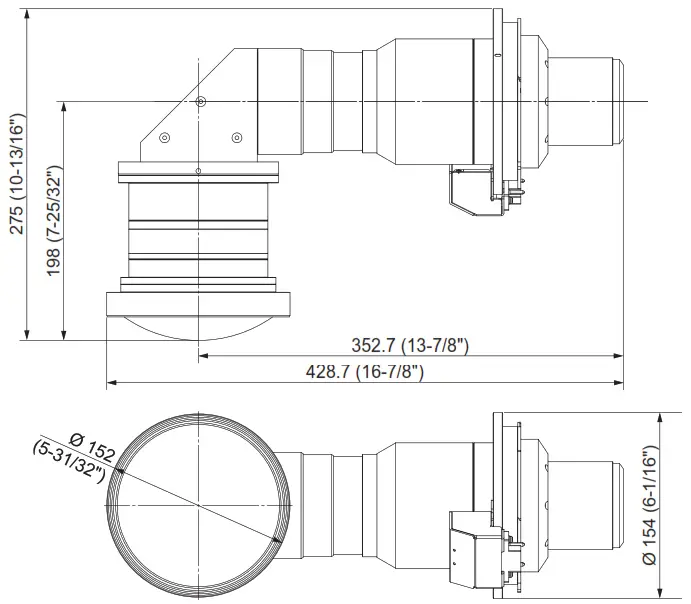 |
| Model number | Dimensions |
| ET-D3LEW200 | 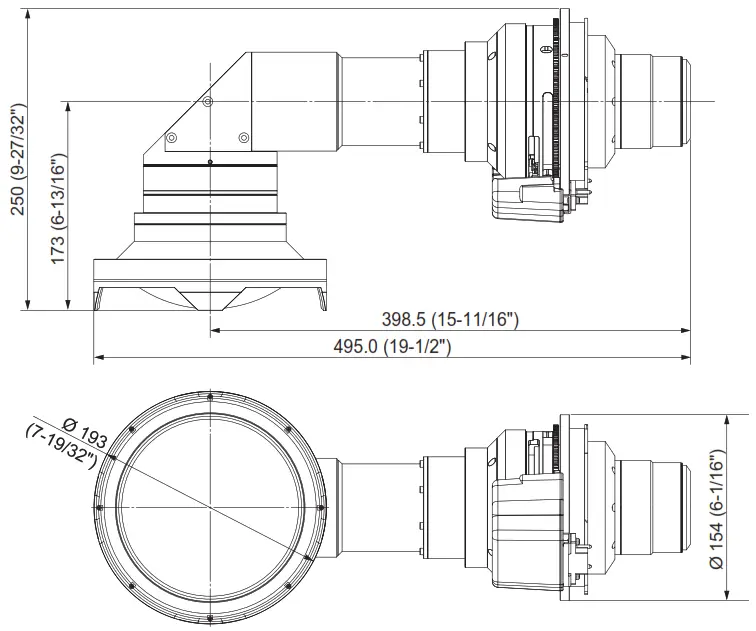 |
Manufactured by:
Panasonic Connect Co., Ltd.
4-1-62 Minoshima, Hakata-ku, Fukuoka 812-8531, Japan
Importer:
Panasonic Connect Europe GmbH
Authorized Representative in EU:
Panasonic Testing Centre
Winsbergring 15, 22525 Hamburg, Germany Importer for UK;
Panasonic Connect UK, a branch of Panasonic Connect Europe GmbH,
Maxis 2, Western Road, Bracknell,
Berkshire, RG12 1RT
Disposal of Old Equipment
Only for European Union and countries with recycling systems![]() This symbol on the products, packaging, and/or accompanying documents means that used electrical and electronic products must not be mixed with general household waste.
This symbol on the products, packaging, and/or accompanying documents means that used electrical and electronic products must not be mixed with general household waste.
For proper treatment, recovery and recycling of old products, please take them to applicable collection points in accordance with your national legislation.
By disposing of them correctly, you will help to save valuable resources and prevent any potential negative effects on human health and the environment.
For more information about collection and recycling, please contact your local authority.
Penalties may be applicable for incorrect disposal of this waste, in accordance with national legislation.
Panasonic Connect Co., Ltd.
Web Site : https://panasonic.net/cns/projector/
© Panasonic Connect Co., Ltd. 2022
Panasonic Connect North America
Two Riverfront Plaza, Newark, NJ 07102
TEL: (877) 803 – 8492
Panasonic Canada Inc.
5770 Ambler Drive, Mississauga, Ontario L4W 2T3
TEL: (905) 624 – 5010
HS0719AM1042 -PS
Printed in Japan
Appendix
Projected image size and Projection distance
ET-D3LEU100
| When the screen aspect ratio is 16:10 | PT-RQ22K / PT-RQ32K / PT-RQ13K | PT-RZ21K / PT-RZ31K / PT-RZ12K / PT-DZ21K2 / PT-DZ13K / PT-DZ10K | ||
| SD | SH | SW | L | L |
| 5.08 (200″) | 2.692 | 4.308 | 1.71 | 1.59 |
| 6.35 (250″) | 3.365 | 5.385 | 2.12 | 2.01 |
| 7.62 (300″) | 4.039 | 6.462 | 2.56 | 2.42 |
| 8.89 (350″) | 4.712 | 7.539 | 3.11 | 2.84 |
| 10.16 (400″) | 5.385 | 8.616 | 3.55 | 3.25 |
| 12.70 (500″) | 6.731 | 10.770 | 4.44 | 4.08 |
| 15.24 (600″) | 8.077 | 12.923 | 5.33 | 4.91 |
| When the screen aspect ratio is 16:9 | PT-RQ22K / PT-RQ32K / PT-RQ13K | PT-RZ21K / PT-RZ31K / PT-RZ12K / PT-DZ21K2 / PT-DZ13K / PT-DZ10K | ||
| SD | SH | SW | L | L |
| 5.08 (200″) | 2.491 | 4.428 | 1.76 | 1.64 |
| 6.35 (250″) | 3.113 | 5.535 | 2.18 | 2.06 |
| 7.62 (300″) | 3.736 | 6.641 | 2.63 | 2.49 |
| 8.89 (350″) | 4.358 | 7.748 | 3.20 | 2.92 |
| 10.16 (400″) | 4.981 | 8.855 | 3.65 | 3.34 |
| 12.70 (500″) | 6.226 | 11.069 | 4.56 | 4.19 |
| 15.24 (600″) | 7.472 | 13.283 | 5.48 | 5.05 |
| PT-RS20K / PT-RS30K / PT-RS11K / PT-DS20K2 / PT-DS12K Throw ratio | PT-DW17K2 Throw ratio | PT-DZ16K2 Throw ratio | |||
| SD | SH | SW | L | L | L |
| 5.08 (200″) | 2.491 | 4.428 | 1.78 | 1.82 | 1.64 |
| 6.35 (250″) | 3.113 | 5.535 | 2.24 | 2.30 | 2.06 |
| 7.62 (300″) | 3.736 | 6.641 | 2.70 | 2.77 | 2.49 |
| 8.89 (350″) | 4.358 | 7.748 | 3.16 | 3.24 | 2.92 |
| 10.16 (400″) | 4.981 | 8.855 | 3.62 | 3.72 | 3.34 |
| 12.70 (500″) | 6.226 | 11.069 | 4.55 | 4.66 | 4.19 |
| 15.24 (600″) | 7.472 | 13.283 | 5.47 | 5.61 | 5.05 |
| When the screen aspect ratio is 4:3 | PT-RQ22K / PT-RQ32K / PT-RQ13K Throw ratio | PT-RZ21K / PT-RZ31K / PT-RZ12K / PT-DZ21K2 / PT-DZ13K / PT-DZ10K Throw ratio | ||
| SD | SH | SW | L | L |
| 5.08 (200″) | 3.048 | 4.064 | 1.94 | 1.81 |
| 6.35 (250″) | 3.810 | 5.080 | 2.45 | 2.28 |
| 7.62 (300″) | 4.572 | 6.096 | 2.95 | 2.75 |
| 8.89 (350″) | 5.334 | 7.112 | 3.45 | 3.22 |
| 10.16 (400″) | 6.096 | 8.128 | 3.96 | 3.69 |
| 12.70 (500″) | 7.620 | 10.160 | 4.96 | 4.63 |
| 15.24 (600″) | 9.144 | 12.192 | 5.97 | 5.56 |
| PT-RS20K / PT-RS30K / PT-RS11K / PT-DS20K2 / PT-DS12K Throw ratio | PT-DW17K2 / PT-DW11K Throw ratio | PT-DZ16K2 Throw ratio | |||
| SD | SH | SW | L | L | L |
| 5.08 (200″) | 3.048 | 4.064 | 1.63 | 2.25 | 2.02 |
| 6.35 (250″) | 3.810 | 5.080 | 2.05 | 2.83 | 2.54 |
| 7.62 (300″) | 4.572 | 6.096 | 2.47 | 3.41 | 3.06 |
| 8.89 (350″) | 5.334 | 7.112 | 2.90 | 3.99 | 3.58 |
| 10.16 (400″) | 6.096 | 8.128 | 3.32 | 4.56 | 4.10 |
| 12.70 (500″) | 7.620 | 10.160 | 4.17 | 5.72 | 5.15 |
| 15.24 (600″) | 9.144 | 12.192 | 5.01 | 6.88 | 6.19 |
ET-D3LEW200
| When the screen aspect ratio is 16:10 | PT-RQ22K / PT-RQ32K Throw ratio : [0.693 – 0.913:1] | PT-RZ21K / PT-RZ31K Throw ratio : [0.645 – 0.850:1] | ||||
| SD | SH | SW | LW | LT | LW | LT |
| 5.08 (200″) | 2.692 | 4.308 | 2.98 | 3.93 | 2.78 | 3.66 |
| 6.35 (250″) | 3.365 | 5.385 | 3.75 | 4.94 | 3.50 | 4.61 |
| 7.62 (300″) | 4.039 | 6.462 | 4.53 | 5.95 | 4.22 | 5.55 |
| 8.89 (350″) | 4.712 | 7.539 | 5.30 | 6.96 | 4.94 | 6.49 |
| 10.16 (400″) | 5.385 | 8.616 | 6.07 | 7.98 | 5.66 | 7.44 |
| 12.70 (500″) | 6.731 | 10.770 | 7.61 | 10.00 | 7.09 | 9.32 |
| 15.24 (600″) | 8.077 | 12.923 | 9.15 | 12.02 | 8.53 | 11.21 |
| When the screen aspect ratio is 16:9 | PT-RQ22K / PT-RQ32K Throw ratio : [0.694 – 0.913:1] | PT-RZ21K / PT-RZ31K Throw ratio : [0.646 – 0.851:1] | PT-RS20K / PT-RS30K Throw ratio : [0.701 – 0.923:1] | |||||
| SD | SH | SW | LW | LT | LW | LT | LW | LT |
| 5.08 (200″) | 2.491 | 4.428 | 3.07 | 4.05 | 2.86 | 3.77 | 3.10 | 4.09 |
| 6.35 (250″) | 3.113 | 5.535 | 3.86 | 5.08 | 3.60 | 4.74 | 3.90 | 5.14 |
| 7.62 (300″) | 3.736 | 6.641 | 4.65 | 6.12 | 4.34 | 5.71 | 4.70 | 6.19 |
| 8.89 (350″) | 4.358 | 7.748 | 5.45 | 7.16 | 5.08 | 6.68 | 5.50 | 7.24 |
| 10.16 (400″) | 4.981 | 8.855 | 6.24 | 8.20 | 5.82 | 7.65 | 6.30 | 8.29 |
| 12.70 (500″) | 6.226 | 11.069 | 7.82 | 10.28 | 7.29 | 9.58 | 7.91 | 10.38 |
| 15.24 (600″) | 7.472 | 13.283 | 9.41 | 12.35 | 8.77 | 11.52 | 9.51 | 12.48 |
| When the screen aspect ratio is 4:3 | PT-RQ22K / PT-RQ32K Throw ratio : [0.835 – 1.09:1] | PT-RZ21K / PT-RZ31K Throw ratio : [0.778 – 1.02:1] | PT-RS20K / PT-RS30K Throw ratio : [0.699 – 0.921:1] | |||||
| SD | SH | SW | LW | LT | LW | LT | LW | LT |
| 5.08 (200″) | 3.048 | 4.064 | 3.39 | 4.47 | 3.16 | 4.16 | 2.84 | 3.75 |
| 6.35 (250″) | 3.810 | 5.080 | 4.26 | 5.61 | 3.97 | 5.23 | 3.57 | 4.82 |
| 7.62 (300″) | 4.572 | 6.096 | 5.14 | 6.76 | 4.79 | 6.30 | 4.31 | 5.78 |
| 8.89 (350″) | 5.334 | 7.112 | 6.01 | 7.90 | 5.60 | 7.37 | 5.04 | 6.74 |
| 10.16 (400″) | 6.096 | 8.128 | 6.88 | 9.04 | 6.42 | 8.43 | 5.78 | 7.71 |
| 12.70 (500″) | 7.620 | 10.160 | 8.63 | 11.33 | 8.05 | 10.57 | 7.25 | 9.63 |
| 15.24 (600″) | 9.144 | 12.192 | 10.37 | 13.62 | 9.67 | 12.70 | 8.72 | 11.39 |
Note
- A ±5 % error in listed projection distances may occur.
In addition, when [KEYSTONE] is used, distance is corrected to become smaller than the specified screen size. - The throw ratio is based on the value during projection with the projected image size of 5.08 m (200″).
- The periods used in the numbers in the tables are decimal points.
Setting-up dimensions which are not given in the above table can be calculated using the formulas below.
Check the projected image size SD (m) and use the following formula to determine projection distance (L).
Projection distance formulas
The dimensions of the following table contain a slight error.
Periods are used to represent decimal points in the calculation formulas in the following table.
ET-D3LEU100
| L | ||
| PT-RQ22K / PT-RQ32K / PT-RQ13K | When the screen aspect ratio is 16:10 | =0.3497 × SD-0.0664 |
| When the screen aspect ratio is 16:9 | =0.3594 × SD-0.0664 | |
| When the screen aspect ratio is 4:3 | =0.3959 × SD-0.0664 | |
| PT-RZ21K / PT-RZ31K / PT-RZ12K / PT-DZ21K2 / PT-DZ13K / PT-DZ10K | When the screen aspect ratio is 16:10 | =0.3264 × SD-0.0664 |
| When the screen aspect ratio is 16:9 | =0.3355 × SD-0.0664 | |
| When the screen aspect ratio is 4:3 | =0.3695 × SD-0.0664 | |
| PT-RS20K / PT-RS30K / PT-RS11K / PT-DS20K2 / PT-DS12K | When the screen aspect ratio is 16:9 | =0.3631 × SD-0.0664 |
| When the screen aspect ratio is 4:3 | =0.3334 × SD-0.0664 | |
| PT-DW17K2 / PT-DW11K | When the screen aspect ratio is 16:9 | =0.3723 × SD-0.0664 |
| When the screen aspect ratio is 4:3 | =0.4558 × SD-0.0664 | |
| PT-DZ16K2 | When the screen aspect ratio is 16:9 | =0.3355 × SD-0.0664 |
| When the screen aspect ratio is 4:3 | =0.4105 × SD-0.0664 | |
ET-D3LEW200
| L | |||
| LW | LT | ||
| PT-RQ22K / PT-RQ32K | When the screen aspect ratio is 16:10 | =0.6070 × SD-0.1001 | =0.7956 × SD-0.1076 |
| When the screen aspect ratio is 16:9 | =0.6239 × SD-0.1001 | =0.8177 × SD-0.1076 | |
| When the screen aspect ratio is 4:3 | =0.6872 × SD-0.1001 | =0.9007 × SD-0.1076 | |
| PT-RZ21K / PT-RZ31K | When the screen aspect ratio is 16:10 | =0.5665 × SD-0.1001 | =0.7425 × SD-0.1076 |
| When the screen aspect ratio is 16:9 | =0.5823 × SD-0.1001 | =0.7632 × SD-0.1076 | |
| When the screen aspect ratio is 4:3 | =0.6414 × SD-0.1001 | =0.8406 × SD-0.1076 | |
| PT-RS20K / PT-RS30K | When the screen aspect ratio is 16:9 | =0.6303 × SD-0.1001 | =0.8262 × SD-0.1076 |
| When the screen aspect ratio is 4:3 | =0.5787 × SD-0.1001 | =0.7584 × SD-0.1076 | |
MEMO…………………….
![]() Panasonic Connect Co., Ltd.
Panasonic Connect Co., Ltd.
Web Site : https://panasonic.net/cns/projector/
Panasonic Connect North America
Two Riverfront Plaza, Newark, NJ 07102
TEL: (877) 803 – 8492
Panasonic Canada Inc.
5770 Ambler Drive, Mississauga, Ontario L4W 2T3
TEL: (905) 624 – 5010
© Panasonic Connect Co., Ltd. 2022
571-8503 0120-872-601
HS0719AM1042 -PS
Printed in Japan


