LUMBERJACK PS165 Plunge Saw Kit

Welcome to Lumberjack!
Dear customer, Congratulations on your purchase. Before using the product for the first time please be sure to read these instructions for use. They provide you with all information necessary for using the product safely and to ensure its long service life. Closely observe all safety information in these instructions!
GENERAL POWER TOOL SAFETY WARNINGS
WARNING Read all safety warnings and all instructions. Failure to follow the warnings and instructions may result in electric shock, fire and/or serious injury.
Save all warnings and instructions for future reference. The term “power tool” in the warnings refers to your electric (corded) power tool or battery-operated (cordless) power tool.
- Work area safety
- Keep work area clean and well lit. Cluttered or dark areas invite accidents.
- Do not operate power tools in explosive atmospheres, such as in the presence of flammable liquids, gases or dust. Power tools create sparks which may ignite the dust or fumes.
- Keep children and bystanders away while operating a power tool. Distractions can cause you to lose control.
- Electrical safety
- Power tool plugs must match the outlet. Never modify the plug in any way. Do not use any adapter plugs with grounded power tools. Unmodified plugs and matching outlets will reduce risk of electric shock.
- Avoid body contact with grounded surfaces, such as pipes, radiators, ranges and refrigerators.There is an increased risk of electric shock if your body is grounded.
- Do not expose power tools to rain or wet conditions. Water entering a power tool will increase the risk of electric shock.
- Do not abuse the cord. Never use the cord for carrying, pulling or unplugging the power tool. Keep cord away from heat, oil, sharp edges or moving parts. Damaged or entangled cords increase the risk of electric shock.
- When operating a power tool outdoors, use an extension cord suitable for outdoor use. Use of a cord suitable for outdoor use reduces the risk of electric shock.
- If operating a power tool in a damp location is unavoidable, use a residual current device (RCD) protected supply. Use of an RCD reduces the risk of electric shock.
Personal safety
- Stay alert, watch what you are doing and use common sense when operating a power tool. Do not use a power tool while you are tired or under the influence of drugs, alcohol or medication. A moment of inattention while operating power tools may result in serious personal injury.
- Use personal protective equipment. Always wear eye protection. Protective equipment such as dust mask, non-skid safety shoes, hard hat, or hearing protection used for appropriate conditions will reduce personal injuries.
- Prevent unintentional starting. Ensure the switch is in the off position before connecting to power source and/or battery pack, picking up or carrying the tool. Carrying power tools with your finger on the switch or energising power tools that have the switch on invites accidents.
- Remove any adjusting key or wrench before turning the power tool on. A wrench or a key left attached to a rotating part of the power tool may result in personal injury.
- Do not overreach. Keep proper footing and balance at all times. This enables better control of the power tool in unexpected situations.
- Dress properly. Do not wear loose clothing or jewellery. Keep your hair, clothing and gloves away from moving parts. Loose clothes, jewellery or long hair can be caught in moving parts.
- If devices are provided for the connection of dust extraction and collection facilities, ensure these are connected and properly used. Use of dust collection can reduce dust related hazards
Power tool use and care
- Do not force the power tool. Use the correct power tool for your application. The correct power tool will do the job better and safer at the rate for which it was designed.
- Do not use the power tool if the switch does not turn it on and off. Any power tool that cannot be controlled with the switch is dangerous and must be repaired.
- Disconnect the plug from the power source and/or the battery pack from the power tool before making any adjustments, changing accessories, or storing power tools. Such preventive safety measures reduce the risk of starting the power tool accidentally.
- Store idle power tools out of the reach of children and do not allow persons unfamiliar with the power tool or these instructions to operate the power tool. Power tools are dangerous in the hands of untrained users.
- Maintain power tools. Check for misalignment or binding of moving parts, breakage of parts and any other condition that may affect the power tool’s operation. If damaged, have the power tool repaired before use. Many accidents are caused by poorly maintained power tools.
- Keep cutting tools sharp and clean. Properly maintained cutting tools with sharp cutting edges are less likely to bind and are easier to control.
- Use the power tool, accessories and tool bits etc. in accordance with these instructions, taking into account the working conditions and the work to be performed. Use of the power tool for operations different from those intended could result in a hazardous situation.
Service
- Have your power tool serviced by a qualified repair person using only identical replacement parts. This will ensure that the safety of the power tool is maintained.
- If the replacement of the supply cord is necessary, this has to be done by the manufacturer or its agent in order to avoid a safety hazard.
Additional Safety and Working Instructions
- Dusts from materials such as lead-containing coatings, some wood types, minerals and metals can be harmful to one’s health and cause allergic reactions, leading to respiratory infections and/or cancer. Materials containing asbestos may only be worked by specialists. Observe the relevant regulations in your country for the materials to be worked.
- Prevent dust accumulation at the workplace. Dusts can easily ignite.
Safety Warnings for Plunge Saw
- Keep hands away from cutting area and the blade. Keep your second hand on auxiliary handle, or motor housing. If both hands are holding the saw, they cannot be cut by the blade.
- Do not reach underneath the workpiece. The guard cannot protect you from the blade below the workpiece.
- Adjust the cutting depth to the thickness of the workpiece. Less than a full tooth of the blade teeth should be visible below the workpiece.
- Never hold piece being cut in your hands or across your leg. Secure the workpiece to a stable platform. It is important to support the work properly to minimize body exposure, blade binding, or loss of control.
- Hold power tool by insulated gripping surfaces when performing an operation where the cutting tool may contact hidden wiring or its own cord. Contact with a “live” wire will also make exposed metal parts of the power tool “live” and shock the operator.
- When ripping always use a rip fence or straight edge guide. This improves the accuracy of cut and reduces the chance of blade binding.
- Always use blades with correct size and shape (diamond versus round) of arbour holes. Blades that do not match the mounting hardware of the saw will run eccentrically, causing loss of control.
- Never use damaged or incorrect blade washers or bolt. The blade washers and bolt were specially designed for your saw, for optimum performance and safety of operation.
Further safety instructions for all saws
Causes and operator prevention of kickback:
- Kickback is a sudden reaction to a pinched, bound or misaligned saw blade, causing an uncontrolled saw to lift up and out of the workpiece toward the operator;
- When the blade is pinched or bound tightly by the kerf closing down, the blade stalls and the motor reaction drives the unit rapidly back toward the operator;
- If the blade becomes twisted or misaligned in the cut, the teeth at the back edge of the blade can dig into the top surface of the wood causing the blade to climb out of the kerf and jump back toward the operator. Kickback is the result of saw misuse and/or incorrect operating procedures or conditions and can be avoided by taking proper precautions as given below.
- Maintain a firm grip with both hands on the saw and position your arms to resist kickback forces. Position your body to either side of the blade, but not in line with the blade. Kickback could cause the saw to jump backwards, but kickback forces can be controlled by the operator, if proper precautions are taken.
- When blade is binding, or when interrupting a cut for any reason, release the trigger and hold the saw motionless in the material until the blade comes to a complete stop. Never attempt to remove the saw from the work or pull the saw backward while the blade is in motion or kickback may occur. Investigate and take corrective actions to eliminate the cause of blade binding.
- When restarting a saw in the workpiece, centre the saw blade in the kerf and check that saw teeth are not engaged into the material. If saw blade is binding, it may walk up or kickback from the workpiece as the saw is restarted.
- Support large panels to minimise the risk of blade pinching and kickback. Large panels tend to sag under their own weight. Supports must be placed under the panel on both sides, near the line of cut and near the edge of the panel.
- Do not use dull or damaged blades. Blunt or improperly set blades produce narrow kerf causing excessive friction, blade binding and kickback.
- Blade depth and bevel adjusting locking levers must be tight and secure before making cut. If blade adjustment shifts while cutting, it may cause binding and kickback.
- Use extra caution when making a “plunge cut” into existing walls or other blind areas. The protruding blade may cut objects that can cause kickback.
- Check guard for proper closing before each use. Do not operate the saw if guard does not move freely and close instantly. Never clamp or tie the guard so that the blade exposed. If saw is accidentally dropped, guard may be bent. Check to make sure that guard moves freely and does not touch the blade or any other part, in all angles and depths of cut.
- Check the operation and condition of the guard return spring. If the guard and the spring are not operating properly, they must be serviced before use. Guard may operate sluggishly due to damaged parts, gummy deposits, or a build-up of debris.
- Assure that the base plate of the saw will not shift while performing the “plunge cut” when the blade bevel setting is not at 90 degree, Blade shifting sideways will cause binding and likely kick back.
- Always observe that the guard is covering the blade before placing saw down on bench or floor. An unprotected, coasting blade will cause the saw to walk backwards, cutting whatever is in its path. Be aware of the time it takes for the blade to stop after switch is released. This appliance is not intended for use by persons (including children) with reduced physical, sensory or mental capabilities, or lack of experience and knowledge, unless they have been given supervision or instruction concerning use of the appliance by a person responsible for their safety. Recommendations for the use of a residual current device with a rated residual current of 30mA or less. Never hold piece being cut in your hands or across your leg. Secure the workpiece to a stable platform. It is important to support the work properly to minimize body exposure, blade binding, or loss of control. Do not use the tool with abrasive or masonry/wet diamond wheels. Only use blade diameter(s) in accordance with the markings on the tool.
SYMBOLS AND POWER RATING CHART
- Danger! – Read the operating instructions to reduce the risk of injury.
- Caution! Wear safety goggles.
- Caution! Wear ear defenders. The impact of noise can cause damage to hearing.
- Caution! Risk of Injury! Do not reach into the running saw blade.
- Caution! Wear a dust mask.
- Class II Double Insulated.
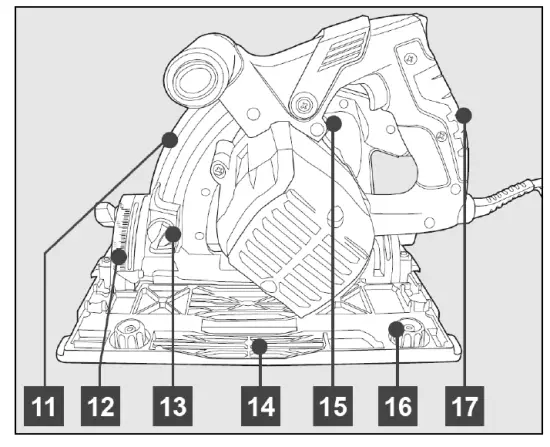
MACHINE DETAILS AND PRODUCT FEATURES
Specifications:
- Mains Voltage – 230-240V / 50Hz
- Power – 1200W
- No-load Speed – 5200rpm
- Blade Size – Ø165×2.6xØ20mm
- Max. Cutting Capacity – 55mm @90 42mm @45
- Mitre Angle – 0°-45°
- Guide Rail – 700mm
- Gross Weight – 8.30kg
- Nett Weight – 6.85kg
Package Contents:
- Plunge Saw
- Blade(fitted)
- 2 x 700mm Guide Rails
- Guide Rail Joiner
- 2 x Guide Rail Clamps
- 2 x Hex key
- Instruction Manual
Intended Use
This power tool is intended to remove and collect wood shavings only. Any other use is considered as not intended use and any damages or injuries result from this unintended use is at operators own risk. This item is also not intended to be used for continuous production or production line use.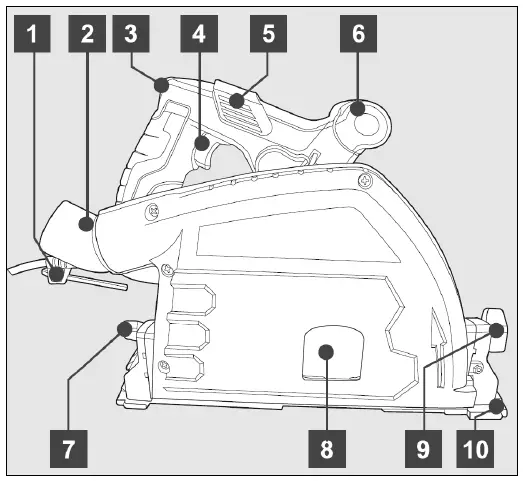
ASSEMBLY INSTRUCTIONS
Assembly
Avoid unintentional starting of the machine. During assembly and for all work on the machine, the power plug must not be connected to the mains supply. Carefully remove all parts included in the delivery from their packaging. Remove all packaging material from the machine and the accessories provided. Before starting the operation of the machine for the first time, check if all parts listed in the box content section have been supplied
Note: Check the power tool for possible damage. Before further use of the machine, check that all protective devices are fully functional. Any lightly damaged parts must be carefully checked to ensure flawless operation of the tool. All parts must be properly mounted and all conditions fulfilled that ensure faultless operation. Damaged protective devices and parts must be immediately replaced by an authorised service centre.
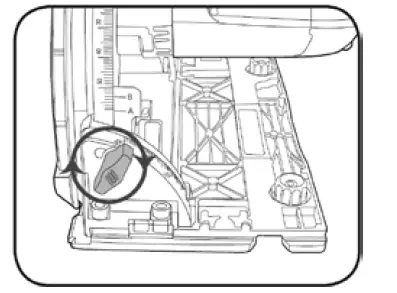
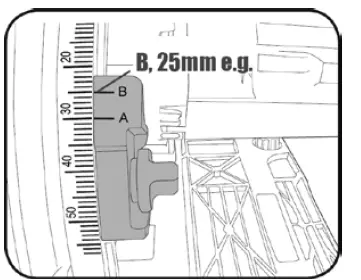
Depth & Bevel Adjustment
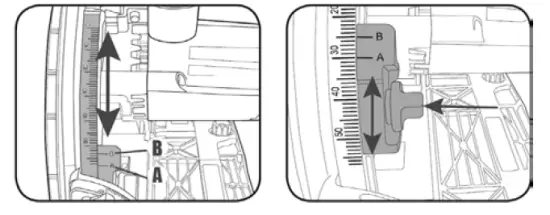
Depth should be adjusted so that no more than one tooth is protruding through the timber. This helps to minimise splintering.
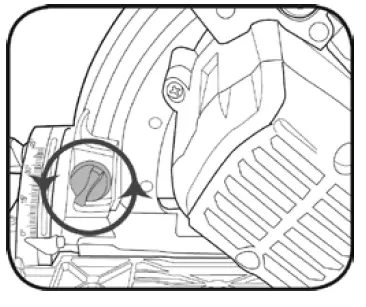
- Loosen the Cutting Depth Knob.

- Press the Knob inwards and slide to set the desired depth using the Cutting Depth Scale.

- Cutting depth A shows the cutting depth WITHOUT Guide rail fitted.
- Cutting depth B shows the cutting depth WITH Guide rail fitted.
- Tighten Cutting Depth Knob.
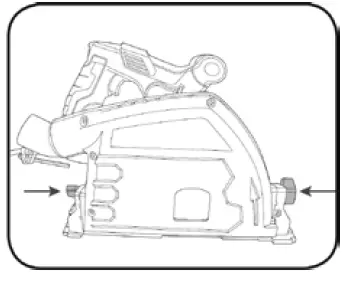
Bevel Adjustment
- Loosen both Bevel Locking Knobs.

- Align Base Plate to desired angle on Bevel Angle Scale.

- Tighten Bevel Locking Knobs.

Operation
Warning!: The tool is recommended for use with a residual current device with a rated residual current of 30mA or less.
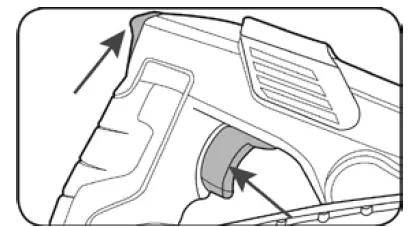
Turning ON and OFF
- Slide and hold the Safety Switch then squeeze the ON/OFF Trigger to start the saw.

NOTE: Allow the saw to reach full speed before beginning a cut. - To stop the saw, release the ON/OFF Trigger.WARNING!: After use, hold the saw away from your body until the blade stops completely.
Guide Rail Adjustment
Tighten or loosen the Adjusting knobs to minimise or increase the clearance between the plunge saw and the guide rail.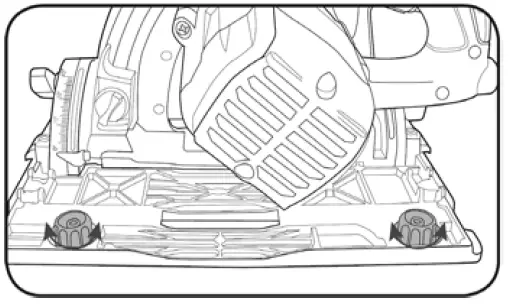
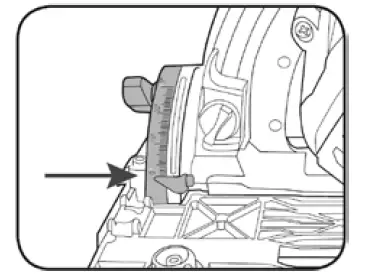
Cutting Line Guides
The Cutting guide will give an approximate line of cut. For a straight cut, use the 0° notch. For a 45° cut, use the 45° notch.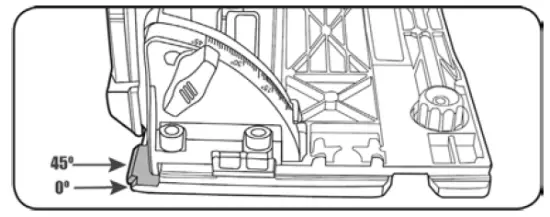
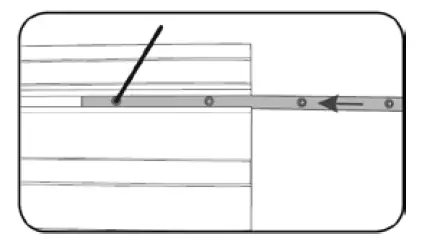
Using the Guide Rail
- To connect two rails, slide the joiner into the notch on the underside of one Guide Rail then tighten the screws with the small(3mm) Hex Key provided.

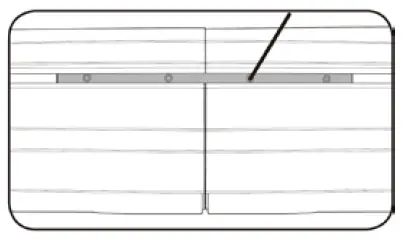
- Slide on the second Guide Rail fully into position and tighten in place.

Note: Additional Guide Rails may be assembled if required by following the above steps. - Place the Plunge Saw in the Guide Rail.

Note: In confined spaces using one 700mm guide rail is ideal.

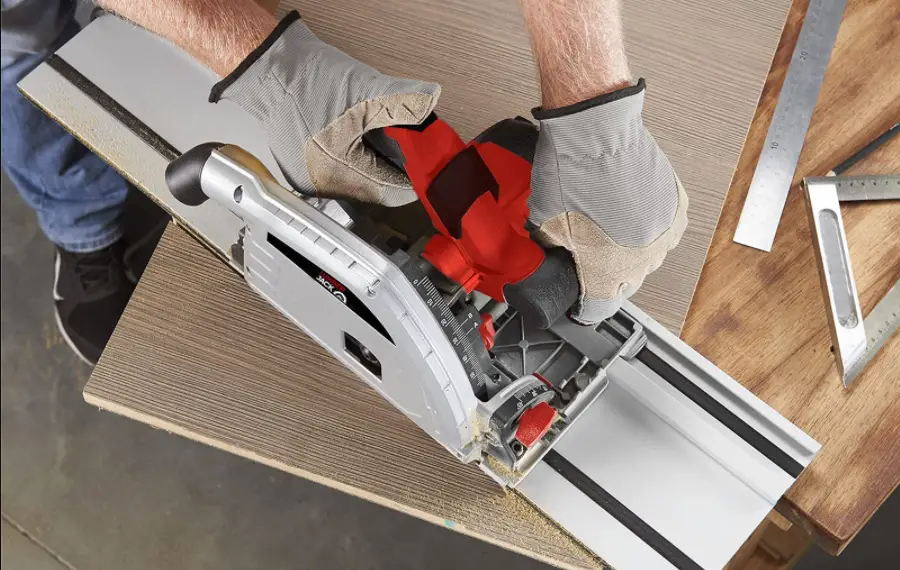
Sawing With the Guide Rail
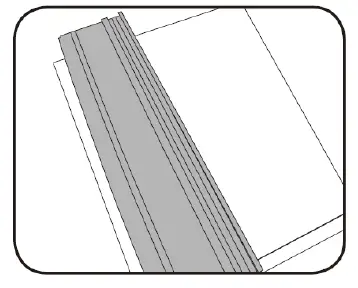
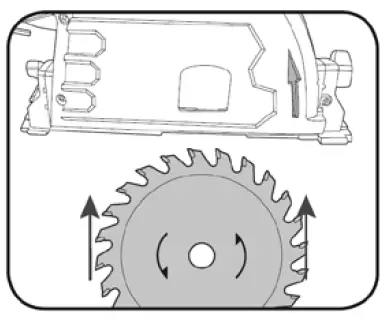
The Guide Rail is used to carry out straight cuts. The rubber lip (black rubber lip) on the guide rail acts as a splinter guard; it prevents fraying of the surface while sawing wooden materials. For this, the teeth of the saw blade must face directly against the rubber lip.
Note: On the very first cut, the rubber lip will be adapted with the guide rail to the plunge saw.
- Place the Guide Rail onto the material to be cut.

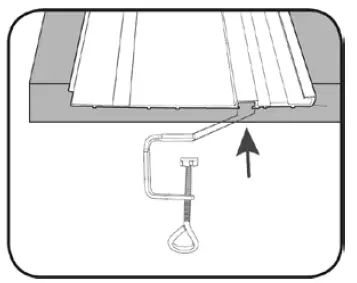
- Place a Clamp at either end of the Guide Rail and clamp the material to be cut.

- Ensure the cutting depth is set and locked to the desired depth.

- Place the Plunge Saw in the guide Rail.

- Hold the saw securely with both hands and start the tool.

- Press the saw downwards to reach the sawing depth set at step 3.

- Move the saw through the material to perform the cut.

- Once complete, release the ON/OFF trigger and move the saw blade upwards.
OPERATION
Blade fitment
Warning!: Ensure the tool is switched OFF and disconnected from the power supply before performing any of the following tasks. The tool is recommended for wood cutting only and is not recommended for use with abrasive wheels or masonry/diamond cutting wheels. Only use 165mm wood cutting blades.
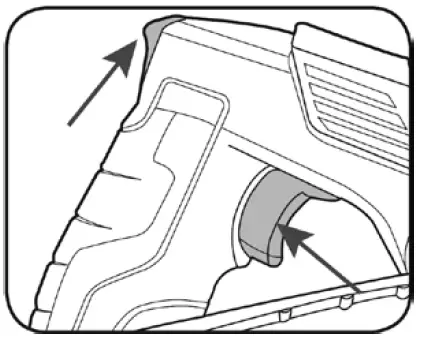
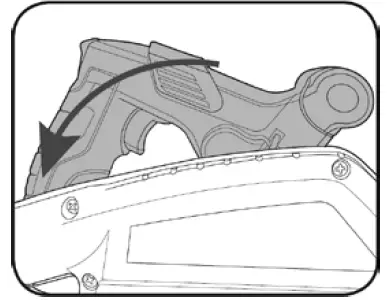
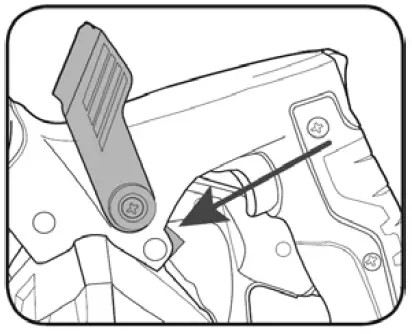
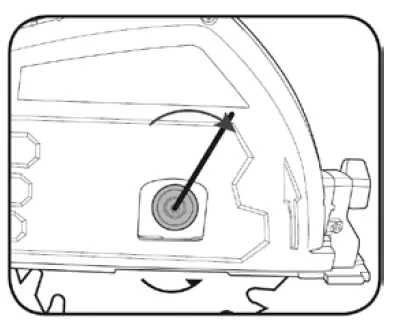
- Lift the Blade Change Lever.

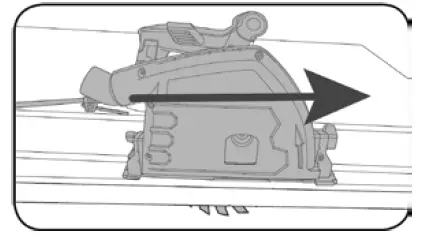
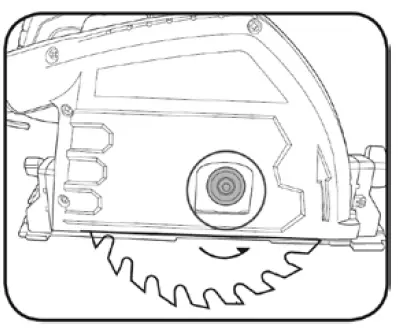
- Press and hold the Safety Switch and push the saw downwards until the Blade Bolt is visible. The motor will lock into place.

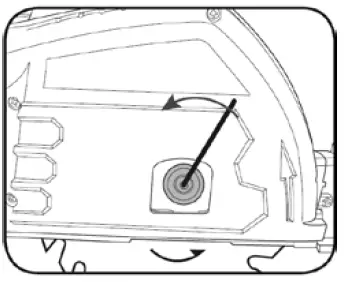
- Press and hold the Blade Locking Lever.

- Use the large(5mm)Hex Key to undo the Blade Bolt, turning anti-clockwise.

Important!: Always wear gloves when handling saw blades, risk of injury. - Remove and replace blade. Ensure arrows on the blade point in the same direction as the arrow on the blade guard.

- Fit outer Blade Flange and blade bolt. Depress blade Locking Lever and tighten blade bolt.

- Set the plunge saw to its original position.

MAINTENANCE
- Keep the vents of the saw clean at all times. If possible, prevent foreign matter from entering the vents.
- After each use, blow air through the saw housing and guard, to ensure it is free from all dust particles which may build up. Build up of dust particles may cause the saw to overheat and fail.
- If the enclosure of the saw requires cleaning, do not use solvents but a moist soft cloth only. Never let any liquid get inside the saw; never immerse any part of the saw into a liquid.
- The grease in the gearbox will require replenishment after extensive use of the saw. Please see a power tool repairer to provide this service.
Carbon Brushes
When the carbon brushes wear out, the saw will spark and/or stop. Discontinue use as soon as this happens. They should be replaced prior recommencing use of the saw. Carbon brushes are a wearing component of the saw therefore not covered under warranty. Continuing to use the saw when carbon brushes need to be replaced may cause permanent damage to the saw. Carbon brushes will wear out after many uses. When the carbon brushes need to be replaced, take the saw to an electrician or a power tool repairer for a quick and low cost replacement. Always replace both carbon brushes at the same time.
Troubleshooting
Circular saw tips
Always hold the soft grip handle with one hand and the front handle with the other. Maintain a firm grip and operate the ON/OFF switch with a positive action. Never force the saw. Use light and continuous pressure. Allow the saw to reach full speed before beginning a cut. When cutting is interrupted, to resume cutting, depress the lock-off button and squeeze the ON/OFF switch and allow the blade to reach full speed, re-enter the cut slowly and resume cutting. When cutting across the grain, the fibres of the wood have a tendency to tear and lift. Advancing the saw slowly minimizes this effect. For a finished cut, a cross cut blade or mitre blade is recommended.
Sparking visible through the housing air vents
A small amount of sparking may be visible through the housing vents. This is normal and does not indicate a problem.
Excessive sparking visible through the housing air vents and/or the saw failing to operate
May indicate the carbon brushes have worn out and need to be replaced. Carbon brushes should only be replaced by a qualified electrician or power tool repairer.
LUMBERJACK GUARANTEE
Guarantee
- Lumberjack guarantees that for a period of 12 months from the date of purchase the components of qualifying products (see clauses 1.2.1 to 1.2.8) will be free from defects caused by faulty construction or manufacture.
- During this period Lumberjack, will repair or replace free of charge any parts which are proved to be faulty in accordance with paragraph 1.1 providing that:
- You follow the claims procedure set out in clause 2
- Lumberjack and its authorised dealers are given reasonable opportunity after receiving notice of the claim to examine the product
- If asked to do so by Lumberjack or its Authorised dealer, you return the product at your own cost to Lumberjack’s or supplying Authorised Dealer’s premises, for the examination to take place clearly stating the Returns Material Authorisation number given by Lumberjack or an Authorised Dealer.
- The fault in question is not caused by industrial use, accidental damage, fair wear and tear, wilful damage, neglect, incorrect electrical connection, misuse, or alteration or repair of the product without approval.
- The product has been used in a domestic environment only
- The fault does not relate to consumable items such as blades, bearings, drive belts, or other wearing parts which can reasonably be expected to wear at different rates depending on usage.
- The product has not been used for hire purposes.
- The product has been purchased by you as the guarantee is not transferable from a private sale.
Claims Procedure
In the first instance please contact the Authorised Dealer who supplied the product to you. In our experience many initial problems with machines that are thought to be faulty due to faulty parts are actually solved by correct setting up or adjustment of the machine. A good Authorised Dealer should be able to resolve the majority of these issues much more quickly than processing a claim under the guarantee. If a return is requested by the Authorised Dealer or Lumberjack, you will be provided with a Returns Material Authorisation number which must be clearly stated on the returned package, and any accompanying correspondence. Failure to provide a Returns Material Authorisation number may result in item being refused delivery at Authorised Dealer. Any issues with the product resulting in a potential claim under the guarantee must be reported to the Authorised Dealer from which it was purchased within 48 hours of Receipt.
If the Authorised Dealer who supplied the product to you has been unable to satisfy your query, any claims made under this Guarantee should be made directly to Lumberjack. The Claim itself should be made in a letter setting out the date and place of purchase, giving a brief explanation of the problem which has led to the claim. This letter should be then sent with proof of purchase to Lumberjack. If you include a contact number with this it will speed your claim up. Please note that it is essential that the letter of claim reaches Lumberjack on the last day of this Guarantee at the latest. Late claims will not be considered.
Limitation of Liability
- We only supply products for domestic and private use. You agree not to use the product for any commercial, business or resale purposes and we have no liability to you for any loss of profit, loss of business, business interruption or loss of business opportunity.
- This Guarantee does not confer any rights other than these expressly set out above and does not cover any claims for consequential loss or damage. This Guarantee is offered as an extra benefit and does not affect your statutory rights as a consumer.
Notice
This Guarantee applies to all product purchased from an Authorised Dealer of Lumberjack within the United Kingdom. Terms of Guarantee may vary in other countries.
CE DECLARATION OF CONFORMITY
TOOL SAVE
Unit C, Manders Ind. Est.,
Old Heath Road, Wolverhampton, WV1 2RP.
Tel: 01902 450 470
Declares that the Plunge Saw Kit(PS165)
Is in compliance with the regulations included in the Directives:2006/42/EC
EC DECLARATION OF CONFORMITY
Certificate for EC-type examination delivered by TÜV Rheinland LGA Products Gmbh -,Tillystra ße 2 – 90431 Nürnberg (Registration No.:AM 50363690 0001)
Person who declares: Bill Evans.
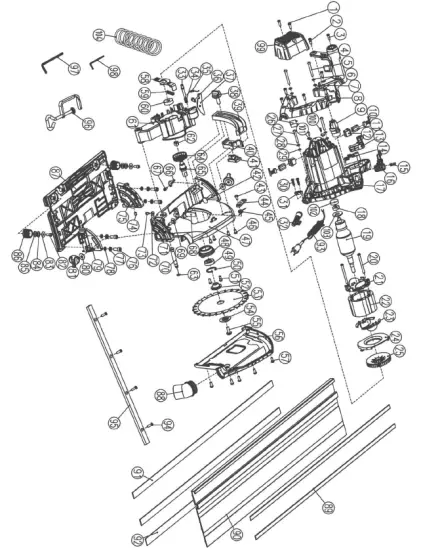
Parts List
| No. | Description | No. | Description |
| 1 | Self tapping screw ST4.1×16-F | 31 | Cable clamp |
| 2 | Self tapping screw ST4.1×16-F | 32 | Cable sheath |
| 3 | Self tapping screw ST4.1×16-F | 33 | Lifting locking pin |
| 4 | Lock handle | 34 | Spring |
| 5 | Pan head screw M5x42 | 35 | Torsion Spring |
| 6 | Small washer 5 | 36 | Hexagon socket cap screws M5x16 |
| 7 | Spring washer 5 | 37 | Lifting limit shaft |
| 8 | Handle | 38 | Locking knob |
| 9 | Lock wheel | 39 | Depth mark |
| 10 | Carbon brush assembly | 40 | Lifting instructions block |
| 11 | Copper bush | 41 | Lifting instructions block sea |
| 12 | Brush box | 42 | Square neck bolt M6x30 |
| 13 | Switch trigger | 43 | Flat head screw M5x12 |
| 14 | Switch | 44 | Locking plate |
| 15 | Switch spring | 45 | Torsion Spring for locking plate |
| 16 | Push rod | 46 | Self tapping screw ST4.1×12-F |
| 17 | Housing | 47 | Fixed guard |
| 18 | Bearing 607 RS(7x19x6) | 48 | Gear cover |
| 19 | Armature assembly | 49 | Bearing 6001-2RS (40x17x12) |
| 20 | Self tapping screw ST4.1×65-F | 50 | Circlip for hole 28 |
| 21 | Stator insulation board(front) | 51 | Lock screw M5X12 |
| 22 | Stator assembly | 52 | Saw blade seat |
| 23 | Stator insulation board(back) | 53 | Saw blade (F165) |
| 24 | Fan shroud | 54 | Saw blade cover plate |
| 25 | Fan | 55 | Flat round head screw M8x20 |
| 26 | Capacitor 0.33μ | 56 | Upper cover |
| 27 | Pan head screw M5x35 | 57 | Lock screw M4x12 |
| 28 | Self tapping screw ST4.1×16-F | 58 | Spanner for spindle lock |
| 29 | Self tapping screw ST4.1×16-F | 59 | Spring for spindle lock |
| 30 | Self tapping screw ST4.1×16-F | 60 | Bearing 6000 RS(8x22x7) |
| No. | Description | No. | Description |
| 61 | Gear box | 83 | Big washer 5 |
| 62 | Oil bearing | 84 | Wave washer 8 |
| 63 | Circlip for shaft 8 | 85 | Small washer 8 |
| 64 | Big gear | 86 | Adjust knob |
| 65 | Output shaft | 87 | Base plate |
| 66 | Dial pointer | 88 | Dust pipe |
| 67 | Hexagon socket cap screws M4x6 | 89 | Rail friction strip |
| 68 | Lift spring seat | 90 | Rail |
| 69 | Square neck bolt M6?2 | 91 | Rail antislip strip |
| 70 | Spindle | 92 | Rail rubber strip |
| 71 | Lock screw M6?2 | 93 | Cable and plug |
| 72 | Big washer 4 | 94 | Lock screw M6X6 |
| 73 | Self tapping screw ST3.5×9-F | 95 | Rail connect strip |
| 74 | Lock screw M6x8 | 96 | Clamping device |
| 75 | Front bracket | 97 | Socket head wrench 5mm |
| 76 | Hexagon socket cap screw M6x15 | 98 | Socket head wrench 3mm |
| 77 | Small washer 6 | 99 | Motor cover |
| 78 | Spring washer 6 | 100 | Screw |
| 79 | Back bracket | 101 | Holder plate |
| 80 | Big washer 6 | 102 | Ball bearing vibration damper |
| 81 | Adjust knob | 103 | Insulation |
| 82 | Hexagon socket cap screw M5x12 | 104 | Spring |
Parts Diagram