![]() USER MANUAL
USER MANUAL
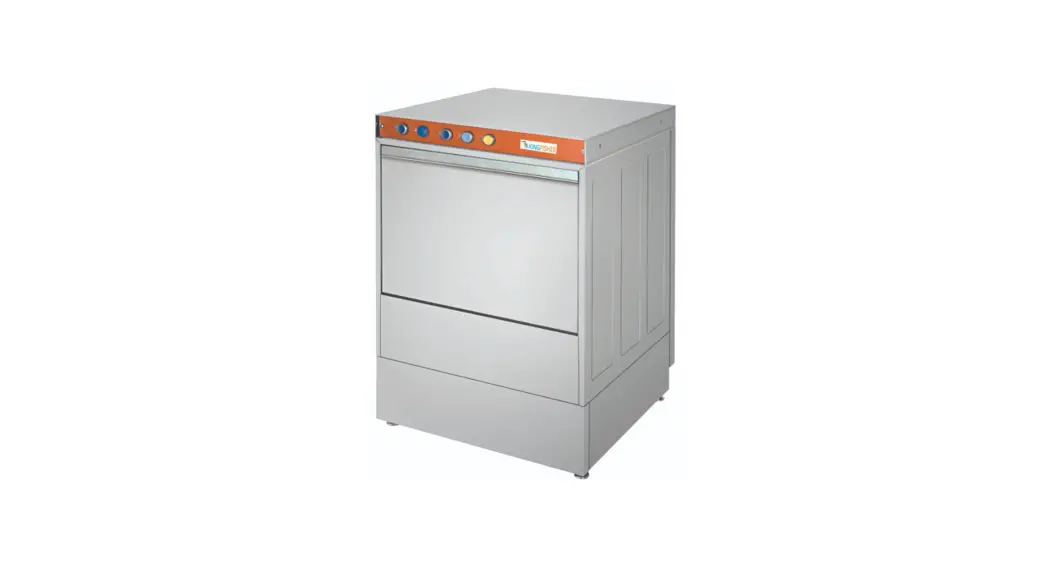
FOR KINGFISHER DELUXE
UNDERCOUNTER GLASS & DISHWASHERS
INTRODUCTION
Welcome to your new Kingfisher Deluxe Ware washer.
This manual refers to more than one type of unit in the range. For reference, refer to the product specifications overleaf to identify your appliance.
Unpacking & Positioning![]() This appliance is not designed to be moved by hand from area to area. It must be moved into position on a pallet with a forklift or other suitable lifting equipment before unboxing.
This appliance is not designed to be moved by hand from area to area. It must be moved into position on a pallet with a forklift or other suitable lifting equipment before unboxing.![]() Upon unwrapping, inspect the machine for damage immediately. If any issues are noticed, please contact the retailer directly.
Upon unwrapping, inspect the machine for damage immediately. If any issues are noticed, please contact the retailer directly.![]() Read this user manually carefully, particularly installation instructions overleaf before attempting to use or operate the machine.
Read this user manually carefully, particularly installation instructions overleaf before attempting to use or operate the machine.
Safety Instructions![]() Do not use the appliance in areas without sufficient lighting.
Do not use the appliance in areas without sufficient lighting.![]() Do not touch moving parts of the appliance whilst it is in operation.
Do not touch moving parts of the appliance whilst it is in operation.![]() Do not install or use the appliance in the presence of flammable or explosive materials.
Do not install or use the appliance in the presence of flammable or explosive materials.![]() Do not operate the appliance when it is not connected to a water supply
Do not operate the appliance when it is not connected to a water supply![]() This appliance must be earthed in accordance with local regulations. All damage caused by use when not earthed will not be covered under the warranty.
This appliance must be earthed in accordance with local regulations. All damage caused by use when not earthed will not be covered under the warranty.![]() If for any reason there is a malfunction of the appliance which causes a leak of water, ensure that the electrical supply is switched off at the plug/circuit breaker immediately before touching the appliance.
If for any reason there is a malfunction of the appliance which causes a leak of water, ensure that the electrical supply is switched off at the plug/circuit breaker immediately before touching the appliance.![]() In the event of a malfunction of the appliance which causes fire or smoke, switch off the electrical supply at the plug/circuit breaker immediately. Do not use water to extinguish and instead use a fire extinguisher suitable for electrical fires.
In the event of a malfunction of the appliance which causes fire or smoke, switch off the electrical supply at the plug/circuit breaker immediately. Do not use water to extinguish and instead use a fire extinguisher suitable for electrical fires.![]() For further assistance, please call our UK service partner on 01279 876 500 or write an email to [email protected]
For further assistance, please call our UK service partner on 01279 876 500 or write an email to [email protected]
PRODUCT SPECIFICATIONS
| Model | Dimensions (mm) | Weight (kg) |
| ABW12P | 490(W)x4500(D)x770(H) | 12:00 AM |
| A500KF13 | 590(W)x600(D)x820(H) | 61 |
Technical Information
| Product Code | ABW12P | A500KF13 |
| Capacity | 1200 glasses/hour | 540 plates/hour |
| Basket Dimensions | 400x400mm | 500x500mm |
| Total Power | 2.7kw | 3kw |
| Motor Power | 0.25kw | 0.55kw |
| Boiler Heating | 2.5kw | 2.5kw |
| Tank Heating | 1.8kw | 2.5kw |
| Operating Voltage | 230v | 230v |
| Fuse Rating | 13A | 13A |
| Water Pressure | 2-4 bar | 2-4 bar |
| Program Timer | 120 seconds | 120 seconds |
| Drain Pump | Yes | Yes |
GENERAL INFORMATION
Before installing or using the appliance, read this quick start user manual carefully. Incorrect installation of the machine may damage the product, cause injury to people and invalidate your warranty. The company is not responsible for damage to the appliance because of incorrect use, negligence, wrong connections etc.
- This instruction manual should be kept in a safe place for future reference
- Installation should be made by a qualified service engineer
- Please check for local regulations and rules about proper use & connection
- The appliance is designed for commercial use & operation by trained personnel only
- In the event of a malfunction or failure, turn off the appliance immediately
- The appliance should only be repaired by authorized service personnel
![]() For further assistance, please call our UK service partner on 01279 876 500 or write an email to [email protected]
For further assistance, please call our UK service partner on 01279 876 500 or write an email to [email protected]
INSTALLATION
All Kingfisher Deluxe glass washers & dishwashers are supplied with the following:
- 3 Pin 13 amp UK Plug (Pre-Installed)
- Drain Hose (Pre-Installed)
- Water Inlet Hose (Not Installed)
- Detergent Intake Pipe (Pre-Installed)
- Rinse Aid Intake Pipe (Pre-Installed)
- Two Baskets
- Height Adjustable Feet (4)
![]() IMPORTANT
IMPORTANT
Please take care when unpacking the unit. Ensure the height adjustable feet are installed on to the unit BEFORE moving to the installation location. Once in place ensure unit is level, left to right, front to back as if not this can affect the running of the machine.
Preparation For Start Up
- Open up the packaging and remove all protective film
- Adjust the feet to ensure the appliance is level. Check with a spirit measure to ensure level back to front and side to side
- Connect the elbowed part of the water supply hose to the water inlet solenoid at the rear
- Unwind the drainage hose and clamp the nearest waste outlet. Make sure the hose is not kinked and water can flow freely. The hose should not bend more than 90 degrees
- Incoming water pressure should be between 2-4 bars. If the water pressure is lower or higher, then a pressure reducing valve or booster pump must be fitted
- A water softener should be fitted to prevent limescale build up. Failure to do so could invalidate your machine warranty
- Turn on the water supply and visually check all connections to confirm there are no leaks and everything is connected tightly
Connecting Chemicals:
All units will come supplied with electric automatic chemical dosing pumps fitted internally to the machine. The pickup for these are the two pipes at the rear of the machine.
The pipes will be labelled RINSE and DETERGENT.
Ensure that they are routed to the correct type of chemicals and insert the tube to the liquid.
RECOMMENDED![]()
Wash results and machine longevity can be highly dependent on the quality of chemicals used. Kingfisher has been tested with and always recommends the use of Entire Pro.
It is always advisable to make a small hole in the lid of the chemicals and feed the tube through, you will need to remove the weight and filter before doing so, re attach this when the tube has gone through the lid, screwing the lid back on to the chemical bottle. Ensure the chemical dosing tube has been fed through, so it is at the bottom of the bottle. This is to prevent Oxidization of the chemicals, provide longer shelf life and prevent air locks.
Connecting Power:
Important Notice: The machine must be connected directly to a mains socket that is suitable for an appliance which draws a maximum of 13 Amps. You must not use the appliance with an extension lead or multi-way adapter, etc.
Further Remarks:
- Always allow the machine to heat up prior to the first use of the day. Check the temperature ready indicator prior to washing.
- Before placing items into the basket, it is recommended that you pre-wash. Any solid waste should be cleared first with a sprayer. Heavily baked on grease or debris should be soaked prior to washing in the machine.
- Do not wash materials that are made of plastic. Check items are suitable for washing in a commercial dishwasher at high temperatures first.
- We recommend the use of liquid detergents with a foam control agent. Failure to use the correct detergents could cause improper wash results, excess foaming and damage to your machine.
- If you are using an external water softener, we recommend that you regularly check it to ensure that it has been regenerated and topped up with salt.
- To gain access to the components/controls such as the thermostat temperature controls, simply remove the front panel. IMPORTANT: Before removing the panel, make sure that you disconnect the electric supply.
- The thermal reset button is located to the left of the thermostat.
- The top thermostat is for the Boiler and the bottom thermostat switch is for the Tank. To adjust the boiler temperature to the recommended 80°c, turn the switch 3/4 clockwise. To adjust the tank temperature to the recommended 55-60°c, turn the switch half way clockwise.
OPERATION
Control Panel Overview
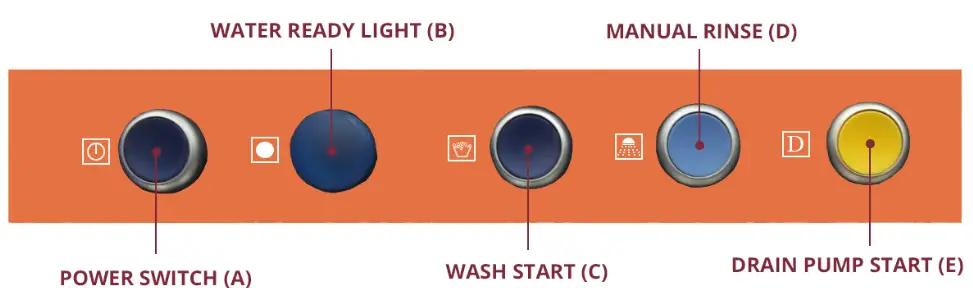
- Shut the door of the appliance
- Press the power switch (A) to turn on the appliance
• The machine will take the water inside and begin heating it
• The water ready light (B) will turn on when the water reaches temperature - After the water ready light (B) has turned on, Press the wash cycle start button (C)
• The machine will then start the 2 minutes wash cycle - During the wash cycle, the washing light will remain on
• Once the wash cycle has finished, this light will switch off - To perform an additional manual rinse cycle:
• Hold the Manual Rinse button (D) - To drain the water after a working day:
• Turn off the machine by pressing the power switch (A)
• Open the door and take out the drain pipe and keep the door open
• Press and hold the manual rinse switch (D) to drain the water
• Once finished draining, open the door and put the drain plug back in
Regular Maintenance
- When the water in the washing tank gets dirty, it must be replaced with fresh water. To do this, switch the machine off and then follow step 6 above to drain the machine.
- We recommend that you regularly clean the washing and rinse nozzles to keep washing results as good as possible. To do this, turn off the machine and disconnect the power. Unscrew each of the nozzles and rinse them through with fresh water. Apply descaler if required to remove any scale build up. Once cleaned, re-assemble all parts and refill the machine.
- If an air lock occurs in the detergent or rinse aid pumps, press and hold the manual rinse cycle button (step 5 above).
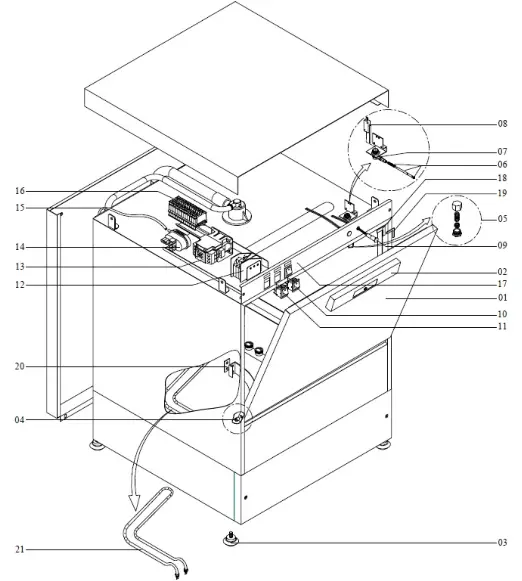
EXPLODED SPARE PARTS DIAGRAM
Kingfisher Deluxe Glasswasher 400mm
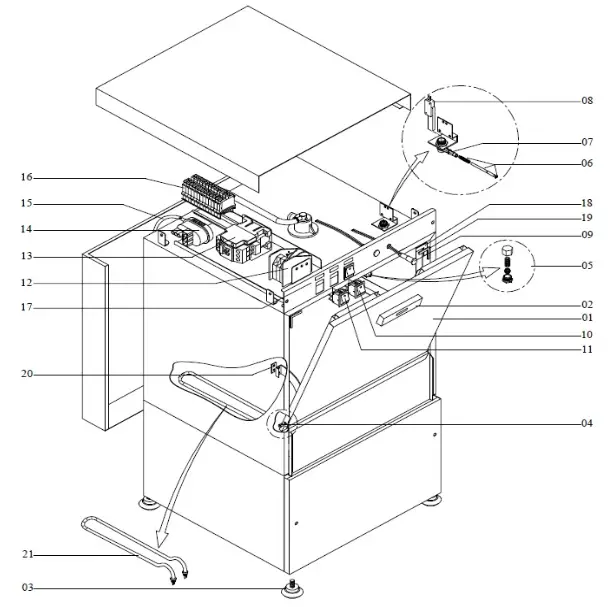
| NO | PRODUCT NAME | NO | PRODUCT NAME | NO | PRODUCT NAME |
| 01 | DOOR | 09 | SIGNAL LAMP | 17 | FASCIA |
| 02 | HANDLE | 10 | ON/OFF SWITCH | 18 | PLASTICS |
| 03 | FOOT | 11 | ON/OFF SWITCH | 19 | RUBBER |
| 04 | SHAFT & SHAFT BEARING | 12 | TIMER M48 | 20 | DOOR STOP |
| 05 | LOCK | 13 | CONTACTOR | 21 | HEATING ELEMENT |
| 06 | SWITCH | 14 | PRESSURE SWITCH | ||
| 07 | ARM | 15 | PRESSURE SWITCH CABLE | ||
| 08 | SWITCH | 16 | CONNECTOR |
EXPLODED SPARE PARTS DIAGRAM PG.2
Kingfisher Deluxe Glasswasher 400mm
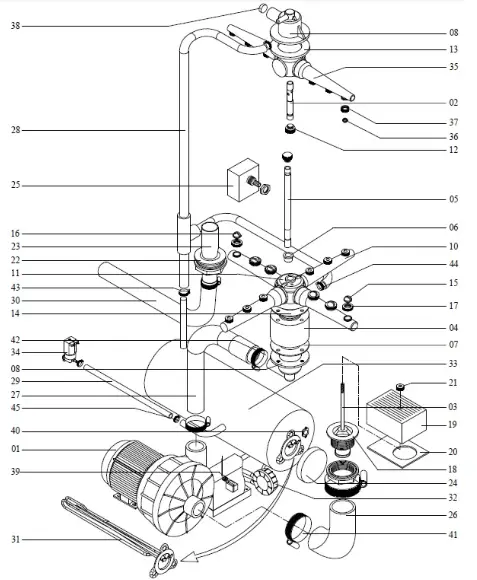
| NO | DESCRIPTION | NO | DESCRIPTION | NO | DESCRIPTION |
| 01 | WASH PUMP | 16 | NOZZLE | 31 | HEATING ELEMENT BOILER |
| 02 | SHAFT | 17 | NUT | 32 | RINSE AID DISPENSER |
| 03 | SUCTION FILTER PIN | 18 | FLANGE | 33 | BOILER |
| 04 | AMPLIFIER | 19 | SUCTION FILTER | 34 | SOLENOID VALVE |
| 05 | SHAFT | 20 | SUCTION FILTER BOTTOM | 35 | RINSE ARM |
| 06 | BEARING | 21 | NUT | 36 | NOZZLE |
| 07 | GASKET | 22 | DRAINER | 37 | NUT |
| 08 | BODY | 23 | DRAIN PIPE | 38 | PLUG |
| 09 | BODY | 24 | LID | 39 | THERMOSTAT |
| 10 | ARM | 25 | PRESSURE POT | 40 | LIMITER |
| 11 | TERMINAL | 26 | HOSE | 41 | CLIP |
| 12 | BOLT | 27 | HOSE | 42 | CLIP |
| 13 | FLANGE | 28 | HOSE | 43 | CLIP |
| 14 | FLANGE | 29 | HOSE | 44 | CLIP |
| 15 | NOZZLE | 30 | HOSE | 45 | CLIP |
Kingfisher Deluxe Dishwasher 500mm
| NO | PRODUCT NAME | NO | PRODUCT NAME | NO | PRODUCT NAME |
| 01 | DOOR | 09 | SIGNAL LAMP | 17 | FASCIA |
| 02 | HANDLE | 10 | ON/OFF SWITCH | 18 | PLASTICS |
| 03 | FOOT | 11 | ON/OFF SWITCH | 19 | RUBBER |
| 04 | SHAFT & SHAFT BEARING | 12 | TIMER M48 | 20 | DOOR STOP |
| 05 | LOCK | 13 | CONTACTOR | 21 | HEATING ELEMENT |
| 06 | SWITCH | 14 | PRESSURE SWITCH | ||
| 07 | ARM | 15 | PIPE FOR PRESSURE SWITCH | ||
| 08 | SWITCH | 16 | CONNECTOR |
Kingfisher Deluxe Dishwasher 500mm

| NO | DESCRIPTION | NO | DESCRIPTION | NO | DESCRIPTION | NO | DESCRIPTION |
| 01 | WASH PUMP | FLANGE | 25 | LID | 37 | NOZZLE | |
| 02 | SHAFT | 14 | FLANGE | 26 | PRESSURE POT | 38 | NUT |
| 03 | SUCTION FILTER | 15 | NOZZLE | 27 | HOSE | 39 | NUT |
| 04 | AMPLIFIER | 16 | NOZZLE | 28 | HOSE | 40 | THERMOSTAT |
| 05 | SHAFT | 17 | NUT | 29 | HOSE | 41 | LIMITER |
| 06 | BEARING | 18 | NUT | 30 | HOSE | 42 | CLIP |
| 07 | GASKET | 19 | FLANGE | 31 | DRAIN HOSE | 43 | CLIP |
| 08 | BODY | 20 | FILTER | 32 | HEATING ELEMENT | 44 | CLIP |
| 09 | BODY | 21 | BOTTOM | 33 | RINSEAID DISPENSER | 45 | CLIP |
| 10 | ARM | 22 | NUT | 34 | BOILER | 46 | CLIP |
| 11 | TERMINAL | 23 | DRAINER | 35 | SOLENOID VALVE | ||
| 12 | BOLT | 24 | DRAIN PIPE | 36 | ARM |
ELECTRIC CIRCUIT DIAGRAM
Kingfisher Deluxe Glasswasher 400mm
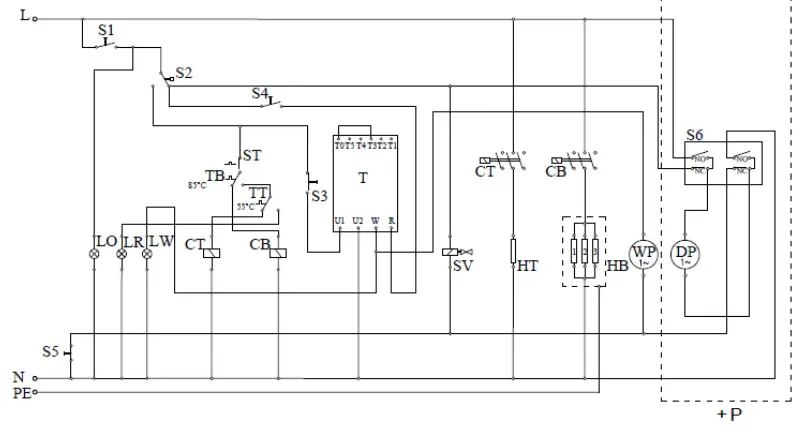
| S1 – On/Off Switch | CB – Boiler Contactor (15A) |
| S2 – Pressure Switch | CT – Tank Contactor (9A) |
| S3 – Programme Start Button | HB – Boiler Heater |
| S4 – Manual Rinse Button | HT – Tank Heater |
| S5 – Lid Switch | WP – Washing Pump |
| S6 – Drain Pump Button | DP – Drain Pump |
| ST – Limit Thermostat (100°C) | SV – Solenoid Valve |
| TB – Boiler Thermostat | LO – On/Off Light |
| TT – Tank Thermostat | LR – Water Ready Light |
| T – Timer | LW – Washing Light |
Kingfisher Deluxe Dishwasher 500mm
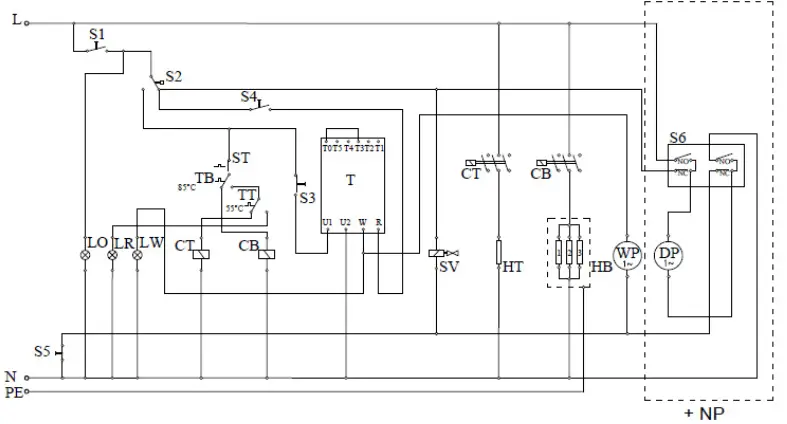
| S1 – On/Off Switch | CB – Boiler Contractor (9A) |
| S2 – Pressure Switch | CT – Tank Contractor (12A) |
| S3 – Programmed Start Button | HB – Boiler Heater |
| S4 – Manual Rinse Button | HT – Tank Heater |
| S5 – Lid Switch | WP – Washing Pump |
| S6 – Drain Pump Button | DP – Drain Pump |
| ST – Limit Thermostat | SV – Solenoid Valve |
| TB – Boiler Thermostat | LO – On/Off Lamp |
| TT – Tank Thermostat | LR – Water Ready Lamp |
| T – Timer | LW – Washing Lamp |
![]()


