
Installation Guide
Version:V1.0
FCC Warning
This device complies with part 15 of the FCC rules. Operation is subject to the following two conditions:
(1) this device may not cause harmful interference, and (2) this device must accept any inte rference received, including interference that may cause undesired operation.
Changes or modifications not expressly approved by the party responsible for compliance could void the user’s authority to operate the equipment.
NOTE: This equipment has been tested and found to comply with the limits for a Class B digital device, pursuant to part 15 of the FCC Rules. These limits are designed to provide reasonable protection against harmful interference in a residential installation. This equipment generates uses and can radiate radio frequency energy and, if not installed and used in accordance with the instructions, may cause harmful interference to radio communications. However, there is no guarantee that interference will not occur in a particular installation. If this equipment does cause harmful interferenceto radio or television reception, which can be determined by turning the equipment off and on, the user is encouraged to try to correct the interference by one or more of the following measures:
-Reorient or relocate the receiving antenna.
- Increase the separation between the equipment and receiver.
- Connect the equipment into an outlet on a circuit different from that to which the receiver is connected.
- Consult the dealer or an experienced radio/TV technician for help.
Radiation Exposure Statement
This equipment complies with FCC radiation exposure limits set forth for an uncontrolled environment.
This equipment should be installed and operated with minimum distance 20cm between the radiator and your body.
Step 1 Hardware Connections
* This picture is for reference only, the specific interfaces and buttons are subject to the actual object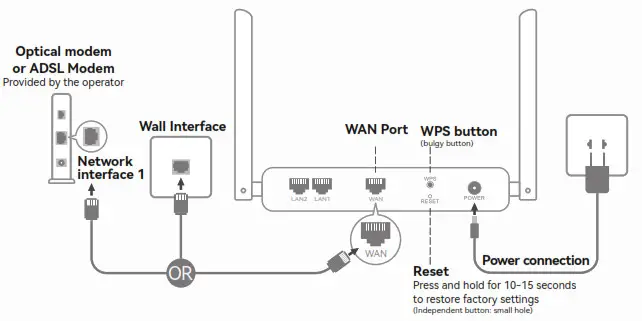
Step 2 Internet settings
Connect the phone (or computer) to the router’s “wireless-XXXX” and then set it up as following steps:
(XXXX represents the last 4 digits of the MAC address, or see the sticker on the back of the router to obtain the wireless network name)
Led lights function description

| System light (single light and two-colors) | |
| Red light steady on | Powered on |
| Red light off | System is starting |
| Red light flashes | Without network |
| Blue or green light is steady on | Network connected |
| Network Led light | |
| Light steady on or flashes | Network cable connected |
| Light off | Network cable not connected |
| Panel light status (multiple lights) | |
| Power light | Steady on: powered on |
| WiFi light | Light off: the system is starting Light flashing: data transmission is available (it is always on when there is no data) |
| WAN/LAN light | Light on: Network cable is connectedLight off: Network cable is not connected Light flashing: data transmission is available |
| Note: 5G WiFi is steady on for some models | |
Interfaces/buttons description
| Interface | |
| POWER | Power port |
| WAN (Network input port) | Can be connected to optical modem or community broadband connectio |
| LAN (Network output port) | Can be connected to computers, set-top boxes and other wired devices |
| Double reset button | |
| WPS (key) | Press for 2-3 seconds to trigger WPS |
| RESET (small hole) | Press and hold for 10-15 seconds to restore factory settings |
| Single reset button | |
| WPS/RST button | Short press 1 to 2 seconds for WPS connection, long press 10 to 15 to restore factory Settings |
| Note: “WPS/RST” are small holes for some models | |


