![]()
E30 II
Model:TP 70F
User Manual
TP70F E30 II Desktop Digital To Analog Converter
 |  |
 | |
 |  |
Thank you for purchasing TOPPING E30 II ! E30 II is a high performance DAC with USB, coaxial and optical inputs. It is compatible with up to 768kHz/32bit and DSD512. E30 II is designed for full digital volume control and equipped with LED display screen. It can be used as not only a DAC but also pre-amplifier. We hope it could bring you more fun at enjoying music. Now we recommend you read this manual so that you can use all the features of E30 II correctly.
Contents list
E30 II x1
DC cable x 1
USB cable x 1
Remote control x 1
User manual x 1
Warranty card x 1
Note: You can download the driver and user manual on http://www.topping.audio/.
Attribute
| Measured | 10.0cm x 12.5an x3.2cm |
| Weight | 295g |
| Power input | DCSVFIA |
| Signal Input | USB/OPT/COAX |
| Line Out output | RCA |
Front panel
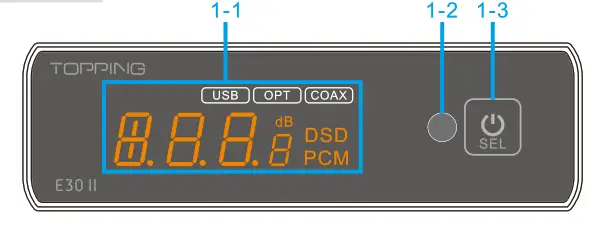
1-1 LED screen
1-2 Remote control receiver
1-3 Multifunction touch button
Rear panel
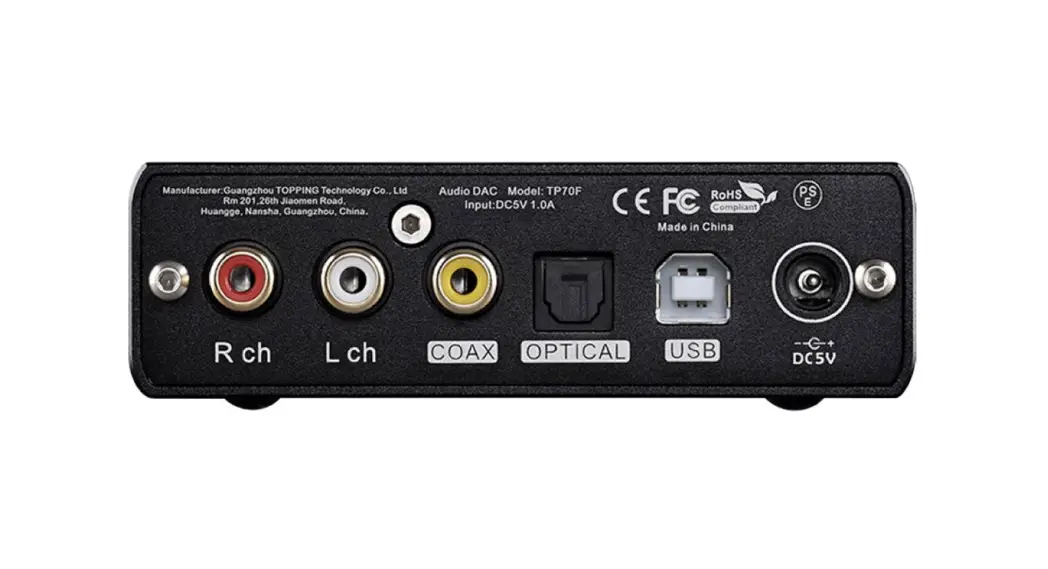
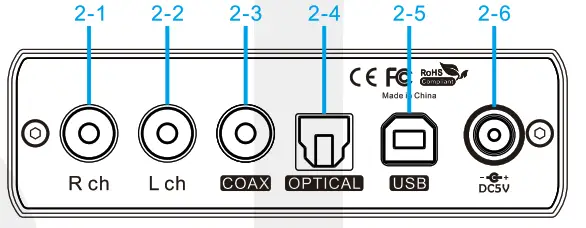 2-1 Right channel single-ended RCA output 2-2 Left channel single-ended RCA output 2-3 Coaxial SPDIF input 2-4 Optical SPDIF input 2-5 USB input 2-6 Power input ( DC5V/1A)
Display
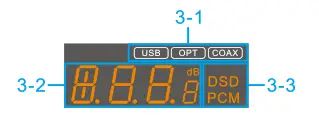 3-1 Input channel (If the current input is connected successfully, the current input indication is always on, otherwise, the indication flashes.)
3-2 Sample rate indication (in DAC mode) or volume indication (in PRE mode)
* 3-3 PCM/DSD format indication
*In PRE (Pre-amplifier) mode, the E30 II will always display the volume level. When the sampling rate of the input signal changes, it will display the sampling rate for 2s and then continue displaying the volume level; In DAC mode, the E30 II will always display the sampling rate, keep the maximum volume output and the volume is not adjustable. Please refer to the Setup Menu to switch the output mode.
Remote control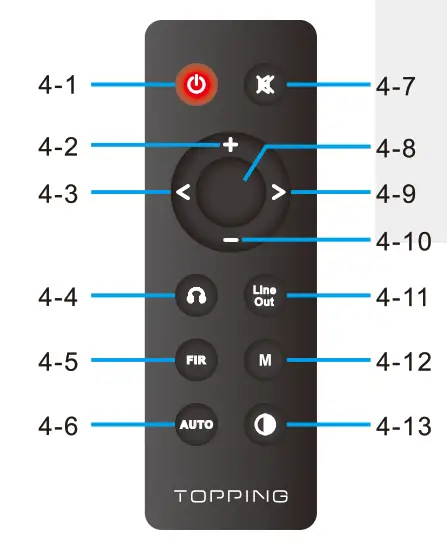
| 4-1 Standby 4-2 Volume up 4-3 Switch to previous input 4-4 Invalid button 4-5 Filter setting 4-6 Automatic standby | 4-7 Mute 4-80K button 4-9 Switch to next input 4-10 Volume down 4-11 Invalid button 4-12 Invalid button 4-13 Brightness* |
- *Note: “L-A” has the same brightness as “L-2”. The differences lie in when there is no operation after 30 seconds under “L-A” mode, the screen will be automatically turned off, only displays the current input. You can press any button to light up the screen.
Input range
| Use IN | PCM 04.1kHz-768kHz/16bit-32bit |
| DSO OSD84.05DS12 (Native). 05064.050256 (Dop) | |
| COAX/OPT IN | PCM 04.1kHz-192kHz/16bit-24bit |
Specifications
| E30 II DAC parameters (UneOut/USB In@96kHz) | |
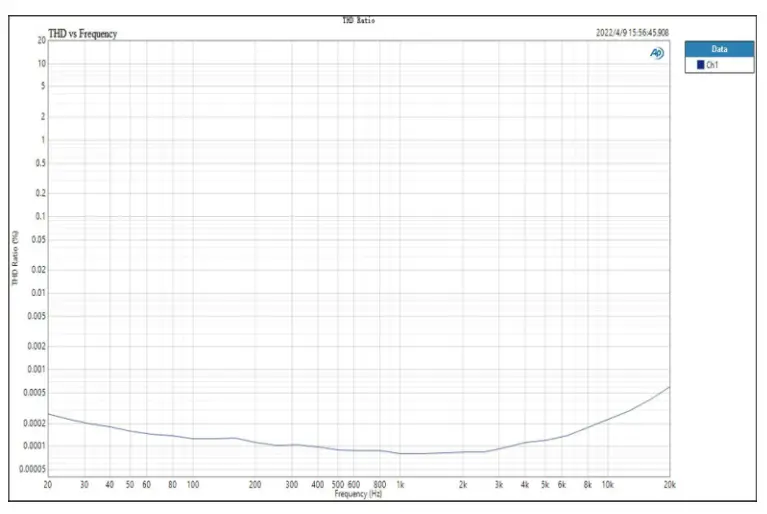
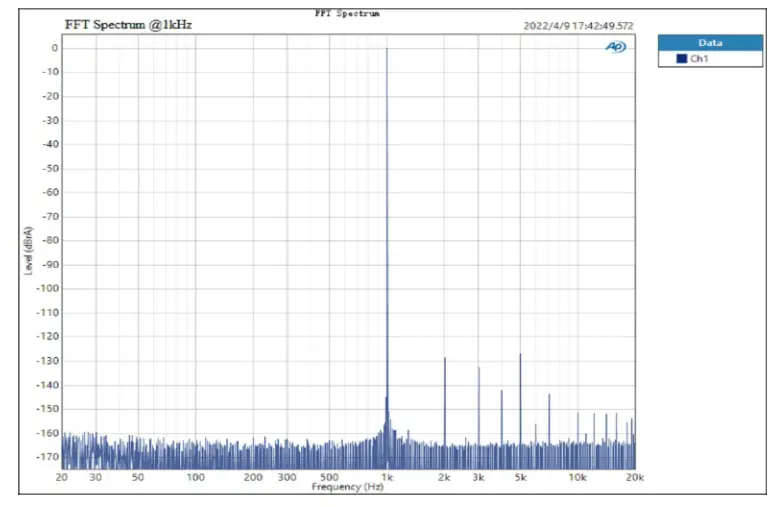
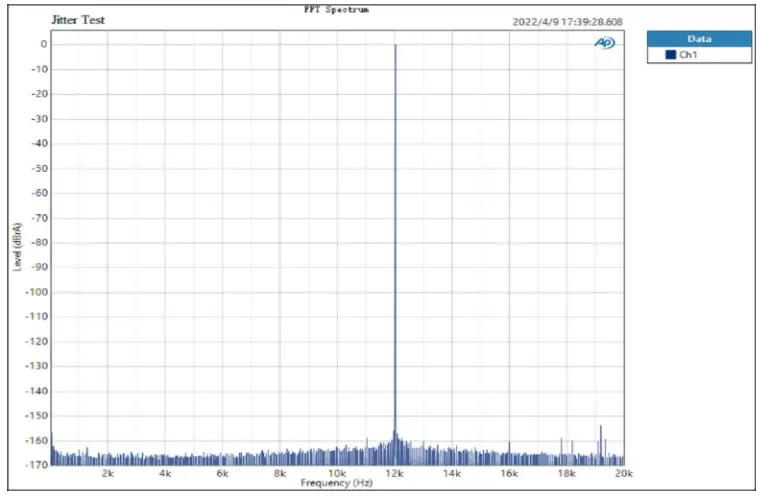
| THD+N ©1kHz (A-wt) | <0.00015% |
| THD ©90kBw (No-wt) | <0.00060% at 20-20kHz |
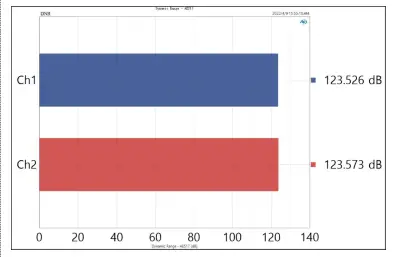
| SNR ©A-wt | 123dB ©1kHz |
| Dynamic range ©A-wt | 123dB 1kHz |
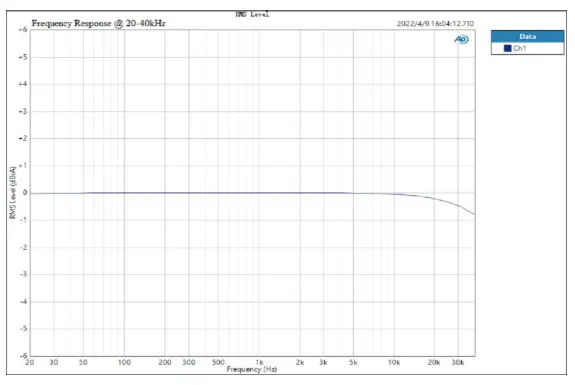
| Frequency Response | 20Hz-20kHz (±0.3dB) |
| 20Hz-40kHz (±0.8dB) | |
| Output Level | 2.1Vrms 00dBFS |
| Noise ©A-wt | <1.5uVrms |
| Channel Crosstalk ©1kHz | -132dB |
| Channel Balance | <0.3013 |
| Output Impedance | 200 |
Operation
Power on & off / standby operation
- Power on: When connects to power supply, E30 II goes into the standby state, the screen displays a bright dot.
- Standby setting: When it is working, press and hold the multi-function touch button on the front panel to enter standby state and short press to exit standby state when it is in standby. Or you can directly press the standby button on remote control to enter or exit standby state.
Note: When the automatic standby function is on, if the current input is not connected or input signal is in valid in 1 minute, it will automatically enter the standby state. Once having detected valid signal, it will automatically return to working state.
Volume setting
(1) The enter and exit of mute state: Press the mute button on the remote control to set mute, press the mute button again or adjust the volume to exit mute state.
(2) Volume adjusting: Adjust volume by pressing the up/down button on the remote control. Press and hold the up/down button will quickly adjust the volume, so please be careful in order to protect your hearing.
Note: Volume is fixed to 0dB in DAC mode and volume adjusting is invalid in this mode.
Input channel switching
Press the multi-function touch button on the front panel or the “Switch to previous input button” and the “Switch to next input button” on the remote control to switch the input in cycle.
Enter the setup menu: In the standby state, press and hold the multi-function touch button on the front panel for 5 seconds to enter the setup menu of E30 II.
Change and save of settings: (1) The touch button on the front panel: pres touch button to enter the next setting item, dome press the touch button to set different parameters. Press and hold the touch button until “8-8” is displayed on the screen to save the settings. (2) The remote control: press the volume up/down button to enter the previous/next setting item, press the left/right button to set different parameters. Press the OK button and E30 11 displays “8-8” indicating that the settings have been saved.
Setting descriptions: PCM filter setting
(available for remote control setting, set PCM filter mode when playing PCM)
| Screen display | Description |
| F-1 | Sharp Roll-off |
| F-2 | Slow Roll-off |
| F-3 | Short Delay Sharp Roll-off (Default) |
| F-4 | Short Delay Slow Roll-off |
| F-5 | Super Slow Roll-off |
| F-6 | Low Dispersion Short Delay Filter |
DSD filter setting
(available for remote control setting, set DSD filter mode when playing DSD)
| Screen display | Description |
| F-1 | 39kHz (Default) |
| F-2 | 76kHz |
Screen brightness setting (Available for remote control setting)
| Screen display | Description |
| L-1 | Low |
| L-2 | Mid (Default) |
| L-3 | High |
| La | ilbriitli,s A87Mi°9 74PrienaaV3,gt0:ggaon |
Automatic standby setting (Available for remote control setting)
| Screen display | Description |
| A-0 | Auto on (Default) |
| A-C | Auto off |
Output mode setting
| Screen display | Description |
| m-p | Per-Amp mode (Volume adjustable) (Default) |
| m-d | DAC mode (Volume nonadjustable) |
Remote control setting
| Screen display | Description |
| r-0 | Remote control enabled (Default) |
| r-C | Remote control disabled |
Factory reset: In standby mode, press the Volume down, Volume up and Mute buttons on the remote control in sequence to restore the factory settings.
Trouble shooting
| Phenomenon | Cause | Solution |
| Input Indicator flashes | Unknown signal format | Change to correct format |
| Signal cable did not connected properly | Check or change the cable | |
| No signal input | Check the player | |
| USB did not recognize | pa I:rae cue not connected | Check or change the cable |
| PC’s USB port damaged | Change another port | |
| The PC does not work | Check or try with another PC | |
| tiggrVntellninietil Z the | Enable OTG function | |
| USB input. no sound | Too low volume on PC | Adjust volume |
| E30 II is not selected as the output device on the PC | Set the E30 II as the default output device | |
| INH Err | Supply voltage too high | Pleaseuse ocsv power supply |
| IbIl. Err | Supply voltage too low | Meng use DCSV power supply |
| II you still have problems or questions. pleas* co tact us ([email protected] | ||
Precautions for daily use
- The output jacks not be groun short-circuited.
- You must not keep the E3011 in a hot, humid environment or drop it
- Opening the case instantly voids the warranty!
- Topping accepts no liability for any loss or damage arising directly or indirectly from the failure of E30 II.


