

Bomaker cinema 500 MAX native Full HD 1080P LED Projector
Important Safety Instructions
Thank you for purchasing bomaker Cinema 500 Max projector.
Please read this manual thoroughly before using and keep it for future reference.
If physical injury, loss of data, or damage is caused by failure to follow instructions, the warranty does not apply.
Set Up
- Do not install the projector in places without proper ventilation.
- Do not install the projector in hot and humid places.
- Do not install the projector in dusty or smokey places.
- Do not block the ventilation holes (intake or exhaust).
- Do not install the projector near the temperature and smoke detectors. It may cause a sensor failure.
- Do not install the projector in areas where warm and cool air will blow directly onto the projector, otherwise, it may cause projector failure due to moisture condensation or large temperature changes. Power Supply
- Power off the device before removing the power supply from the socket.
- Use the power cord with caution to avoid unduly bending it. Damaged power cords may cause electric shock or fire.
- Unplug this device if there are lightning storms or when unused for a long period of time.
- Never touch the power cable or the power connection with wet hands.
- Unplug the power cord from the outlet after using the projector.
Repairs
- Never make any repairs to the projector yourself.
- No components in the projector can be repaired by customers.
- Please entrust qualified professional maintenance personnel for repair.
Caution
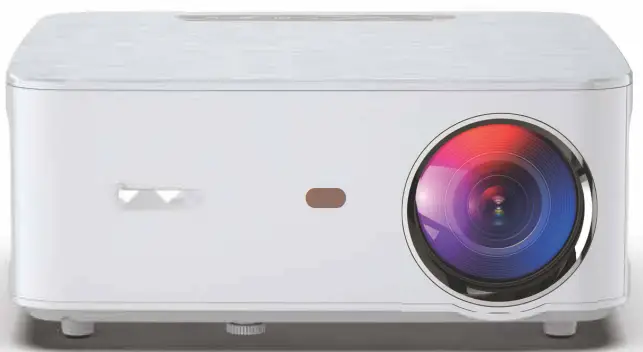
- Do not look at the lens or it may cause severe eye injury.
- During and after use, the temperature near the outlet will rise. Therefore touching it may cause burns.
- Do not place projector in a too-warm or too-cold room, because the high temperature or low temperature will shorten the lifespan of the device. The working environment would be 5°C-35°C better.
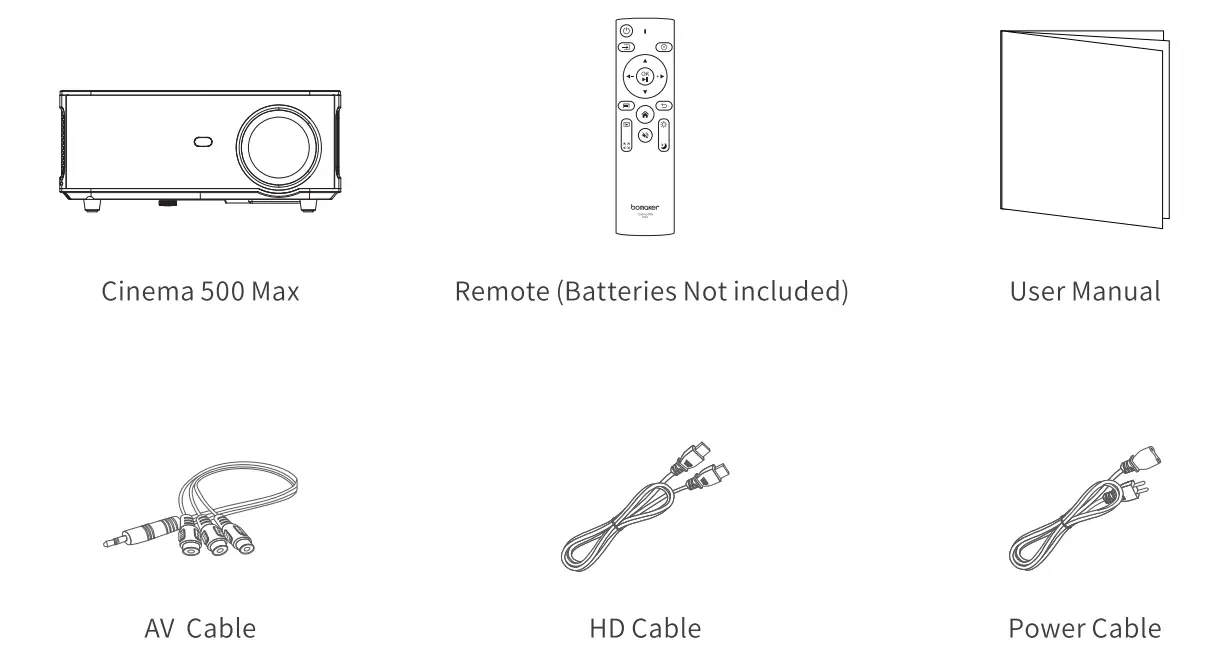
Packing List
Overview
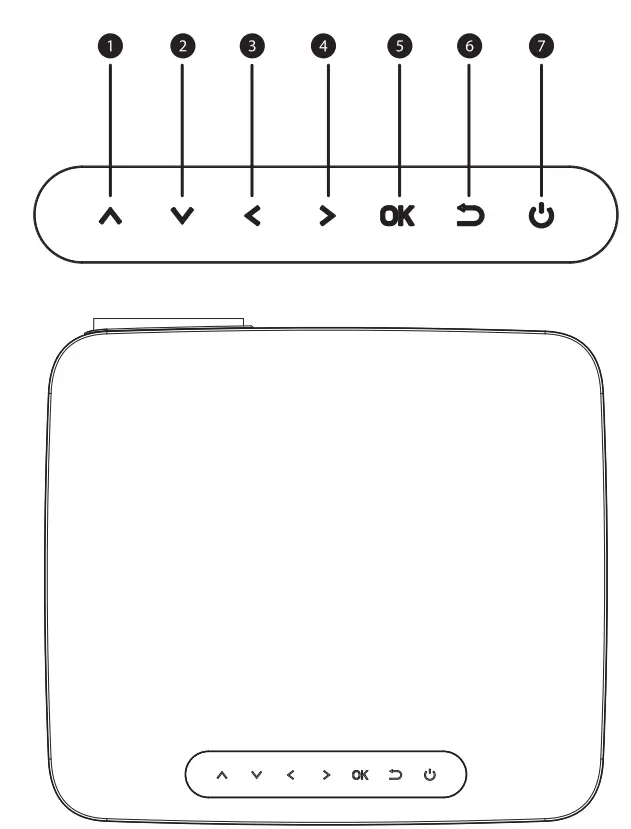
- Up
- down
- Left(Decrease the volume)
- Right(lncrease the volume)
- 0K
- Return
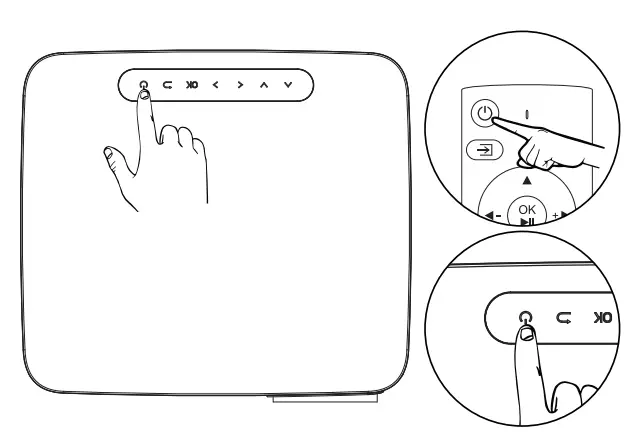
- Power Button
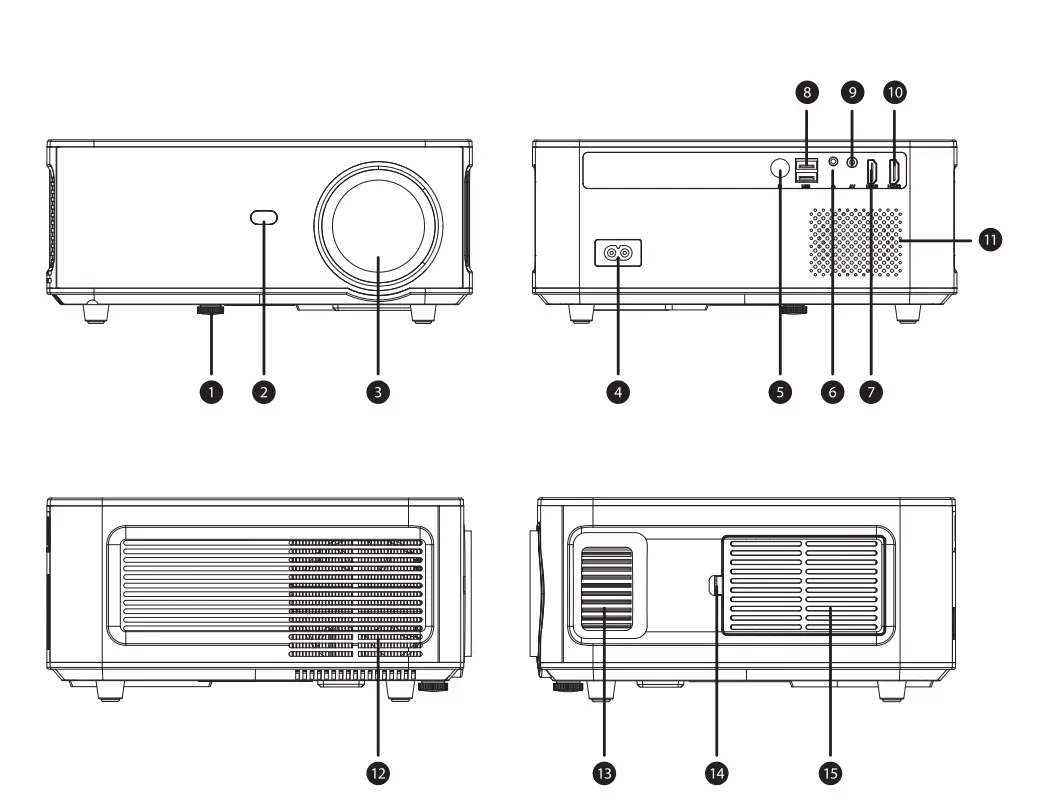
- Adjusting Knob
- IR receiver
- Focus Lens
- Power Switch
- iR for remote control
- 3.5mm port for audio output
- HDMI 1 port
- USB port
- AV port
- HDMI 2 port
- Speaker
- Cooling window
- Focus
- Switch Of Removable Dust Cover
- Removable dust cover
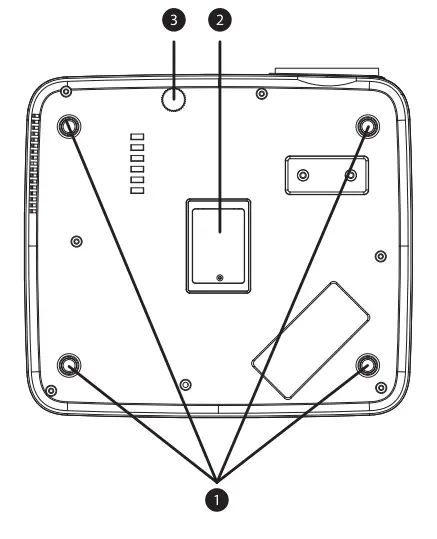
- Projector mount holes
- Maintenance Window
- Adjusting Knob

Remote Control
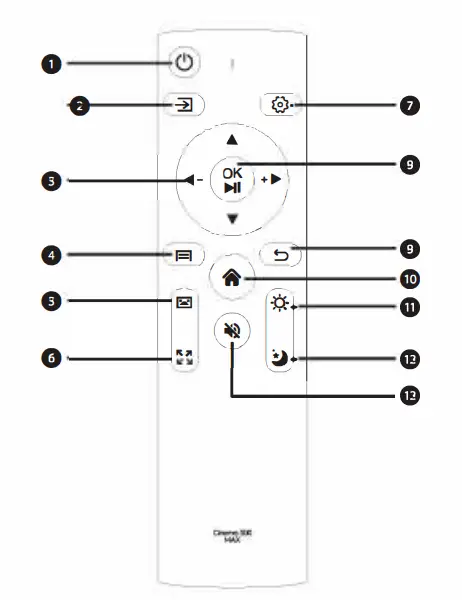
- Power button
- Source button
- “Arrow button (up, down, left, right)”
Left: Decrease the volume
Right:increase the volume - Menu button
- Keystone correction button
Short press for once: Enter the four edges keystone correction Short press for twice: Enter the four points keystone correction - Zoom out button
- Set button
- OK button/Play/pause button
- Back button
- Home button
- One button to light
- Sleep shutdown button
- Mute button
Getting Started
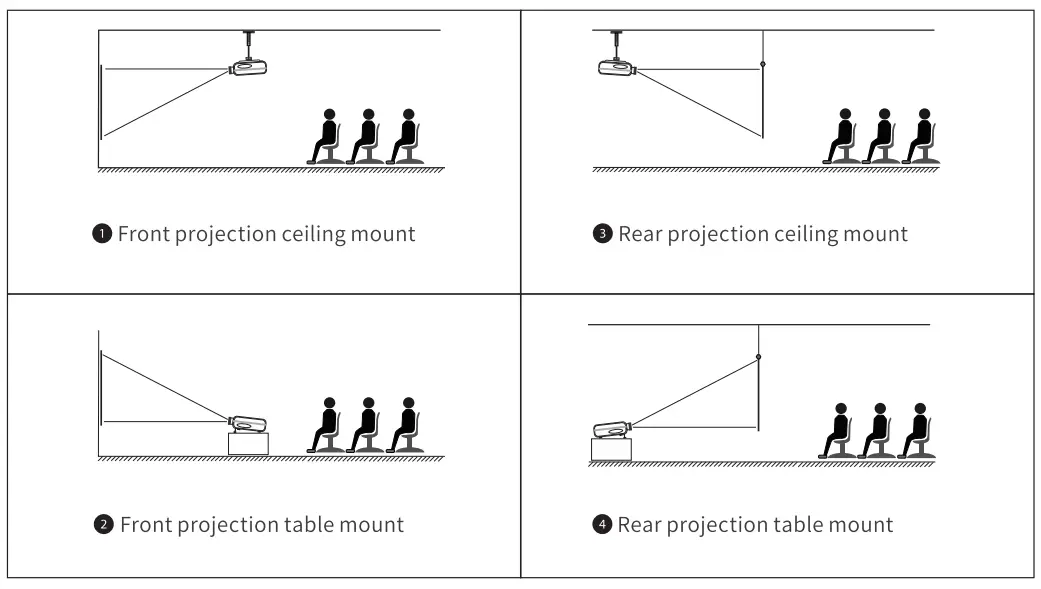
Projector Placement
Note:
- During the installation process, please do not operate with electricity to avoid the electric shock hazard and projector circuit failure.
- Please keep a gap of at least 30 cm from the wall. Do not cover or block the projector’s vents with any objects. Make sure that the projector has enough ventilation to ensure the projectors. performance and reliability.
- If you have a projector screen that need to be mounted on a ceiling, the projector cannot be higher than the upper edge of the screen, otherwise, it will affect the image effect.
Ceiling installation
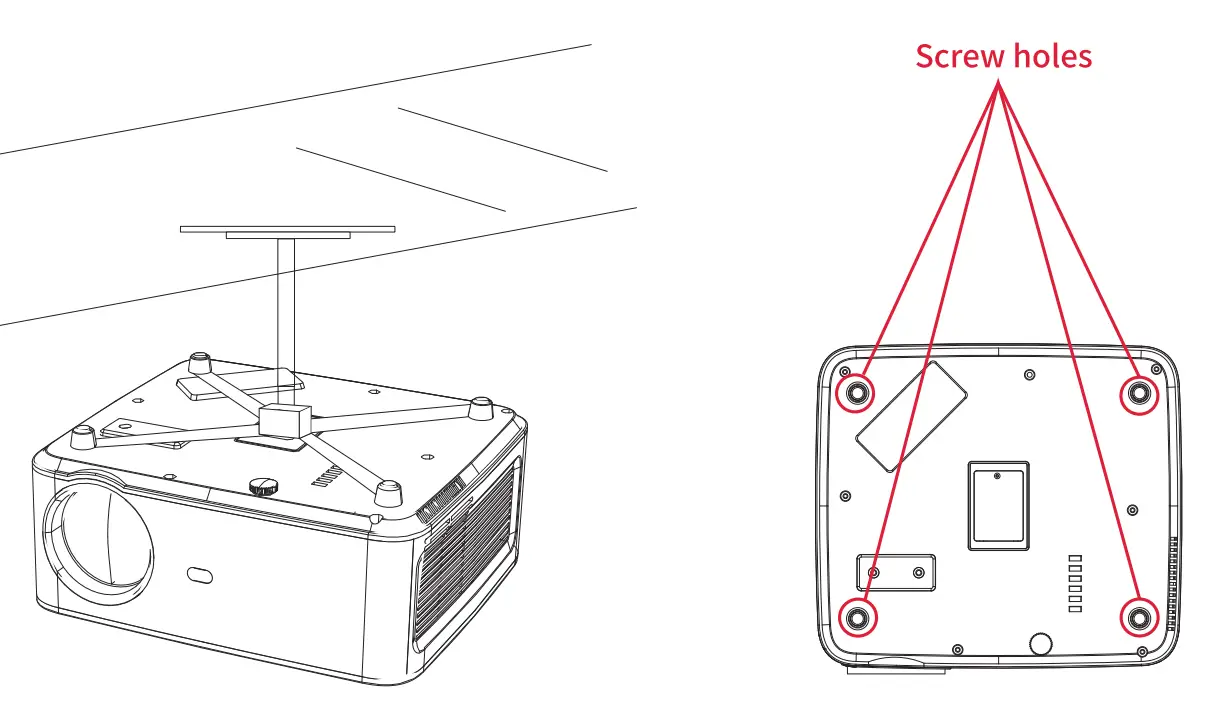
- Please purchase a universal projector ceiling mount;
- Remove the four rubber pads on the button of the projector, you will see the screw holes use the M5*11mm screws for installing the ceiling, and then install it.
Start Using
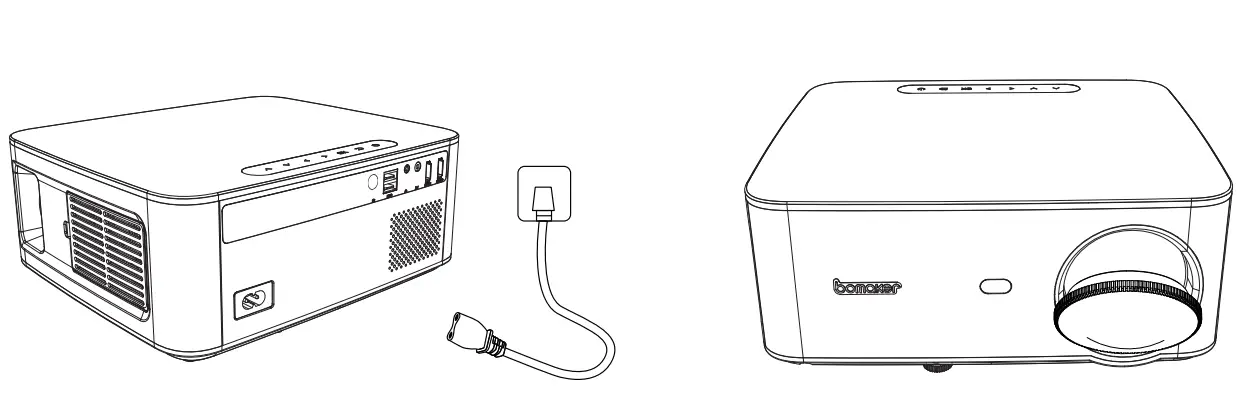
Power On
- Plug the power cord into an outlet.

- Take off the lens cover.
- Press the power button to turn on the projector.

Projector Distance & Size 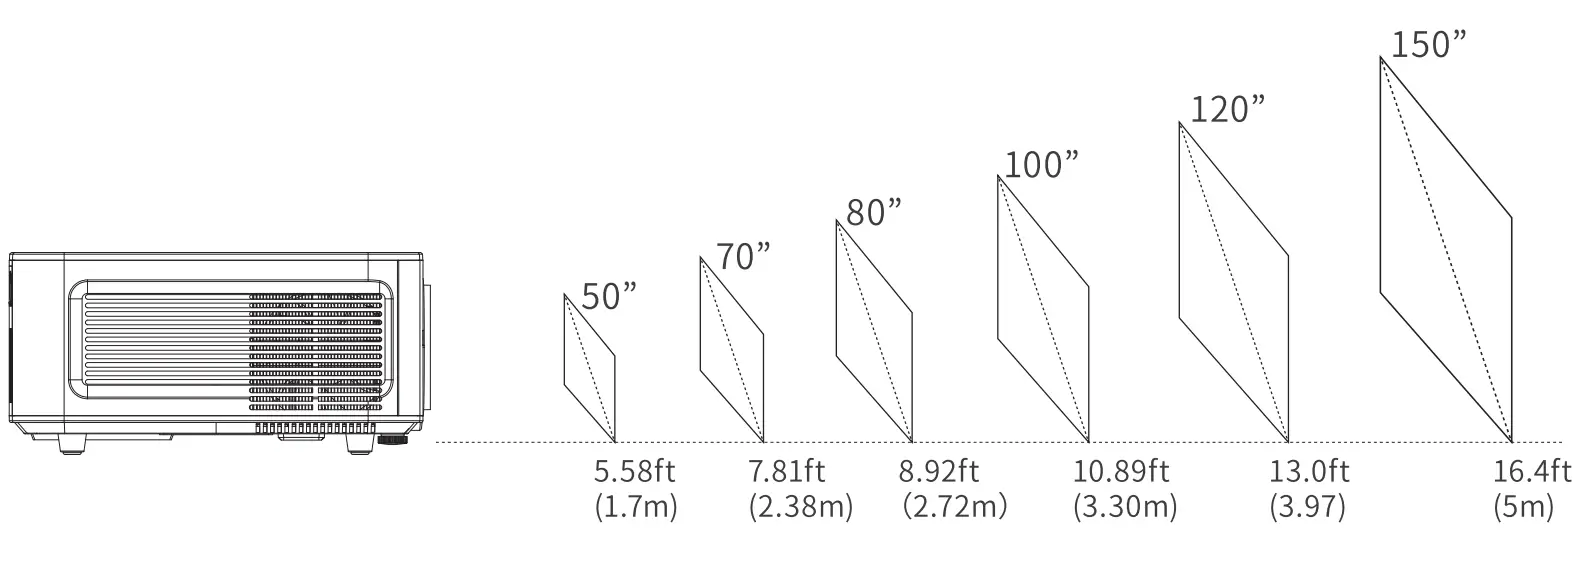
The recommended projection screen is around 80 inches with a projection distance of around 8.92 ft. Ambient darkness will improve the clarity of the projected images.
Adjusting the projected image
After adjusting the size and distance of the projector, please rotate the focus ring left and right to change the front and rear positions of the lens until a clear image is obtained.
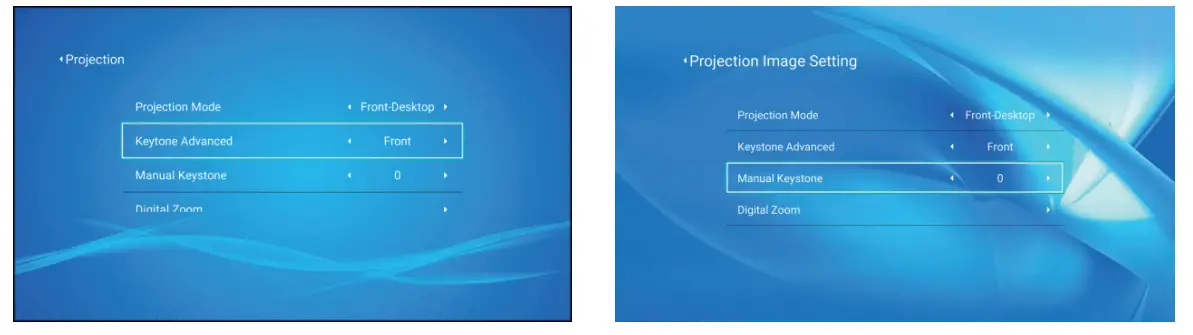
Electronic keystone correction
Vertical keystone correction
- Use the remote control or projector button to enter the setting interface.
- Select the picture setting interface, press OK to enter, select [Front] in the [Keystone Advance] column, and then press the down button on the remote control to enter manual keystone correction.

- If the picture is shown as picture (1), use the direction buttons of the remote control or projector to adjust the vertical parameter {-50~0) in the manual keystone correction option until the picture is obtained (2).
- the lithe picture is shown as picture (3), use the direction buttons of the remote control or projector to adjust the vertical parameters (0-50) in the manual keystone correction option until you get the picture (4).


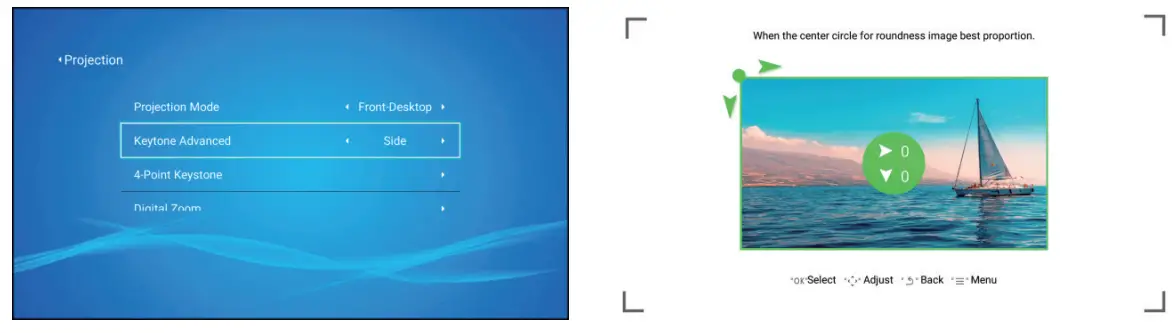
Four-point keystone correction (horizontal and vertical keystone correction)
When the projected image is not rectangular, it can be adjusted by a four-point keystone correction
- Use the remote control or projector button to enter the setting interface.
- Select the picture setting interface, press OK to enter, select [Side] in the [Keystone Advance] column, then press the down button on the remote control to switch to manual keystone correction, and press OK to enter the four-point adjustment display interface.

- Use the remote control or projector’s direction buttons to adjust the projected image according to the figure. After the current point is adjusted, press the OK button to enter the next corner point.
- After adjusting the four points, you can press the return key to save the current adjustment status and return to the main menu interface. Press the menu button to pop up a prompt whether to reset the current adjustment.

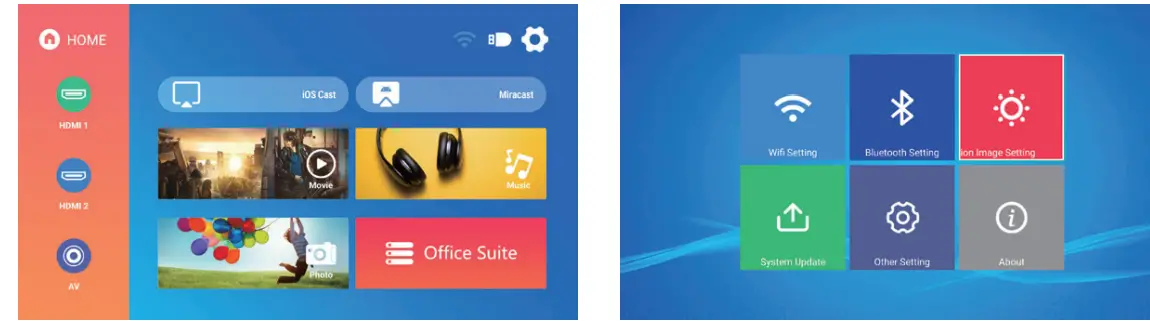
Input Source
HDMI mode
- Connect the projector and equipment with an HDMI cable.
- Press and hold the source button -:±1 of the projector or remote control to enter the input source interface, or use the button to select HDMI on the main interface of the projector.
- Select the HDMI cable to connect to the corresponding interface H DMll or HDMl2, press the OK key to enter the interface, and press the return key to exit and return to the main interface of the projector.


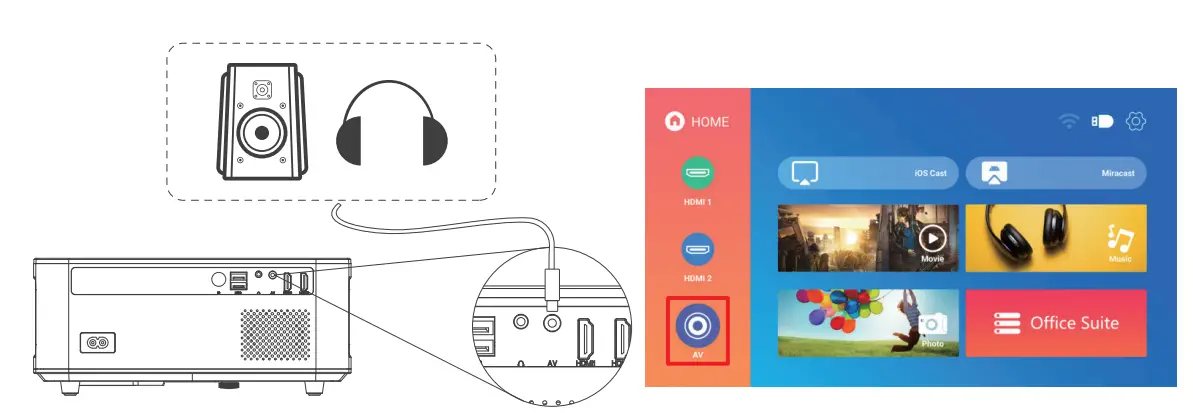
AV mode
- Connect the projector and the equipment with the AV cable.
- Press and hold the source button -:±1 of the projector or remote control to enter the input source interface.
- Select AV, press OK to enter, press Return to exit and return to the main interface of the projector.

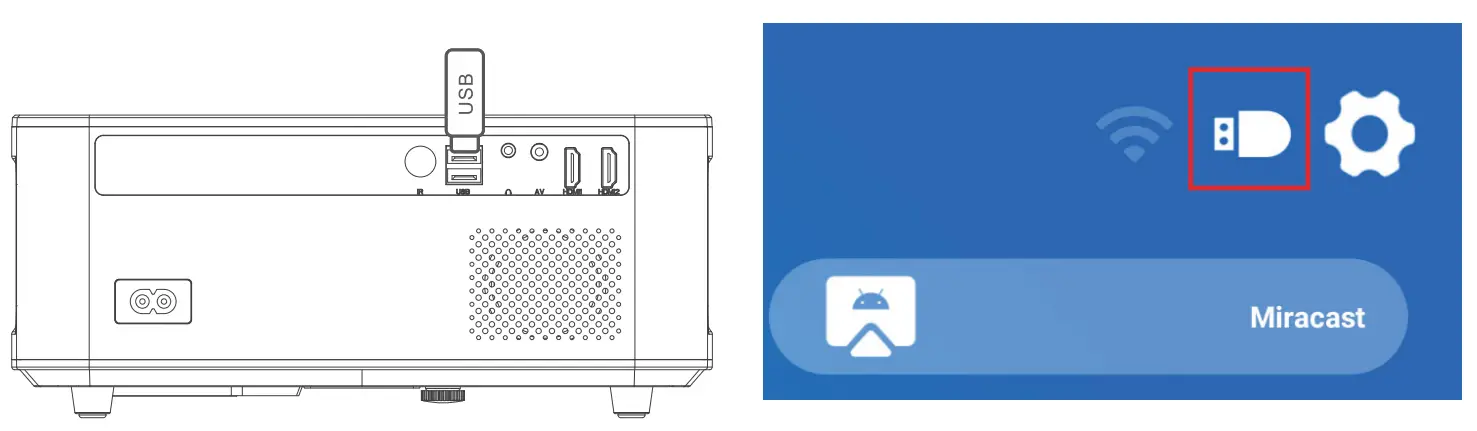
USB mode
- Connect the projector to the U disk, the U disk on the main interface of the projection screen will display the highlighted state.
- Select the corresponding Movie, Music, Picture, and Office Suite modules of the file type, and press OK to enter the file.

WiFi settings
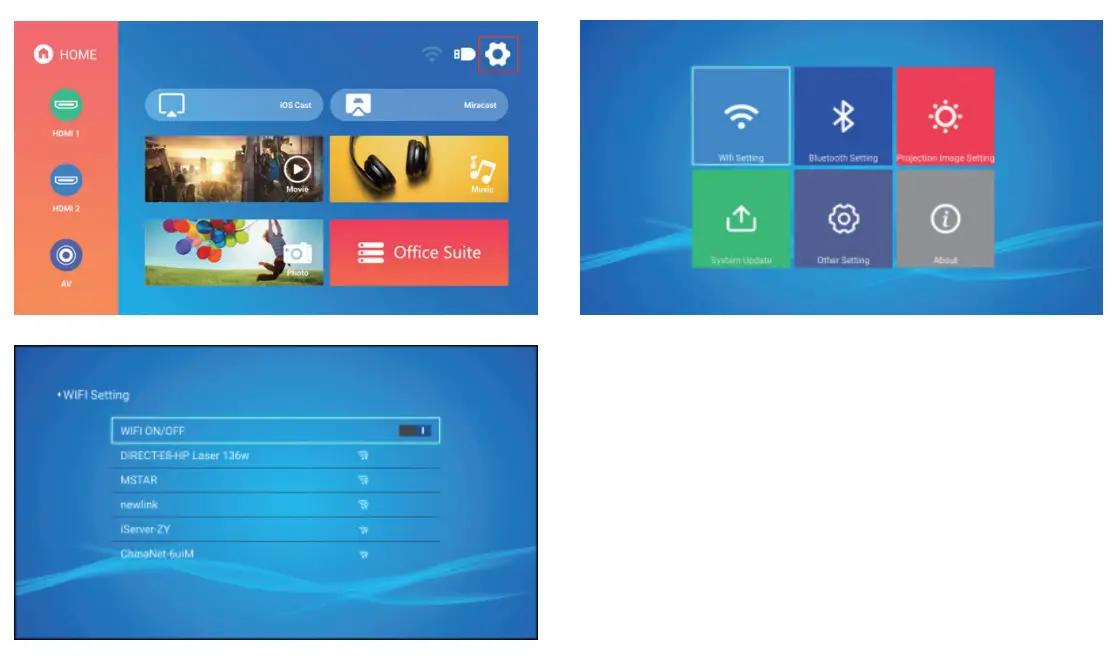
- Use the remote control or projector button to enter the setting interface at the upper right corner of the projector’s main interface.
- Find the WlFl setting in the setting interface, press the OK button to enter the WiFi setting, press the OK button to turn on the WiFi, a list ofWiFi names appears.
 Use the remote control or projector button to enter the setting interface at the upper right corner of the projector’s main interface.
- Find the WI Fl setting in the setting interface, press the OK button to enter the WiFi setting, and Press the OK button to turn on the WiFi, a list of WiFi names appears.

 Use the remote control or projector button to enter the setting interface at the upper right corner of the projector’s main interface.
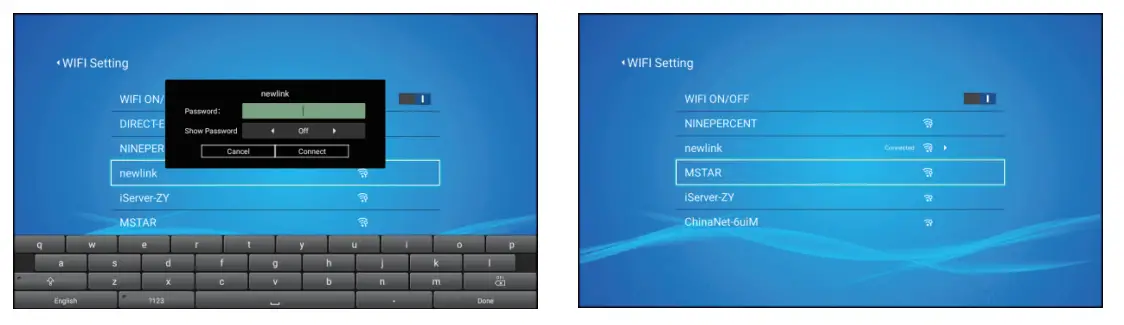
Screen Mirroring
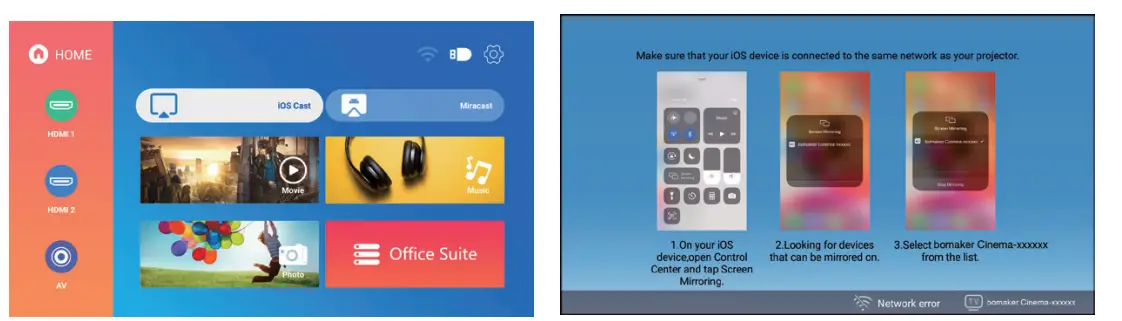
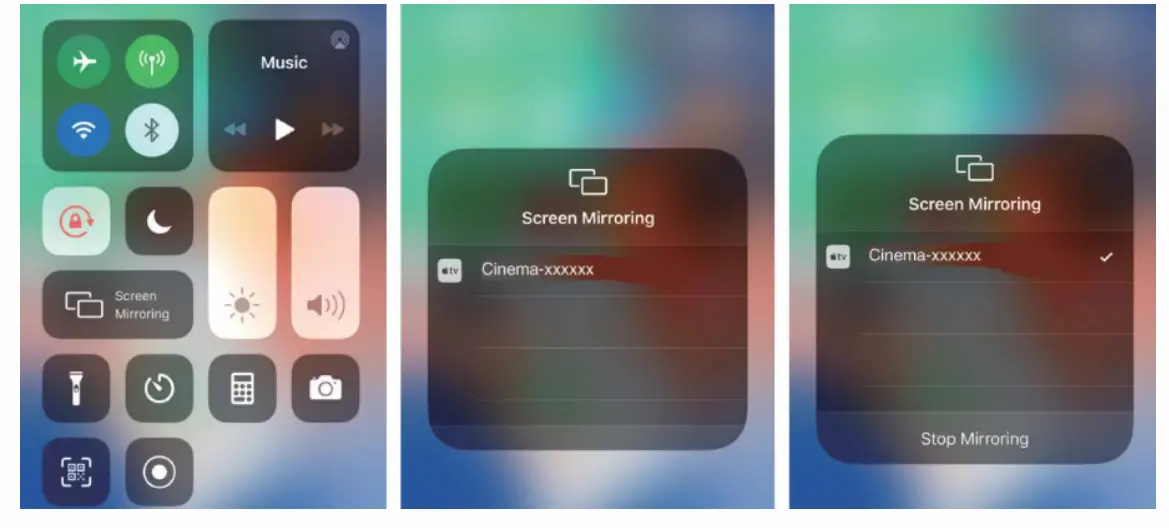
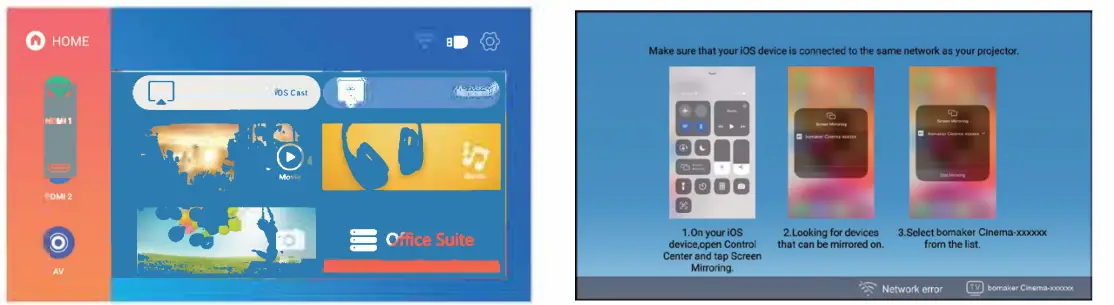
For iOS System (Streaming with WiFi)
Note: It can only achieve screen mirroring via WiFi instead of data for iOS devices.
- Connect the projector to the WIFI according to the projector WIFI setting steps and turn on WiFi on your iPhone, please make sure your iPhone and the projector are connected under the same WiFi.
- Open the projector home menu, use the remote control to select iOS Cast, press OK to enter the interface.

- Select the WiFi name that needs to be connected, press the OK button to display a virtual keyboard, after using the remote control to enter the password, place the control cursor on the keyboard [Donel, and press the OK button to complete the password input
- After entering the password, move the cursor to [Connect] with the direction buttons on the remote control, and press OK to connect.

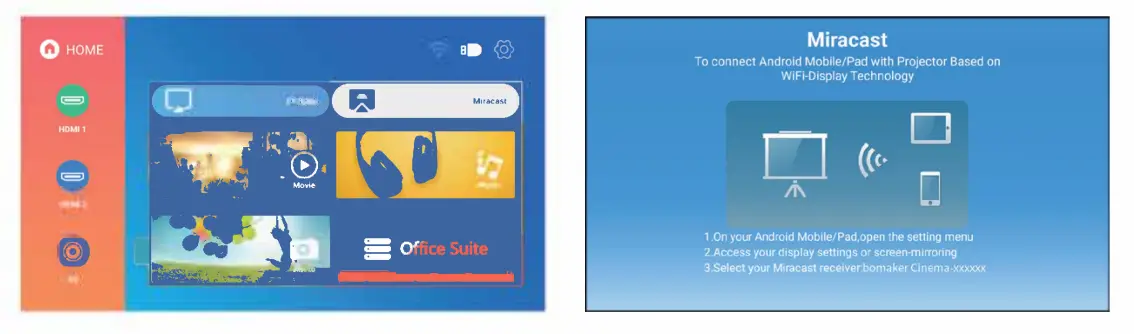
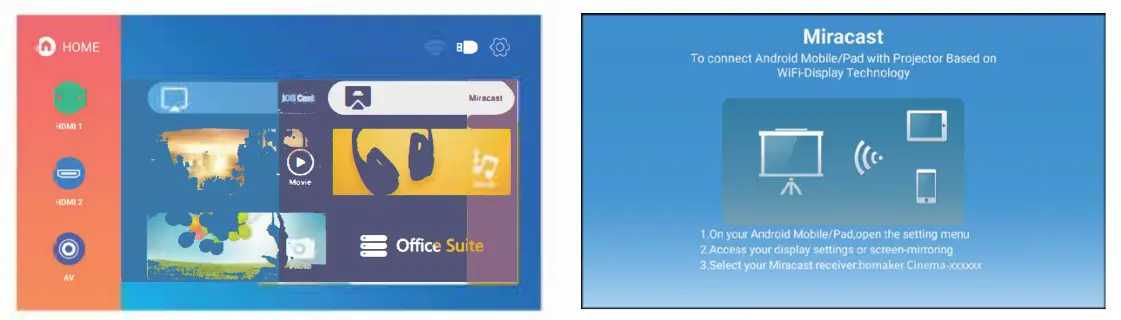
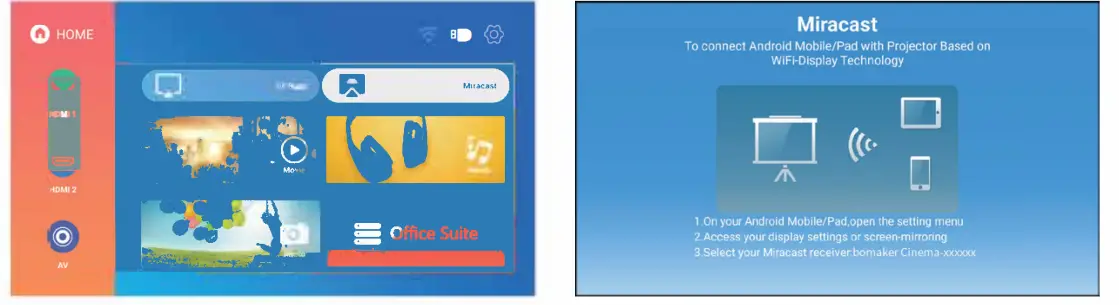
For Android System(Streaming with WiFi)
- Connect the projector to WIFI according to the protector WIFI setting steps, and turn on WiFi on your Android device to connect to any wifi.
Note: There is no need for your Android device and the projector are connected to the same WiF,. - Open the projector home menu, use the remote control to select Mira cast, and press OK to enter the interface.

- Select the “Wireless Display” option on your Android device, select the current projector name: Cinema-xxxxxxxx, click and connect.
- After a successful connection, the screen content of your Android device is cast to the projection surface.

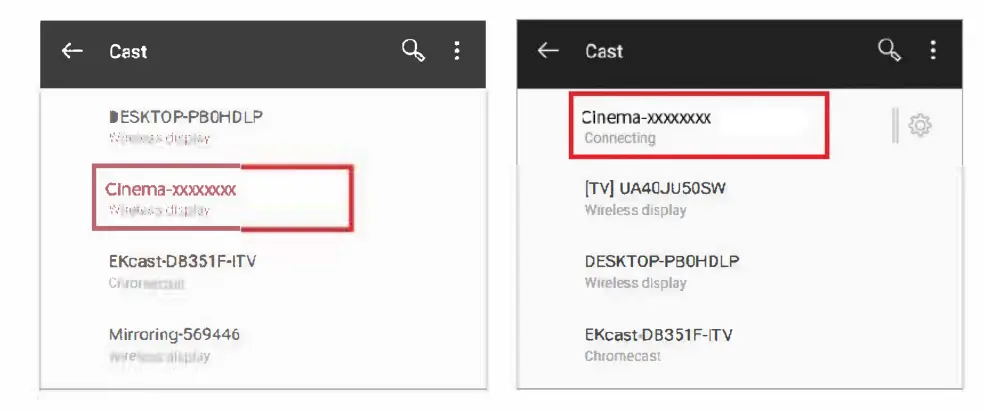
For Android Systems (Streaming with cellular data)
- Turn on the projector’s WIFI settings without connecting any wifi, and turn on your Android device’s WiFi settings without connecting to any wifi.
- Open the projector home menu, use the remote control to select Mira cast and press OK to enter the interface.

- Select the “Wireless Display” option on your Android device, select the current projector name: Cinema-xxxxxxxx, click and connect.
- After a successful connection, the sc「een content of your Android device is cast to the projection surface.


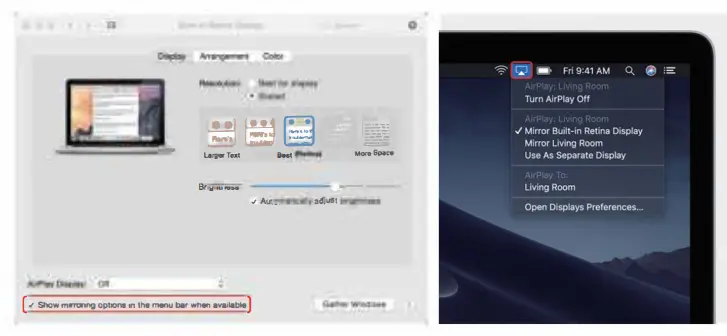
For MacBook device
- Connect the projector to the WIFI according to the projector WIFI setting steps, and open the computer network settings, please make sure the Macbook and the projector are connected under the same WiFi.
- Use the remote control to select iOS Cast, and press OK to enter the interface.

- Open the settings, find the Airplay option, click and search for the projector
- Select the current projector device: Cinema-xxxxxxxx, click, and connect.
- When the projector and the device content are consistent,screen mirroring is successful.

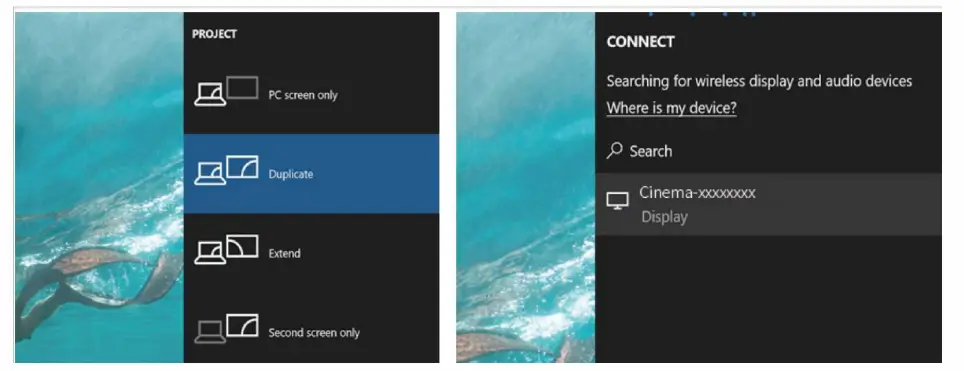
For Windows PC (Wireless Miracast only support Window 10 system)
- Connect the proJector to the WIFI according to the projector WIFI setting steps, and open the computer network settings, please make sure the PC and the projector are connected under the same WiFi.
- Use the remote control to select Miracast, and press OK to enter the interface.

- Use the shortcut key
 +P to enter the projection settings, select Duplicate, and click Connected to a wireless display to enter the device search
 - Select the current projector device: Cinema-xxxxxxxx, click and connect
- When the projector and the PC devices content are consistent, screen mirroring is successful.

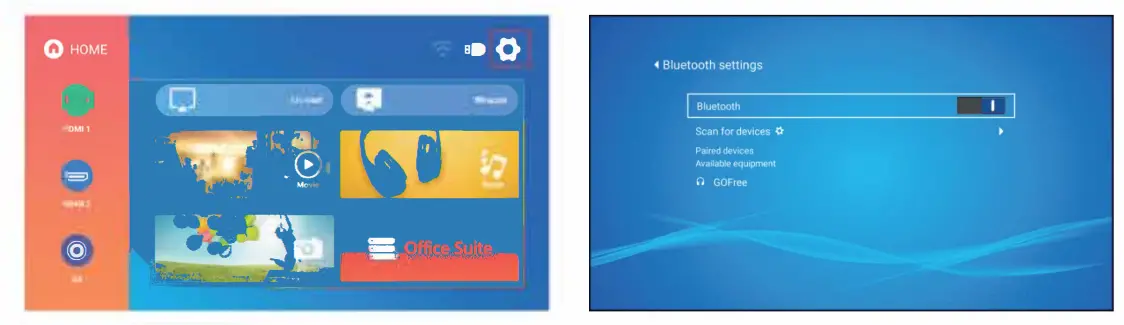
Bluetooth mode
Note: Cinema 500 Max projector can be connected to the external speaker through Bluetooth. It cannot be connected to a smartphone or tablet for music streaming through Bluetooth. In Bluetooth mode, the projector cannot be used as a Bluetooth speaker.
- Use the remote control or projector button to enter the setting interface at the upper right corner of the projector’s main interface
- Find the Bluetooth settings on the setting interface, press OK to enter Bluetooth settings, press OK to turn on Bluetooth, the Bluetooth device list will be displayed.
- Select your Bluetooth speaker from the device list for connection.
- After a successful connection, it will display connected on Bluetooth devices.


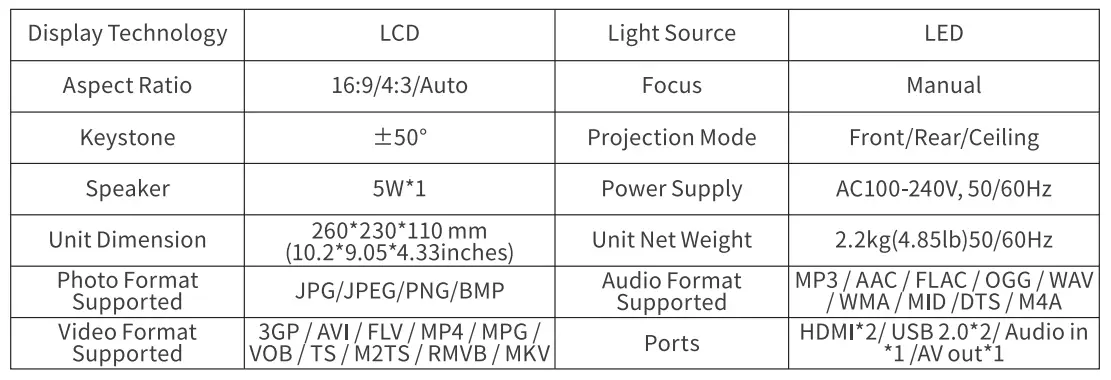
SPECIFICATION
Trouble Shooting
blurry Image
- Make sure the projection distance is farther than the minimum projection distance of 1.3 m.
- Adjust the focus ring.
the projector image shows no signal
- Please make sure all cables are connected to the projector properly and stably.
- Check whether the projector input source mode has been selected as the corresponding format.
- For example, the device and the projector are connected with an HDMI cable, the HDMI input channel must be selected for projection, and no signal will be displayed if other channels are selected.
What should I do if I want to watch content from Hulu, Netflix, and similar services via the projector?
Please prepare a Fire TV stick, Roku stick, or Chromecast TM (not included), then connect it to the projector to watch the content.
Remote Unresponsive
- Make sure remote points at IR receiver directly.
- Do not cover the IR receiver.
- Try a new pair of AAA batteries.
Black spots appear in the projector picture
- Turn the bottom of the projector up and open the Maintenance Window at the bottom of the projector. ‘Use a hairdryer or hairdryer to blow the bottom of the machine.
- Check whether there are still black spots in the projected image. If there are, it means that the dust has not been removed, and you need to continue cleaning until the image has no black spots.
- Close the Maintenance Window of the projector after cleaning to restore it to its original state.
The projector will stop automatically every after time it is used for a period of time
- Check if the projector’s air inlet and outlet are blocked by other objects.
- Please pay attention to whether the local mains voltage is too low or too high or fluctuates too much.
FAQS
How do i take hdmi output from the projector? Both the HDMI ports seems to be for input
No way to do this
what’s the quality of the projection?
The image quality is quite good. It is full 1080p, and the projection is very bright, visible in a brightly lit room
Is there a way to get video from a Bomaker and audio second HDMI to output audio? If so is the setting on projector to tell it to output audio
Yes
Firestick works on TVs, not projector
Yes amazon Fire TV works on the projector
Can artists use this for tracing images onto their canvas?
YES
Can this display PowerPoint (ppt) presentations that include animations with motion paths, 3d models and transition effects?
It should work if you use HDMI, but I’m not sure if it works when you use a USB flash directly. I didn’t try that.
Does this support 5.1 Bluetooth speakers?
No! Only stereo.
Can this be used outside?
Yes, we watch movies outside all the time. Great picture quality.
Does it include mounting hardware for ceiling installation?
no but you’ll get a gift card once you send the email to the yabber support team which will cover the purchase of ceiling equipment.
How does it work with a firestick? Thanks.
The firestick plugs directly into the projector.
How this projector is mounted? I haven’t seen any screw holes at the bottom!
They are under the rubber feet on the bottom. you remove the rubber part of the feet and you can attach to a mount.
can this connect through my phone to stream? I am trying to avoid using a cable connection to my phone/laptop to use a projector
yes you can
returned a Bomaker did not work for my space. need (cheap) one that can give me a focused image at a 20ft distance from the projection wall. Suggestions?
You can adjust the focus to make it move closer or further away.


