![]()
AM-DC07
User Manual
Ver 1.0
[email protected]
www.amacam.net
In the Box
1x Amacam AM-DCO07
1x Camera Mount
1x Power Cable with GPS
2 Adhesive Pad
2 x Screen Mount Film
1x Pry Tool
1x Lens Cloth
1x User Manual
Features
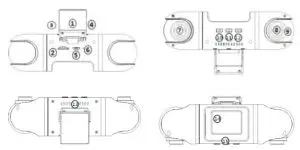
| 1 | Mount | Adhesive and detachable |
| 2 | Micro SD Card Slot | For external micro SD card |
| 3 | Micro USB Port 1 | Power connector |
| 4 | Micro USB Port 2 | Optional power connector |
| S | Micro USB Port 3 | Optional power connector & data sync |
| 6 | Microphone | Records audio |
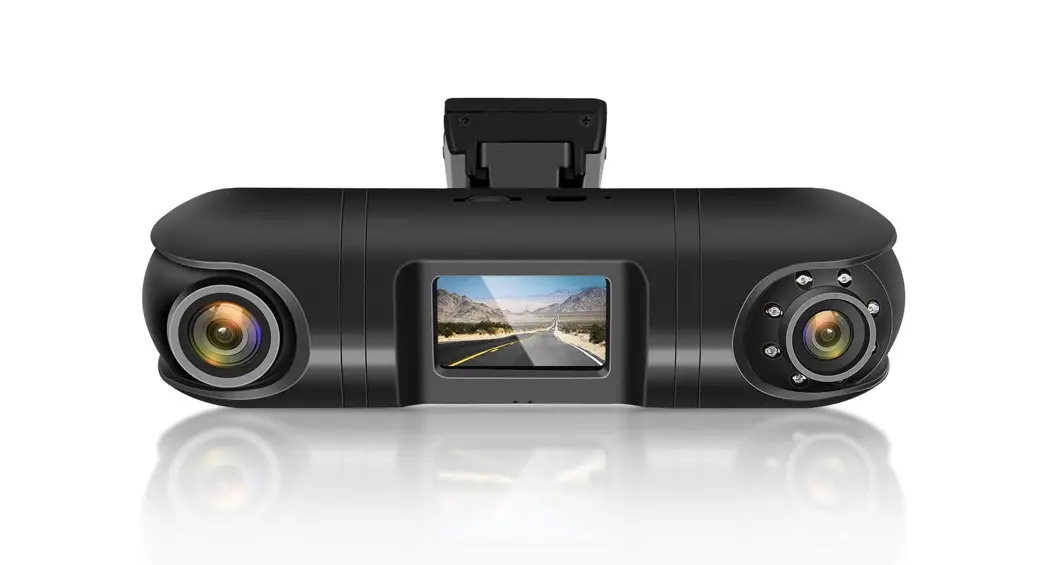
| 7 | Front Camera Lens | 2706 rotatable vertically 180° rotatable horizontally |
| 8 | Rear Camera Lens | 270′ rotatable vertically 180° rotatable horizontally |
| 9 | IR LED | 8pcs IR LED lights for infrared night vision |
| 10 | Up Button | Video lock/unlock – Switch screen – Menu settings |
| 11 | OK Button | Pause recording – Power on/off – Confirm Reset |
| 12 | Down Button | Take snapshots – Mute/Unmute – Playback |
| 13 | Speaker | Plays audio in playback mode |
| 14 | LCD Screen | 1.5″ TFT Colour LCD display |
| 15 | LED display | Indicates working modes |
Installation
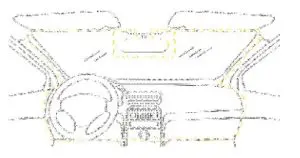
- Attach the camera onto the mount.
- Select an ideal location (A or B) on the windscreen near the rear-view mirror.

- Remove the protective film from the adhesive pad and firmly affix the mount onto the windscreen.
- Tuck the power cable into the seams and weatherstrips around the edge of the windscreen and the dashboard.
- Adjust the viewing angle of front lens and rear lens respectively to ensure that they are aligned with the road ahead and the cabin inside.
Daily Use
Monitor the following four key points :
- MicroSD card: Analert will sound if the SD card is missing, needs formatting or needs replacing.
- Reformat the SD card every two weeks.
- Camera power state: Camera LED displays means the camera is working.
- Camera recording mode: The red flashing point on screen means the camera is recording.
Shortcut keys
All the following shortcut keys are applicable in Recoding Mode
| Short Press | UP | Lock/Unlock the current video clip |
| Long Press | Switch screen between front and rear views | |
| Short Press | OK | Pause recording |
| Long Press | Power On/Off | |
| 1Cs Long Press | Reset the camera | |
| Short Press | DOWN | Take a snapshot |
| Long Press | Mute/Unmute the microphone |
LED Indication
| Blue Flash | Normal recording |
| Blue Constant On | Firmware upgrading/SD card error/Motion Detection |
| Red Flash | Time Lapse 1FPS in parking mode |
Screen Overview

| 1 | Resolution | Video resolution for front & rear |
| 2 | Microphone | Audio is being recorded |
| 3 | SD card | SD card is installed properly |
| 4 | Recycle | lmin recycle |
| 5 | Parking Mode | Time Lapse or Motion Detection is on |
| 6 | Emergency lock | Lock current video dip |
| 7 | Video Duration | Current video clip recording time |
| 8 | Recordng Mode | Camera Is recording |
| 9 | Time | Current time YYW/MM/DO |
Menu Settings
| Enter Menu | Short press OK to pause record% then lore press UP |
| Set parameters | UP/DOWN to navigate press OK to confirm |
| Eliot Menu | long press UP to go b ack to Recording Mode |
Menu Details
| Function | Setup |
| Resolution | 2560’1440P. 30FPs•72a/1920•1080P.60sPS•720W1920•1080P, 30FPs•720s |
| Bitrate | Super Fine/ Fine |
| Recycle | OFF/Imin/3min/Smin |
| Time | Manual setup is required |
| Time Stamp | On/Off |
| Language | English |
| Mute | Mute/ Unmute |
| Beep Sound | On/Off |
| Start Tone | On/Off |
| Screen | Always-On/1min off/3min off |
| TV type | NTSC/ PAL |
| Frequency | SOH2/60H2 |
| G-sensor | High/ Middle/ Low |
| Parking | OFF/ Time Lapse UPS/ Motion Detection |
| Guard Time | 15min/1 Hour/6 Hour/24 Hour |
| IR Mode | Auto/ On/Off |
| Mirror | Left mirror/ Right mirror/ No mirror |
| EV | 0/ From-2.0 tot2.0 |
| GPS STAMP | On/Off |
| Speed unit | MPH/ KMH |
| Speed | Speed Stamp On/ Speed Stamp Off |
| Timezone | Manual setup is required |
| Format | No/Yes |
| Default | No/Yes |
| Version | xxxxxx |
| DVR version | xxxxxx |
| MCU version | xxxxxx |
Note
| Bitrate | 1440P 30FPS | 1080P 60FPS | 1080P3OFPS |
| Super Fine | 16Mbps | 12Mbps | 10Mbps |
| Fine | 12Mbps | 10Mbps | 8Mbps |
Infrared Guide
- IR mode Auto, the camera automatically turns on/off infrared night vision.
- If the ambient light level is lower than the threshold value, the camera turns on infrared night vision.
- If the ambient light level is higher than the threshold value for 10 consecutive seconds, the camera tums off infrared night vision.
- There is a possibility that the infrared night vision is unable to turn on due to driving through a street with very bright street lights. This will result ina dark image being recorded of the car interior. We suggest that you manually set IR MODE to “ON” if every video at night needs to be recorded with infrared night vision.
Parking Monitor
The parking monitor requires a constant power supply and will only record using the front camera, Set either Time-lapse 1FPS or Motion Detection and Guard 15 minutes, the carnera will automatically turn off after 30 minutes when the vehicle is parked.
Note: Motion detection is not triggered by motion sensor but by sensing the changes of ambient luminance through the front lens.
Video Playback
- Enter into Playback: Short press OK to pause Recording Mode (Red dot will disappear off screen ) Long press DOWN
- UP/DOWN to select the subfolder and OK to enter.
- UP/DOWN to select the target video dip OK to Play/Pause the video clip.
- Enter into Rear Cam from Front Cam. Long press DOWN.
- Whenthe video dip is playing/pausing Long press UP to enter into Delete/Lodc ‘Long press UP again to exit from Delete/Lock.
- Exit from Playback in Play Mode. Long Press DOWN to Front Cam Long Press ‘OWN again to Rear Cam. Long Press DOWN again to Recording Mode.


View Camera Recordings
There are two options for viewing the recorded video footage.
- Connect the camera directly to a computer using a suitable USS data cable. Press the DOWN button on the camera simultaneously as the data cable connects. Release the OOWN button when the US8 icon appears on camera’s screen,
- Remove the SD card from the came ra and insert into a computer using a card reader, if required.
To ew the video footage, use the software called = GVP.
Download for Windows or MAC
Windows
https://master.dl.sourceforge.net/peoject/gvplayer-win/GVPlayer_WIN.7z
mac
https://master.dl.sourceforge.net/peoject/gvplayer-mac/GVPtayer_MAC.72
Insert the SD card into a computer, Using file manager, locate the folder named “PLAYER” Open the text file “Readme” and copy the appropriate URL and paste it into a web browser, The file will download. Extract the files to a convenient location. Find and double click the GvP.exe file.
To view the recorded videos, select “Open File” in the player and select the SD card then press “OK” The video files will oad up into the player. Please see the picture below,

Camera Reset
106 Jong press OK. then the camera starts to reset automatically.
Firmware Upgrade
Important: The camera must be powered up for the duration of the update.
- Back up the files on the micro SD card if required.
- Format the SD card using the format option in the camera.
- Earact the firmware OVR (BIN file) or MCU (LAP file) and place it in the root bolder of the micro SD card,
- insert micro $0 card into camera, and then tum on the power. Make sure camera is connected to the power cable during whole update process.
- The camere will update automatically. On-screen confirmations will appear as. follows: Read File – Write Firmware – Write Done. The complete process will take several minutes.
- The camera will reboot after the update is completed .
- Misrecommended that the micro SO-card is then formatted in the camera after ‘the firmware update.
- Check settings as required. The camera will revert to factory default settings.
Specifications
| Main Processor | MSC8328Q |
| Image Sensor | Front: 0V4689 4-megapixel CMOS Rear: I-162 1-megapixel CMOS |
| Lens | Front: 140° view angle. 6-layer glasses. 1 infrared filter Rear: 130° view angle. 8pcs infrared LED |
| LCD screen | 1.5″ TFT LCD |
| G-sensor | Built-in. 3-axis. Sensitivity 3-level adjustable |
| System Language | English /Espanol /Deutsch /Pycamil /ft f4 Ill /6 *Pi |
| Video | .MOV format 2560′ 1440P 30FP5 + 720P 1920′ 1080P 60FPS + 720P 1920′ 1080P 30FPS + 720P |
| Audio | Built-in microphone & speaker |
| Image | PEG format |
| RAM | 2GB |
| Storage | External SDHC micro SD. Up to 128GB. Class 10 (UHS-1) or above. FAT32 |
| Battery | No. Built-in supercapacitor |
| Power Input | SVdc/1.5A |
| Power Interface | Micro USB |
| Power Consumption | 4W-5.5W |
| Working Temperature | -4° to 158°F (-20° to 70°C) |
| Storage Temperature | -4° to 176°F (-20° to 80°C ) |
Trouble Shooting
Camera will not record.
Check if there is enough storage space on the micro SD card. Check the number of protected files (read only attribute). Format the SD card.
Camera records intermittently.
The data stream is a high-definition video and the file sizes are very large. We recommend a high-quality micro MLC SD card.
“File Error” prompt during playback.
Corrupt data storage will result in the file error. Use the “FORMAT CARD” menu to format the micro SD card. Consider changing the SD card if this happens on a regular basis.
Video is blurred.
Remove the lens protection film. Ensure the lens and windscreen are clean. Use a lens Deaner to clean the lens if necessary.
Video has horizontal lines.
This is due to the wrong “Flicker” setting. Adjust to the required frequency SOHz / 60Hz. Camera does not auto-start recording when the ignition is turned on.
Set the Movie Clip Time to 1/3 /5 minutes. Not OFF. The camera will not auto-start recording when Movie Clip Time is OFF and the micro SO card is full.
Camera Is frozen.
Unplug the power cable from the camera. Wait for 30 seconds then reconnect.
Camera takes a long time to boot up.
If the camera has not been used for a long time it may take longer to boot up due to the initial conditioning of the supercapacitor. This is normal and not a fault. The camera does not have a built-in battery.


