
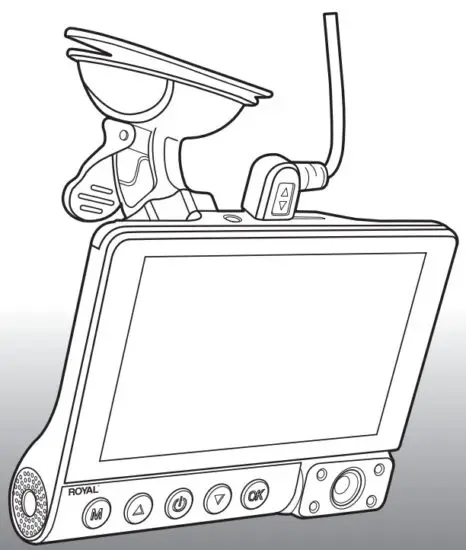
![]() DC400HD Dual Channel Dash Camera
DC400HD Dual Channel Dash Camera
User Manual
Dash Cam Overview
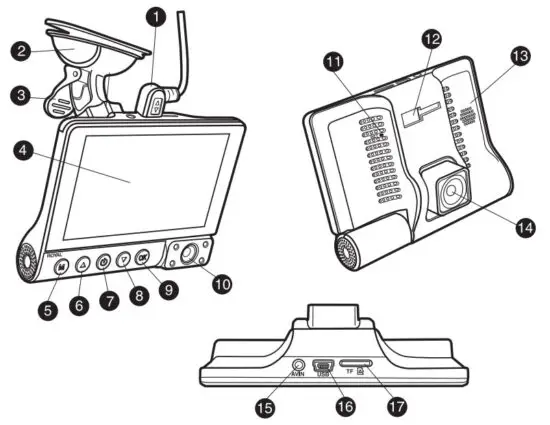
| 1. DC power cord | 10. Tillable rear camera |
| 2. Windshield suction cup mounting bracket | 11. Reset button |
| 3. Suction cup lock | 12. Suction cup mount bracket slot |
| 4. 4.0 inch IPS LCD Screen | 13. Speaker |
| 5. Menu button | 14. Tillable front camera |
| 6. Up button | 15. Auxiliary optional camera input |
| 7. Power button | 16. AC power cord input |
| 8. Down button | 17. MicroSD card slot |
| 9. OK button |
WARRANTY, REGISTRATION & TECHNICAL SUPPORT
PLEASE FILL OUT THE PRODUCT REGISTRATION FORM ON THE ROYAL WEB PAGE AT: http://www.royal.com.
BE SURE TO KEEP A COPY OF YOUR SALES RECEIPT!
STANDARD WARRANTY
ROYAL CONSUMER INFORMATION PRODUCTS, INC. (“Royal”), at 1011 U.S. Highway 22 West, Suite 202 Bridgewater, NJ 08807 USA WARRANTS that your NEW Product is free of defects of workmanship and materials. If there is a defect or malfunction of this product, Royal will repair it free of charge as follows:
PARTS: New or comparable rebuilt parts in exchange for defective parts for ONE (1) YEAR from the date of customer purchase.
LABOR: Royal provides a labor warranty for ONE (1) YEAR from the date of end-user purchase.
The product must be sent postage prepaid and insured to Royal in accordance with the warranty procedures outlined below. At the completion of the repair, the consumer will be responsible for the cost of any parts or services no longer covered under the warranty.
This warranty does not apply to persons who purchased this product second-hand or used.
This warranty does not include adjustments, parts, and/or repairs required by circumstances beyond the control of Royal, including but not limited to fire or another casualty, accident, neglect, abuse, misuse, abnormal use, or battery leakage damages.
THERE ARE NO OTHER EXPRESSED WARRANTIES EXCEPT AS STATED HEREIN. AFTER IN THE PERIOD OF EXPRESSED WARRANTY SET FORTH HEREIN, THERE ARE NO
EXPRESSED OR IMPLIED WARRANTIES AND THOSE EXCLUDED INCLUDE THOSE OF MERCHANTABILITY AND FITNESS FOR A PARTICULAR PURPOSE. Royal shall NOT be held liable for CONSEQUENTIAL DAMAGES resulting from any failure, defect, or malfunction of this product. Some states do not allow limitations on how long an implied warranty lasts and some states do not allow the exclusion or limitation of incidental or consequential damages, so the above limitations may not apply to you.
WARRANTY PROCEDURES
TO OBTAIN SERVICE UNDER THE TERMS OF THIS WARRANTY:
Please do the following:
- Send a copy of your original sales receipt showing the original purchase date, along with your mailing and shipping addresses, the model name of the product and a note describing the nature of the problem to:
Royal Consumer Information Products, Inc.
Warranty Processing
50 Hilton Street
Easton, PA 18042-7391 the USA
Do Not Return the Product to This Address! - You will receive a return authorization number via U.S Mail within 7-12 business days from the date, your return request is received if it is determined that there is a basis for a replacement product. The return authorization form you receive will list the return procedures, applicable charges, if any, and the correct shipping address for the returned product.
PRODUCT SUPPORT HOTLINE:
For questions on the use of this product or this warranty call 1-800-272-6229 (in the U.S. and Canada) or in Mexico call 01-800-849-4826, Monday through Friday during normal business hours. You can also e-mail Royal at: [email protected]
| Button | Functions |
 | POWER: • Press and hold to turn the device ON or turn OFF. • Short press to turn ON/ OFF screen light |
 | OK: • Press to confirm a selection while in Setting Mode. • Press to start/ stop the video recording. • Press to start/stop playback video. |
 | MENU: • Short press sends you back to the main menu interface. |
 | ARROW DOWN: • Press DOWN through options in Setting Mode. |
 | ARROW UP: • Press to UP through options in Setting Mode. • Press UP to switch mode between Front/Internal/PIP. |
Status icons:
| Icon | Meaning | Icon | Meaning |
| Video resolution | Video recording mode | ||
| Wide Dynamic Range | Video playback mode | ||
| Charging via Mini USB charger | Photo mode | ||
| Battery power level | Loop recording | ||
| Microphone mute | Memory card inserted | ||
| Microphone ON | G-Sensor sensitivity |
Package content:
Check the product box for the following items:
- (1)One, Dashboard camera
- (1)One, DC car charger
- (1)One, USB cable
- (1)One, Suction cup bracket
- (1)One, 64GB MicroSD card & adapter
- (1)One, Operation manual
The items supplied with the device and any available accessories may vary depending on the region. Appearances and specifications are subject to change without prior notice. Availability of all accessories is subject to change depending entirely on manufacturing companies.
All supplied items are designed for use only with the device and may not be compatible with other devices. Malfunctions resulting from the use of unapproved accessories are not covered by the warranty service.
Installation:
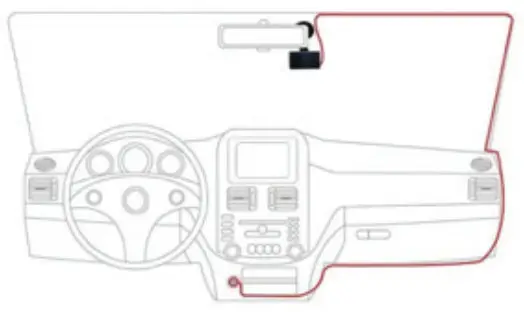
- Attaching the front camera to the window mount
Before the device can be used in a car, it is essential to first install a properly attached window mount. Make sure that you place the Dash Cam in a safe, appropriate location where it will not obstruct the driver’s view.
Clean windshield thoroughly before applying mount, and hold mount in place for 20 seconds to ensure an air-tight seal. Do not attach the camera for at least 20 minutes. - Memory card
The factory has pre-installed a 64GB MicroSD card into your DC400HD.
Nothing more needs to be done unless you wish to change the card.
In that case, see inserting a new memory card on page 4. P.S. The Dash Cam supports MicroSD cards with a capacity of up to 64GB · Class 10 or higher memory card when formatted using the device. For reliable operation, use a Class 10 memory card with a capacity of at least 8GB.Note: DO NOT insert or remove a memory card while the device is powered on.
![]() Settings Cont’d:
Settings Cont’d:
Date and Time – set the time and date.
Headlight – Used to improve the video quality
Format- used to format NEW MicroSD cards
Default – Default to the factories default settings
Version – To view the current software version
Fill Light- To enhance the Video quality during night driving.
However, it is recommended to keep this in the close status as the quality will be diminished.
Product Specifications
| CPU | AC-JL5601A |
| Sensor | GC1064 (4G) |
| Display | 4.0 inch IPS Touch LCD |
| Video resolution | Front 1920*1080P FHD/ 1280720P HD |
| Internal: | 640480P VGA |
| External port | MINI USB 5V/1A power adapter port MAX support 64GB class 10 MicroSD card |
| Speaker | Built-in Mic |
Features:
| Loop recording | Support (1mins / 3mins / 5mins / Close) |
| MicroSD card | MAX 64GB (Class 10 high speed) |
| Photo | Support (VGA/ 1M / 2M / 3M I 5M / SM / 10M) |
| Playback | Support |
| Mode | Video/Photo/Playback mode switch |
| Power | Cigarette Lighter ( 12V-5V 1A) |
| Video format | MOV |
| Image format | JPG |
| Compression | H.264 |
| Battery | Built-in |
| Language | Support English, Chinese, Russian |
| Record Mode Settings Cont’d | HDR – Its High-Dynamic Range. Options include close/open. It’s a function that enhances night vision for some roads. Exposure – This is to adjust Video performance Motion – It has close and open options. When you open the motion detection function, when somebody is passing from your car or crashing your car, it will turn on and record 10-15 seconds then shut down. This video will be saved as a protection file. This is only for nighttime when a parked car. Watermark – When you open the Watermark function, the video will have a date and time stamp. Gravity – Also called G-sensor, options includes Close/ Low/ Middle / High. This means when your car crashes the video files will be saved and protected and will not loop recording. However when closed and cars are passing on some unsmooth roads, the G-sensor will start to work. It will continue to record many files, the Micro SD card will not loop recording which leads your dashcam always show please format TF card or TF card is full, you will need a manual delete. Sound – turn sound off and on Guard – Means Parking monitoring |
| Camera: | 1. Press the Camera mode icon 2. Press 3. Press 4. Press 5. Press |
Files: | 1. Press Files icon 2. Choose Folder Front/ Internal to playback video. |
| Settings: | 1. Press settings Icon 2. Users can choose Protection /Auto-Shutdown/ Frequency/Key sound /Language/ Date & Time/ License/ Headlight/ Format/ Default/ Version/ Fill light settings. Protection – The screen will close/ 30 seconds/ 60 seconds/ 120 seconds optional. It will turn off the LCD display automatically but will continue to record. Auto-Shutdown – It will close and shut down completely/ 3 minutes/ 5 minutes/ 10 minutes option. Frequency – lt has 50 Hz and 60 Hz optional. Key Sound – Choose the close or open option. When you choose an open option, you will have a sound when touching the display. Language – Choose the language. Date and Time – To set time and date. |
Installation cont’d: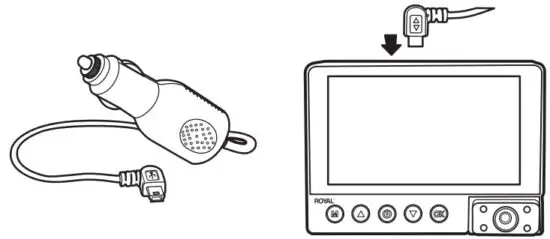
3. Connecting the Power cable
Be sure to connect the camera only to the approved Car charger designed and supplied specifically for use with your device. Using an incompatible power cable can cause serious personal injury or damage to your device.
Insert the USB mini micro plug into the AC cord input. Then insert the AC adapter end of the power cord into your vehicle’s AC outlet.
Inserting new memory card:
Your device accepts MicroSD cards with a maximum capacity of 64GB. Depending on the memory card manufacturer and type, some cards may not be compatible with your device. Using an incompatible card may damage the device or the memory card, or corrupt the data stored on it.
Recommended Memory Card SDHC or SDXC Class 10 or higher.
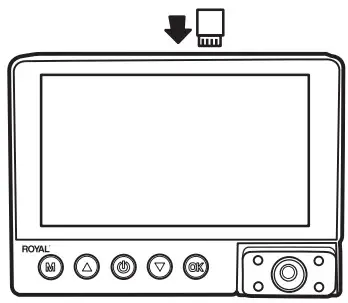
Use caution to insert the memory card right-side up as shown in the image below.
- Insert a memory card with the gold-colored contacts facing downwards.
- Push the memory card into the slot until it locks in place.
- Click sound when memory card locks in place.
- Using a coin or other tool to push the memory card will make it easier to insert.
Inserting the memory card cont’d:![]() Note: It is recommended that you reformat a memory card after every time the images are transferred to a computer, or at least once a month.
Note: It is recommended that you reformat a memory card after every time the images are transferred to a computer, or at least once a month.
Reformatting a memory card keeps important elements of data and file structure clean, helping to prevent error messages and missing images. Reformatting also restores the memory card, which can help prevent it from becoming corrupted.
For best results format the memory card using the camera.
Removing the memory card:
Before removing a memory card from your device:
- Press the OK button
 to stop the device from recording
 - Press and hold the POWER button
 to power the device off.
 - Gently push the memory card in until you hear a click, and allow the spring release to push the card out.
![]() Note: Do not remove the memory card while the device is transferring or accessing information. Doing so can result in data loss or corruption, or damage to the memory card and/or device.
Note: Do not remove the memory card while the device is transferring or accessing information. Doing so can result in data loss or corruption, or damage to the memory card and/or device.
Formatting the memory card:![]() Note: MicroSD card supplied from the factory has been pre-formated.
Note: MicroSD card supplied from the factory has been pre-formated.
You DO NOT need to format this card.
We recommend using the camera to format the memory card:
- Press the OK button to stop the device from recording
- Poss senna icon
 enter srstem semno
 - Press Format Icon
 to format the SD card
Before formatting a mem~r card, always remember to make backup copies of all important data stored on the device. The manufacturer’s warranty does not cover the loss of data resulting from user actions.
Turning the device On and Off:
Press and hold the POWER button ![]() for a few seconds to turn on the device. A welcome message will be displayed on the screen as shown in the image below.
for a few seconds to turn on the device. A welcome message will be displayed on the screen as shown in the image below.

To turn off the device, again press and hold the POWER button ![]() for a few seconds. A goodbye message will be displayed on the screen as shown in the image below.
for a few seconds. A goodbye message will be displayed on the screen as shown in the image below.
Turning the device On and Off cont’d:
![]() Note: The Dashboard Camera will switch on and off automatically if you keep it permanently connected to the car charger.
Note: The Dashboard Camera will switch on and off automatically if you keep it permanently connected to the car charger.
** If the car charging port provides a continuous flow of power, the camera will stay powered on at all times
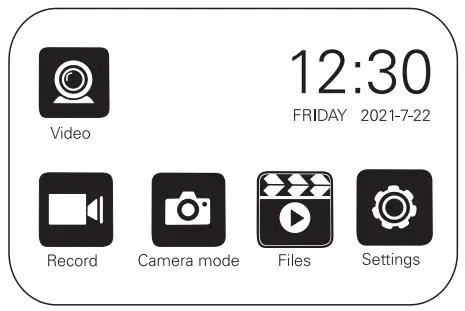
Main Menu:
Your main menu will show all of the touch screen options along with time, date, and year.
Video: | 1. Press Video Icon 2. Press Video Icon |
Record: | 1. Press Video Icon 2. Press 3. Press 4. Press 5. Press 6. Press 7. Press |
| Record Mode Settings: | Resolution – Select the resolution that you will want to record Dual – When your choice to open it will record at the same time for the front lens+ internal lens. If choose close, only the front camera will record. Cycle – Also called looping recording. It has / 1 minute/ 3 minutes/ 5 minutes optional. When you choose 1 minute, every Video file will be 1 minute. It will always loop record. Interval – Close / 100 ms/ 200ms / 300ms optional, this function is to save Micro SD card storage. We suggest to choose close statue. HDR – High-Dynamic Range. Options include close/open. It’s a function that enhances night vision for some roads. |
![]()
Consumer Information Products, Inc.
50 Hilton Street
Easton, PA 18042
© Copyright, Royal Consumer Information Products Inc,
2021, AII Rights Reserved.
DC400HDIM0821


