![]() RR7455 Explorer Serie 60 Vacuum Cleaner
RR7455 Explorer Serie 60 Vacuum Cleaner
User Guide X-PLORER SERIE 60
RR7365 Robot Vacuum Cleaner
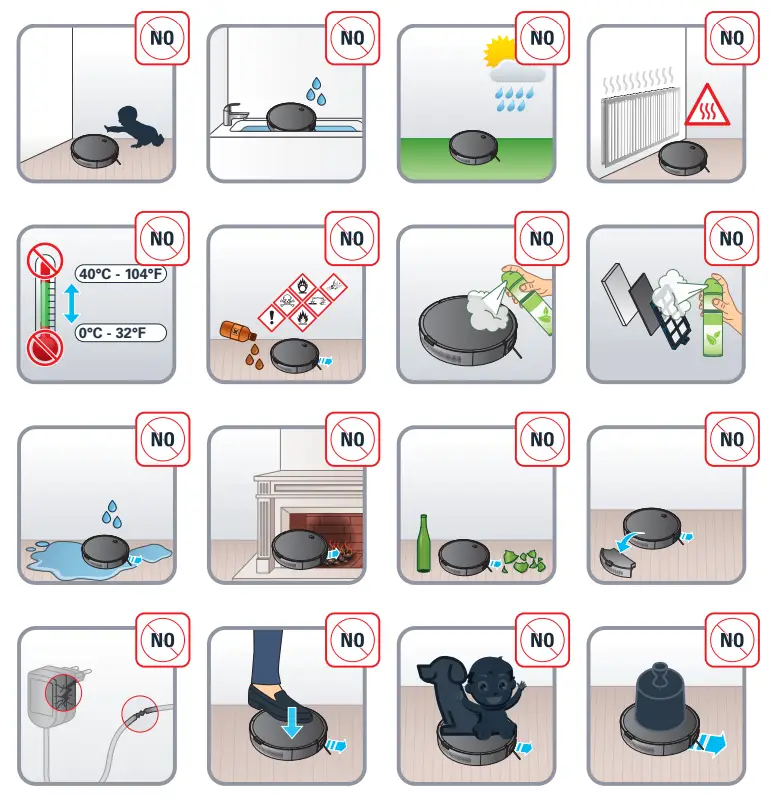
Please read carefully the “Safety and use instructions” booklet before first use.
For more information 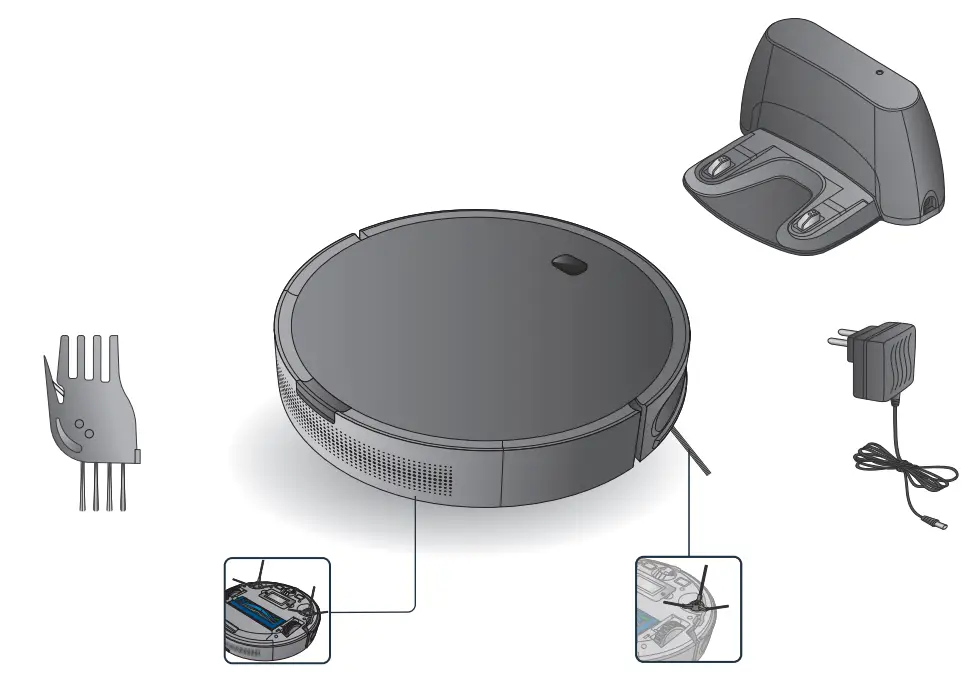
Your robot may encounter some difficulties on carpets: with fringes, too thick, with long piles, or too light (ex: bathroom carpet)
![]()
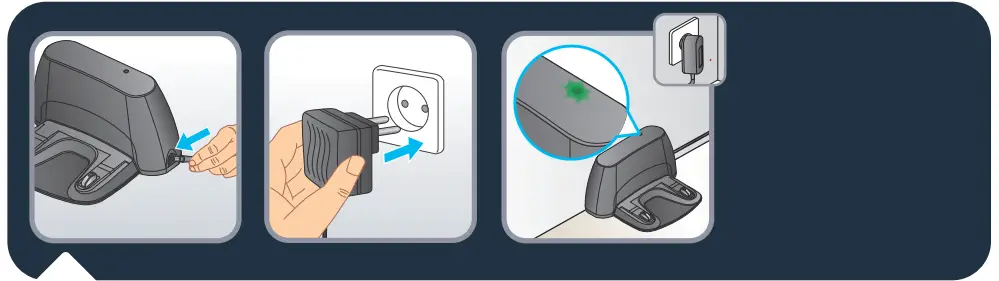
Plug the adaptor into the power jack on the side of the base. Only use the charger provided with the robot: do not use universal chargers.
Connect the power cord plug to the main socket. When the power cord is plugged check the upper side of the base if the green light is shining.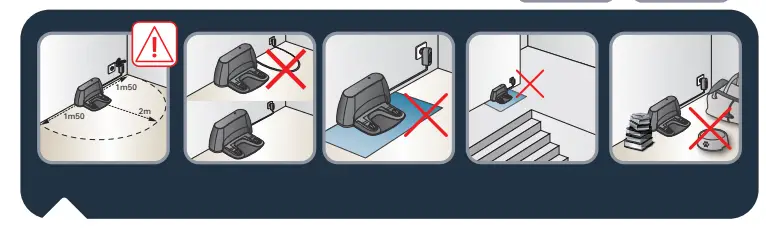
To place the docking station, make sure there is an empty area of 1.5m on each side and 2m in front of the docking station. Do not install the docking station near the stairs. The cable must be tight. Always place the docking station on the hard floor. Do not place the docking station on the carpet.
To charge the robot turn it on by pushing the on / off button for 3 seconds. Place the robot on the docking station: the charging plates on the robot must touch those on the docking station. Replace the robot on its charging base after use.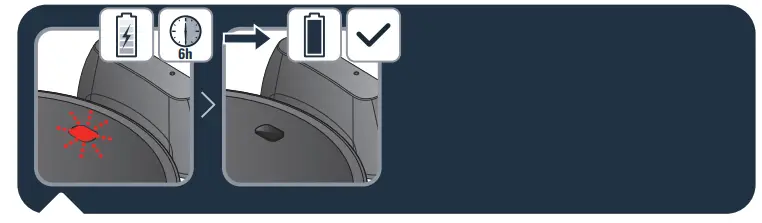
When the on/off button blinks the robot is charging. Once the on / off button stops blinking it is fully charged (6h for the battery to be fully charged).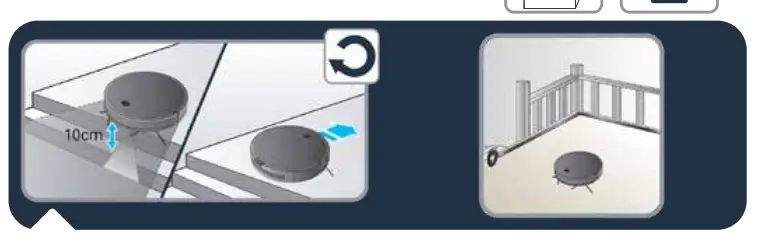
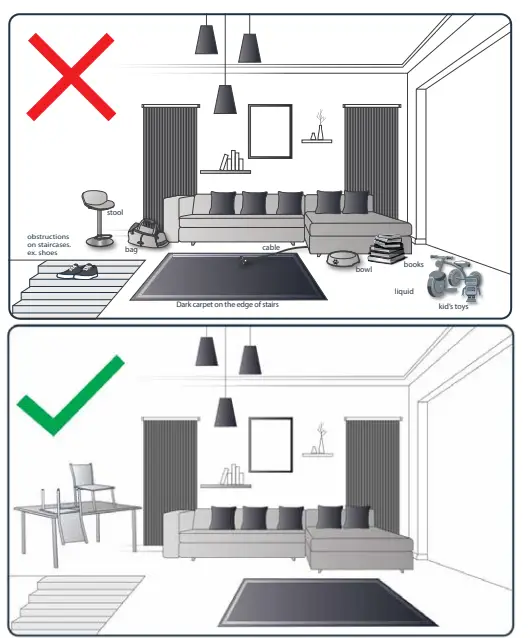
The robot has drop sensors to detect stairs and gaps. The robot will change direction when detecting them.
In order to correctly detect the floor level difference, make sure there are no objects (bags, shoes…) on the floor next to gaps, stairs or on the stairs’ steps. The step must be more than 10 cm away to be detected. If the area to be cleaned has stairs, a magnetic strip must be placed at the edge of a drop in order to prevent product damage and ensure safe operation.
To clean all the accessible areas of your home, use the « Methodic » mode: press once the Power button.
To clean a localized area of your home, use the « Spot » mode: press twice the Power button. Please note that the « Spot » mode is not available when the robot is on the docking station. To clean along the walls and in the corners, use the « Wall follow » mode: press three times the Power button.
To end the cleaning session, press the button on the robot.
To send the robot back to its docking station, press twice on the robot’s button when it is running. Please note that if you pause the robot and then press twice on the power button the robot will clean in “Spot” mode.
![]()
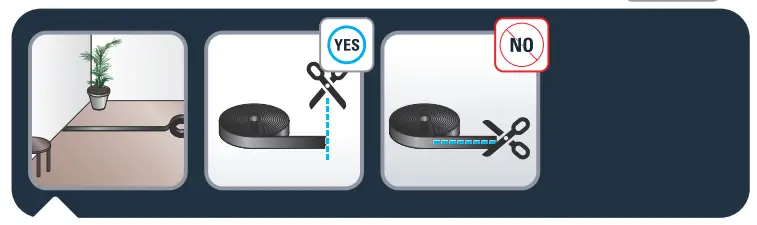
Should you like to restrict access of the robot to some areas, use the magnetic stripe. Put the magnetic stripe on the floor to mark a no-go zone for the robot.
You can cut the magnetic stripe in pieces to adjust its length to your need. Please cut it only vertically and never along the stripe.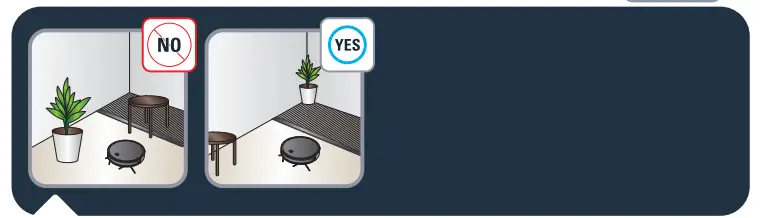
Do not put anything on top of the magnetic stripe.
Sold Separately![]()
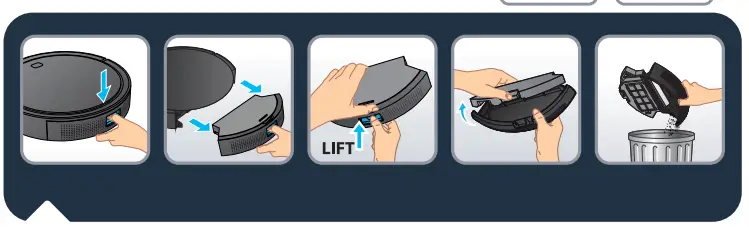
The robot must be emptied and cleaned after each use. Push the button on the backside of the robot and pull out the dust container. To empty it, flip off the cover. 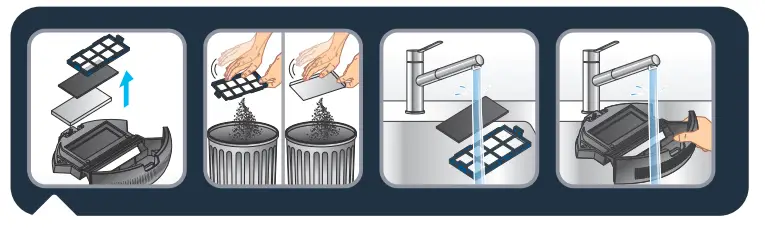
Clean the filter cover and the filter by tapping the back, and holding it above a waste bin.
Wash the foam filter, the filter cover, and the dust catcher in clean water. Do not wet the fine dust filter (white filter). The filters must be cleaned at least once a week.

Let all parts dry for approximately 12 hours. Do not use a wet filter or dust container. When dry put the filters back in the dust container.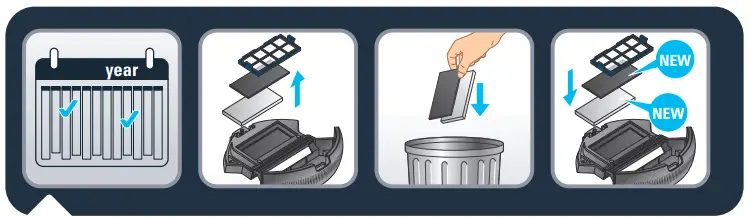 Every 6 months replace the fine dust and foam filter with new ones to maintain optimal performance.
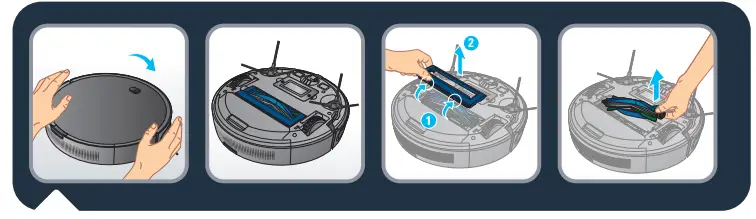
Clean the brush of the robot once a week. To do that turn the robot upside down.
To remove the brush, open the brush guard by pushing the 2 snap latches and pull it up. Then pull out the brush from the robot.
3b.

To clean the brush, use the cleaning accessory or scissors to cut away any hair.
Clean the robot’s side brushes with a clean, dry cloth at least once a month.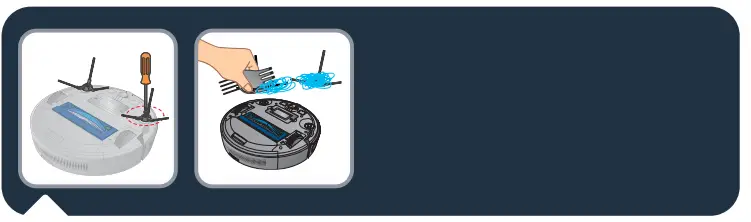
To clean the side brush, remove it and use a cleaning brush to clean the side brush and the entanglements in the slot of the side brush. Replace lateral brushes every 6 months.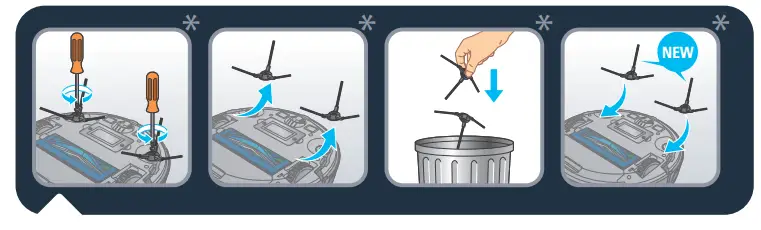
Replace lateral brushes every 6 months.
Throw away the old brushes and replace them with new ones. Screw the new brushes on the robot.
* Depending on model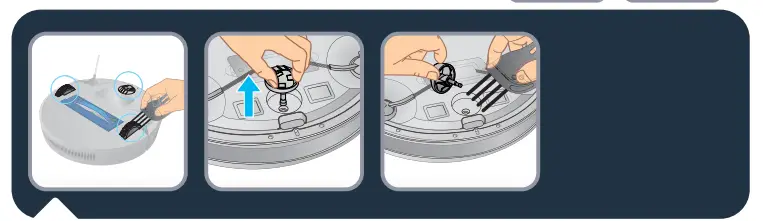
o clean the wheels, and clean the front, left, and right wheels regularly with a cleaning brush. The wheel shaft may be entanglement by the hair, cloth strips, etc. so please clean it in time.
Attention: Before touching sensitive parts of the robot make sure it is turned off by pressing the on/off button for 3 seconds. 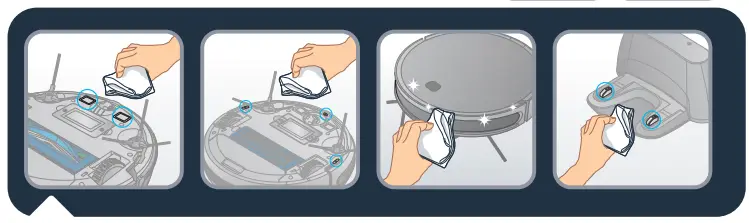
Once a week, clean the following parts with a clean, dry cloth: the robot’s charge plates, fall sensors, distance sensor, the docking station’s charge plates, and the robot’s front wheel.
| Component | Cleaning the component | Replacing component |
| Dust collector | After each use | Not applicable |
| Filter | Once a week | Twice per year |
| Brush | Once a week | If required |
| Charging base | Once a week | Not applicable |
| Fall sensors | Once a week | Not applicable |
| Front-wheel | Once a week | Not applicable |
| • Brush heads | Once a month | Twice per year |


Do not throw the robot in the bin.
Always wear gloves and protection.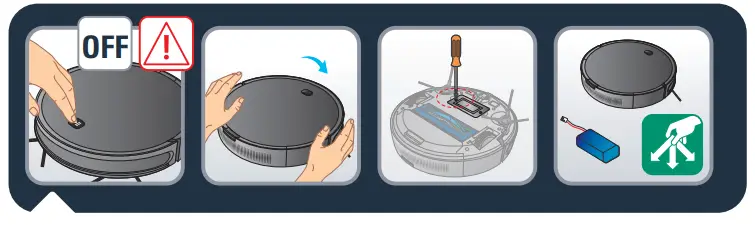
Attention: Before removing the battery turn off the robot. Turn the robot upside down to get access to the battery slot. Remove the battery by screwing the top cover.
Disconnect the battery from the robot. Recycle the battery and robot.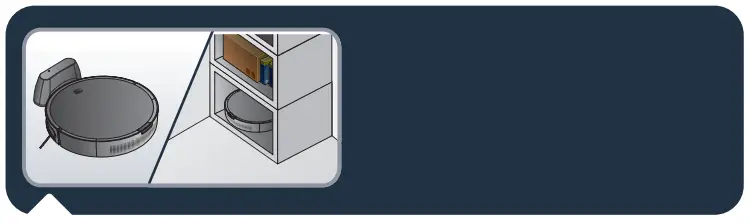
In order to extend the battery lifespan, always keep the robot charging on the docking station while not using it.
If the robot is stored off/out of the docking station, make sure the robot is OFF and the battery is fully charged. Store the robot in a fresh and dry place. Please charge the robot every 3 months when you are not using it![]()
IS THERE A PROBLEM WITH YOUR APPLIANCE?
According to model:
- The charger is getting hot:
 This is perfectly normal. The vacuum cleaner can remain permanently connected to the charger
without any risk. - The charger is connected but your appliance is not charging:
– The charger is incorrectly attached to the appliance or is faulty. Check that the charger is properly connected or contact an Approved Services Centre to change
the charger. - Your appliance stops during use:
– Your appliance may be overheating. Stop the appliance and leave it cool for at least 1 hour. If it overheats on repeated occasions, contact the Approved Services Centre. - The appliance stopped after the charge light was flashing:
– The appliance has run out of battery charge.Recharge the vacuum cleaner. - The power brush is not working properly or makes a noise:
– The rotating brush or hose is obstructed. Stop the vacuum cleaner and clean them.
– The brush is worn. Contact an Approved Service Centre to change the brush.
– The belt is worn.Contact an Approved Service Centre to change the belt. - The power-brush stops during vacuuming:
– The safety function has been triggered. Stop the vacuum cleaner. Check that nothing is obstructing the rotation of the brush; if there is an
obstruction, remove it and clean the power brush, then turn on the vacuum cleaner. - Your vacuum cleaner is not vacuuming as well, is making noise, and whistling:
– The intake channel is partially blocked. Unblock it
– The dust collector is full.
Empty it and clean it.
– The dust collector is not properly fitted. Re-position it correctly.
– The intake head is clogged. Remove the power brush and clean it.
– The protective foam filter is saturated. Clean it.
| RR73XX | |||
| Error Indicator Light | Error Designations | Error Forms | Solutions |
| The red indicator light blinks twice and beeps | Failure of the left wheel | The left wheel does not turn and is overloaded. | Please confirm that the device’s left wheel is not covered. |
| The red indicator light blinks three times and beeps | Failure of the right wheel | The right wheel does not turn and is over-loaded | Please confirm that the device’s right wheel is not covered. |
| The red indicator light blinks four times and beeps | Failure of robot lifted | The robot is lifted over 1 second. | Please clean your vacuum sensors and put your robot back on the ground. |
| The red indicator light blinks five times and beeps | Failure of the front wheel | The front wheel is ‘Mocked and no longer turns. | Please confirm that the small wheels of the front wheel are not covered. |
| The red indicator light blinks six times and beeps | Failure of the ground inspection | There is a problem with the ground inspection. | Please confirm that the sensor window at the bottom of the device is not unusually concealed. |
| The red indicator light blinks seven times and beeps | Low current or battery | The battery power supply was extremely low (but not at the recharge voltage critical point). | Please replace the device on the docking station to recharge it. |
| The red indicator light blinks eight times and beeps | Failure of the front bumper | The impact switches on the front left and right shells cannot be restored. | Please check whether or not the device’s stop is normal. |
| The red indicator light blinks nine times and beeps | Failure of the main brush | The wheel of the main brush is overloaded or insufficiently charged. | Please confirm that no foreign bodies are present on the device’s main brush. |
| The red indicator light blinks ten times and beeps | Failure of the side brush | The side sweeper wheel is overloaded or insuffi- ciently charged. | Please confirm that elements such as hair or fabric are not wound around the side brush. |
| The red indicator light blinks eleven times and beeps | Failure of the wall in- section | There is a problem with the wall inspection. | Please confirm that the wall inspection clear window is not concealed or obstructed by hair or fabric. |
| The red indicator light blinks twelve times and beeps | Failure of the fan | The fan only turns with significant current flow. | Please confirm that the fan blades are not loose or jammed by hair or fabric. |
| The red indicator light blinks fourteen times and beeps | Load failure | The device cannot be supplied with power or cannot indicate the charge status. | Please confirm that the device is connected to the docking station. |
The languages NL, PT, RO, BG, CS, SK, UK, EL, HR, HU, SL, SR, BS and MK are included in the safety instructions.
2220003911/04![]()


