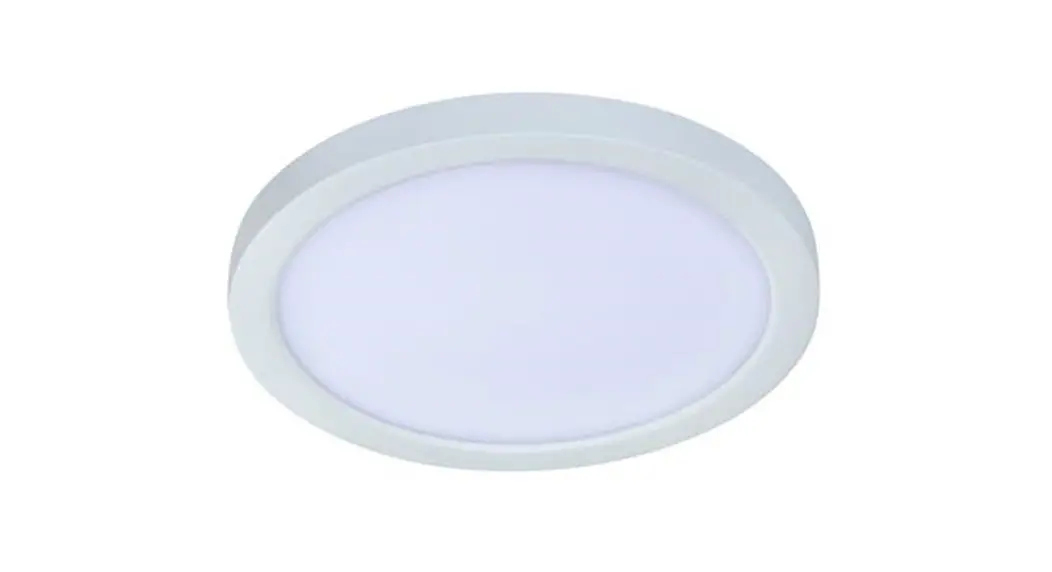
![]() CCOLOR SELECTABLE 4″ LED SURFACE MOUNT DOWNLIGHT FIXTURE
CCOLOR SELECTABLE 4″ LED SURFACE MOUNT DOWNLIGHT FIXTURE
Color Selectable 4 Inch LED Surface Mount Downlight Fixture
WARNING, CAUTION, SAFETY AND INSTALLATION INSTRUCTIONS
WARNING
- Installation, service, and maintenance of luminaries should be performed by a qualified licensed electrician.
- Before starting installation, please read instructions and keep for future reference.
- This fixture is designed for use in a circuit protected by a fuse or circuit breaker.
- To avoid electrical shock, do not turn on fixture with missing or damaged lens.
- There are no serviceable parts inside of the LED module.
CAUTION
- Power wires connecting the fixture must be rated for a minimum of 90°C (194°F).
- Do not make or alter any holes in the wiring enclosure, or in any of the electrical components.
- This fixture is rated TYPE NON-IC and is not suitable for direct contact with insulation.
- Do not cover the fixture with any heat insulated materials.
- The National Electric Code (NEC) does not permit cords to be concealed where damage to the cord’s insulation may go unnoticed. To prevent fire damage, do not run cord behind walls, ceilings, soffits, or cabinets where it may be inaccessible for examination. Cords should be visually examined periodically and immediately replaced when damage is noted.
- All parts must be used as indicated in these instructions. Do not substitute any parts, leave parts out, or use parts that are worn out or broken. Failure to obey this instruction could invalidate the ETL certification.
NOTICE
- Suitable for use in wet locations.
- Account for small parts and destroy packing material, as these may be hazardous to children.
Installation Instructions
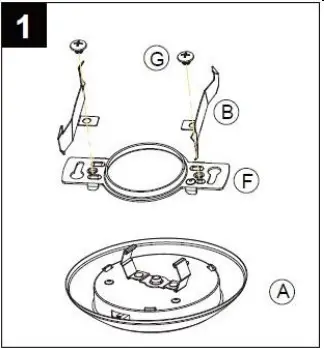
Package Contents 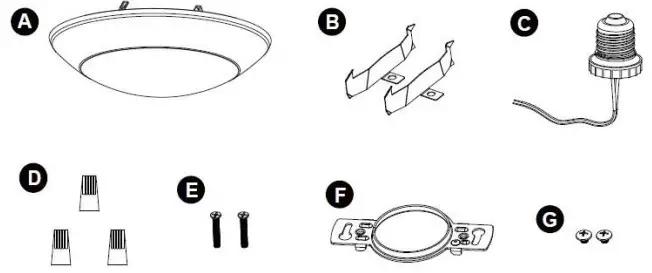
| PART | DESCRIPTION | QUANTITY |
| A | 4in Round LED Disc | 1 |
| B | 4″shrapnel | 2 |
| C | E26 Base Whip | 1 |
| D | Wire nut | 3 |
| E | Mounting Screws | 2 |
| F | Mounting brackets | 1 |
| G | Spring Holder Screws | 2 |
Preparation
- Before beginning assembly, installation, or operation of product, make sure all parts are present.
- Tools Required for Assembly (not included): Ladder, safety glasses
- Estimated assembly time: 15-20 minutes per fixture
New Construction Installation to 4″ Junction Box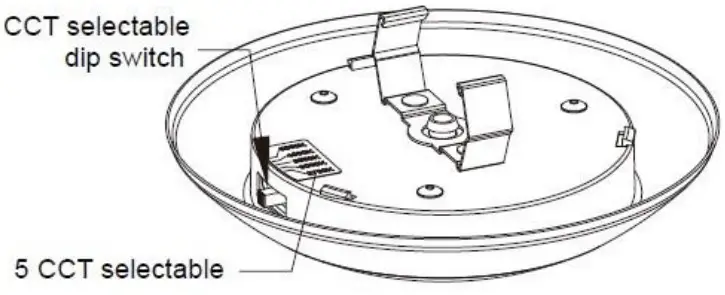 Note: Toggle the dip switch on the back of the disc light (A) to select the correlated color temperature (CCT) prior to installation.
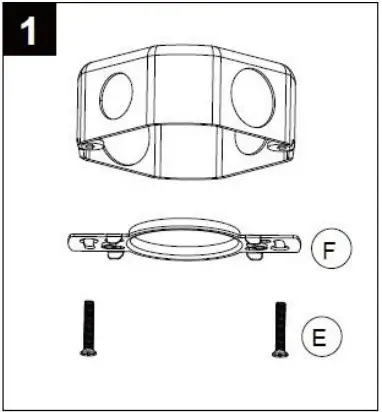
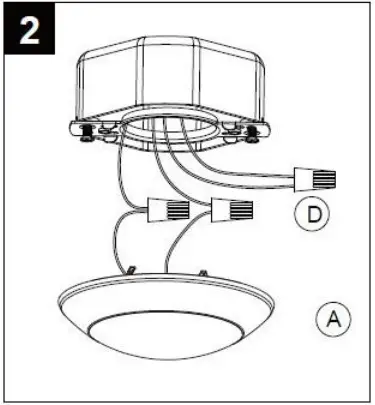
- For 4″ junction box installation, attach the mounting brackets (F) to the junction box using that two mounting screws (E).

- Pull out the source wires from the outlet box. Make wire connections to fixture (A) using wire nuts (B): black to black, white to white, and ground to ground.
Carefully push the wire back into the outlet box.
- Align the springs on the back of the fixture with the slots on the mounting brackets (F). Push the fixture upwards until the springs engage with the mounting bracket (F) so the fixture is flush with the ceiling.

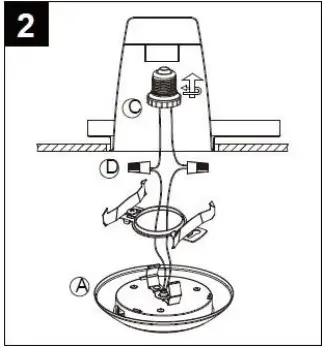
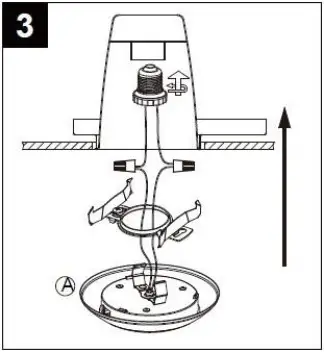
Retrofit Installation to 4″ Recessed Housing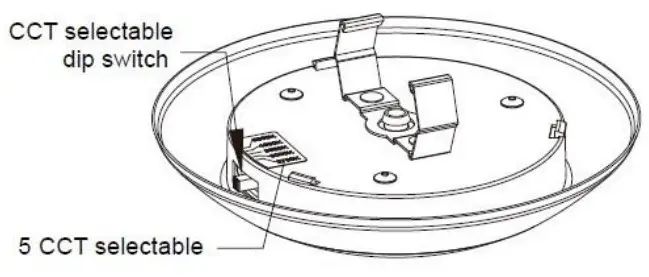 Note: Toggle the dip switch on the back of the disc light (A) to select the correlated color temperature (CCT) prior to installation.
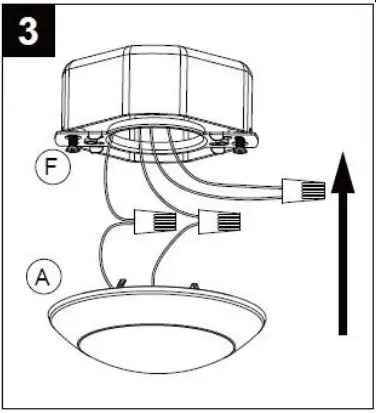
- For 4″ recessed housing installation, secure the 4″ shrapnels (B) to the mounting brackets (F) using the spring holder screws (G). Then, connect the mounting brackets (F) to the back of the disc light (A) by snapping into place.

- Connect the E26 base whip (C) to the fixture (A), making connections using wire nuts (D): black to black and white to white. Cap the ground wire using a wire nut. Then, connect the E26 base whip (C) to the socket inside of the recessed housing by screwing it into the socket.

- Push the fixture (A) into the recessed housing, being sure not to pinch or nick any of the wires.

Troubleshooting
- The light does not illuminate
a. With power supply turned off, ensure all connections are made correctly.
b. Make sure the circuit breaker is on and that the switch controlling branch circuit is on.
c. If the fixture still does not illuminate, call a certified electrician.
Dimming
- This product is suitable for use in dimming circuits. For 10%-100% light control, use with an LED-compatible dimmer (sold separately), including
- LUTRON SCL-153P, LUTRON CTCL-153P
- LUTRON DVCL-153P, LUTRON MAC-153M
Care and Maintenance
- Only use a mild soap and/or water with a soft cloth to clean the fixture. Harsh chemicals will damage the fixture. Do not wipe the fixture with a rough cloth as that may scratch the finish or the lens.
![]() WARNING
WARNING
- Before installing, servicing, or performing routine maintenance upon this equipment, follow these general precautions.
- To reduce the risk of death, personal injury, or property damage from fire, electric shock, falling parts, cuts/abrasions, and other hazards, read all warnings and instructions included with and on the fixture box and all fixture labels.
- Proper grounding is required to ensure safety.
- Power must be turned off at the breaker before installation or maintenance.
- This product must be installed in accordance with the applicable installation code by a person familiar with the construction and operation of the product and the hazards involved.
- Wear gloves and eye protection at all times while installing, servicing, or performing maintenance on the luminaire, and avoid direct eye exposure to the light source while it is on.
- To prevent wiring damage or abrasion, do not expose wiring to edges of sheet metal or other sharp objects.
- Do not install damaged product. Inspect luminaire for damage that may have occurred during transit. If damaged, contact the manufacturer immediately.
- These instructions do not purport to cover all details or variations in equipment nor to provide every possible contingency to meet in connection with installation, operation, or maintenance. Should further information be desired or should particular problems arise which are not covered sufficiently for the purchaser’s or owner’s purposes, contact the manufacturer.
![]() 972-535-0926
972-535-0926
pltsolutions.com
ver 031023


