![]() 503 Series
503 Series
Pressure-Assist Systems
Installation + Operation
Keep for Future Reference
F3B / F3B
1.6 gpf / 6 Lpf Systems
User Manual
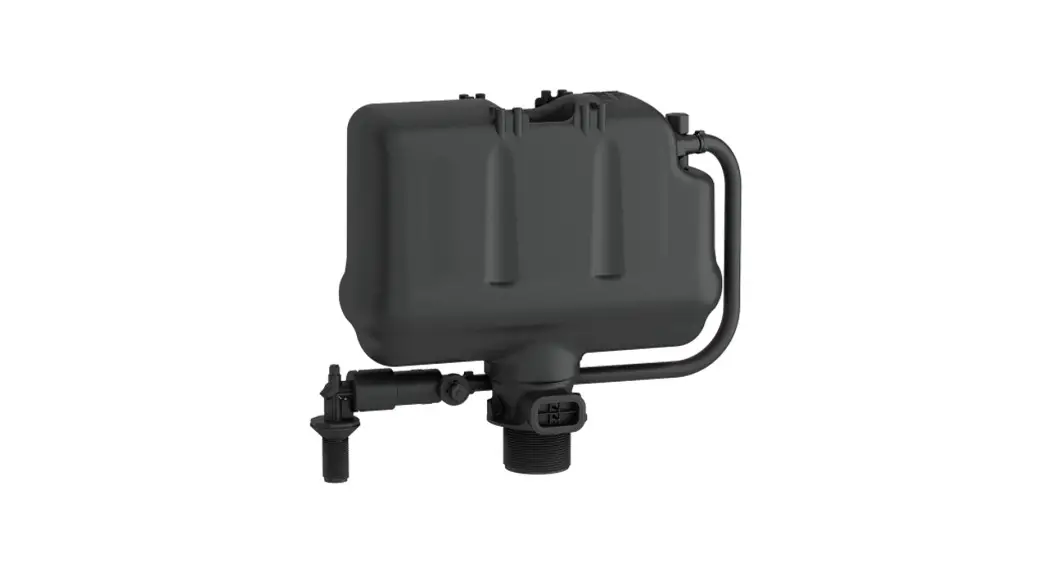
Flushmate® Systems are designed to deliver optimal performance for pressure-assist toilets. Backed by 30 years of experience, customers can depend on Flushmate products for increased efficiency and reliability with every flush.
Open Inside Flap
Components Reference
Keep this page open for reference.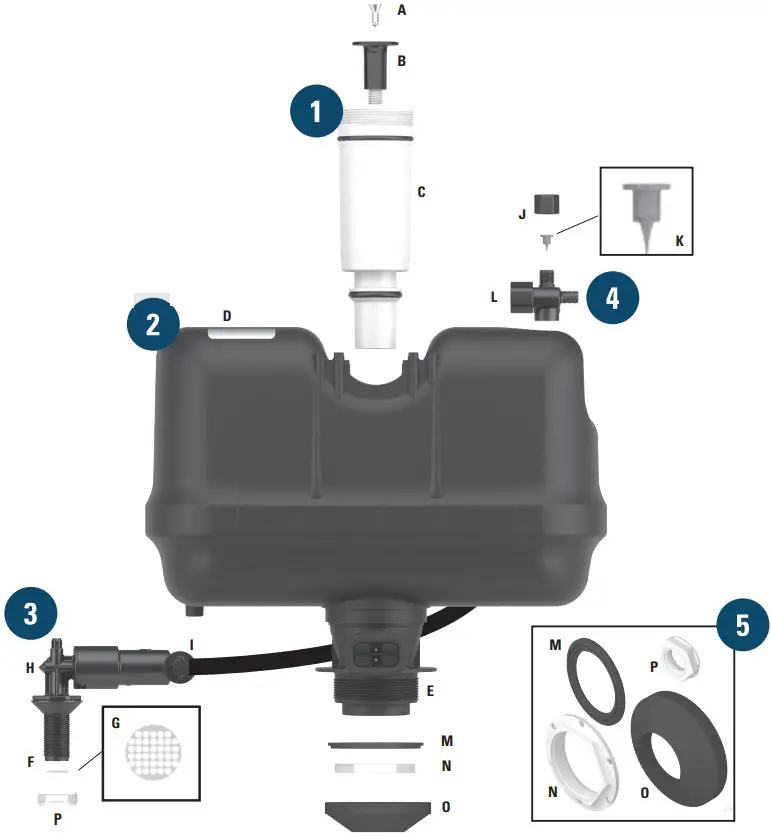
- Flush Valve Cartridge
A Set screw
B Actuator
C Cartridge body - Flushmate Vessel
D Label and serial number
E Discharge extension (with drain) - Lower Supply Group + Hose
F Supply shank
G Inlet screen
H Pressure regulator, back check and pressure relief valve
I Hose - Upper Supply Group
J Air inducer cap
K Duckbill
L Upper supply body with vacuum breaker - Gaskets + Locknuts
M Tank to tank gasket
N Discharge locknut
O Tank to bowl gasket
P Supply shank locknut
i Always use genuine Flushmate replacement parts.
Operating Requirements
Water Pressure
Pressure-assist toilets harness the energy of incoming water and air to provide a more robust flush. It is important to have sufficient pressure and flow in the water supply for the Flushmate System to function.
Minimum Operating
Pressure: 20 psi / 137.9 kPa
Maximum Operating
Pressure: 80 psi / 551.6 kPa
Minimum Water Flow Rate: 1 gal. / 3.79 l in 30 seconds
Water Supply
Flushmate Systems are designed to be used with a cold, potable water supply only. Use of non-potable water supply or a hot/tempered water supply may damage the system and will void your Flushmate Limited Warranty.
Toilet Installation
This manual contains instructions to replace the Flushmate System installed in your toilet tank. Please follow the toilet manufacturer’s instructions for installing the toilet.
WARNING
To Prevent Injury:
Read Installation Manual
Read entire manual before performing any tasks.
Safety Precautions
Care should be taken when working on the Flushmate System. Surfaces can become wet, which may create a slip / fall hazard. Exposed tank bolts have sharp threads and may cause injury – avoid contact.
Lifting the toilet tank (up to 45 lb /20,4 kg) is required. If you are unable to lift the toilet tank contact Flushmate: 1.800.533.3460
Vessel Under Pressure
Prior to servicing the Flushmate System, first completely CLOSE water supply stop and then flush toilet to release pressure from the Flushmate vessel. Failure to do so can result in injury or damage to the toilet tank and bowl.
NOTICE
Use of petroleum based lubricants or cleaning products containing chlorine (household bleach, drop-in blocks or tablets, disinfectants) that are applied or inserted into the toilet tank and/ or Flushmate vessel will void your Flushmate Limited Warranty. When cleaning the exterior of the toilet, follow manufacturer’s recommendations.
Install according to applicable plumbing code.
Use cold, potable water only.
Preparation
Before you begin, read all instructions to have a clear understanding of the time, tasks and tools required. Removal and installation can typically be completed in about an hour.
- Review all sections of the manual
- Complete steps in the order provided
- Prepare work area
- Identify and organize parts, tools and supplies
- If necessary, consult with a plumber
Package Contents Checklist
 | 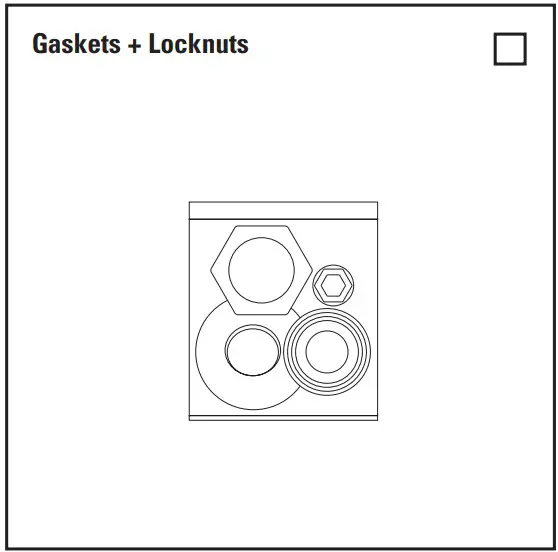 |
| See inside cover ap for listing of all system components. | See inside cover flap for listing of all gaskets and locknuts. |
| AP300503 Handle Replacement Kit (Optional) | ST300500 Tool Kit (Optional) |
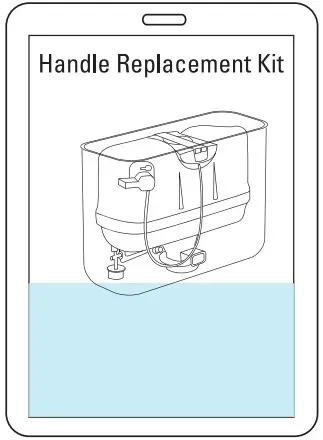 |  |
| Included for flush handle toilets only. | Depending on part number shipped, tool kit may not be included. |
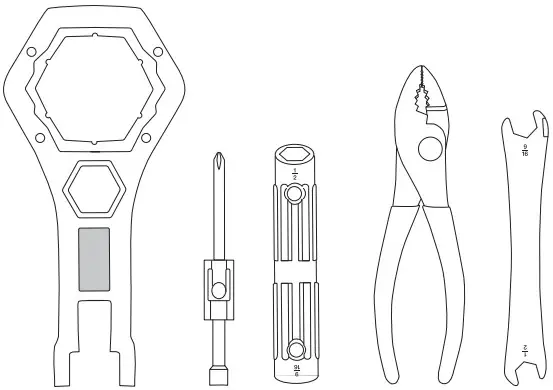
Tools (Optional)
4-in-1 Tool
Herramienta 4 en 1 / Outil 4 en 1
- Phillips screwdriver
- Nut driver – 1/4”
- Nut driver – 1/2”
- Nut driver – 9/16”
The screwdriver and 1/4” nut driver can only be inserted into the 9/16” end of the tool.
Pliers
Llave plana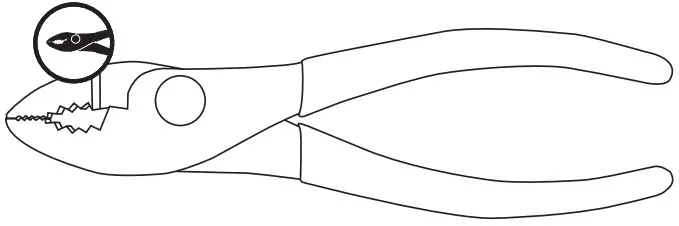 Flat Wrench
Flat wrench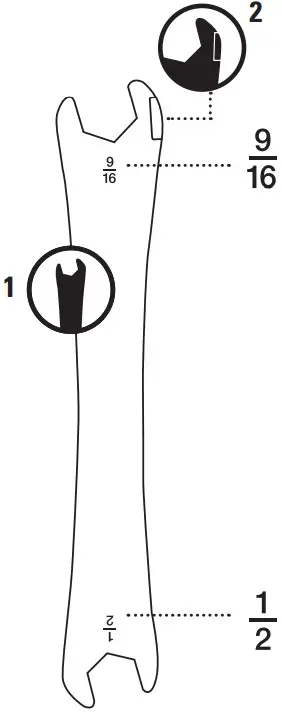 Supplies (Not Included)
| Towels | Bucket |
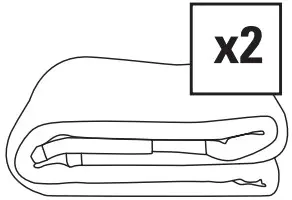 | 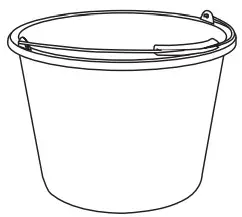 |
| Large towels (2) | 2-gallon bucket |
3-in-1 Wrench 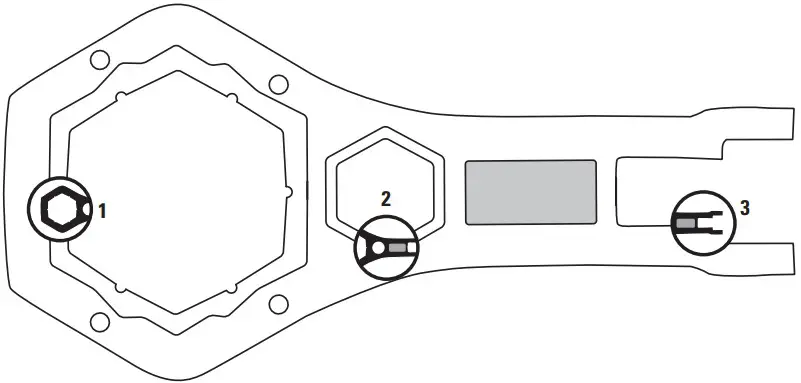
- Discharge locknut
- Supply shank locknut
- Flush valve cartridge
This is a two-sided tool.
Variations in nut size on each side of wrench accommodate old and new Flushmate locknuts.
Removing Your Existing Flushmate System
The existing Flushmate System in your toilet tank contains a pressurized vessel.
Before you begin, read all instructions to have a clear understanding of the time, tasks and tools required. Removal can typically be completed in 15-20 minutes.
![]() WARNING
WARNING
Lifting the toilet tank (up to 45 lb /20,4 kg) is required.
Surfaces can become wet, which may create a slip/fall hazard.
Exposed tank bolts have sharp threads and may cause injury – avoid contact.
Vessel Under Pressure
Prior to servicing the Flushmate System, first completely CLOSE water supply stop, and then flush toilet to release pressure from the Flushmate vessel.
Failure to do so can result in injury or damage to the toilet tank and bowl.
Remove Existing Flushmate
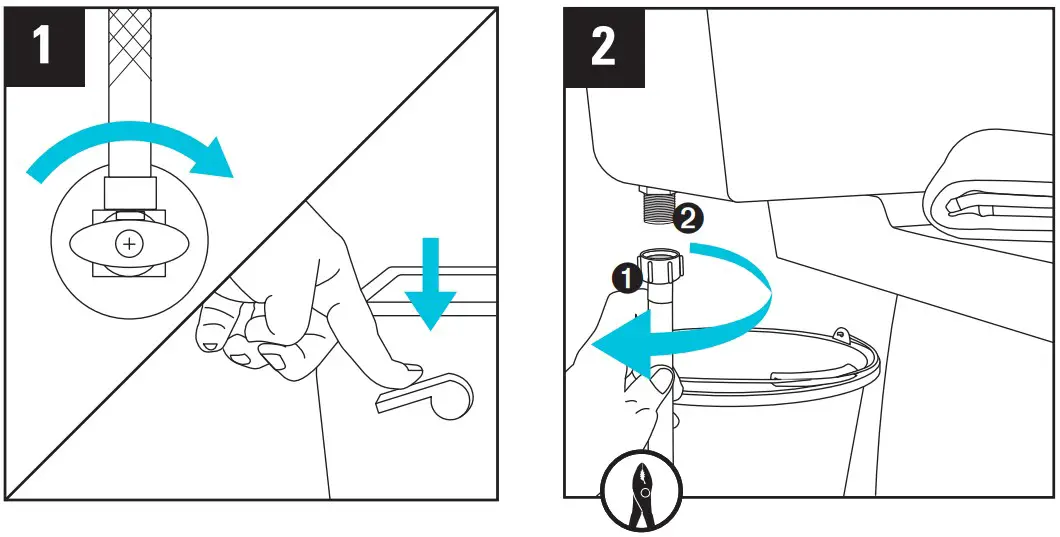 | |
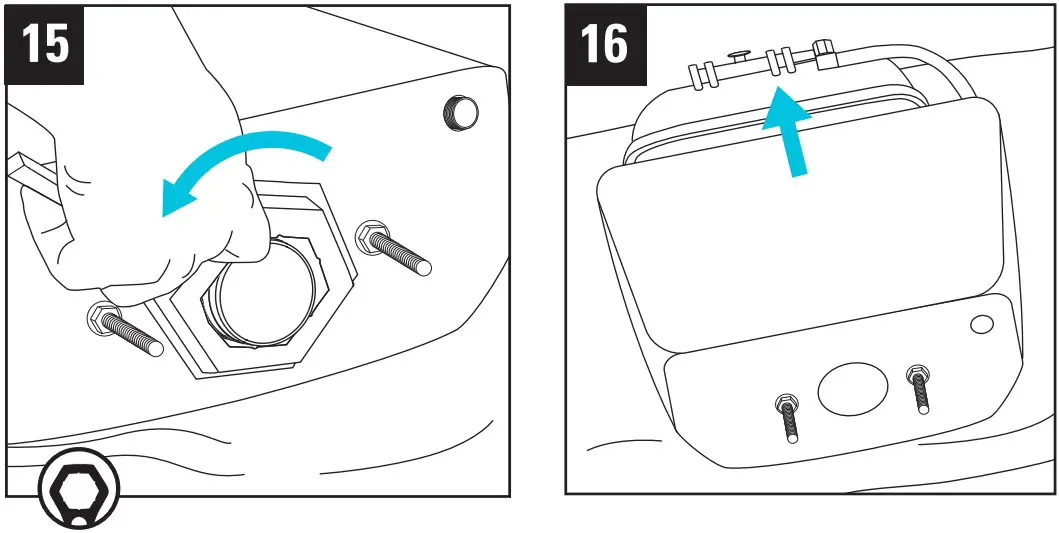
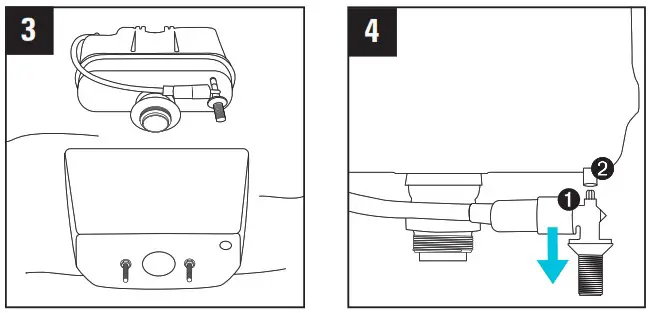
| Completely CLOSE toilet’s water supply stop. Not all valves look alike. Flush toilet to release water and air pressure from the vessel. If unable to close water supply stop, contact plumber. WARNING: Failure to release pressure from the Flushmate vessel can result in injury or damage to the toilet tank and bowl. | Place bucket and towels near toilet tank to prepare for draining water from tank. Disconnect water supply line ➊ from supply shank ➋. Pliers may be needed. Drain excess water from water supply line into bucket. TIP: Verify rubber gasket remains seated inside supply line connector. |
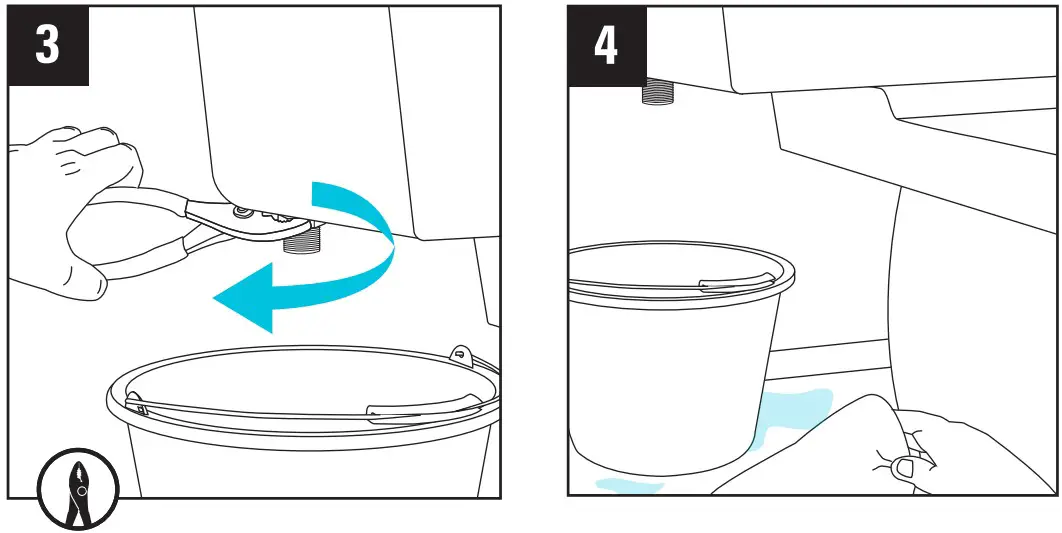 | |
| Place bucket under supply shank, completely remove supply shank locknut with pliers, and allow water to drain into bucket. Discard locknut. | |
 | |
| Remove toilet tank lid and place flat on floor, away from work area. | Press actuator to flush toilet. This will ensure all pressure is released from the vessel. TIP: You will not hear a flush if pressure has already been released. Pull up on actuator and hold for 1 minute, until excess water from vessel drains into toilet bowl. |
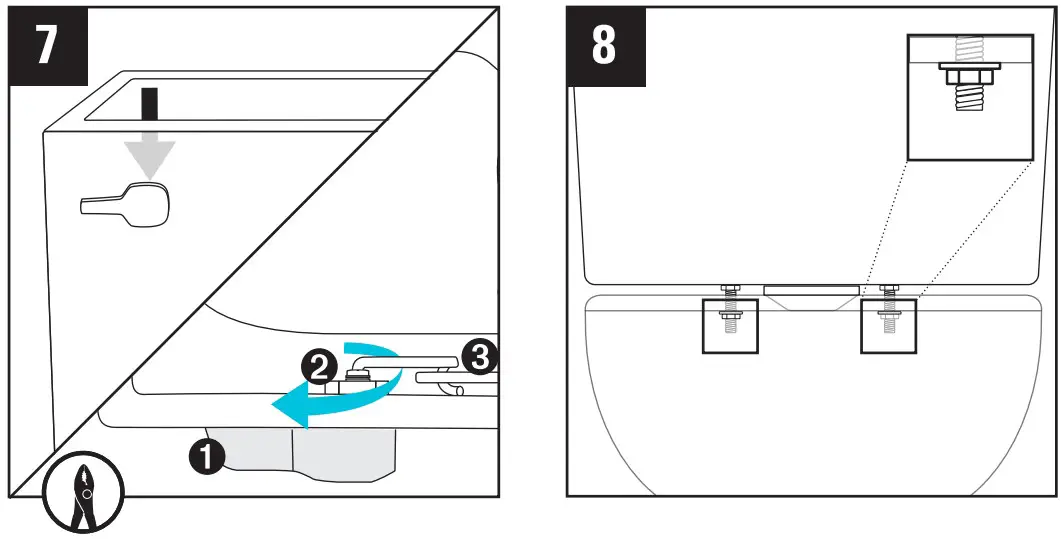 | |
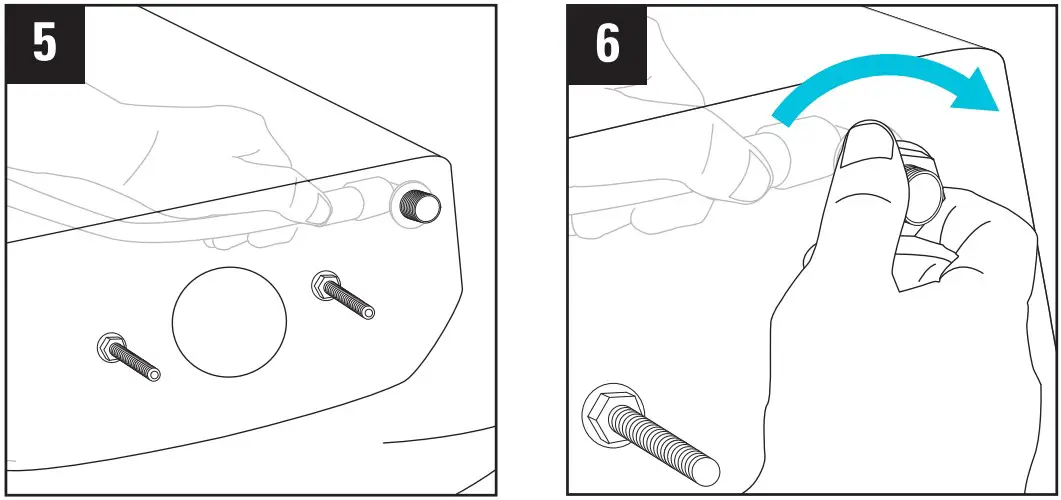
| If you have a push button toilet, >>> Skip to Step 8. Before removing existing handle, note its orientation. To remove handle ➊, loosen and remove nut ➋ (inside toilet tank). It is reverse thread. Pliers may be needed. Disconnect the flush rod ➌ as you are removing the handle. Discard nut and handle. | Locate tank bolts and nuts under toilet tank and bowl. Some toilets have two tank bolts and nuts, others have three. |
 | |
| Use the flat wrench to hold upper nuts in place. Loosen and remove tank bolt nuts with 4-in-1 tool. TIP: If it is difficult to loosen nuts with 4-in-1 tool, use pliers. | Keep all tank bolt nuts and washers for re-use during installation of your new Flushmate System. Place a towel on floor of work area to protect toilet tank during removal of the existing Flushmate System. |
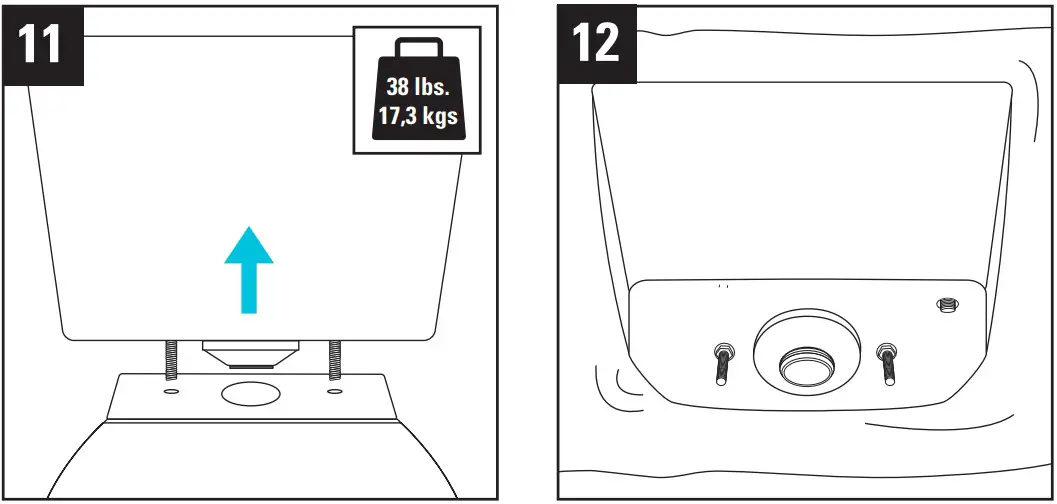 | |
| WARNING: Lifting the toilet tank (up to 45 lbs./20.4 kgs) is required. Exposed tank bolts have sharp threads and may cause injury – avoid contact. Lift the toilet tank straight up to remove from the toilet bowl. | Lay toilet tank on towel, with the front side of the tank facing down. |
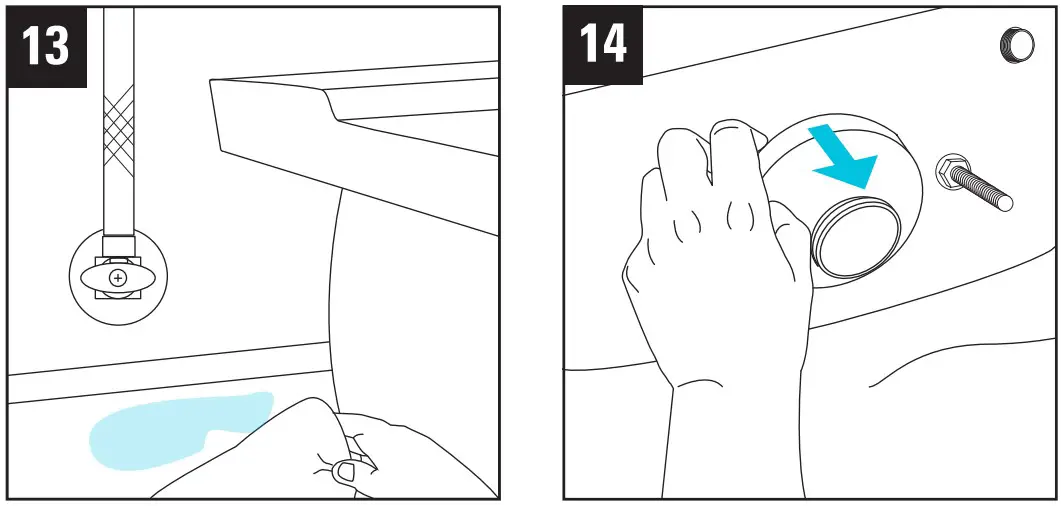 | |
| Remove tank to bowl gasket from discharge extension. Discard. | |
 | |
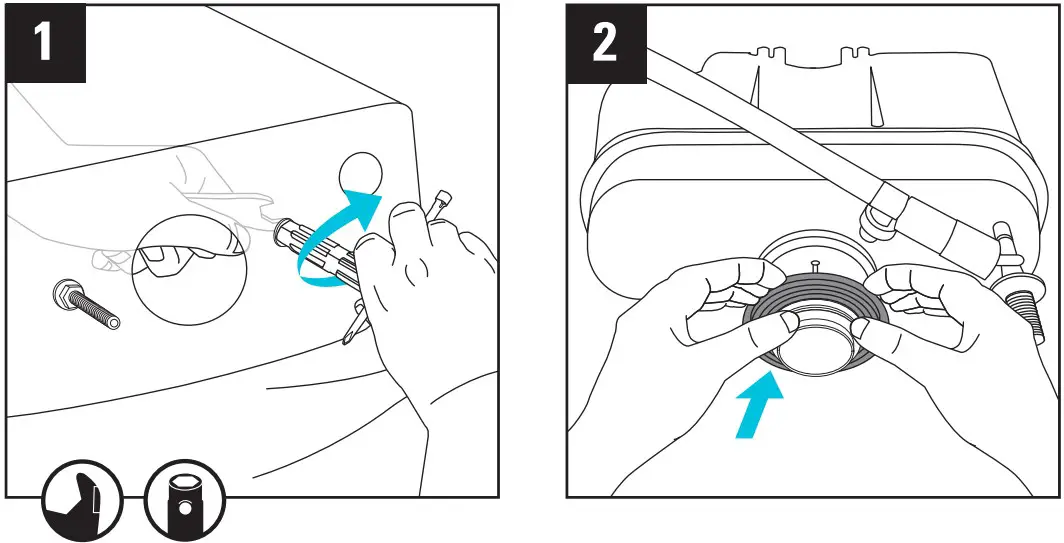
Loosen and remove discharge locknut. Depending on your tank bolt configuration, you may need to reposition toilet tank for better access. Once removed, discard locknut. | Slide existing Flushmate out of the toilet tank. Dispose of in accordance with local waste handling procedures. TIP: Now is a good time to remove any debris you may find inside of the toilet tank. >>> You are ready to install your new Flushmate System. |
Installing Your New Flushmate System
Before you begin, read all instructions to have a clear understanding of the time, tasks and tools required. Installation can typically be completed in about 45 minutes.![]() WARNING
WARNING
Lifting the toilet tank (up to 45 lbs./20.4 kgs) is required.
Surfaces can become wet, which may create a slip/fall hazard.
Exposed tank bolts have sharp threads and may cause injury – avoid contact.
NOTICE
It is normal that a small amount of water may be emitted from the upper supply group after each flush. This may cause some residual water (less than 1”) in the china holding tank.
Install New Flushmate
 | |
| Confirm tank bolts are tight. From inside toilet tank, hold head of tank bolt stationary with flathead screwdriver feature on flat wrench. On outside of tank, tighten nut using 4-in-1 tool. TIP: Some toilets have rubbers spacers between the tank and bowl that should be temporarily removed for tightening. | Place new ‘tank to tank gasket’ on the discharge extension with the flat side toward the vessel. |
 | |
| Line up the Flushmate vessel with toilet tank as shown. | Release lower supply group ➊ from the vessel’s mounting post ➋. Gently wiggle lower supply group ➊ and pull to release. |
 | |
| Holding the lower supply group, guide the supply shank inside the toilet tank and through the small opening at the bottom of the tank. | Hold supply shank in place (inside toilet tank), and thread on supply shank locknut by hand. |
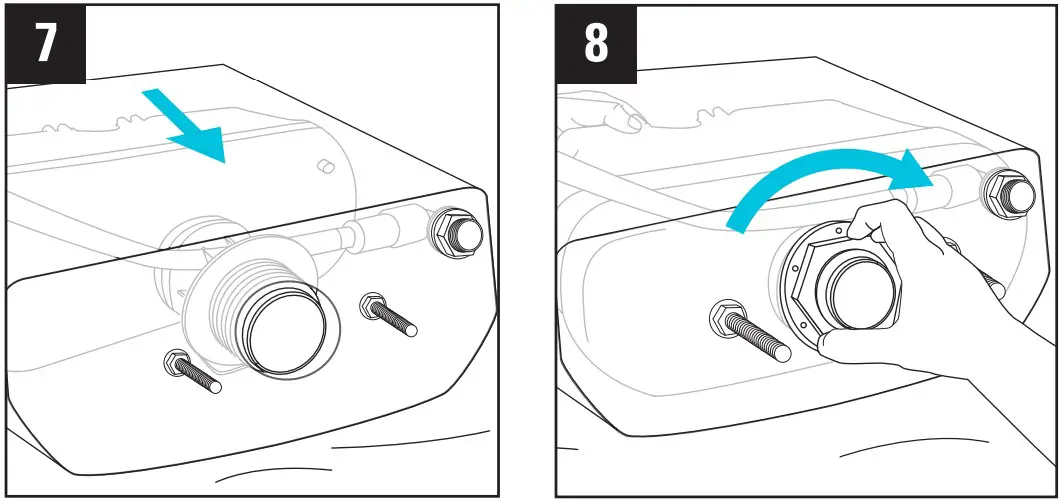 | |
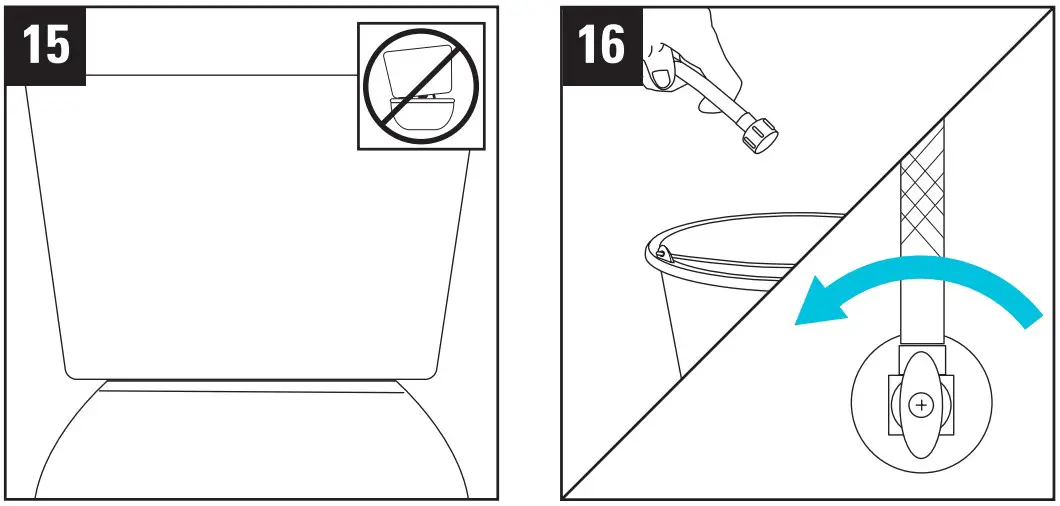
| Insert the new Flushmate System into toilet tank. Guide discharge extension through center opening. | Hold vessel in place so discharge extension stays centered in opening while hand tightening discharge extension locknut. Be careful not to cross-thread locknut. |
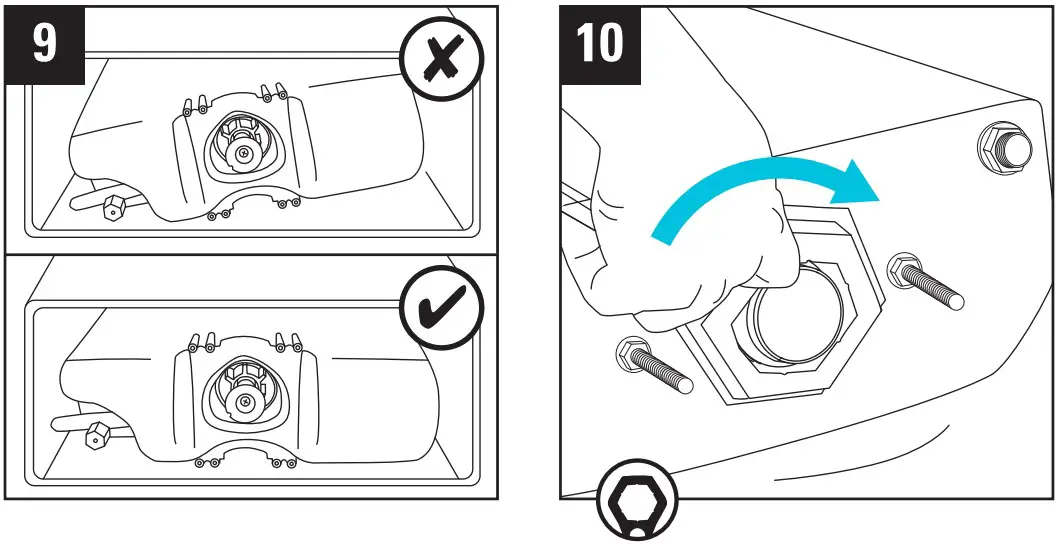 | |
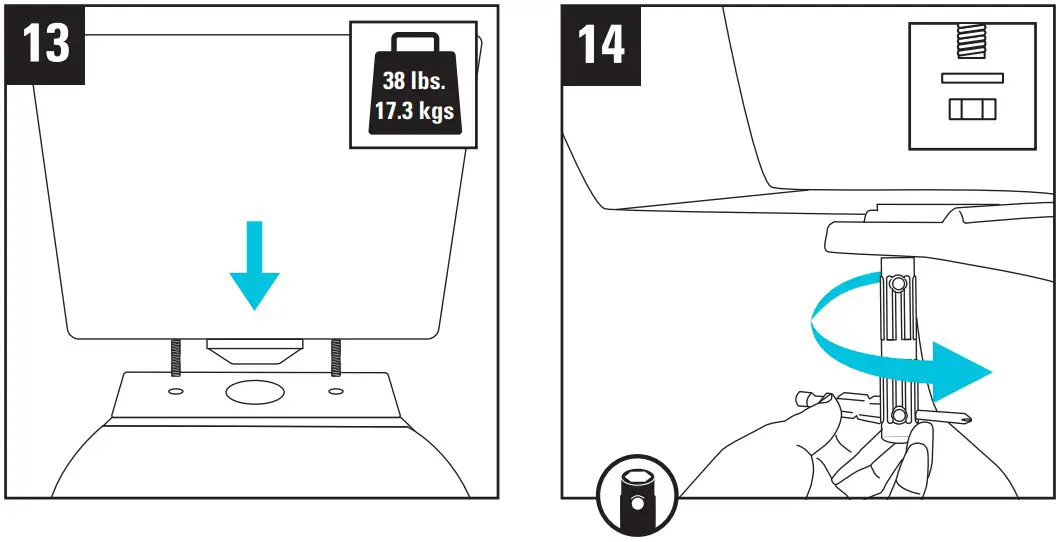
| Center vessel within toilet tank. Use both hands on opposite ends of the vessel to gently twist into position. | Tighten discharge locknut using 3-in-1 wrench, but do not over-tighten. Depending on tank bolt configuration, you may need to reposition toilet tank for better access. |
 | |
| Tighten supply shank locknut using 3-in-1 wrench. NOTICE: Both locknuts should be snug to prevent leakage, but do not over-tighten, as this can damage the toilet tank. | Place new tank to bowl gasket over discharge locknut. Make sure tank to bowl gasket contacts toilet tank all the way around. TIP: If discharge locknut is visible, tank to bowl gasket is not sealed. Reinstall. |
 | |
Return toilet tank to bowl. Align tank bolts over holes on bowl and gently lower into place. Some toilets have two tank bolts and nuts, others have three. | Re-install washers and nuts to tank bolts by hand. Tighten in small increments with 4-in-1 tool. Alternate between tank bolts. NOTICE: Tank bolts must be snug to prevent leakage, but do not over-tighten, as this can damage the toilet tank and / or bowl. |
 | |
| Make sure toilet tank is level with bowl. Refer to toilet manufacturer’s guidelines for any special instructions about tank to bowl connections. | Take disconnected water supply line and direct over / into bucket. Completely OPEN water supply stop. |
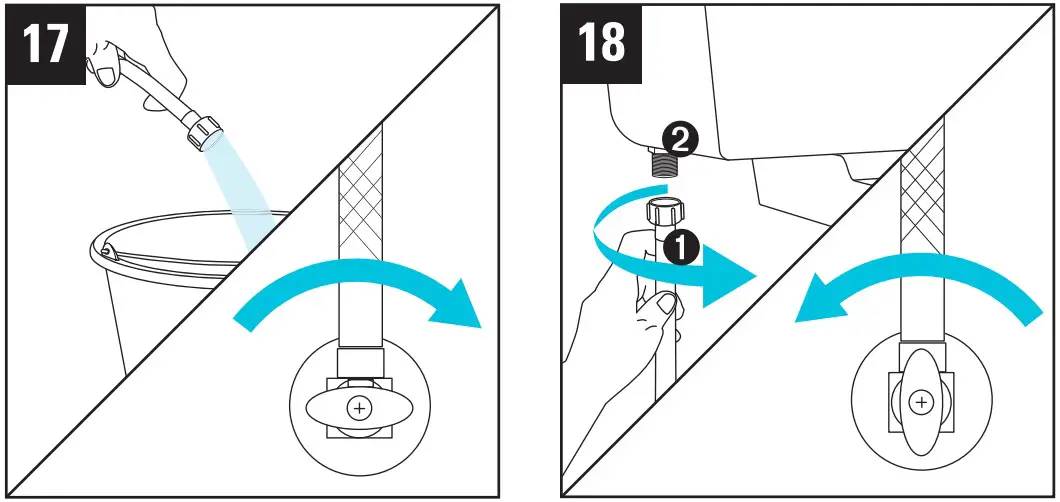 | |
| Allow water to fill bucket to ¾ full to flush the water supply line. Completely CLOSE water supply stop. | Reattach water supply ➊ to supply shank ➋. Hand-tighten. Completely OPEN water supply stop and check for leaks. If leaks are present, check for loose, over-tightened or cross-threaded connections. |
 | |
| Wait and listen for water to stop filling system. If water stops running in 1 minute or less, >>> Continue to Step 20. If water continues to run for 1 minute or longer, the system needs adjustment. >>> Go to New System Adjustments, Page 31. | Flush the toilet twice by pressing down on actuator. Wait 1 minute between flushes to test the system. If water continues to run after 1 minute, the system needs adjustment. >>> Go to New System Adjustments, Page 31. If the water stops running, >>> Continue to Step 21 |
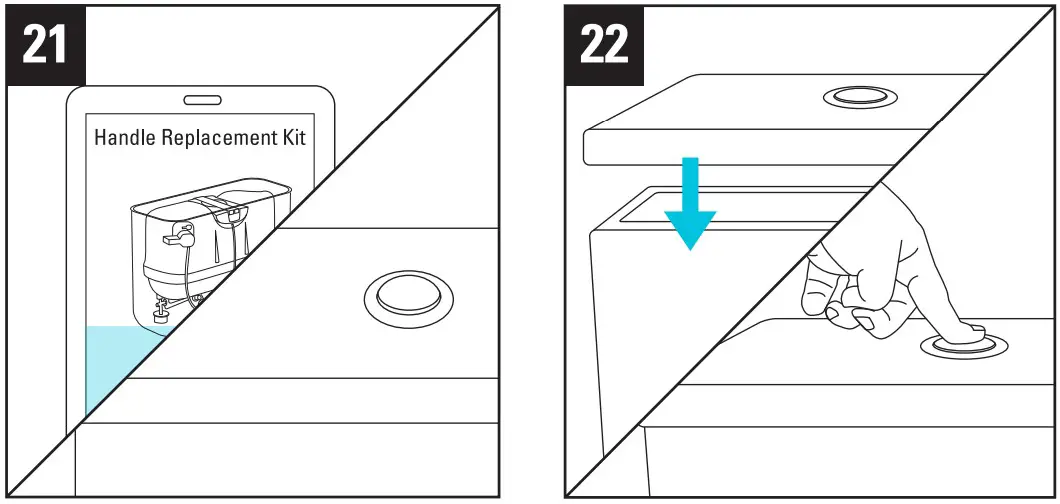 | |
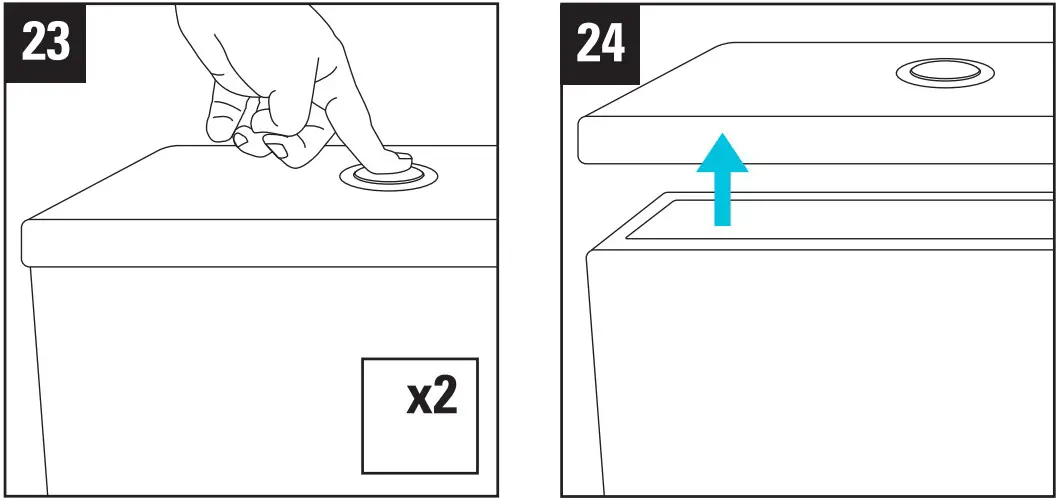
| If your toilet requires a flush handle, install the Handle Replacement Kit. Follow the instructions included in the kit. For push button toilets, >>> Skip to Step 22 | Place tank lid on toilet tank. Push to feel how much space is between push button and actuator. There should be ¼” of travel between them. Is the travel distance correct? YES: >>> Continue to Step 23 NO: Actuator adjustments are needed. >>> Skip to Step 24 |
 | |
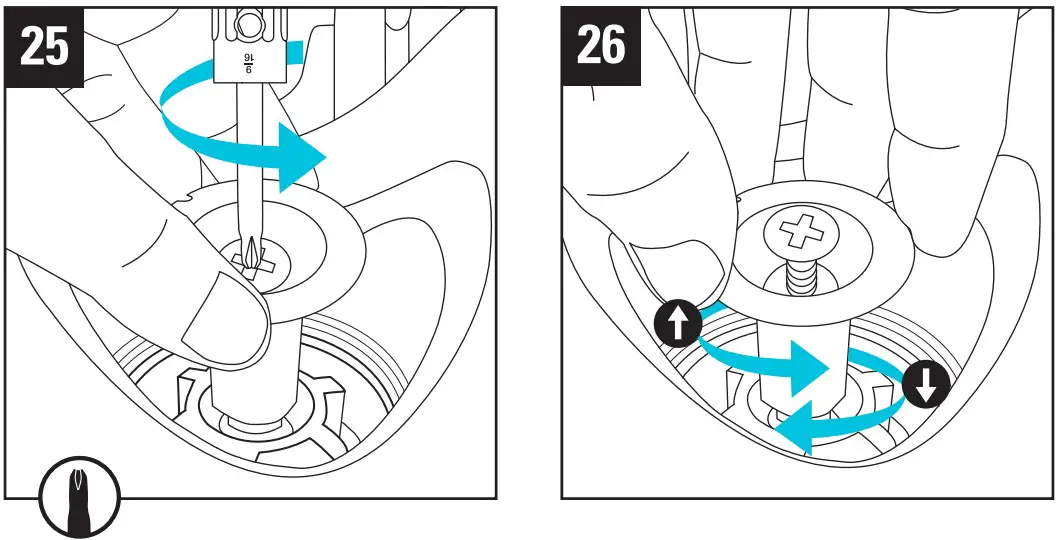
| Flush toilet two times to test, waiting 1 minute between flushes. Does the water stop running? YES: >>> Your Flushmate is ready for use. Please complete Product Registration card. NO: >>> Proceed to Step 24 | Remove toilet tank lid and place flat on floor, away from work area. |
 | |
| Hold actuator in place. Use 4-in-1 tool to loosen set screw by turning counter-clockwise, approximately 4 rotations. Do not remove set screw. Toilet may flush during Steps 25-27. | Adjust actuator UP (counter-clockwise) if there is too much travel in push button, or if toilet does not flush completely. Adjust actuator DOWN (clockwise) if there is not enough travel in push button, or if toilet runs for more than 1 minute. |
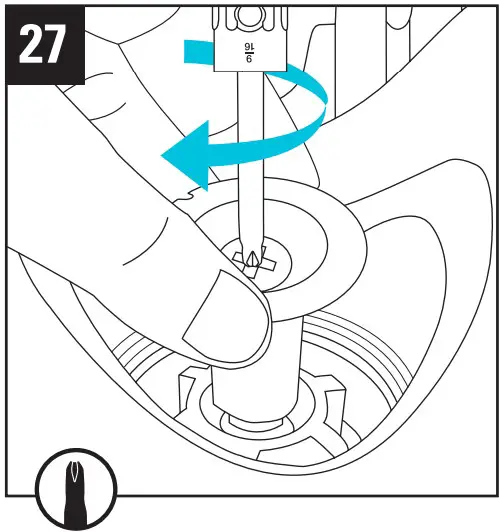 When height of actuator is set, hold actuator in place and tighten set screw using 4-in-1 tool.
>>> Repeat Steps 22-23
After 2 unsuccessful attempts, contact Flushmate: 800.533.3460
New System Adjustments
Newly installed Flushmate Systems often need adjustments.
If the water supply stop is completely open, minor adjustments should resolve run-on conditions in new installations. Make sure to complete steps in the order provided to identify the source of the run-on condition.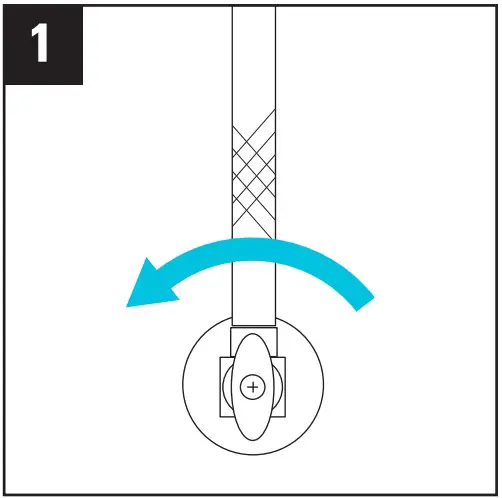 Make sure water supply stop is completely OPEN.
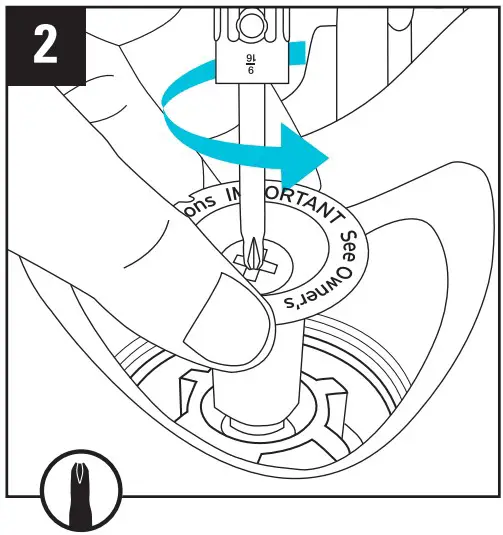 Hold actuator in place. Use 4-in-1 tool to loosen set screw by turning counter-clockwise, approximately 4 rotations. Do not remove set screw. Toilet may flush during this step.
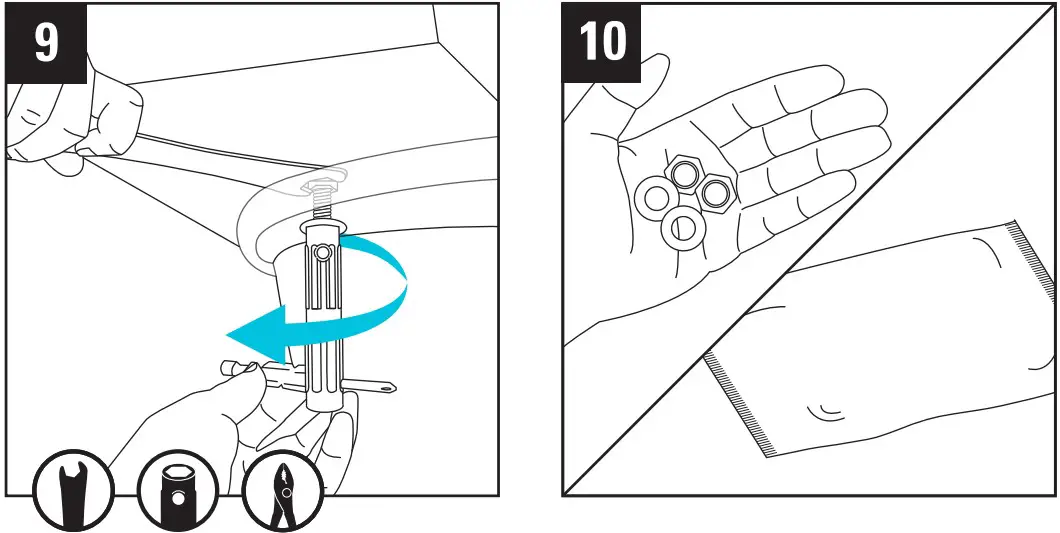
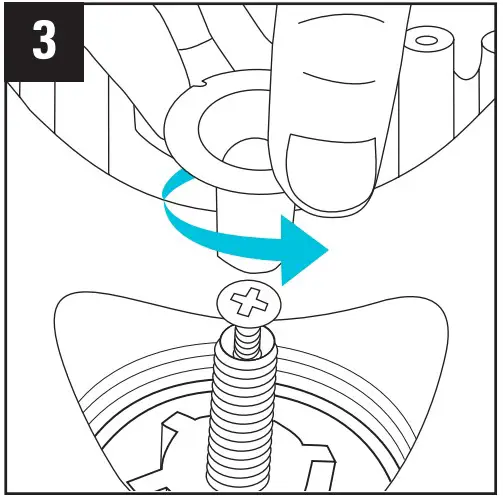 Unscrew and remove actuator. Set aside to reinstall. Leave set screw in place.
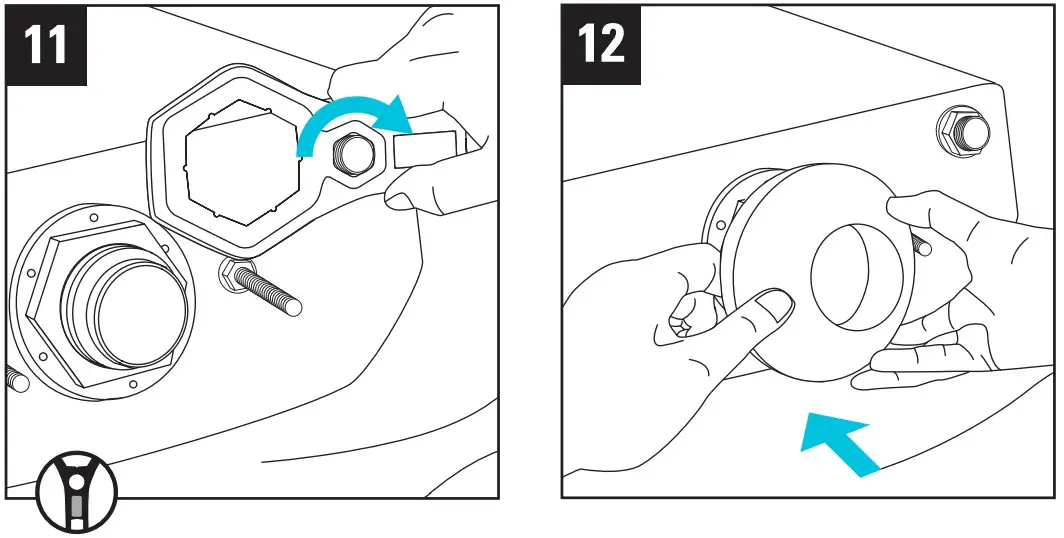
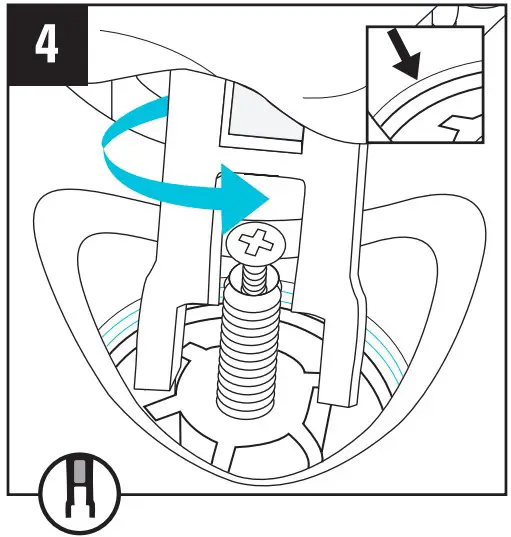 Use end of 3-in-1 wrench to turn flush valve cartridge counter-clockwise until only 1 black thread of the vessel is showing.
 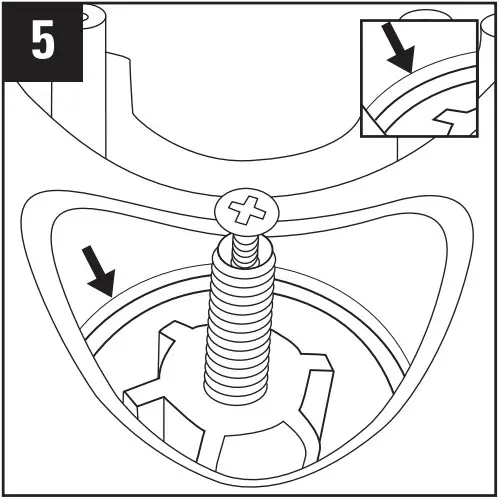 After you complete raising the flush valve cartridge, confirm only 1 black thread of the vessel is showing.
 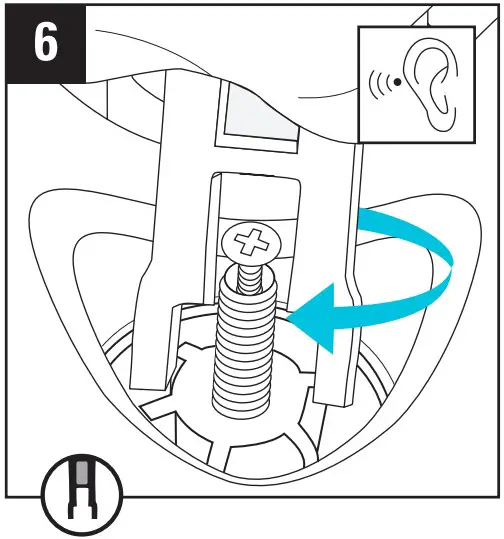 Use end of 3-in-1 wrench to turn flush valve cartridge clockwise ¼ turn. Listen for the water to stop running.
If necessary, continue making ¼ turns, always waiting 30 seconds between each turn, until water stops running. 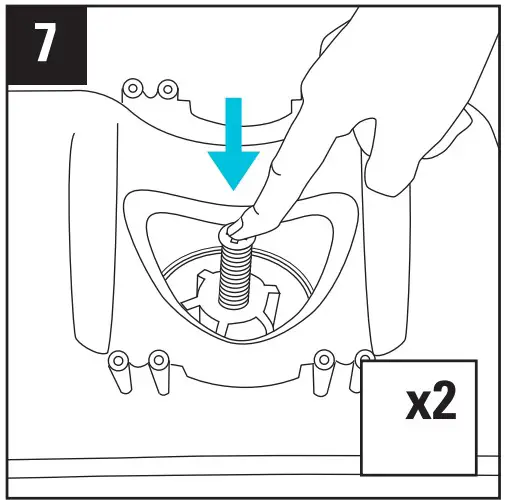 Flush toilet twice, waiting 1 minute between flushes to test. Does the water stop running?
YES: >>> Continue to Step 8
NO: >>> Repeat Steps 4-7.
After 2 unsuccessful attempts, contact Flushmate: 800.533.3460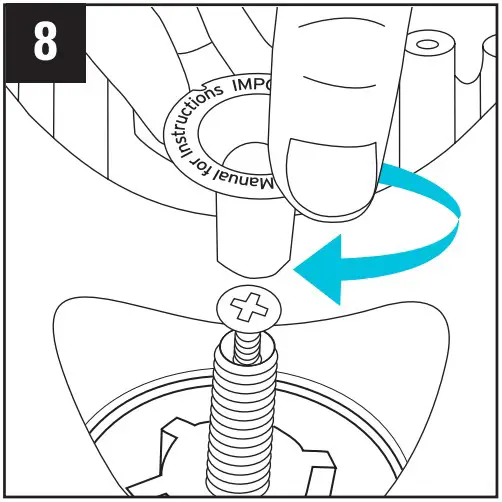 Reinstall actuator, then >>> Return to Installation Instructions Page 27, Step 21.
Winterizing
NOTICE
Do not put antifreeze or any other chemical agents in the toilet tank or in the Flushmate System. Doing so will damage the Flushmate System and void your Limited Warranty.
- Turn off Water
- Release Pressure
Flush toilet to release pressure from the Flushmate vessel. - Drain Water
Place a bucket under the supply shank and disconnect water supply line, allowing water to drain into bucket. - Push Actuator Down
Hold down for 5 seconds. - Pull Actuator Up
Hold for 5 seconds to allow for residual water drainage and air to enter the vessel. - Sponge Water
Sponge out any additional water that may be in toilet tank.
Follow any additional instructions from the toilet manufacturer for winterizing the toilet bowl.
For more information on winterizing, visit www.flushmate.com.
Limited Warranty Summary
Flushmate, LLC, (“Flushmate”), warrants each Flushmate Pressure Assisted System against defects in materials and workmanship. Flushmate’s limited warranty does not cover abuse, misuse, vandalism, or damage caused by Acts of God or other matters beyond Flushmate’s control, such as use of harmful chemicals, modifications to or faulty installation of the system, or improper or deficient plumbing. You can file a claim by email, telephone or regular mail by following the instructions found in the Limited Warranty which can be obtained at www.flushmate.com or by requesting a free copy by telephone at 800.533.3460. If you submit a valid claim, Flushmate at its discretion, will repair or replace your defective product, or provide a refund, as your exclusive remedy. This is only a general summary of Flushmate’s limited warranty so it is important to note that the specific terms, conditions, restrictions, limitations and exclusions, including the duration of the warranty, are contained in the actual Flushmate Limited Warranty. In case of a conflict with the above summary, the complete warranty terms will prevail.
Record and Keep
Serial number
The first six numbers indicate
the manufacture date in
MM DD YY format. Scan the QR code to register your product online.

Date purchased ———-
Installation date ———
Resources / Contacts
Troubleshooting Resources
Additional information and troubleshooting guides and videos can be viewed and downloaded by visiting the Flushmate website, flushmate.com/resources.
Product Questions and Technical Support
If you would like additional information or need technical assistance, please contact Flushmate by phone:
US and Canada
Monday – Friday
8am – 4:30pm EST
800.533.3460
[email protected]
Outside US and Canada: [email protected]
Please be prepared to provide the serial number located on the top of your Flushmate vessel.
To Order
Replacement Parts
Alway use Flushmate genuine replacement parts.
Go to the “Where to Buy” section of our website flushmate.com or visit eflushmate.com.
It is very important to register your product after installation.
Product registration allows Flushmate to deliver the most current product information available.
Mail-in or register online: www.flushmate.com
Product Registration
It is very important to register your product after installation. Product registration allows Flushmate to deliver the most current product information available.
Owner’s name ———–
Telephone ————— E-mail ————-
Owner’s address ————-
City ———– State ———– Zip —————
Date purchased ———– Date installed ———–
Serial number ———– Model number ———–
Both numbers located on the label on top of the Flushmate vessel.
Toilet name (located on bowl) ———–
Mail-in or register online: flushmate.com
Where did you purchase this toilet?
- Home center
- Plumbing store
- K&B dealer
- Other
Describe / Name of Company
What sources did you use to select a new toilet?
- Home center
- Internet
- Magazines
- Other
Describe / Name of Company
Which of the following best describes your situation?
- I bought a new toilet.
- Replaced Flushmate only.
- Replaced other pressure-assist brand:
This toilet was installed by:
- Plumber
- Owner
- Other
Describe / Name of Company
Flushmate
Attention: Flushmate
30075 Research Drive
New Hudson, MI 48165-8548
![]() 30075 Research Drive
30075 Research Drive
New Hudson, MI 48165
Toll Free: 800.533.3460
Local: 248.446.5300
www.flushmate.com
FLU-MFG7007.4 0122


