![]()
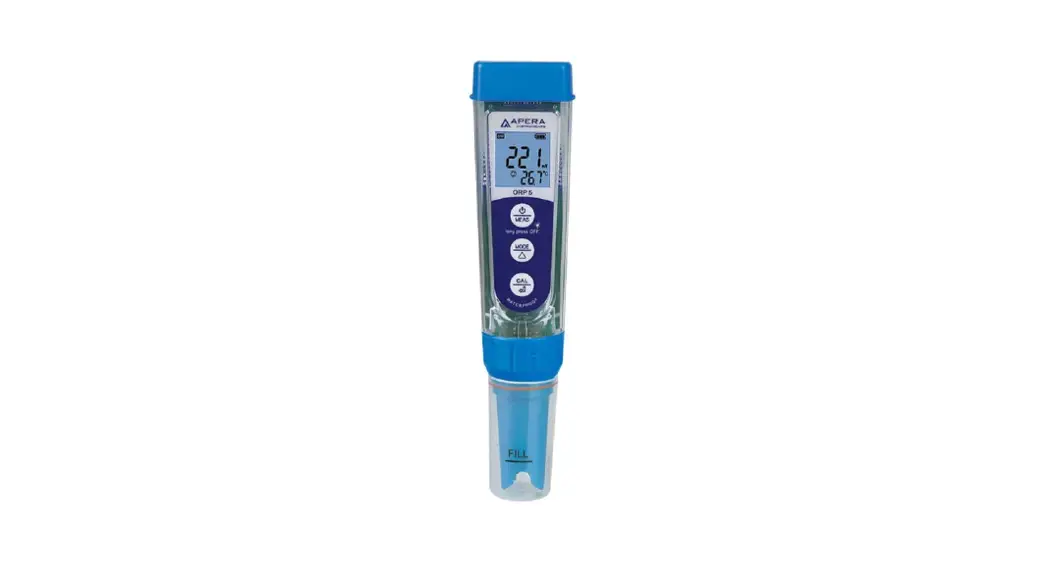
ORP5 Premium Pocket ORP Tester 
![]() APERA INSTRUMENTS (Europe) GmbH
APERA INSTRUMENTS (Europe) GmbH
www.aperainst.de
v3.1
Battery Installation
![]() Please install batteries according to the following steps. *Please note direction of batteries: All POSITIVE SIDES (“+”) FACING UP. (Wrong installation of batteries will cause damage to the tester and potential hazards)
Please install batteries according to the following steps. *Please note direction of batteries: All POSITIVE SIDES (“+”) FACING UP. (Wrong installation of batteries will cause damage to the tester and potential hazards)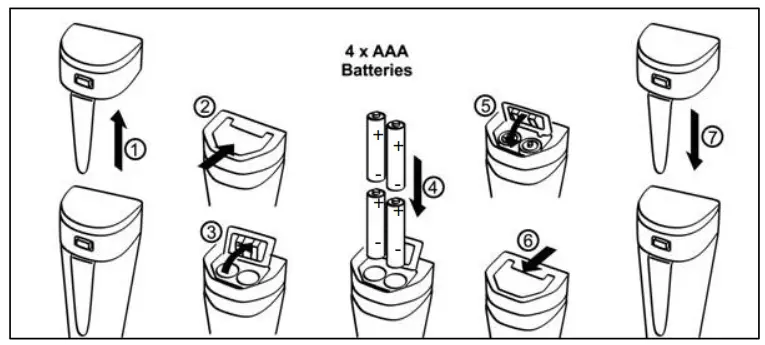
- Pull the battery cap up
- Slide the battery cap along to the direction of arrow
- Open the battery cap
- Insert the batteries (ALL POSITIVE SIDES FACING UP) (see graph)
- Close the battery cap
- Slide and lock the battery cap along to the direction of arrow
- Fit the tester’s cap while making sure to push all the way down. The tester’s waterproof design may be compromised if the cap is not fitted correctly.
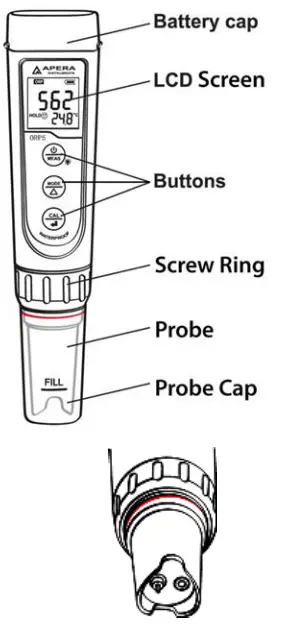
Keypad Functions
- Short press — < 2 seconds
- Long press — > 2 seconds
| 1. Short press to turn on the tester and long press to turn off the tester. 2. When turned off, long press to enter parameter setting. 3. In measurement mode, short press to turn on backlight. | |
 | 1. In calibration mode, press to change calibration value (unidirectional) 2. In mode setting, short press to change parameter(unidirectional) |
 | 1. Long press to enter calibration mode. 2. In calibration mode, short press to con- firm calibration. 3. When measured value is locked, short press to unlock. |
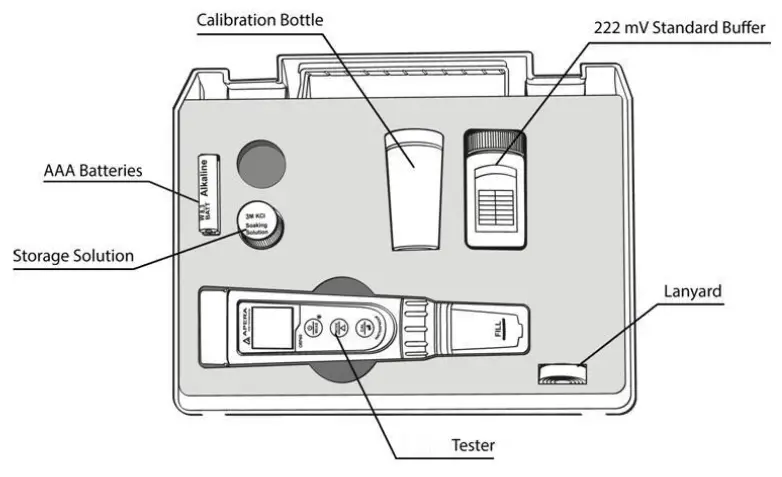
Complete kit
Preparation Before Use
- Pour certain amount of Storage solution (KCl) into the probe cap, soak the probe for 3 to 5 minutes to activate the sensor (if frequently used, there is no need to soak).
- The soaking solution is 3M KCl solution, which comes with the test kit. Users can also make it by themselves by dissolving 25g KCl in 100 ml distilled water.
ORP Calibration
- Clean electrode in distilled water and dry it.
- Pour certain amount of 222 mV ORP standard buffer solution into the calibration bottles (about half volume of the bottle).
- Short press
 to turn the meter on. Long press
 to enter calibration mode. If you need to exit calibration mode, short press
 - Dip electrode in the standard buffer solution, stir gently, and allow it to stand still in the calibration solution until a stable reading is reached. When stable
 icon comes up, press
  to adjust the calibration value according to the table below(also on the buffer bottle’s label).
| 222 mV (25˚C) ORP Standard Buffer Solution Calibration Reference Table | ||||||||
| Temperature (˚C) | 10 | 15 | 20 | 25 | 30 | 35 | 38 | 40 |
| mV | 242 | 235 | 227 | 222 | 215 | 209 | 205 | 201 |
For example, if the temperature is around 25˚C, then adjust the calibration value to 222 mV. If the temperature is around 20˚C, then adjust the calibration value to 227 mV.
press![]() to complete the calibration.
to complete the calibration.
ORP Measurement
Press ![]() to power on, clean the probe in distilled water and dry it. And place the probe in the tested solution and stir gently and let it stand still. Read the measurement
to power on, clean the probe in distilled water and dry it. And place the probe in the tested solution and stir gently and let it stand still. Read the measurement ![]() after comes up and stays.
after comes up and stays.
Notes
- Usually there’s no need to calibrate for ORP testing. When used for a long time, users can test it in 222 mV ORP standard buffer. If the error is big, please calibrate according to the steps in 5.1 to 5.4.
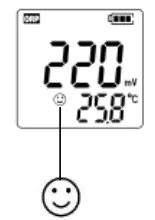
- The meter has self-diagnosis function. Please refer to the followed chart for detailed information.
| Symbol | Self-Diagnosis information | How to fix |
face comes up) | Wait till the smile icon stays, then short press |
The cleaning and activation of ORP probes
After long-time use, the surface of the platinum sensor can be contaminated and cause inaccuracy and slow response time. If that happened, the followed methods can be adopted to clean and activate:
a) For contamination caused by inorganic substances, dip the probe into 0.1 mol/L dilute hydrochloric acid for 30 minutes. Clean it with distilled water, soak it into the KCL storage solution for 6 hours, and then it will be ready for use again.
b) For contamination caused by organic substances and oiliness, clean the platinum surface with dishwashing liquid, and wash with distilled water. And then the probe will be ready for use again after 6 hours’ soaking in the storage solution.
c) If the platinum surface is so severely contaminated that there forms an oxide film, toothpaste can be used to clean the platinum surface, and then wash it with distilled water. The probe will be ready for use again after 6 hours’ soaking in the storage solution.
Parameter Setting
9.1 Setting chart
| Symbol | Parameter Setting Contents | Code | Factory Default |
| P1 | Low value measurement alarm | -1000 to 1000 mV | -1000 |
| P2 | High value measurement alarm | -1000 to 1000 mV | 1000 |
| P3 | Select automatic lock | Off – On | Off |
| P4 | Select backlight | Off – 1 – On | 1 (1 min auto off) |
| P5 | Select temperature unit | ˚C – ˚F | ˚C |
| P6 | Restore to Factory Default | No – Yes | No |
9.2 Parameter setting instruction
When turned off, long press![]() to enter parameter setting mode; Press
to enter parameter setting mode; Press![]() to switch from P1- P2-…P6. Press
to switch from P1- P2-…P6. Press![]() , the parameter flashes; Press
, the parameter flashes; Press![]() to choose parameter Press to confirm; Long press
to choose parameter Press to confirm; Long press ![]() to power off.
to power off.
A) High-Low Measurement Heads-Up Examples (P1 and P2)
Heads-Up when measured value ≤120 mV:
Preset low value = 120 mV, highest value = 1000 mV, when measured value ≤ 120 mV (stable icon ![]() displays on LCD); Red back-lit heads-up displays.
displays on LCD); Red back-lit heads-up displays.
Heads-Up when measured value ≥ 150 mV:
Preset high value = 150 mV, lowest value = -1000 mV, when measured value ≥ 150 mV (stable icon ![]() displays on LCD); Red back-lit heads-up displays.
displays on LCD); Red back-lit heads-up displays.
Heads-Up when measured value in range of 120 mV and 150 mV:
Preset low value = 120 mV, highest value = 150 mV, when the measured value <120mV or >150mV (stable icon![]() displays on LCD); Red back-lit heads-up displays.
displays on LCD); Red back-lit heads-up displays.
B) Automatic lock (P3): Select “On” to activate auto lock function. When reading is stable for more than 10 seconds, the tester will lock the value automatically, and HOLD icon will display on LCD. Press ![]() key to cancel auto hold.
key to cancel auto hold.
C) Backlight (P4)
“Off”-turn off backlight, “On”-turn on backlight, “1”- backlight will last for 1 minute.
D) Temperature Unit (P5)
Select C˚ or F˚, the factory default is ˚C.
E) Factory default setting (P6)
Select “Yes” to recover instrument calibration to theoretical value (pH value in zero potential is 7.00, slope is 100%), parameter setting return to initial value. This function can be used when instrument does not work well in calibration or measurement. Calibrate and measure again after recover the instrument to factory default status.
Technical Specifications
| ORP (mV) | Measuring Range | ±1000 mV |
| Resolution | 1 mV | |
| Accuracy | ±0.2% F.S | |
| Temp. | Measurement Range | 0 — 50 °C |
| Resolution | 0.1 °C | |
| Accuracy | ±0.5 °C |
Tester functions:
- Calibration points indication:

- Stable measurement:
- Reading value auto. hold: HOLD
- Self-Diagnostic Information: Er2
- Low-Voltage warning:
 flickering, reminder of battery replacement
 - Three-color backlight:
- Blue—Measurement Mode; Green—Calibration Mode; Red color—Alarm
- Auto. Power-Off in 8 minutes without operation
Electrode Replacement
Twist off the probe ring, unplug the probe, plug in new probe (pay attention to the electrode’s position), and screw on the probe ring.
The compatible model of replacement probe is ORP5-E / ORP60-E.
Warranty
We warrant this instrument to be free from defects in material and workmanship and agree to repair or replace free of charge, at option of APERA INSTRUMENTS (Europe) GmbH, any malfunctioned or damaged product attributable to responsibility of APERA INSTRUMENTS (Europe) GmbH for a period of TWO YEARS (SIX MONTHS for the probe) from the delivery. This limited warranty does NOT cover any damages due to: Transportation, storage, improper use, failure to follow the product instructions or to perform any preventive maintenance, modifications, combination or use with any products, materials, processes, systems or other matter not provided or authorized in writing by us, unauthorized repair, normal wear and tear, or external causes such as accidents, abuse, or other actions or events beyond our reasonable control.
APERA INSTRUMENTS (Europe) GmbH
Wilhelm-Muthmann-Straße 18, 42329 Wuppertal, Germany
ww.aperainst.de
Contact: [email protected]
Tel. +49 202 51988998


