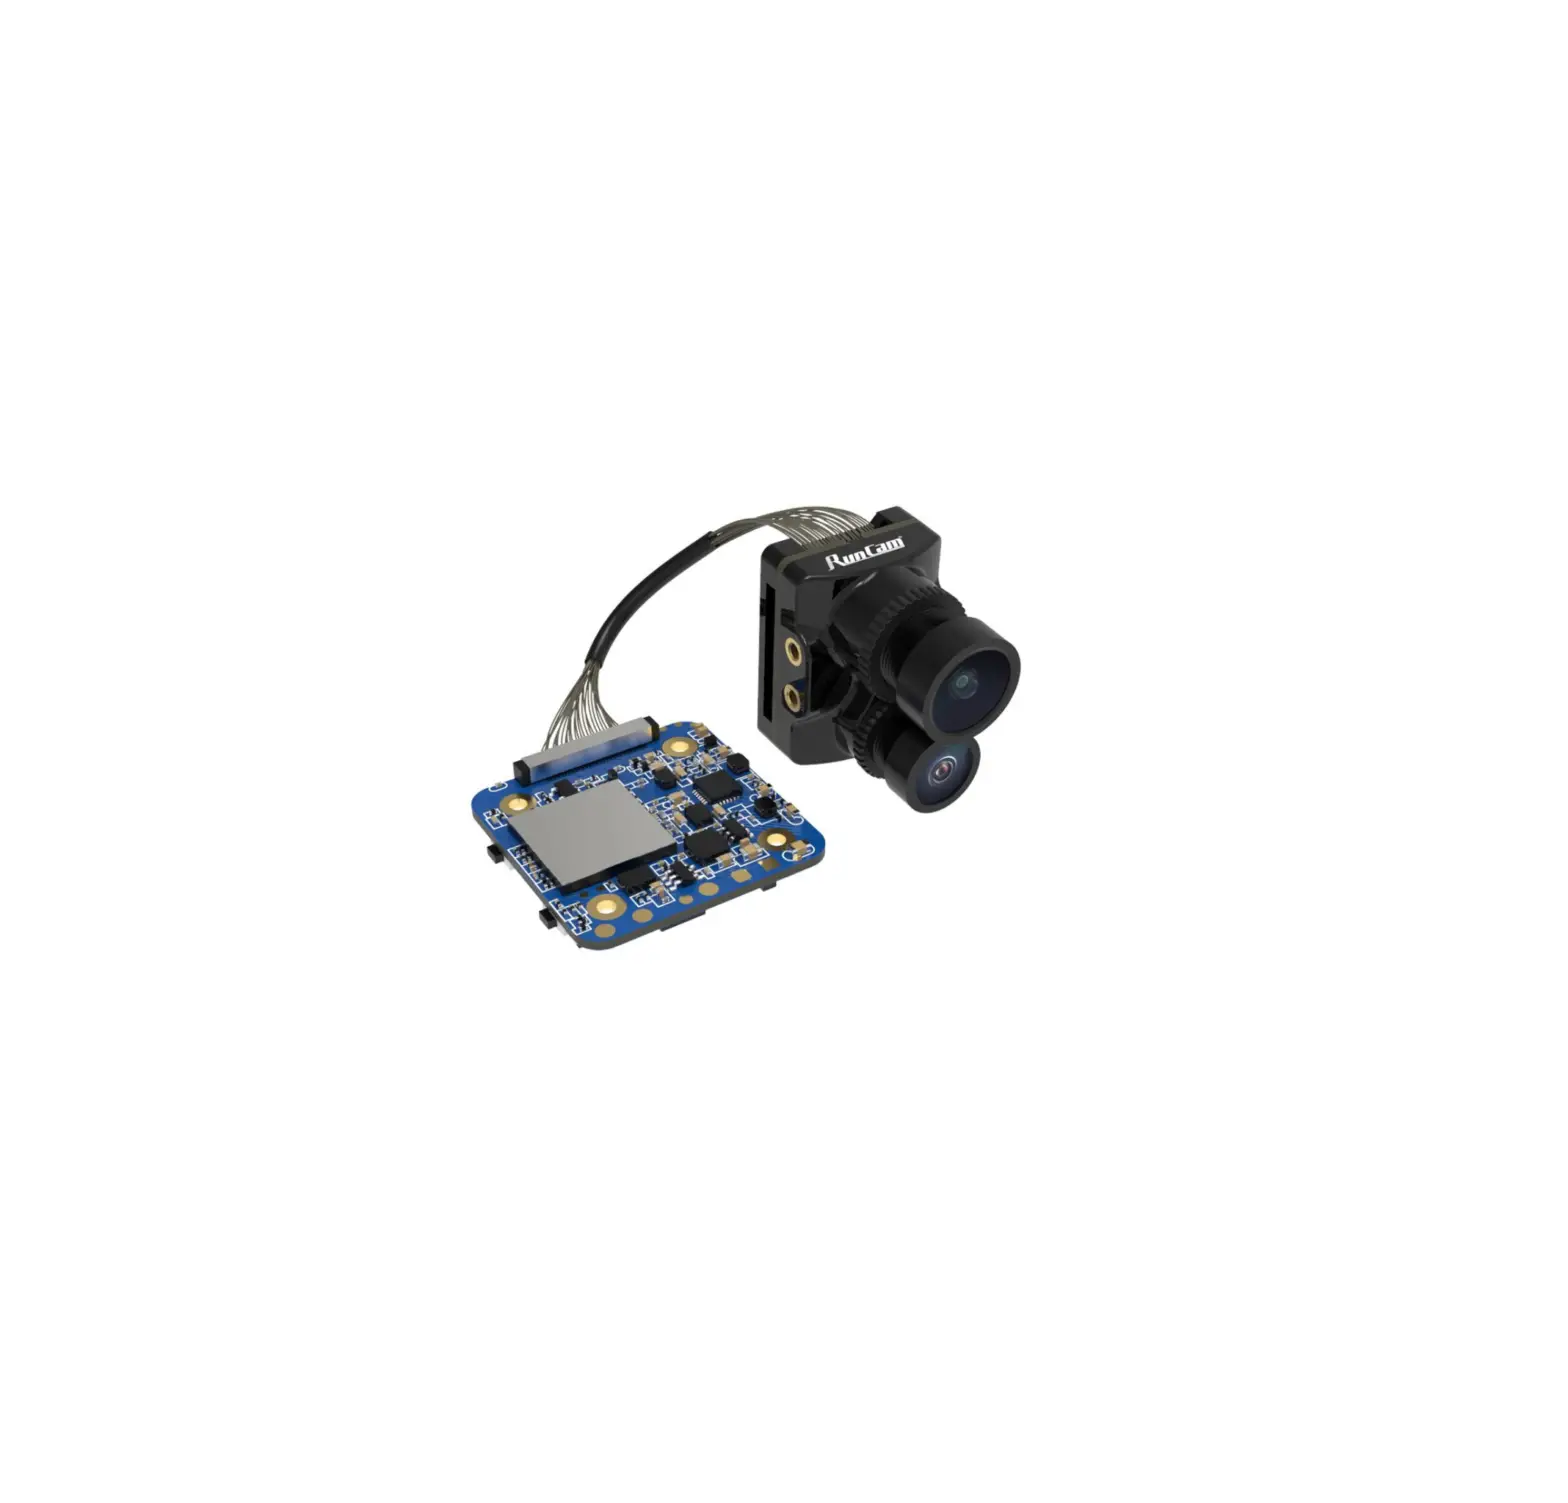
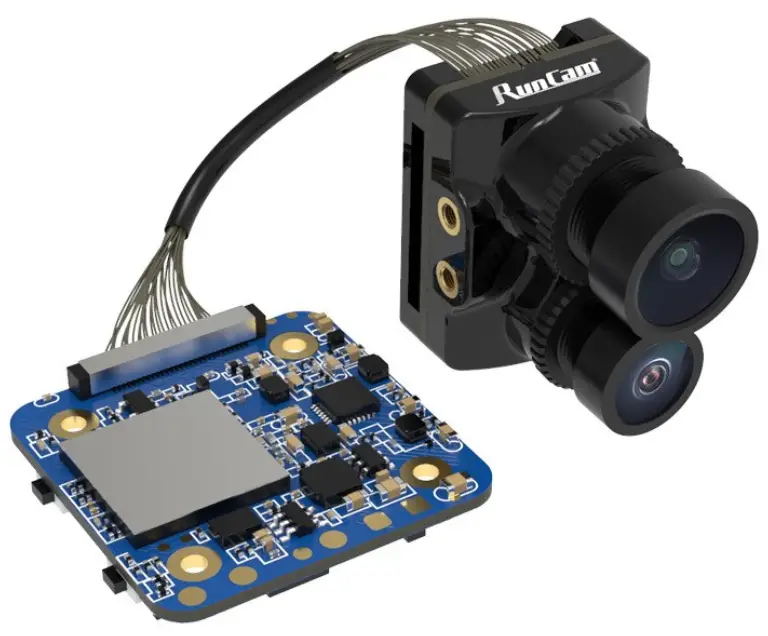
RunCam Hybrid 2 Split HD Camera
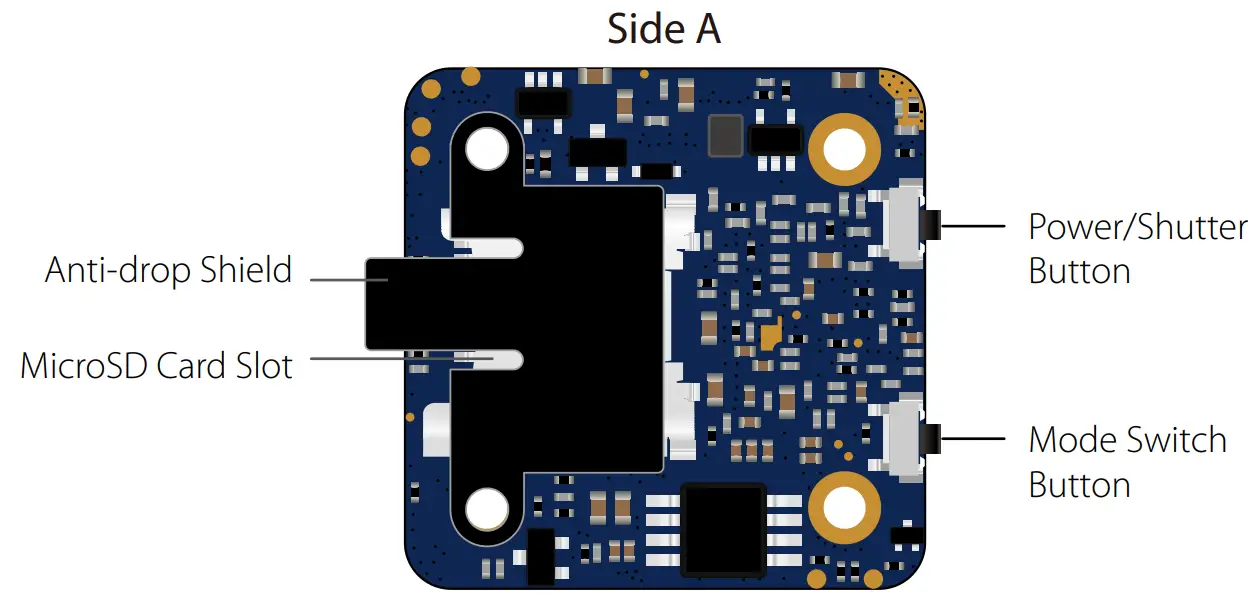
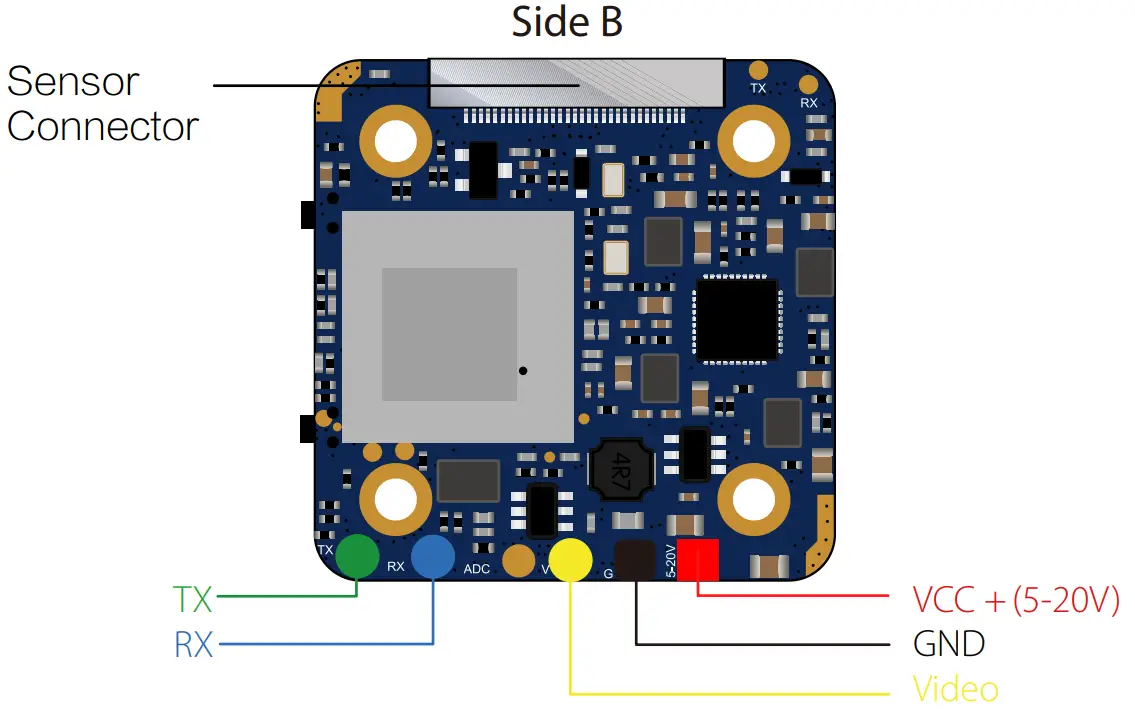
Instruction Diagram
Lens Module Connection Diagram

Micro SD Card
Capacity up to 128GB; U3 recommended (2.7K50/1080P120 requires U3 or above; other solutions require U1 or above)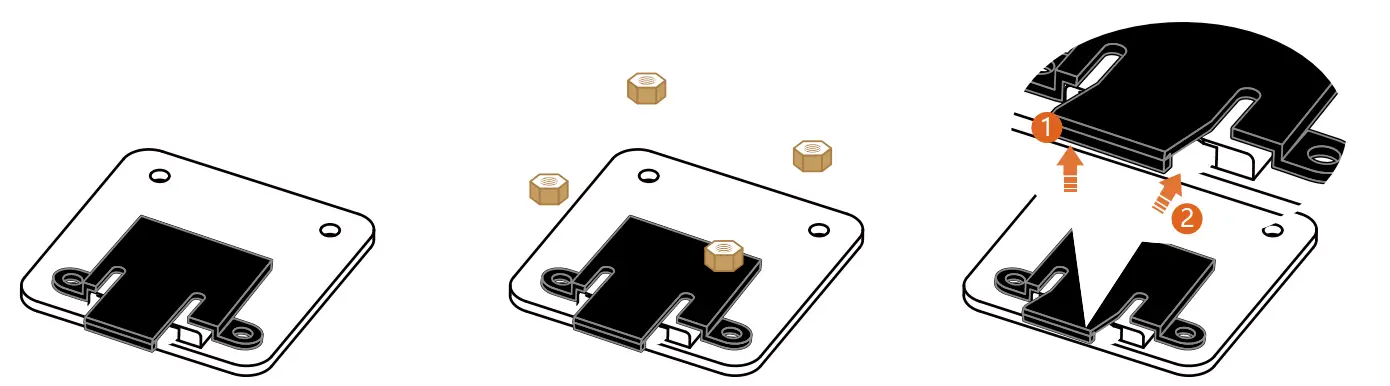
Please push the shield a little bit up with one hand like showed in above step 1 and then press the SD card(step 2) with another hand to let the card pop out.
Basic Camera Operation
| Powering On/Off | Long press the Power/Shutter button |
| Standby Mode | Camera Status Light: Blue is On |
| Mode Switching | In Standby Mode, long press the Mode Switch button to cycle through the recording mode and the QR code setting mode. |
| Video Mode | Camera Status Light: Blue LED blinks slowly, one second interval Press the Power/ Shutter button to start/stop recording. |
| QR Code Setting | Camera Status Light: Green is on Use RunCam App to access to RunCam Hybrid interface, set it and create the QR code. Under QR code setting mode, use camera to scan the QR cod e. Switch to standby mode automatically after scanning successfully. The status light is Blu e. |
| HD Recording Firmware Update | Camera Status Light: Green LED blinks slowly, one second interval |
| SD Card Issues | Camera Status Light: Blue LED blinks quickly, 0.5 second interval |
| Lens Module Bad Connection | Camera Status Light: Green LED blinks quickly, 0.5 second interval |
Transmitter Connection Diagram
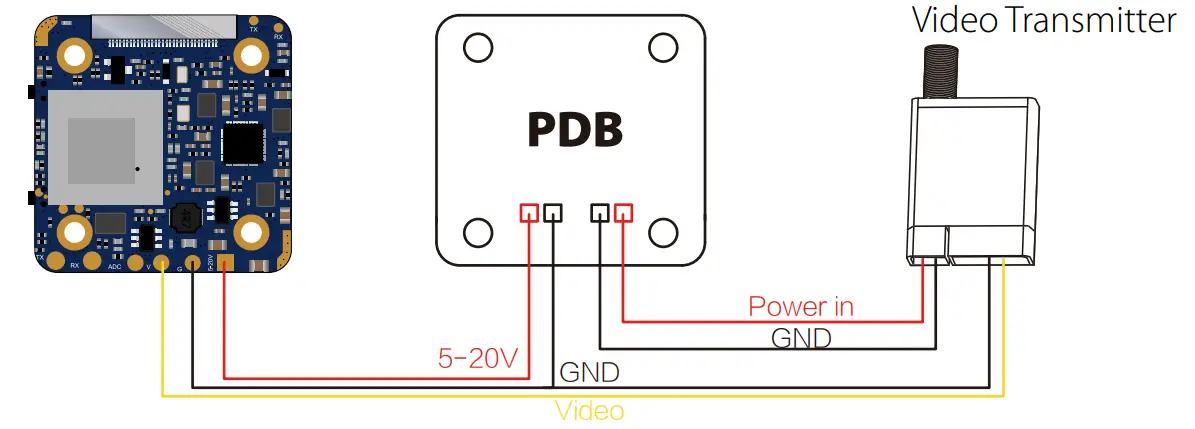
Warning: Current Input ≥1A (Don’t powered by VTx)
FPV Flight Controller Setup
FPV camera supports Joystick Control and UART Control. The top left corner of the screen will shortly display the current control mode. The default is Joystick control mode. You can switch the mode via below way:
Short the two camera control pins (TX and RX on board as shown in below picture)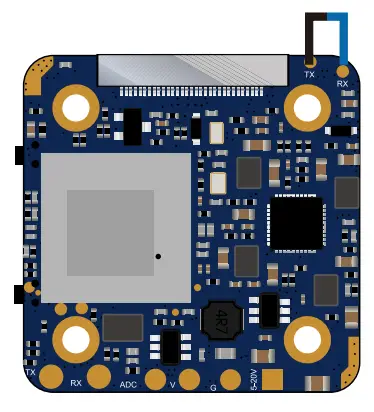
Then power on, camera will auto switch between the two modes.
The mode can be saved after power off.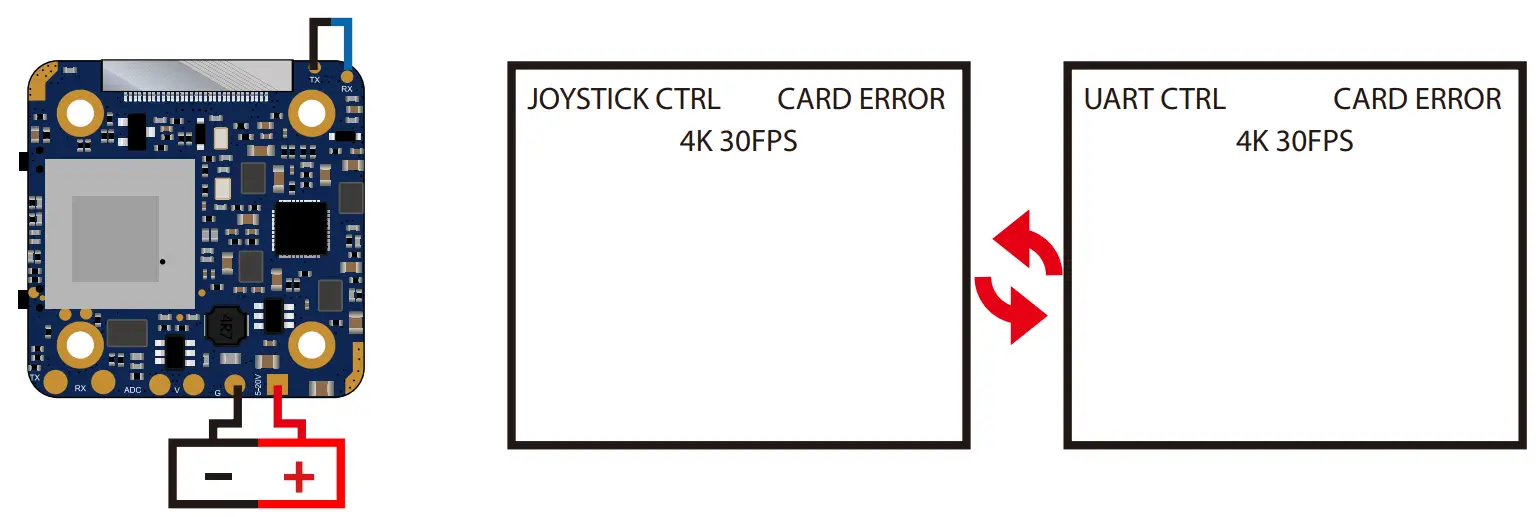
After switching to the desired mode, please unplug the short-circuit cable.
UART Control works with Flight Controllers:
BetaFlight 3.3 or above / ButterFlight 3.4 or above / CleanFlight 2.2 or above
Joystick Control
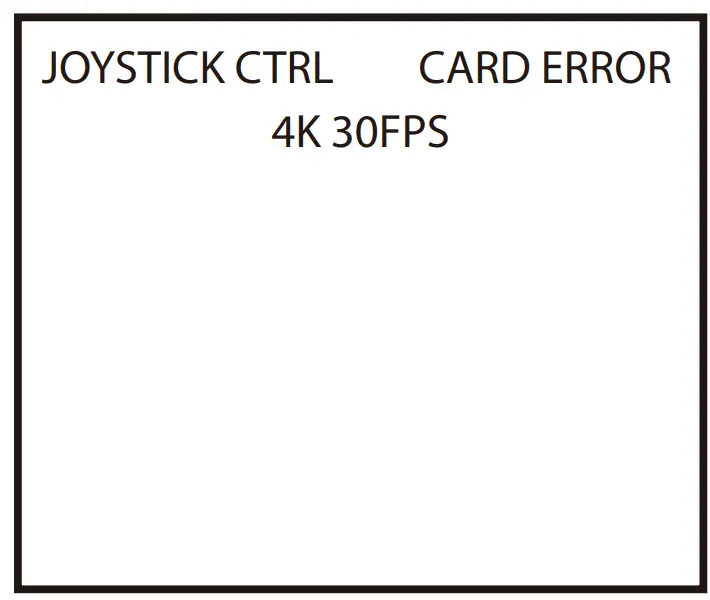
- JOYSTICK CTRL: Camera is under Joystick Control and the icon remains for 5 seconds.
- CARD ERROR: Card error or no SD card
- CARD FULL: SD card is full
- 4K 30FPS: Current video resolution, remains for 10 seconds

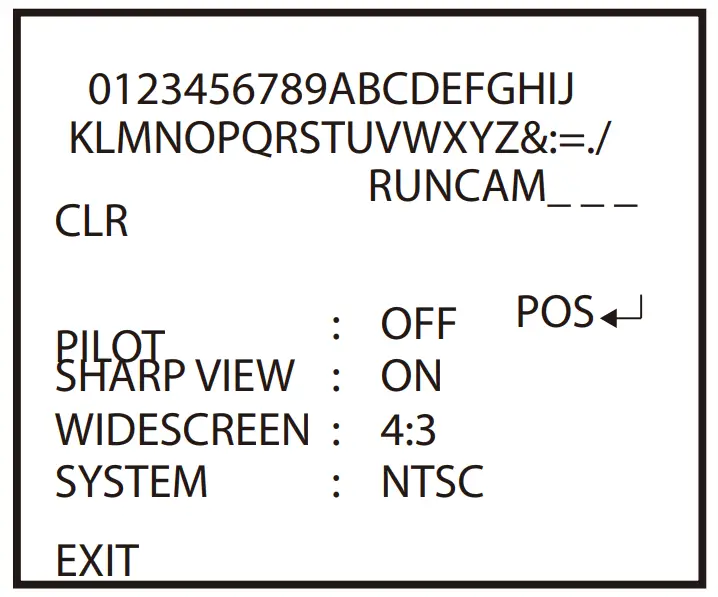
Quick Setting (Long press the upper button to enter the menu)
- Press the middle button to switch ON / OFF
- CLR: Clear RUNCAM logo or pilot’s name
- POS: Move to POS to adjust position
- SHARP VIEW: Turn on, it will increase the image details, but also noise
- WIDESCREEN: Switch image ratio between 16:9 and 4:3.
- SYSTEM: Press the middle button to switch NTSC/PAL. It will work only after you exit the menu and reboot.
- EXIT: Exit and saved.

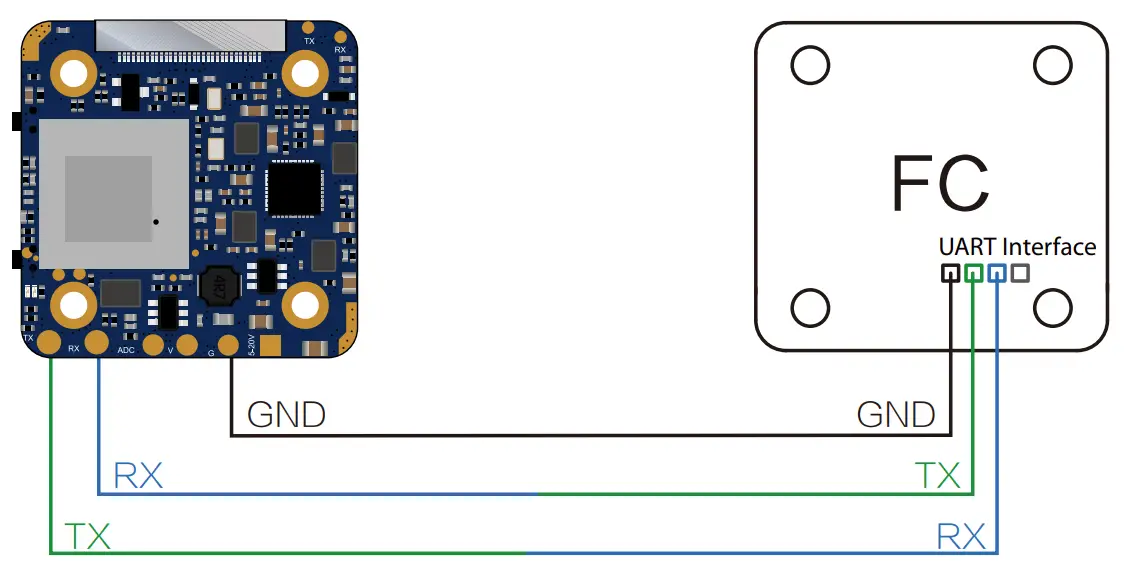
UART Control
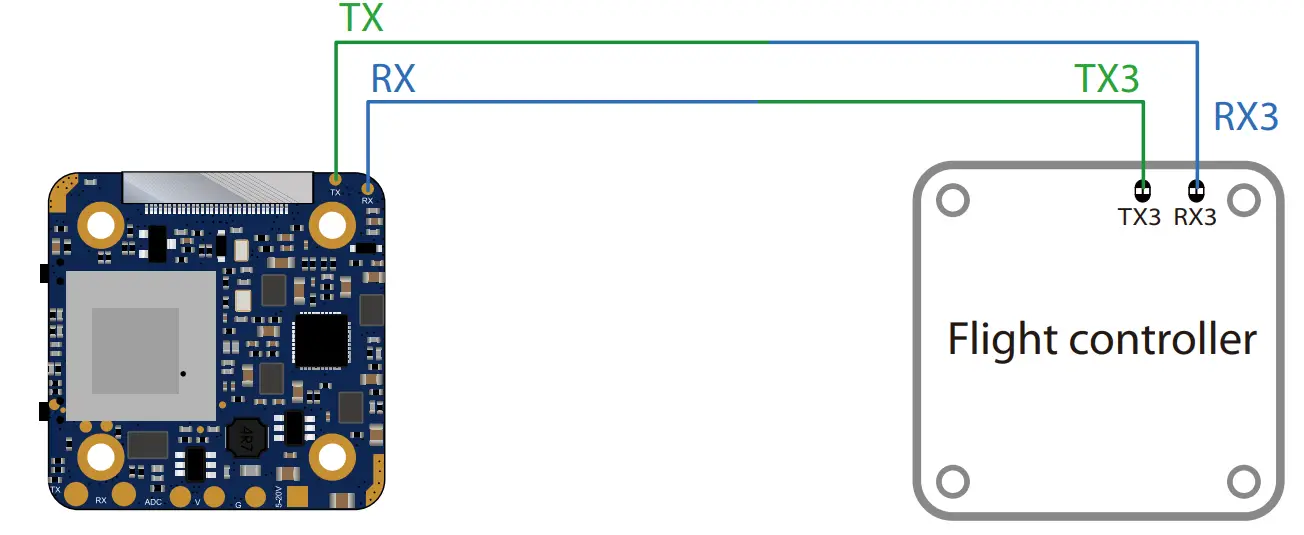
- Flight controller wiring (Take UART3 for example)

- Beta flight 3.3 or above setting
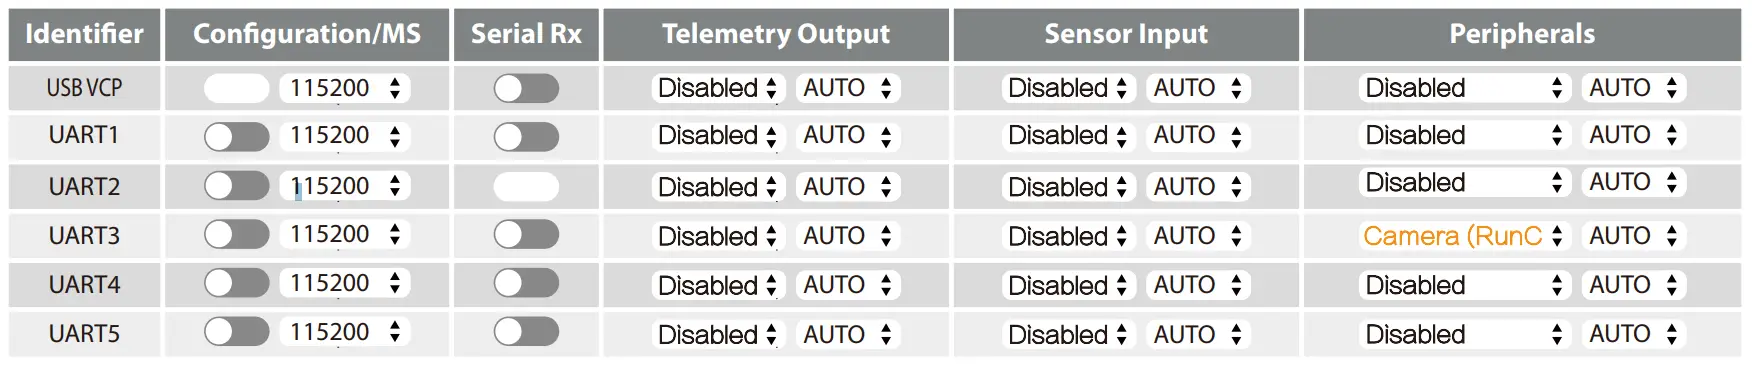
Just need to choose “Camera (RunCam Protocol)” on UART 3 as shown in below screenshot.
- UART Control (Operate with your remote controller. Yellow icon to indicate bar operation direction. Black dot means centering control )


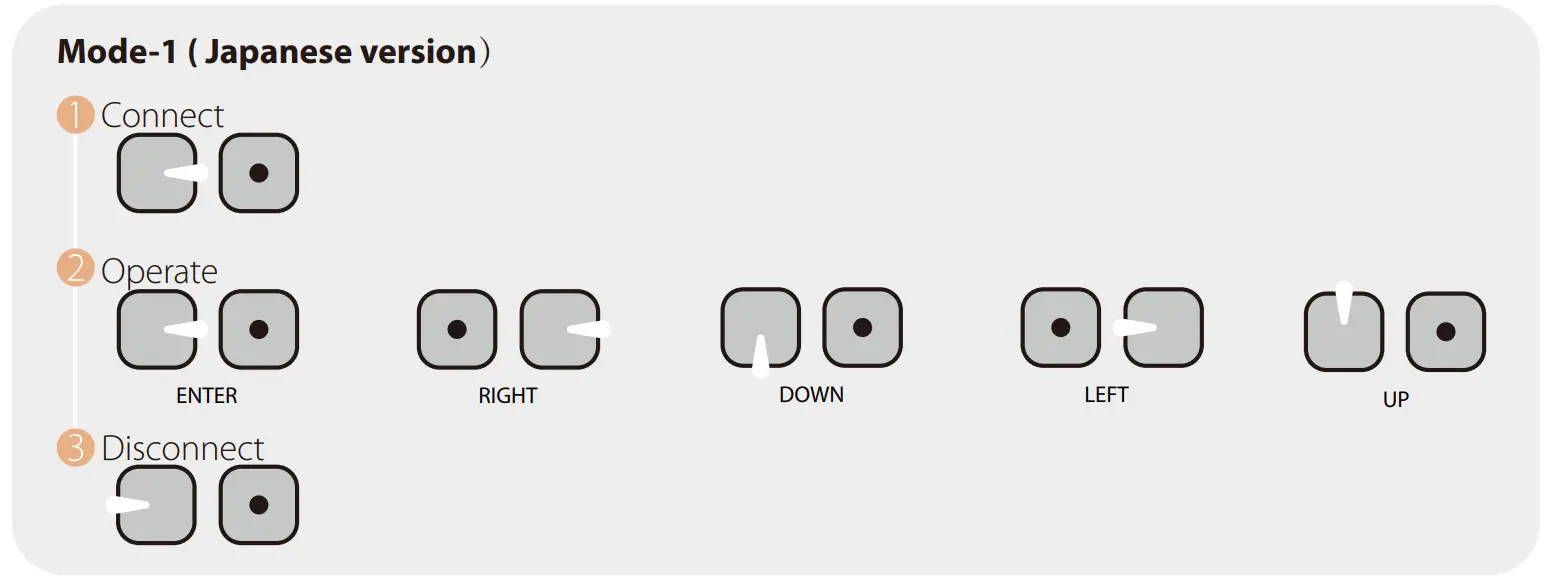
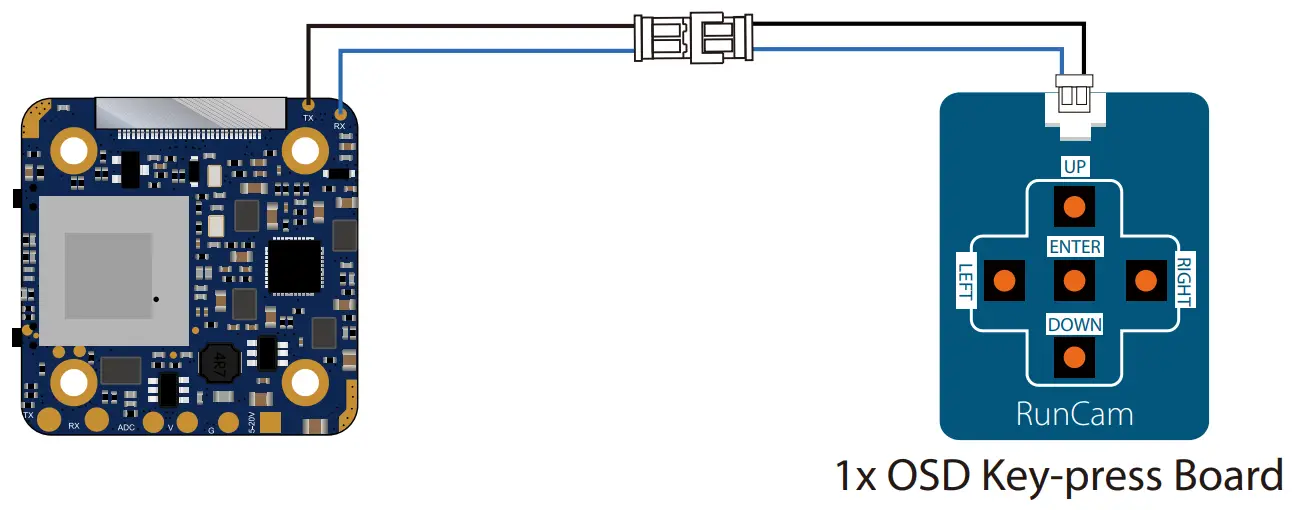
When connected, The buzzer on Flight Controller will beep for 3 times; When disconnected, The buzzer on Flight Controller will beep for 2 times only; If connected successfully, you can long press the up button to enter the OSD menu, right button to switch preset scenes, left button to calibrate voltage and down button to reset OSD.
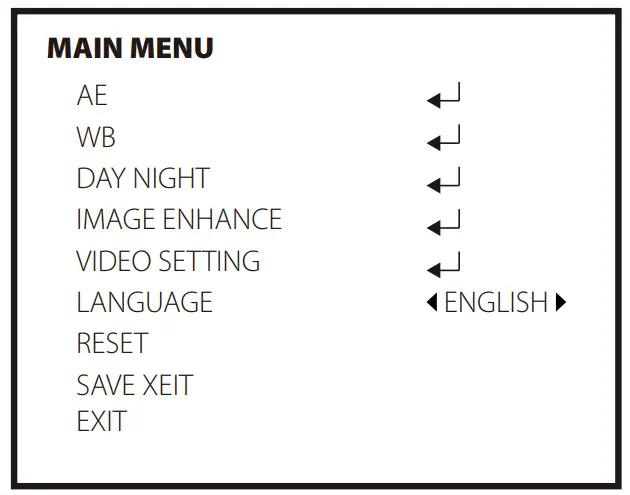
- MODE (MWB/ATW)

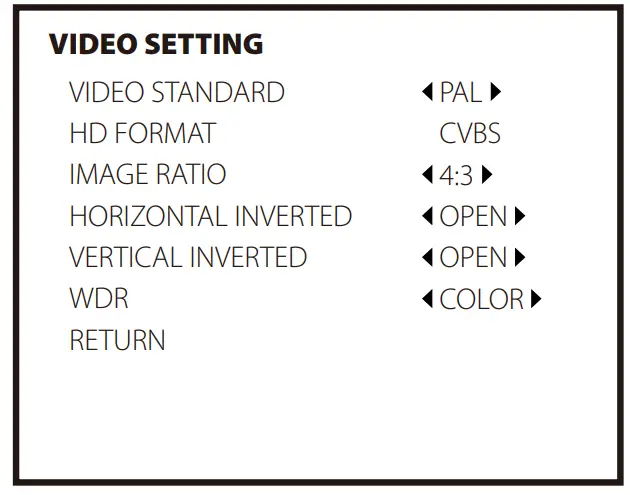
- VIDEO STANDARD (PAL/NTSC)
- IMAGE RATIO (4:3 /16:9)
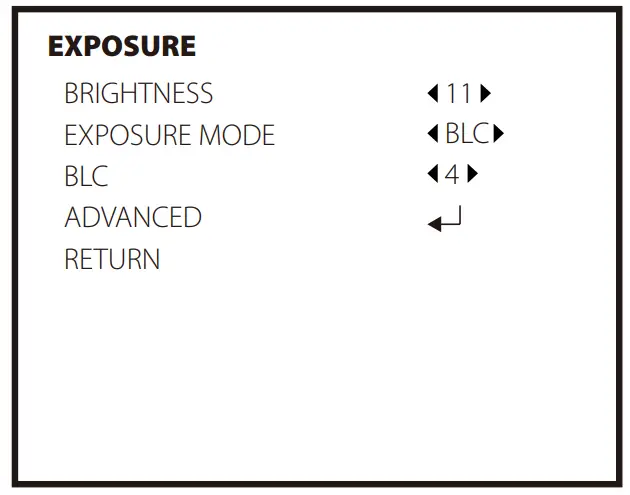
- EXPOSURE MODE (BLC/ GLOBE)
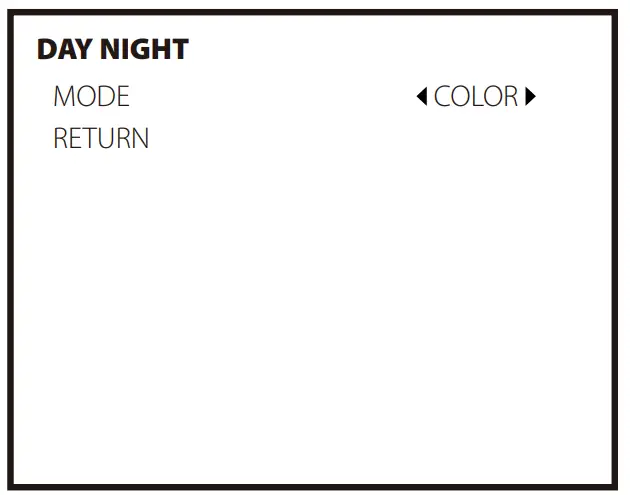
- MODE (COLOR / BW / EXT / AUTO)
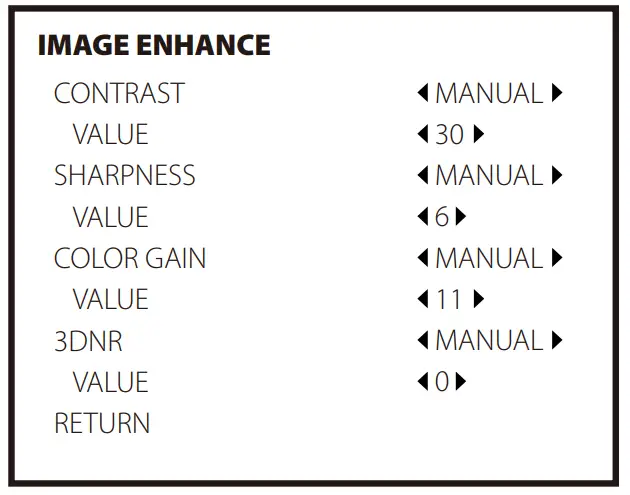
- CONTRAST (MANUAL/AUTO)
- SHARPNESS (MANUAL/AUTO)
- COLOR GAIN (MANUAL/AUTO)

HD Flight Controller Set
Preparation
- Firmware: BetaFlight Firmware (≥3.2.0),CleanFlight Firmware(≥2.1.0) ,
KISS Firmware (≥1.3-RC30) or INAV Firmware (≥1.7.3). - Any available UART interface on the Flight Controller
- Connect the RunCam Hybrid with the UART interface of the Flight Controller

- Make the Flight Controller recognize the RunCam Hybrid
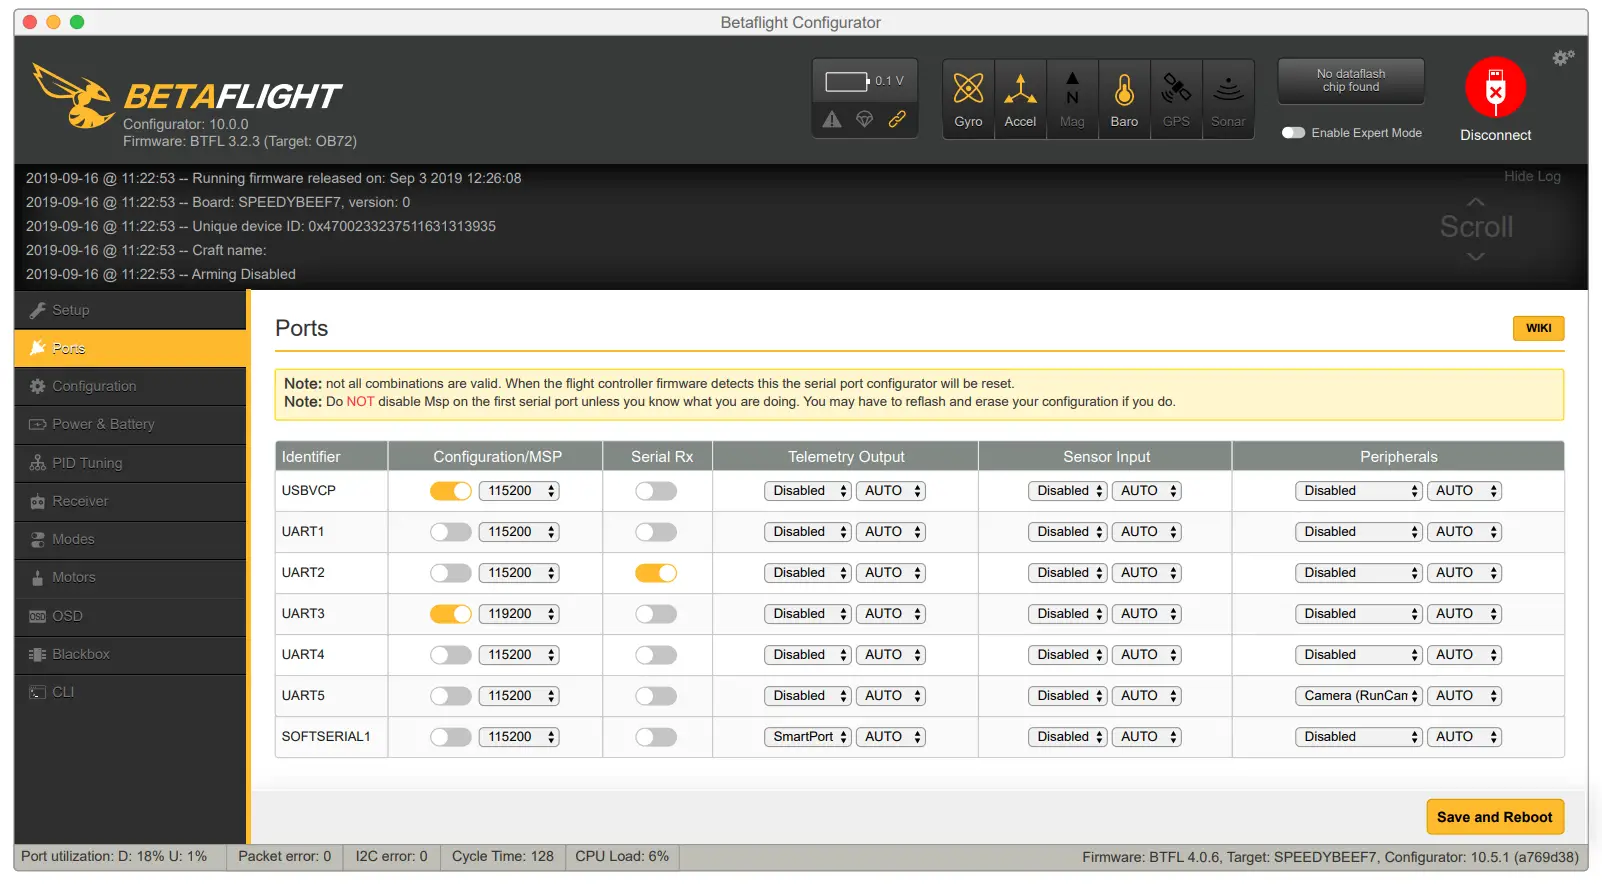
For example, we connect the RunCam Hybrid to the UART 5 interface on the Flight Controller: connect the Flight Controller to the computer, then open the configurator software of the Flight Controller. (Open up the configurator that matches the firmware you are running, Betaflight Configurator for Betaflight, Cleanflight Configurator for Cleanflight). In the Peripherals column of the line UART 5 (on the Ports tab), select Camera (RunCam Protocol) and click Save And Reboot.
- Instructions of the functions of the camera and assigning transmitter channels to them
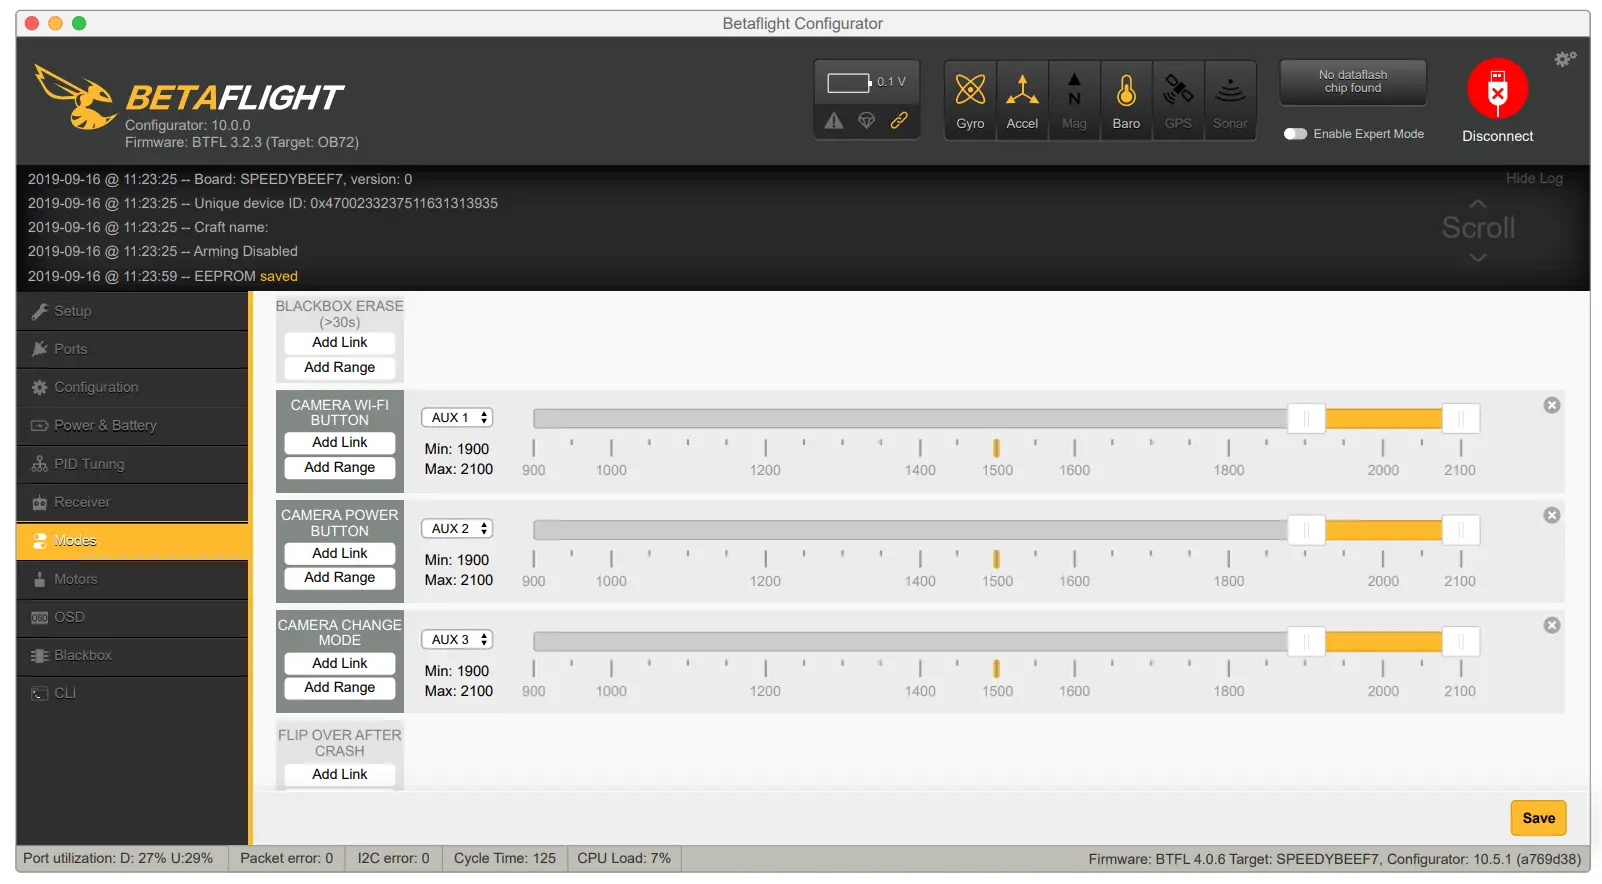
In the Flight Controller Configurator, navigate to the Modes tab. There are new CAMERA WI-FI, CAMERA POWER and CAMERA CHANGE modes
CAMERA POWER: start/stop the video. When in the OSD of the camera, this is used to move to the next menu item.
CAMERA CHANGE MODE: Switch between the recording mode and the QR code setting mode.
Assign any available channel to the function you need, for example:
Assign the AUX2 to the CAMERA POWER, range 1900-2100
Assign the AUX3 to the CAMERA CHANGE MODE, range 1900-2100 - Assign the channel to the switch of the controller
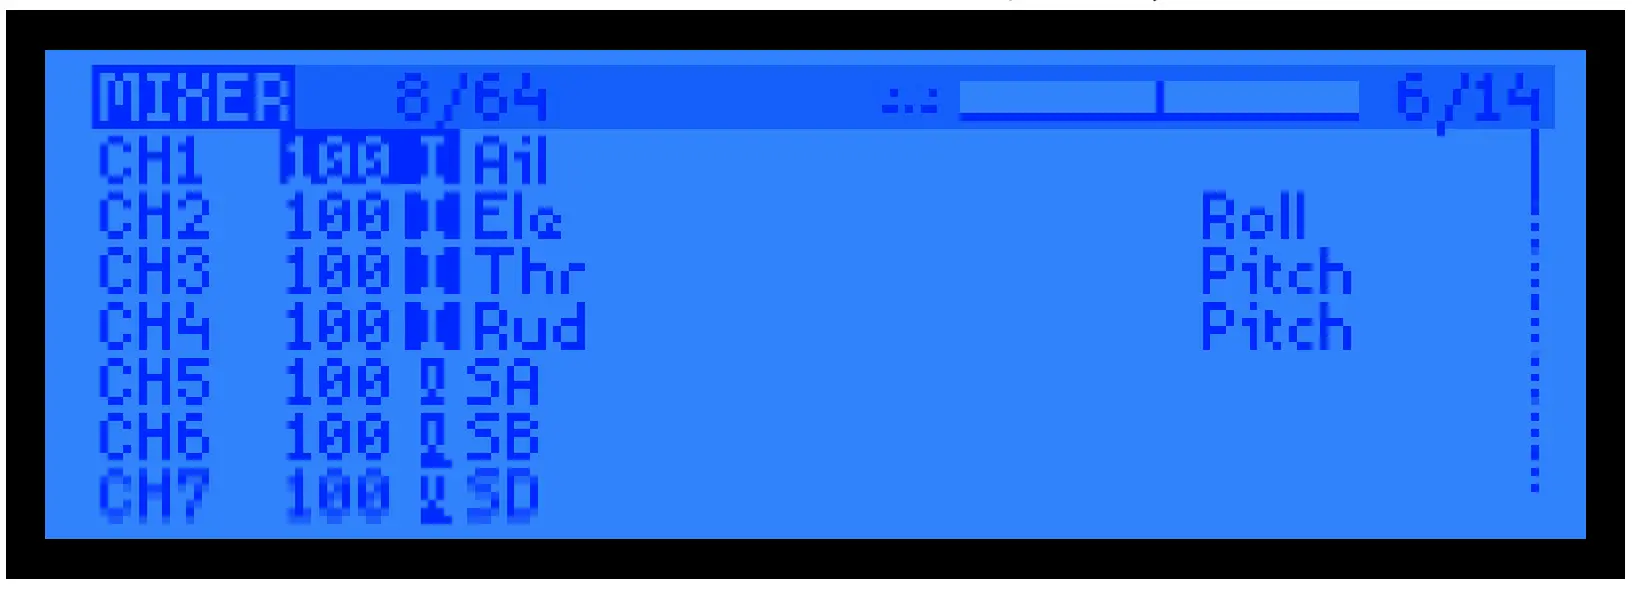
Please choose your Model on the controller, then access to the MIXER interface and assign the channel to the switch of the controller. Take opentx 2.2.0 for example, assign the channels CH5, CH6 and CH7 to SA, SB and SD respectively
- Test
Power the Flight Controller and the RunCam Hybrid
Set the SA to the bottom, the camera starts/stops the video
Set the SD to the bottom, the camera switches among the two modes: video and OSD setting mode
Technical Support
Please visit: https://support.runcam.com
Parameter
| HD sensor | SONY8MP | |
| Analog sensor | SONY 1.3MP | |
| Field of View(FOV) | HD Recording FOV 145°;(FPV FOV 150 °@4:3) | |
| Video Resolution | 4K@30fps / 2.7K@60fps / 2.7K@50fps / 1080P@l 20fps / 1080P@60fps / 1080P@50fps I 1080P@30fps | |
| Video File Format | MP4 | |
| TV Mode | NTSC (720*480)/PAL (720*576) Switchable | |
| Interface | HD supports UART remote control; FPV (Ana log) supports UART fimrware update. | |
| Max Micro SD Card Supported | Up to 128G. Samsung’s U3 card is recommended (2.7K60/1080P120 requires U3 or above; other solutions required or above) Please make sure that the file format of the SD card is FAT32,otherwise,it will easily cause errors. | |
| Mounting Holes Distance | 20*20mm | |
| PCB Size | 29*29mm | |
| Lens Module Size | 19*25mm | |
| Lens Specs | HD Lens:Ml0 | FPV Lens: M8 |
| Power Input | DC 5-20V (Non-direct power supply from 4s battery or above. Powered directly with battery will generate surges and burn the camera.) | |
| Working Current | 480mA @SV / 140mA @12V | |
| Weight | 18g | |


