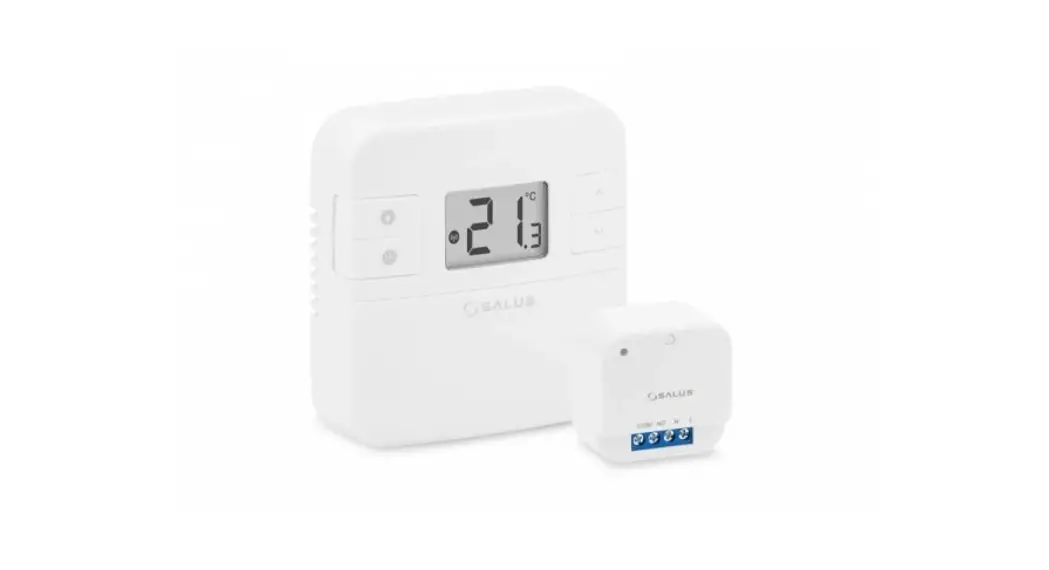
![]() RT310SR
RT310SR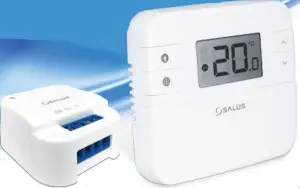
Introduction
The RT310SR module will switch your appliance on or off in accordance with the temperature set by you. The completed RT310SR series consists of a transmitter – RT310TX thermostat and a Smart Relay SR868.
Product Compliance
This product complies with EMC 2014/30/EU, LVD 2014/35/EU, RED 2014/53/EU, and RoHS 2011/65/EU. Full text of the EU Declaration of Conformity on ww.saluslegal.com. 868.0-868.6MHz; <13dBm![]() Safety Information
Safety Information
Use in accordance with the regulations. Indoor use only. Keep your equipment completely dry. Disconnect your equipment before cleaning it with a dry towel.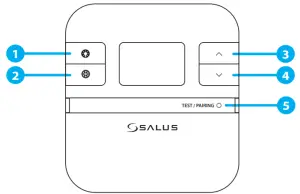 1. Turn on the LCD backlight
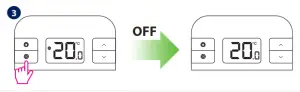
2. Turn On/Off the Frost Mode
3. Increase button
4. Decrease button
5. Test Mode/ Pairing Mode
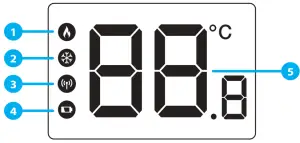
1. Thermostat is calling for heat
2. Thermostat is in frost mode
3. RF signal
4. Low battery indicator icon
5. Temperature display
DIP switch settings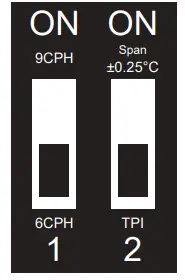
The DIP Switches can be found on the rear of your thermostat.
| Control feature | TIP | Span |
| operation | When TPI is selected on DIP switch № 2, the DIP switch № 1 is functional. You can choose the Cycles Per Hour between a lower comfort level (6CPH) and a higher comfort level (9CPH). | When Span is selected on DIP switch № 2, the DIP switch № 1 is not functional. The temperature accuracy of your thermostat is set to ± 0.25 °C. |
LED indication Smart Relay
Installation – Step 1
Electric heater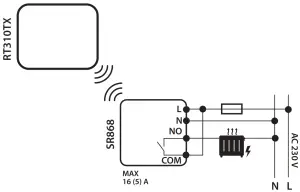
Boiler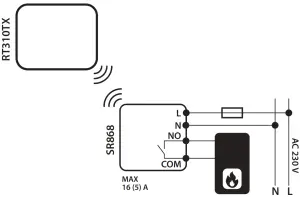
![]() The thermostat and the smart relay are pre-paired from the factory if purchased as a pack. If not, follow the thermostat pairing process.
The thermostat and the smart relay are pre-paired from the factory if purchased as a pack. If not, follow the thermostat pairing process.
Installation – Step 2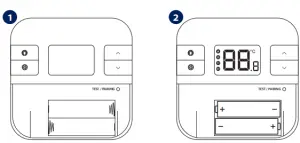
Pairing process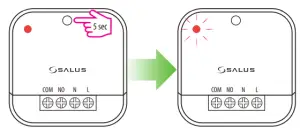
![]() In case you want to add more than one relay, set all relays into pairing mode, including the ones already paired, and start the pairing process. The LED will flash red when the relay is in pairing mode.
In case you want to add more than one relay, set all relays into pairing mode, including the ones already paired, and start the pairing process. The LED will flash red when the relay is in pairing mode.
Put the thermostat into pairing mode, by pressing the pair button for 3 seconds. After the smart relay is paired with the thermostat, the LED is steady red.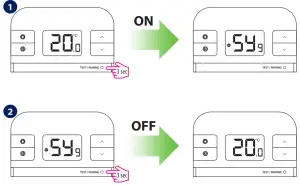
Test the pairing process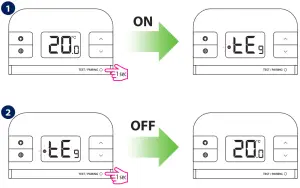
![]() If the thermostat loses connection with the Smart Relay, the Smart Relay goes into fail-safe mode after 30 minutes.
If the thermostat loses connection with the Smart Relay, the Smart Relay goes into fail-safe mode after 30 minutes.
Change temperature
Actual room temperature![]() By changing the Setpoint (desired) temperature, you are permanently altering your temperature.
By changing the Setpoint (desired) temperature, you are permanently altering your temperature.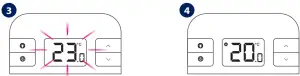
Two seconds timeout
Actual room temperature
Frost Mode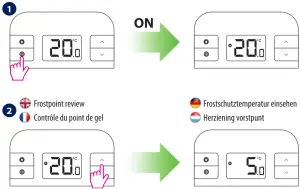
 Installer mode
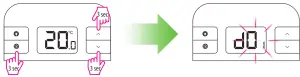 Press the three buttons together for 3 seconds. Use
![]() to select dxx parameter,
to select dxx parameter, ![]() to change parameter value and
to change parameter value and ![]() to confirm.
to confirm.
Parameter
| dxx | Function | Parameter | Description | Default value |
| d01 | Temperature displaincrements | 0.1 or 0.5°C | Select temperature display increments | 0.5°C |
| d02 | Temperature offset | ±3.0°C | Calibrate your thermostat temperature | 0.0°C |
| d03 | Frost setpoint | 5.0-17.0°C | Calibrate your thermostat | 5.0°C |
DE / NL: [email protected]
tel: +49 6108 8258515
FR: [email protected]
tel: +33 (0) 134 724 039
UK: [email protected]
tel: +44 (0) 1226 323961
Head Office:
SALUS Controls Plc
Units 8-10 Northfield Business Park
Forge Way, Parkgate, Rotherham
S60 1SD, United Kingdom
T: +44 (0) 1226 323961
E: [email protected]
E: [email protected]
www.salus-controls.com
SALUS Controls is a member of the Computime Group
Maintaining a policy of continuous product development SALUS Controls plc reserve the right to change specification, design and materials of products listed in this brochure
without prior notice. For PDF Installation guide please go to www.salus-manuals.com
Issue date: 06 2020
Version: V005


