
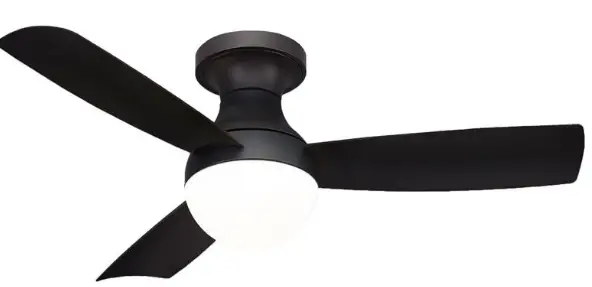
WAC F-004L-MB Smart Fans Orb Indoor and Outdoor
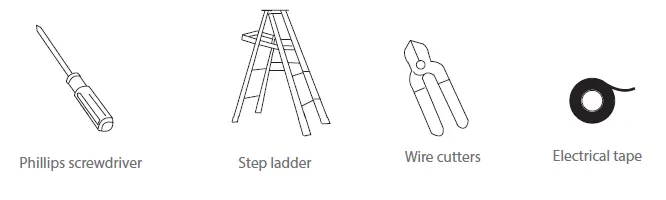
TOOLS & MATERIALS REQUIRED
PACKAGE CONTENTS
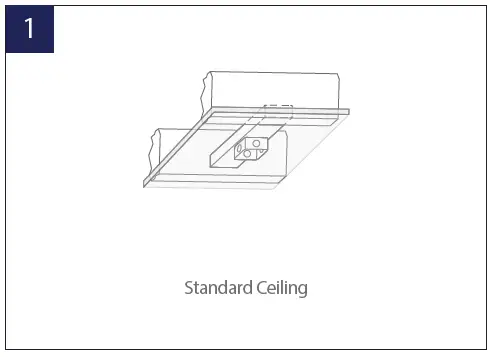
MOUNTING OPTIONS
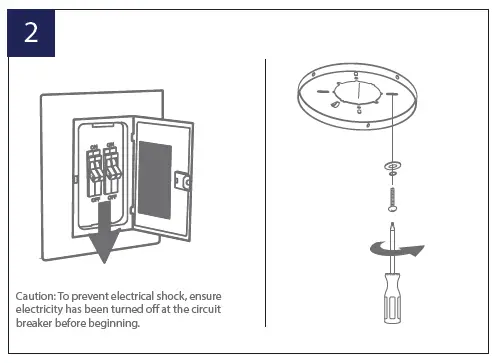
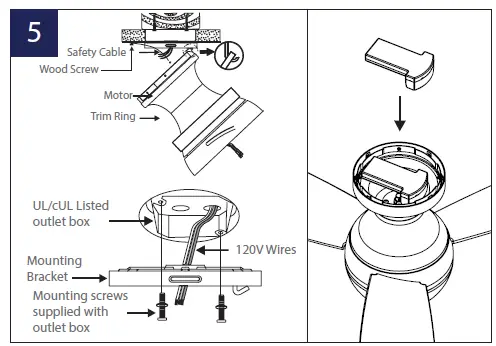
INSTALLING THE MOUNTING BRACKET
- Mount to the outlet box as shown above.
- Remove 1 set screw from mounting bracket and set aside for use in Finishing the Installation.

- Pass supply wires through mounting bracket and secure to outlet box.
- Place blade into motor housing.
- Insert blades in slots, aligning with motor assembly holes.

- Secure blades with blade attachment screws & washers.

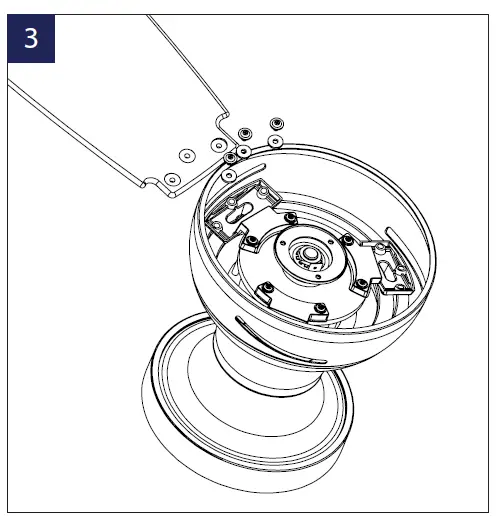
HANGING THE FAN
- Remove 2 opposing screws and loosen the other 2.
- Pass supply wires through mounting plate.
- Place trim ring onto the canopy. Opening of 4 clips facing up.
- Lift motor assemby and hang it on the hook on the mounting plate using one of the screw holes.
- Secure the safety cable to the building structure using a wood screw (not included)

MAKING THE ELECTRICAL CONNECTIONS
INSTALLING THE OPTIONAL WALL CONTROL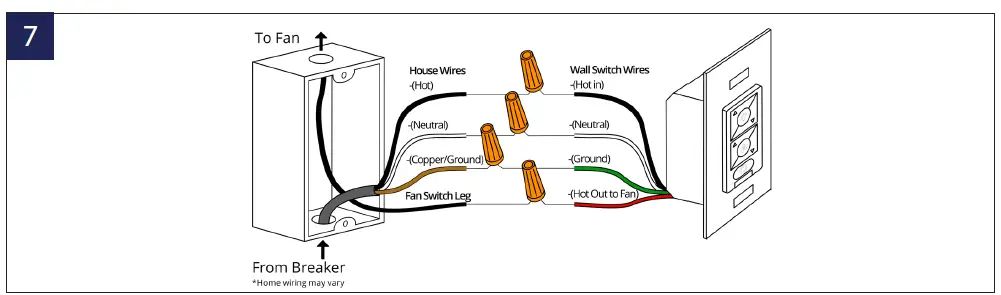
- Connect the green wire marked “GROUND” from the wall control to the copper wire from the wall outlet box that feeds back to the circuit breaker – important for proper fan function.
- Connect the black wire marked “LINE IN” from the wall control to the black LINE VOLTAGE wire from the wall outlet box that feeds back to the circuit breaker.
- Connect the red wire from the wall control to the black wire from the wall outlet box that feeds up to the fan.
- Connect the white wire from the wall control to the white (neutral) wire from the wall outlet box.
- Carefully tuck the wire connections inside the outlet box. Secure the wall control with the two (2) wall control screws provided.
- Attach the wall mounting plate over the wall switch and secure with the two (2) wall mounting plate screws provided.
- Fasten the wall plate to the wall mounting plate
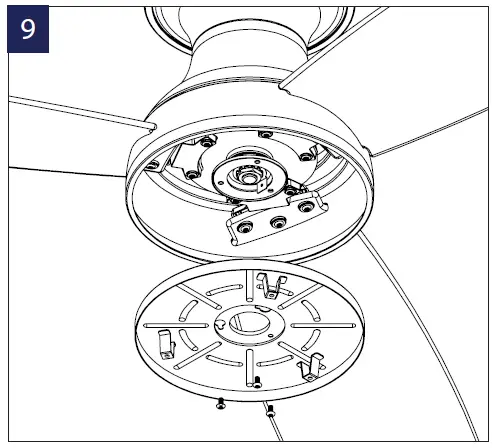
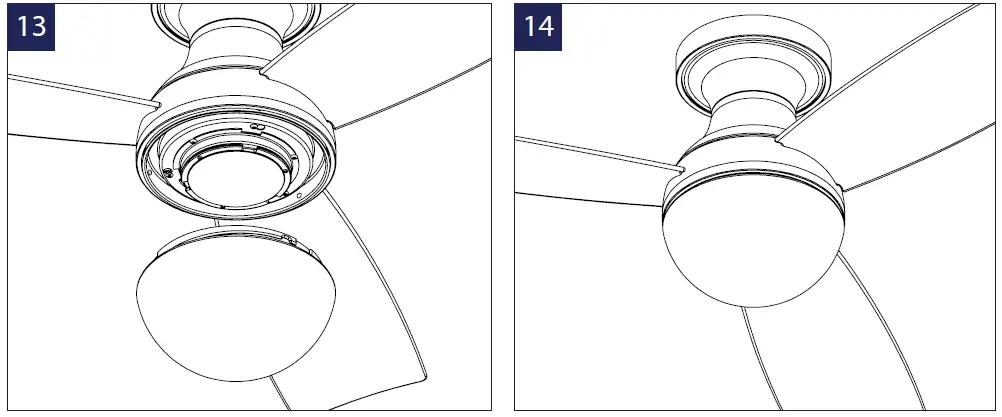
INSTALLING THE ADAPTER PLATE / FINISHING THE INSTALLATION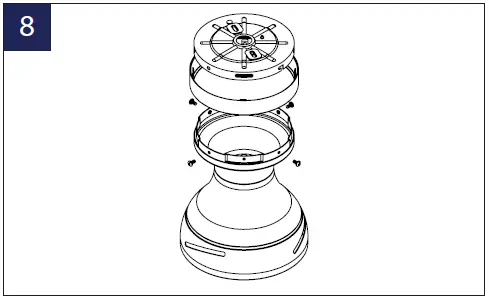
- Secure wire connectors with supplied wire ties.
- Remove the motor from the hook on the mounting bracket. Slide
the motor up to the mounting bracket and place the key hole on the motor over the screw on the mounting bracket. Turn motor until it locks in place at the narrow section of the key holes. - Align the circular hole on canopy with the remaining hole on the mounting bracket. Secure by tightening the two screws previously loosened and the two screws previously removed.
- Raise up trim ring and line up the 4 tabs with the 4 grooves on the mounting bracket. Once lined up, slide the trim ring and secure it to the canopy until snug
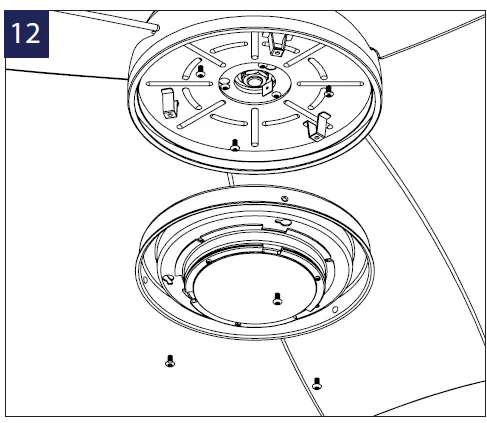
 Remove 1 of 3 screws from the mounting ring and loosen the others (do not remove).
- Install the adapter plate, by screwing in the previously removed screw and tightening the others.
 Remove 1 of 3 screws from the mounting ring and loosen the others (do not remove).
INSTALLING THE LUMINAIRE COVER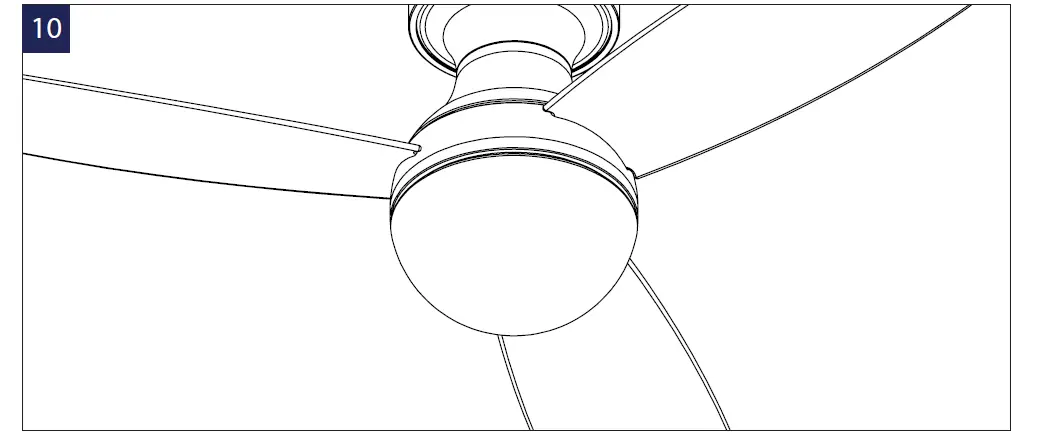
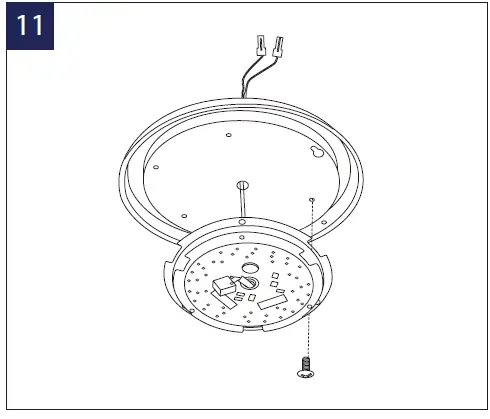
INSTALLING THE LUMINAIRE MODULE & GLASS
- Run LED wires from motor housing through the adapter and luminaire adapter plates.
- Connect white wire to white wire and black wire to blue wire

- Remove 1 of 3 screws from the adapter plate and loosen the others (do not remove).
- Using the screw from the previous step, install the luminaire plate.
- Secure the LED module to the luminaire plate using the 3 screws provided in the screw bag.
FINISHING THE INSTALLATION 
SAFETY RULES
- To reduce the risk of electric shock, ensure electricity has been turned off at the circuit breaker before beginning.
- All wiring must be in accordance with the National Electrical Code “ANSI/NFPA 70” and local electrical codes.
- Electrical installation should be performed by a licensed electrician.
- To reduce the risk of fire, electric shock, personal injury or damage to the fan or other items, the outlet box and support structure must be securely mounted and capable of reliably supporting a minimum of 35 Ibs (15.9 kg). Use only UL/cUL listed outlet boxes marked “FOR FAN SUPPORT.” Use only the screws and washers provided with the outlet box.
- The fan must be mounted with a minimum of 7 ft. (2.1m) clearance from the trailing edge of the fan blades to the floor and a minimum of 1.5 ft (0.5m) from the edge of the fan blades to the surrounding walls.
- Never place objects in the path of the fan blades.
APPLICATION
In addition to the included control, you can operate your fan by purchasing the WAC Smart Fans app.* Upgradeable with Smart Features Scan the code to the right with your phone to find out how you can enable smart features through the WAC Smart Fan app and integrate with your smart home ecosystem. NOTE: Press light toggle and season toggle and hold for 4 seconds if you prefer not using the app or broadcasting Wi-Fi
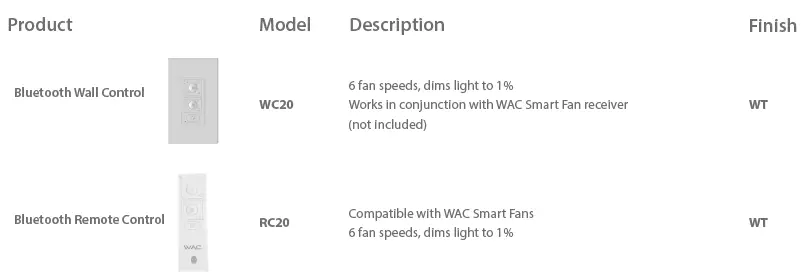
ACCESSORIES
TROUBLESHOOTING
- My remote or wall control is not controlling my fan
- Verify that the fan is receiving power by power cycling the fan.
- To do this:
- Cut power to the fan via standard On/Off wall switch, or the breaker if standard wall switch is not applicable.
- Wait at least 10 seconds, and then restore power.
- The fan will power on in Pairing mode for 3 minutes.
- Press and hold (ICON) and (ICON) buttons on wall control for 10-15 seconds.
- When the LED indicator remains solid green, and three (2) audible beeps are heard, the pairing process is complete.
- My home Wi-Fi network is not showing up in the app’s list during setup.
- Your fan supports connection with 2.4GHz 802.11b/g/n networks. Confirm your network is compatible by checking your router settings or contact your router manufacturer.
- Make sure your network’s SSID is not hidden.
- Your fan does not support 5 GHz network connectivity.
- My Fan failed to join the Wi-Fi network
- Make sure you entered the correct Wi-Fi password and your mobile device is connected to the same network you attempted to connect the fan. Make sure you are within the router manufacturer’s specified range. If all of these steps have failed – please power cycle your fan and router and retry.
What is power cycling and how do I power cycle my fan?
Power cycling is the act of temporaily removing the power source for your fan. If the fan is powered through a wall switch, turn the switch off for
10 seconds and back on. Alternately, you can use the circuit breaker the fan is connected to by toggling it off for 10 seconds and back on. If your fan
is wired through a WAC wall control (P/N: WC20-WT) pull the Air-Gap Switch on your wall control, wait 10 seconds, and re-insert.
What is Adaptive Learning?
Adaptive learning is an exclusive feature that allows your fan to learn your daily/weekly habits and automatically recommend scheduled activity
through the Modern Forms app. This feature can be toggled on or off.
What is Breeze Mode?
Breeze Mode mimics the natural ebb and flow of winds in nature by fluctuating your fan’s speed.
What is Pairing?
Pairing is the process of connecting your WAC remote or wall control to your fan. Your fan comes pre-paired to your included remote control. However, if you want additional controls for your fan or if you’re replacing a control, refer to the pairing and unpairing section of the instructions.
What is a Factory Reset?
Factory Reset is a restore of the fans original settings. This can be achieved from the control or by pressing and holding the small button on the receiver until you hear three audible beeps or by holding down the fan toggle, light toggle, and season toggle buttons on your paired remote or wall control for 10 seconds. NOTE: You will need to re-pair your remote or wall controls to the fan following a factory reset. A factory reset will also disconnect the fan from your home Wi-Fi network and will require you to add the fan using the WAC Smart Fans app. Please refer to the FAQ section of our app for further guidance. For all other questions, please contact our dedicated Fan Support specialists. Contact information can be found at the front of the instructions.
CERTIFICATE OF WARRANTY
Your new WAC Smart Fan is engineered to make life easier every day. WAC creates future-forward fans and luminaires that provide energy savings and outstanding efficency. Our dedication to doing things the right way goes beyond our love for amazing products. WAC Smart Fans™ warrants any of its outdoor rated ceiling fan products that they are to be free from defects in material and workmanship for a period of one (1) year from the date of purchase; outdoor painted finishes are warranted for two (2) years; LED light modules and electronic components are warranted for five (5) years; DC motors and stainless steel finishes are warranted for lifetime under normal use to the first nondealer purchaser. Although WAC uses the best available materials and does extensive testing for finish endurance, some fading or chalking may occur and is considered normal. For coastal locations, some corrosion and/or deterioration is considered “normal wear” in this environment. Therefore, any finish claim due to coastal environment conditions is not applicable to our warranty.If a product is defective, all efforts will be made to correct the problem in the field. If the problem cannot be resolved, an RGA number will be issued. WAC obligation is expressly limited to repair or replacement, without charge, at the WAC factory after prior written return authorization has been granted. WAC obligation under this warranty shall not extend beyond the distributor’s initial purchase price of the product and accordingly any consequential damages or labor costs arising out of a defect are expressly excluded. This warranty shall not apply to products that have been altered, improperly installed, mishandled or misused. Notice of a defect in writing must be received by WAC within five (5) years from the date of purchase (or according period of time as outlined by material). Excluded from warranty are any 3rd party component which carries its own manufacturer’s warranty. Note: WAC product warranty applies only to purchases from authorized WAC distributors. THERE ARE NO WARRANTIES WHICH EXTEND BEYOND THE DESCRIPTION ON THE FACE HEREOF INCLUDING WARRANTIES OF MERCHANTABILITY AND FITNESS FOR A PARTICULAR PURPOSE. The Bluetooth ® word mark and logos are registered trademarks owned by Bluetooth SIG, Inc. and any use of such marks by Wangs Alliance Corporation is under license. Other trademarks and trade names are those of their respective owners.
GET SMART
The WAC app synchronizes seamlessly with smart home devices you already own 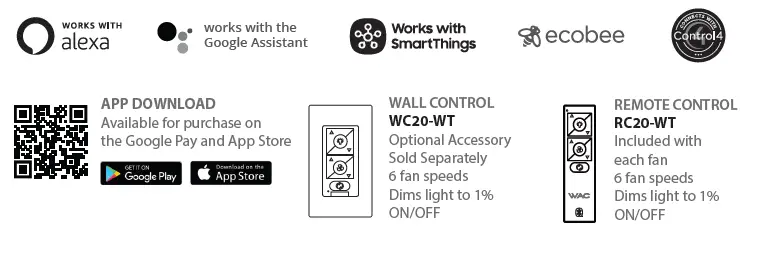
GENERAL INQUIRIES
For all questions about your ceiling fan please read all included instructions, installation procedures, troubleshooting guidelines and warranty information before starting installation For missing parts or general inquiries call our trained technical staff at 1-800-526-2588 Email: [email protected] Or live chat at www.waclighting.com
FAN SUPPORT
For fast service have the following information below when you call:
- Model Name and Number
- Part Number and Part Description
- Date Of Purchase and Purchase Location
- 1-800-526-2588
- Email: [email protected]
FAQS
The motor on the Fanimation Odyn is quiet and carries a lifetime motor warranty. This ceiling fan is Energy Star certified, and much more efficient than most other fans we evaluated.
Ceiling fans that have a wooden and composite blade can begin sagging if there is too much moisture generation.
Wet rated fans are made to handle intense moisture and the top of the fan is sealed to prevent moisture from getting in the motor.
For an office, the recommended ventilation rate is 20 cfm per person. The occupancy of a general office is one person per 80 to 150 sq. ft. An office is 40′ x 60′ or 2,4000 sq.
Humid climates need closer to 350 CFM/ton or less, while dry climates work just fine with 400 CFM/ton
In the winter, ceiling fans need to spin clockwise on low speed (any faster and you’ll start to feel a cool breeze).
Fan Speed: button: Turn off the fan. Light button: Turn ON\OFF the light. Turn on the fan and turn speed up. Turn on the fan and turn speed down.
Control your ceiling fans with your smart devices and personal voice assistants. Power to control your ceiling fan with your voice or the swipe of the finger
Some ceiling fans are noisy, although more expensive models tend to be quieter.
It is crucial to keep flood drying equipment running 24 hours a day to ensure the structural integrity of your home is not compromised after a flood.
Yes. Fans can cause fires, especially in the summer. Fans blow air around the room, which can be enough to ignite a fire if it’s hot enough
Drywall and plaster ceilings are known to fail and collapse under excessive or prolonged water exposure.
Can outdoor ceiling fans be exposed to rain?
Yes, outdoor rated ceiling fans can get wet.19-Aug-2021
What is a good air flow for an outdoor ceiling fan?
Are fanimation fans quiet?
The fan are quiet — great for the bedroom. Also purchased the light kit — it is dimmable and provides the right amount of light for any activity.


