![]() Energy Monitoring Smart Relay
Energy Monitoring Smart Relay
Rev. A-022823
Instruction Manual
CHW01 Energy Monitoring Smart Relay
Thank you very much for purchasing the Evvr Energy Monitoring Smart Relay. Please read this manual carefully to learn about all the functions and uses of this Relay.
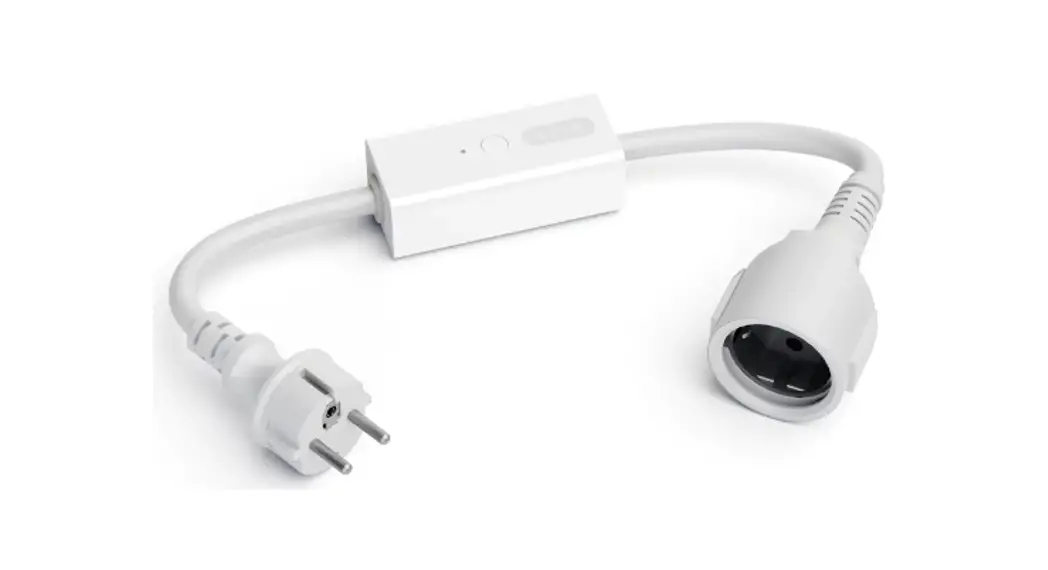
This Relay, which supports a maximum currentof 16A, is designed to make almost any conventional home appliances smart. It is HomeKit-enabled, allowing you to efortlessly manage the connected appliance over your iPhone. When in use, the Relay will also continuously measure the electrical consumption of the connected appliance, and you can check this information at any time via the EvvrApp installed on your iPhone.
Safety Precautions
 Caution: To avoid electric shock, DO NOT splash water on the device or touch the Switch Button with wet hands.
- Caution: Turn of the power at the AC mains before wiring.
- Caution: Improper use or improper installation can cause damage/loss of property, injury, or even death.
 Caution: This product is intended for indoor use only.
- Caution: Metal casings, mirrors, electrical appliances, etc., may afect, reduce, or interfere with wireless communication.
 Caution: This product is intended for indoor use only.
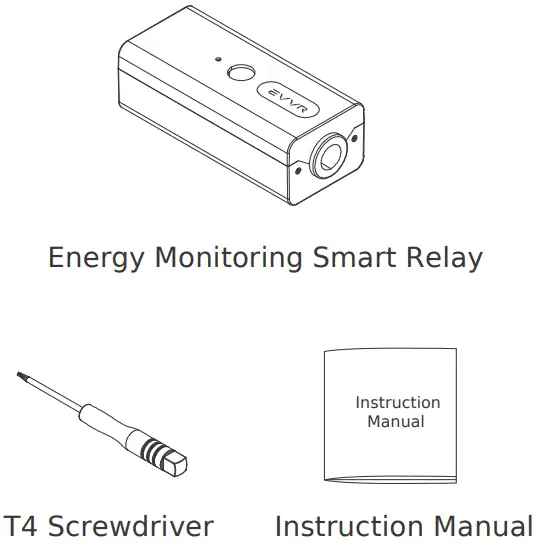
What’s in the Box
Technical Specifications
| Model | CHW01 |
| Input | AC 85V~245V 50/60Hz |
| Max. Load | 16A |
| Wireless Standard | IEEE 802.11 b/g/n Wi-Fi 2.4GHz |
| Power Consumption | 0.65W |
| Operating Temperature | -20~60°C (-4°~140°F) |
| Storage Temperature | -40~85°C (-40°~185°F) |
| Ambient Humidity | 5~85% RH |
| Product Size (L*W*H) | 100mm*42.8mm*32mm (3.94in. × 1.69in. × 1.26in.) |
Part Names

Wiring
For your safety, we recommend that you ask aprofessional electrician for help installing this Relay.
For appliances that have three wires (live, neutral & ground wires):
- Turn of the power at the AC mains.
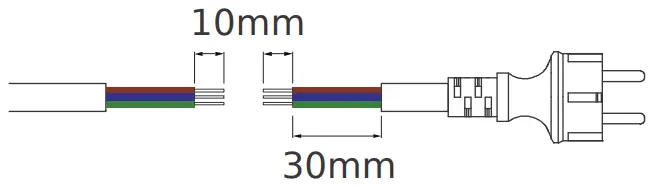
- Cut the power cable connecting the appliance into two segments. Strip each segment to expose 10mm of each of the three wires. Then, identify the live wire, neutral wire, and the ground wire.
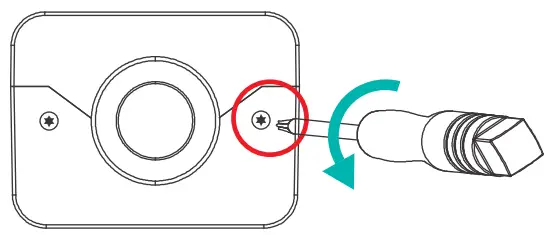
- Remove the exterior case of the Relay with the T4 screwdriver.
- Connect the Relay between the appliance and the AC mains as follows:
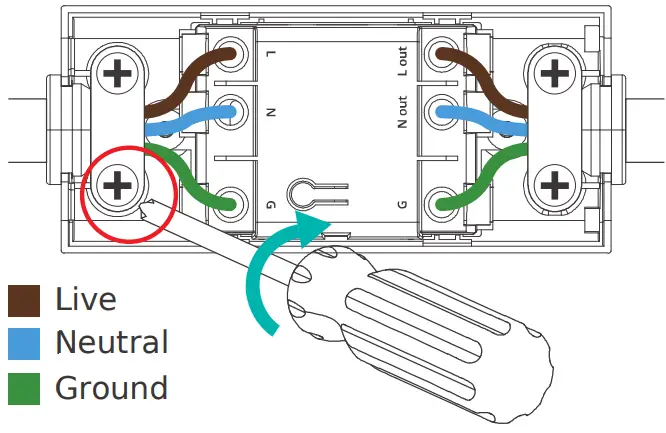 On the Appliance side of the Relay
• L OUT – the live wire
• N OUT – the neutral wire
• G – the ground wire
On the AC mains side of the Relay
• L – the live wire
• N – the neutral wire
• G- the ground wire - Fasten the wires with screws, and then put the exterior case back in place.
- Turn on the power at the AC mains.
For appliances that have two wires (live & neutral wires, no ground wire), please follow the above steps for wiring, skipping the connection of the ground wire.
Setup Instructions
This Relay uses Wi-Fi 2.4GHz networking. It is HomeKit-enabled and you can set it up on your iPhone.
When powered on for the first time, the Relay will automatically go into the setup mode (indicated by a continuous blue blinking light).
In this mode, you can add the Relay to the Home App.
- Open the Home App on your iPhone, tap “+”, and then tap Add Accessory.
- Scan the QR code or input the 8-digit setup code.

Note: The setup mode will exit if there is no action performed in 10 minutes. If you want to set up the Relay again, please reboot it into setup mode once again.
Indicator Light Status
- Blue blinking (continuous): The Relay is in the setup mode.
- Blue blinking (3 blinks): The Switch Buttonis disabled.
- Blue steady: The Relay is on; HomeKit & Wi-Fi are connected.
- Red blinking (continuous): Wi-Fi is disconnected.
- Red blinking (2 blinks): The Relay is restored to factory settings.
- Red blinking (3 blinks): The Relay is overloaded or exceeds the temperature limit.
- Red steady: The Relay is on; HomeKit & Wi-Fi are disconnected.
Expanded Functionality with the Evvr App
When the Relay is in use, you can use the EvvrApp to further expand the Relay’s functionalityYou can check electricity consumption, disablethe Switch Button in case of unintended touch,and configure the status of the Relay when it isre-powered on after a loss of power.
- Install the Evvr App on your iPhone from theApple App Store.
- Allow the App to gain access to HomeKit’s devices.
Restore to Factory Settings
There are two methods to restore the Relay to actory settings:
- Using Switch Button on the exterior of the plastic case
i. Disconnect the Relay from power.
ii. While pressing and holding the Button, reconnect the Relay to power.
iii. Keep holding the Button for another 10 secondsuntil the red LED blinks twice. - Using Reboot Button on the interior of the plasticcase
Press and hold Button 2 for 5 seconds until the red LED blinks twice.
Troubleshooting
Q1. Smart Relay pairing failed.
- The device may be too far from the Wi-Fi router, or there may be interference in the current network environment. Please try to bring devices closer to the Wi-Fi router.
- The device may be already paired. Please return the device to factory defaults if you want to pair it again.
Q2. Smart Relay cannot be controlled by Apple
Home APP.
The device may be installed too far from theWi-Fi router, or there may be signal interference. Please check whether there is strong electromagnetic field equipment nearthe wireless switch and check whether the equipment is installed in a closed metal housing or in a closed concrete wall.
Legal Notice
Use of the Works with Apple badge means thatan accessory has been designed to work specifically with the technology identified in thebadge and has been certified by the developermeet Apple performance standards. Apple is noresponsible for the operation of this device or itcompliance with safety and regulatory standard Apple, HomeKit, HomePod, HomePod mini, iPadiPhone and Apple TV are trademarks of Apple Inc., registered in the U.S. and other countries and regions.
Certifications (regional)
FCC ID: 2A68U-CHW01

FCC Statement
This device complies with part 15 of the FCC rules.Operation is subject to the following two conditions (1) this device may not cause harmful interferenceand (2) this device must accept any interference received, including interference that may cause undesired operation.
Changes or modifications not expressly approved bthe party responsible for compliance could void theuser’s authority to operate the equipment.
Note: This equipment has been tested and found tocomply with the limits for a Class B digital device,
pursuant to part 15 of the FCC Rules. These limits are designed to provide reasonable protection against harmful interference in a residential installation.
This equipment generates, uses and can radiate radio frequency energy and, if not installed and usedin accordance with the instructions, may cause harmful interference to radio communications.
However, there is no guarantee that interference will not occur in a particular installation. If this equipment does cause harmful interference to radioor television reception, which can be determined bturning the equipment of and on, the user is encouraged to try to correct the interference by onor more of the following measures:
– Reorient or relocate the receiving antenna.
– Consult the dealer or an experienced technician fhelp.
Important Announcement Important Note
Radiation Exposure Statement
This equipment complies with FCC radiation exposure limits set forth for an uncontrolled environment. This equipment should be installed and operated with minimum distance 20cm between the radiator and your body.
This transmitter must not be co-located or operatinin conjunction with any other antenna or transmitter.
Disposal Instructions
This product must not be disposed of with your other household waste. Instead, it is your responsibility to dispose of your waste equipment by handing it over to a designated collection point for the recycling of waste electrical and electronic equipment. The separate collection and recycling of your waste equipment at the time of disposal will help to conserve natural resources and ensure that it is recycled in a manner that protects human health and the environment. For more information about where you can drop of your waste equipment for recycling, please contact your local city ofce, your household waste disposal service or the shop where you purchased the product.
Warranty Policy
For warranty information, please visit https://www.evvr.io/warranty
![]() Please contact us for any technical issue [email protected]
Please contact us for any technical issue [email protected]
Rev. A-022823
P/N CHW01


 User Manual")


 Instruction Manual")

