Anaplan 123780 User Access Management
Product Information
User Access Management (UAM) is a feature of Anaplan that allows administrators to add and delete users, manage their selective access assignments, elect workspace administration rights, or enable single sign-on functionality. Anaplan and its customers have continued to mature, which has led to the development of new and innovative ways to manage users leveraging a combination of actions, imports, custom lists, and modules. As a result, solutions have been developed to enable internal and external customers to more effectively manage users.
Product Usage Instructions
The following component has been ranked in order of complexity with Component A being the least technical to build. Users should deploy these components based on their requirements. The build time varies based on the complexity of the current model and level of deployment.
Component A: Monitor Users
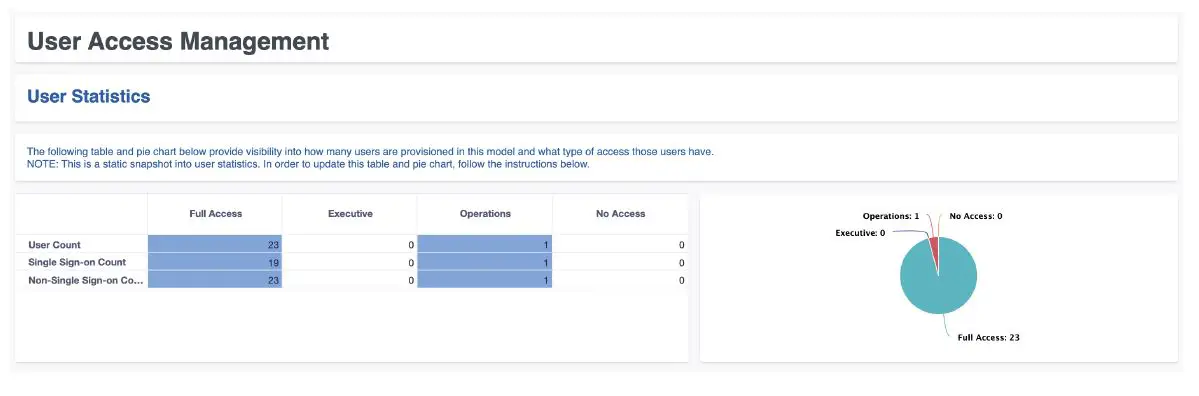
The User Statistics Page component enables administrators to see how many individuals have access and what type of access they have. This is a static view. If users are added through the native user settings, they will not automatically be reflected in this basic solution. If admins do not build Component B, they should include language to remind them to manually update the dashboard component (i.e., export from user list and import into module).
- Create Fake Users List
- Create the SYS: Fake Users Module
- Dimensions: Users
- Line Item: User Text
- Format: Text
- Formula: NAME(ITEM(Users))
- Create Load Fake Users List saved view:
- Pivot so line items are on the columns and Users are the rows
- Show the following line items: In Fake Users List
- Enable filter by Load? = True (checked)
- Save View called Load Fake Users
- Import fake users from SYS: Fake Users into Fake Users List
- Import the User Text
- Save this import action as Maintain: Load Fake Users from SYS:
Fake Users
- Create INP: User Settings Module
- Dimensions: Fake Users Line Item, Email
- Format: Text, List, ITEM(Fake Users), Boolean, No Data, Number,
Number, Number, No Data, List, Boolean, No Data, Number - Formula: First Name, Last Name, Model Role, Single Sign-on,
- COUNT-Count Single Sign-on Count, Non-Single Sign-on Count,
- FILTERS-Prior Model Role Import Filter, –CONDITIONAL FORMATTING-Single Sign-on CF
- 1 If ‘Single Sign-on’ THEN 1 ELSE 0 If NOT ‘Single Sign-on’ THEN 1 ELSE 0
- IF Model Role = Prior Model Role THEN FALSE ELSE TRUE IF ‘Single Sign-on’ THEN 1 ELSE 0
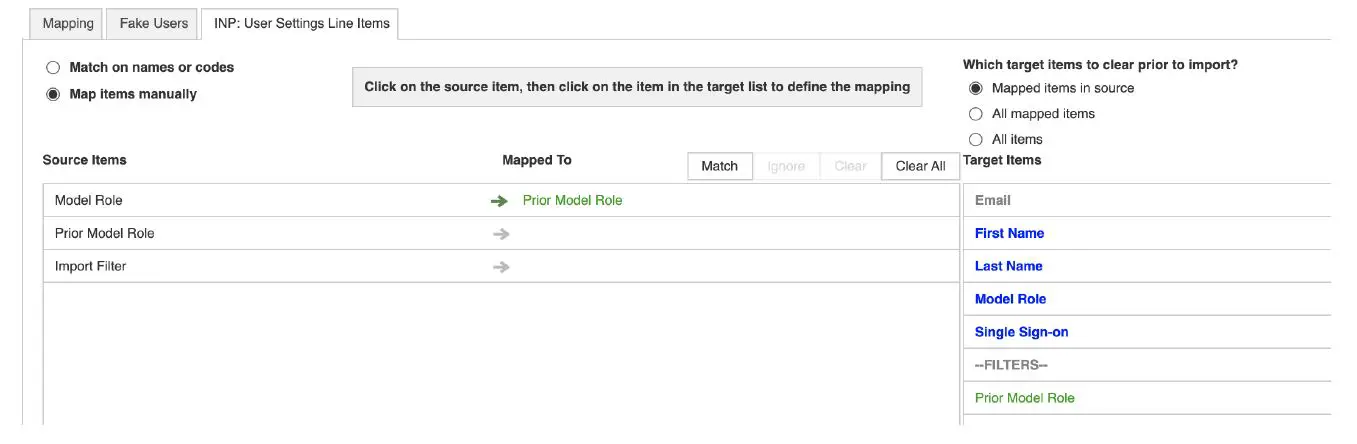
- Import Email from SYS: Fake Users into INP: User Settings
- Export current native user settings in CSV format. Then import user settings into INP: User Settings
- Create OUT: User Statistics module
- Dimensions: Model Roles
- Line Item: User Count, Single Sign-on Count
- Format: Number
- Formula: ‘INP: User Settings’.Count[SUM: ‘INP: User
- Settings’.Model Role], ‘INP: User Settings’.’Single Sign-on Count'[SUM: ‘INP: User Settings’.Model Role]
Introduction
User Access Management (UAM)
Anaplan’s robust native user access management capabilities enable administrators to add and delete users, manage their selective access assignments, elect workspace administration rights, or enable single sign-on functionality.
As Anaplan and its customers have continued to mature, we have identified new and innovative ways to manage users leveraging a combination of actions, imports, custom lists and modules. As a result, we have developed, and are in the continuous process of developing, solutions to enable our internal and external customers to more effectively manage users.
In-Model Solution
Benefits
- Enhanced visibility into model access
- Ability to sort/filter users by name and role
- Add, edit, or remove access for multiple users at once
- Copy user access settings from one user to another
Component Overview
The following component have been ranked in order of complexity with Component A being the least technical to build. Users should deploy these components based on their own requirements.
- Component A
- Monitor users by model role and access type
- Drill down to see individual-level access
- Component B
- Add new user(s)
- Assign model role and Single Sign-on access
- Update user model role
- Component C
- Add new user and assign selective access
- Update selective access
- Component D
- Copy selective access from one user to another
Build Time: 1-2 hours. Time varies based on the complexity of the current model and the level of deployment.
Build Instructions
Component A: Monitor Users
The User Statistics Page component enables Administrators to see how many individuals have access and what type of access they have. This is a static view. If users are added through the native user settings, they will not automatically be reflected in this basic solution. If admins do not build Component B, they should include language to remind them to manually update the dashboard component (i.e., export from user list and import into module).
- Create “Fake Users List”
- Create the SYS: Fake Users Module
SYS: Fake Users Dimensions: Users Line Item Format Formula User Text Text NAME(ITEM(Users)) In Fake Users List List FINDITEM(Fake Users, User Text) Load? Boolean ISBLANK(In Fake Users List) - Create “Load Fake Users List” saved view:
- Pivot so line items are on the columns and Users are the rows
- Show the following line items: In Fake Users List
- Enable filter by Load? = True (checked)
- Save View called “Load Fake Users”
- Import fake users from SYS: Fake Users into Fake Users List
- Import the User Text
- Save this import action as Maintain: Load Fake Users from SYS: Fake Users
- Create the following lists:
- All Model Roles list
- No additional action required
- Model Roles list
- Top Level: “All Roles”
- Make “All Model Roles” list the parent
- Export roles from native user settings and import roles into Model Roles list
- Assign unique code to each model role
- All Model Roles list
- Create INP: User Settings Module
INP: User Settings Dimensions: Fake Users Line Item Format Formula Email List ITEM(Fake Users) First Name Text Last Name Text Model Role List Single Sign-on Boolean –COUNT– No Data Count Number 1 Single Sign-on Count Number If ‘Single Sign-on’ THEN 1 ELSE 0 Non-Single Sign-on Count Number If NOT ‘Single Sign-on’ THEN 1 ELSE 0 –FILTERS– No Data Prior Model Role List Import Filter Boolean IF Model Role = Prior Model Role THEN FALSE ELSE TRUE –CONDITIONAL FORMATTING– No Data Single Sign-on CF Number IF ‘Single Sign-on’ THEN 1 ELSE 0 - Import Email from SYS: Fake Users into INP: User Settings
- Export current native user settings in CSV format. Then import user settings into INP: User Settings
- Create OUT: User Statistics module
OUT: User Statistics Dimensions: Model Roles Line Item Format Formula User Count Number ‘INP: User Settings’.Count[SUM: ‘INP: User Settings’.Model Role]
Single Sign-on Count Number ‘INP: User Settings’.’Single Sign-on Count'[SUM: ‘INP: User Settings’.Model Role]
Non-Single Sign-on Count Number ‘INP: User Settings’.Count[SUM: ‘INP: User Settings’.Model Role]
–CONDITIONAL FORMATTING– No Data User Count CF Number IF User Count > 0 THEN 1 ELSE 0 Single Sign-on Count CF Number IF ‘Single Sign-on Count’ > 0 THEN 1 ELSE 0 Non-Single Sign-on Count CF Number IF ‘Non-Single Sign-on Count’ > 0 THEN 1 ELSE 0 - Create the following saved views from OUT: User Statistics module:
- DB View
- Model Roles list as columns and line items as rows
- Show:
- Columns: Full Access, Executive, Operations, No Access
- Rows: User Count, Single Sign-on Count, Non-Single Sign-on Count
- Enable conditional formatting
- Save view as “DB View”
- Pie Chart
- Models Roles list as rows and line items as columns
- Show:
- Columns: User Count
- Rows: Full Access, Executive, Operations, No Access
- Save as “Pie Chart”
- DB View
- Prepare the Page:
- Publish the following to the dashboard:
- OUT: User Statistics – DB View saved view
- Pie Chart created from OUT: User Statistics – Pie Chart saved view
- Instructions: “The following table and pie chart below provide visibility into how many users are provisioned in this model and what type of access those users have. NOTE: This is a static snapshot into user statistics. In order to update this table and pie chart, follow the instructions below.”
- Publish the following to the dashboard:
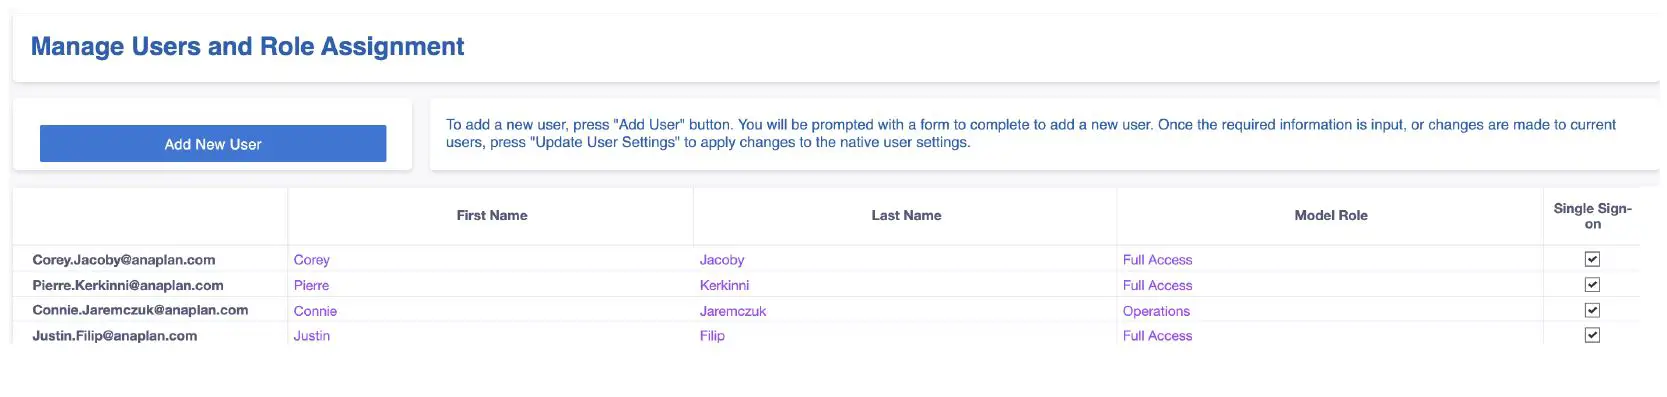
Component B: Manage Users and Role Assignment
Enable Admins to quickly add new users and assign roles, or update model role assignment for existing users.
- Add line items to INP: User Settings module (created in Component A)
INP: User Settings Add the following line items Line Item Format Formula –FILTERS– No Data Prior Model Roles List Import Filter Boolean IF Model Role = Prior Model Role THEN FALSE ELSE TRUE - Create the following saved views:
- Input DB
- Line items as columns and Fake Users as rows
- Show: Email, First Name, Last Name, Model Role, Single Sign-on
- Save this view as “Input DB”
- User Settings Import
- Line items as columns and Fake Users as rows
- Show: Email, First Name, Last Name, Model Role, Single Sign-on, Import Filter
- Apply Filter to show items with Import Filter = True (checked)
- Save this view as “User Settings Import”
- Copy Current to Prior
- Line items as columns and Fake Users as rows
- Show: Model Role, Prior Model Role, Import Filter
- Apply Filter to show items with Import Filter = True (checked)
- Save this view as “Copy Current to Prior”
- Input DB
- Use Import to Copy Current Model Role to Prior Model Role from INP: User Settings –Copy Current to Prior saved view
- Save this action as 1.2 Copy Current to Prior
- Save this action as 1.2 Copy Current to Prior
- Set-up 1.1 Import User Settings into Native User Settings
- From native user settings import from INP: User Settings – User Settings Import saved view
- Import First Name, Last Name, Model Role, and Single Sign-on using Email as source
- Save as 1.1 Import User Settings into Native User Settings
- Create process “Update User Settings”
- Add Maintain: Load Fake Users from SYS: Fake Users and 1.1 Import User Settings into Native User Settings and 1.2 Copy Current to Prior to this process
- Create the “Add New User” Worksheet (and Form)
- Make the grid the “INP: User Settings – Input DB” saved view
- Select “Configure Worksheet Actions”
- On the right panel, select the “Forms” drop down menu and create a new form
- Form Title: “Add New User”
- Choose List: “Fake Users”
- Choose Module: “INP: User Settings”
- Line Items to Include: First Name, Last Name, Model Role, Single Sign On
- Prepare the Page:
- Publish INP: User Settings – Input DB to dashboard
- Publish “Update User Settings” process to dashboard via action card [Note: In the sample dashboard below, the “Update User Settings” process is not displayed. This is because the complete template contains Selective Access provisioning and this button is located at the bottom of the dashboard.]
- Publish “Add New User” form via an action card
- Instructions: To add a new user, press “Add User” button. You will be prompted with a form to complete to add a new user. Once the required information is input, or changes are made to current users, press “Update User Settings” to apply changes to the native user settings.
- Workaround Disclaimer Language: Workarounds: 1) Workspace Administrator (WSA) rights can only be assigned from the native user settings. If adding a user that requires WSA access, be sure to go to the native user settings to provision WSA access even if the boolean is checked above. 2) To remove access for a user who previously had access, mark their role as “No Access” before updating user settings. 3) To remove a user that has been added via the “Add User” action before the changes have been published to the native user settings, leverage Anaplan’s native list management capabilities, or select the drop down menu at the top left corner of dashboard module to Edit and then delete list items.

Known Workarounds:
Include language around required workarounds:
- Assign/update WSA rights:
- WSA assignment can only be done from the native users settings
- Remove User Access From Current User:
- Mark model role as “No Access” and utilize the native user settings to remove user from the model
- Remove user that has been added to user list via the “Add User” action
- Utilize list management to manually remove that item
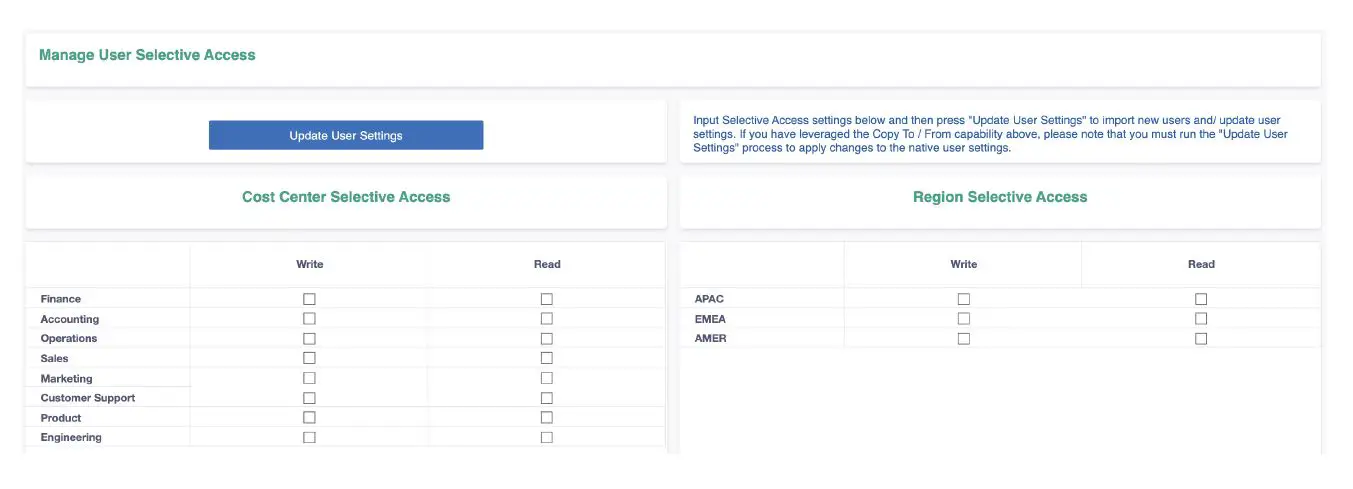
Component C: Manage Selective Access
Add or update Selective Access for new or existing users.
Pre-Build Activities:
- Identify which lists will have selective access enabled
- Define role-based access to lists with selective access enabled
- Configure those lists with selective access Boolean enabled
- Create flat Region and Cost Center lists
- Create Region Flat (L1) and Cost Center Flat
- Import the Region and Cost Center lists into the flat lists
- If the source lists have assigned the items a unique code, import that code with the list item name. If the source list has not assigned the list items a unique code, assign a unique identifier.
- Create SYS: Cost Center Flat Properties module
SYS: Cost Center Flat Properties Dimensions: Cost Center Flat Line Item Format Formula Code Text CODE(ITEM(‘Cost Center Flat’)) Cost Center (Hierarchy) List FINDITEM(Cost Center, Code) Name Text NAME(‘Cost Center (Hierarchy)’) - Create SYS: Region Flat Properties module
SYS: Region Flat Properties Dimensions: Region Flat (L1) Line Item Format Formula Code Text CODE(ITEM(‘Region Flat (L1)’)) Region (Hierarchy) List FINDITEM(‘Region (L1)’, Code) Name Text NAME(‘Region (Hierarchy)’) - Create INP: Cost Center Selective Access
INP: Cost Center Selective Access Dimensions: Fake Users, Cost Center Flat Line Item Format Formula User List IF Write OR Read OR ISNOTBLANK(Cost Center None) THEN ITEM(Fake Users) ELSE BLANK Write Boolean Read Boolean –ANAPLAN CALCS– No Data Cost Center Write Text IF Write THEN ‘SYS: Cost Center Flat Properties’.Code ELSE BLANK Cost Center Read Text IF Read THEN ‘SYS: Cost Center Flat Properties’.Code ELSE BLANK
Cost Center None Text IF NOT Write AND Prior Write OR NOT Read AND Prior Read THEN ‘SYS: Cost Center Flat Properties’.Name ELSE BLANK Load? Boolean Write <> Prior Write OR Read <> Prior Read AND ISNOTBLANK(User) OR ISNOTBLANK(Cost Center None) –PRIOR– No Data Prior Read Boolean Prior Write Boolean –CONDITIONAL FORMATTING– No Data Read and Write CF Number IF Write AND Read THEN 1 ELSE 0 - Create the Following Saved Views
- Selective Access Import
- Line Items as the columns and Fake Users and Cost Center Flat as the rows
- Show User, Cost Center Read, Cost Center Write, Load? line items
- Enable filter to show items with Load?=TRUE (checked)
- Save this view
- Copy Current to Prior
- Line Items as the columns and Fake Users and Cost Center Flat as the rows
- Show User, Write, Read, Prior Write, Prior Read line items
- Enable filter to show items with Load?=TRUE (checked)
- Save this view
- DB View
- Line Items as the columns, Fake Users as the Page, Cost Center Flat as the rows
- Show Write and Read
- Save this view
- Remove Security
- Line Items as the columns and Fake Users and Cost Center Flat as the rows
- Show User, Cost Center None, Load? line items
- Enable filter to show items with Load?=TRUE (checked)
- Save this view
- Selective Access Import
- Create INP: Region Selective Access
INP: Region Selective Access Dimensions: Fake Users, Region Flat (L1) Line Item Format Formula User List IF Write OR Read OR ISNOTBLANK(Region None) THEN ITEM(Fake Users) ELSE BLANK Write Boolean Read Boolean –ANAPLAN CALCS– No Data Region Write Text IF Write THEN ‘SYS: Region Flat (L1) Properties’.Code ELSE BLANK Region Read Text IF Read THEN ‘SYS: Region Flat (L1) Properties’.Code ELSE BLANK Region None Text IF NOT Write AND Prior Write OR NOT Read AND Prior Read THEN ‘SYS: Region Flat (L1) Properties’.Name ELSE BLANK Load? Boolean Write <> Prior Write OR Read <> Prior Read AND ISNOTBLANK(User) OR ISNOTBLANK(Region None) –PRIOR– No Data Prior Read Boolean Prior Write Boolean –CONDITIONAL FORMATTING– No Data - Create the Following Saved Views:
- Selective Access Import
- Line Items as the columns and Fake Users and Region Flat (L1) as the rows
- Show User, Region Read, Region Write, Load? line items
- Enable filter to show items with Load?=TRUE (checked)
- Save this view
- Copy Current to Prior
- Line Items as the columns and Fake Users and Region Flat (L1) as the rows
- Show User, Write, Read, Prior Write, Prior Read line items
- Enable filter to show items with Load?=TRUE (checked)
- Save this view
- DB View
- Line Items as the columns, Fake Users as the Page, Region Flat (L1) as the rows
- Show Write and Read
- Save this view
- Remove Security
- Line Items as the columns and Fake Users and Region Flat (L1) as the rows
- Show User, Region None, Load? line items
- Enable filter to show items with Load?=TRUE (checked)
- Save this view
- Selective Access Import
- Set-up the following imports and rename once you are done
- 2.1 CC Selective Access Remove Security
- Import into Native User Settings from INP: Cost Center Selective Access –Remove Security saved view
- Import 2 fields:
- User à Email Address
- Cost Center None à Cost Center None
- 2.2 CC Selective Access Import
- Import into Native User Settings from INP: Cost Center Selective Access –Selective Access saved view
- Import 3 fields:
- User à Email Address
- Cost Center Read à Cost Center Read
- Cost Center Write à Cost Center Write
- 2.3 CC Selective Access Copy Current to Prior
- Import into INP: Cost Center Selective Access from INP: Cost Center Selective Access – Copy Current to Prior saved view
- Import 2 fields:
- Write à Prior Write
- Read à Prior Read
- 2.4 Region Selective Access Remove Security
- Import into Native User Settings from INP: Region Selective Access –Remove Security saved view
- Import 2 fields:
- User à Email Address
- Region None à Region None
- 2.5 Region Selective Access Import
- Import into Native User Settings from INP: Region Selective Access –Selective Access saved view
- Import 3 fields:
- User à Email Address
- Region Read à Region Read
- Region Write à Region Write
- 2.6 Region Selective Access Copy Current to Prior
- Import into INP: Region Selective Access from INP: Region Selective Access – Copy Current to Prior saved view
- Import 2 fields:
- Write à Prior Write
- Read à Prior Read
- 2.1 CC Selective Access Remove Security
- Create Process “Update User Settings” and add imports 2.1 to 2.6 to the process
- Prepare the Page:
- Publish INP: Cost Center Selective Access – DB View
- Publish INP: Region Selective Access – DB View
- Publish “Update User Settings” process
- Instructions: Input Selective Access settings below and then press “Update User Settings” to import new users and/ update user settings. If you have leveraged the Copy To / From capability above, please note that you must run the “Update User Settings” process to apply changes to the native user settings.
Note: This example focuses on a single level hierarchy for both Cost Center and Region. If this dashboard is being built for a multi-level hierarchy, make sure that you incorporate a process to clear the highest level of the hierarchy before applying changes at lower levels. For example, if All Cost Centers was previously assigned, that assignment would need to be cleared out via the “None Import” before assigning Finance and Accounting.
Component D: Copy Selective Access From One User To Another (Copy To/From)
Enable Administrators to set-up a new user, or update a user, with the same selective access settings as another user.
- Create INP: Copy From/To Module
INP: Copy From/To Dimensions: Fake Users Line Item Format Formula Copy From List List: Fake Users; DCA: Copy User Access Copy User Access Boolean –CALCULATIONS– No Data Copy To List –CONDITIONAL FORMATTING– No Data Input Highlight Number - Create the following saved view:
- DB View
- Fake Users list as rows and line items as columns
- Show: Copy User Access and Copy From
- Save this view
- DB View
- Add new line items to INP: Region Selective Access and INP: Cost Center Selective Access
INP: Region Selective Access New Line Items to Add Line Item Format Formula –COPY FROM/TO– No Data Load Copy To?
Boolean
‘INP: Copy From/To’.Copy User Access AND (Write[LOOKUP: Copy From] OR Read[LOOKUP: Copy From]) Copy From List: Fake Users ‘INP: Copy From/To’.Copy From Copy To List: Fake Users
IF Load Copy To? THEN ‘INP: Copy From/To’.Copy To ELSE BLANK
Copy From Write User Text IF ISBLANK(Copy To) THEN BLANK ELSE Region Write[LOOKUP: Copy From]
Copy From Read User Text IF ISBLANK(Copy To) THEN BLANK ELSE Region Read[LOOKUP: Copy From]
Copy From Write Boolean Boolean ISNOTBLANK(Copy From Write User) Copy From Read Boolean Boolean ISNOTBLANK(Copy From Read User) –CLEAR PREVIOUS ACCESS– No Data Clear Write No Data Clear Read No Data Clear Previous Write No Data Clear Previous Read No Data Clear Previous? Boolean ‘INP: Copy From/To’.Copy To = User AND ISNOTBLANK(Clear Previous Access) Clear Previous Access Text IF Write OR Read THEN ‘SYS: Region Flat (L1) Properties’.Code ELSE BLANK
INP: Cost Center Selective Access New Line Items to Add Line Item Format Formula –COPY FROM/TO– No Data Load Copy To?
Boolean
‘INP: Copy From/To’.Copy User Access AND (Write[LOOKUP: Copy From] OR Read[LOOKUP: Copy From]) Copy From List: Fake Users ‘INP: Copy From/To’.Copy From Copy To List: Fake Users IF Load Copy To? THEN ‘INP: Copy From/To’.Copy To ELSE BLANK Copy From Write User Text IF ISBLANK(Copy To) THEN BLANK ELSE Cost Center Write[LOOKUP: Copy From]
Copy From Read User Text IF ISBLANK(Copy To) THEN BLANK ELSE Cost Center Read[LOOKUP: Copy From] Copy From Write Boolean Boolean ISNOTBLANK(Copy From Write User) Copy From Read Boolean Boolean ISNOTBLANK(Copy From Read User) –CLEAR PREVIOUS ACCESS– No Data Clear Write No Data Clear Read No Data Clear Previous Write No Data Clear Previous Read No Data Clear Previous? Boolean ‘INP: Copy From/To’.Copy To = User AND ISNOTBLANK(Clear Previous Access) Clear Previous Access Text IF Write OR Read THEN ‘SYS: Cost Center Flat Properties’.Code ELSE BLANK
- Create the following saved views:
- INP: Cost Center Selective Access – Copy To: Clear Previous
- Line items as the columns; Cost Center Flat and Fake Users lists as the rows
- Show: Write, Read, Prior Write, Prior Read, Clear Write, Clear Read, Clear Prior Write, Clear Prior Read, Clear Previous?
- Enable Filter: Clear Previous?= TRUE (checked)
- INP: Cost Center Selective Access – Copy To: Module Settings
- Line items as the columns; Cost Center Flat and Fake Users lists as the rows
- Show: Write, Read, Copy From Write, Copy From Read, Load Copy To?
- Enable Filter: Load Copy To? = TRUE (checked)
- INP: Region Selective Access – Copy To: Clear Previous
- Line items as the columns; Region Flat (L1) and Fake Users lists as the rows
- Show: Write, Read, Prior Write, Prior Read, Clear Write, Clear Read, Clear Prior Write, Clear Prior Read, Clear Previous?
- Enable Filter: Clear Previous?= TRUE (checked)
- INP: Region Selective Access – Copy To: Module Settings
- Line items as the columns; Region Flat (L1) and Fake Users lists as the rows
- Show: Write, Read, Copy From Write, Copy From Read, Load Copy To?
- Enable Filter: Load Copy To? = TRUE (checked)
- INP: Cost Center Selective Access – Copy To: Clear Previous
- Create the following imports:
- 3.1 Copy To: Clear Current Module Settings (Region)
§ Import into INP: Region Selective Access from INP: Region Selective Access – Copy To: Clear Previous saved view
§ Import 4 fields:
• Clear Read à Read
• Clear Write à Write
• Clear Previous Read à Prior Read
• Clear Previous Write à Prior Write - 3.2 Copy To: Copy From to Current (Region)
- Import into INP: Region Selective Access from INP: Region Selective Access – Copy To: Module Settings saved view
- Import 2 fields:
- Copy From Write Boolean à Write
- Copy From Read Boolean à Read
- 3.3 Copy To: Clear Current Module Settings (Cost Center)
- Import into INP: Cost Center Selective Access from INP: Cost Center Selective Access – Copy To: Clear Previous saved view
- Import 4 fields:
- Clear Read à Read
- Clear Write à Write
- Clear Previous Read à Prior Read
- Clear Previous Write à Prior Write
- 3.4 Copy To: Copy From to Current (Cost Center)
- Import into INP: Cost Center Selective Access from INP: Cost Center Selective Access – Copy To: Module Settings saved view
- Import 2 fields:
- Copy From Write Boolean à Write
Copy From Read Boolean à Read
- Copy From Write Boolean à Write
- 3.1 Copy To: Clear Current Module Settings (Region)
- Prepare the Page:
- Publish INP: Copy From/To – DB View saved view
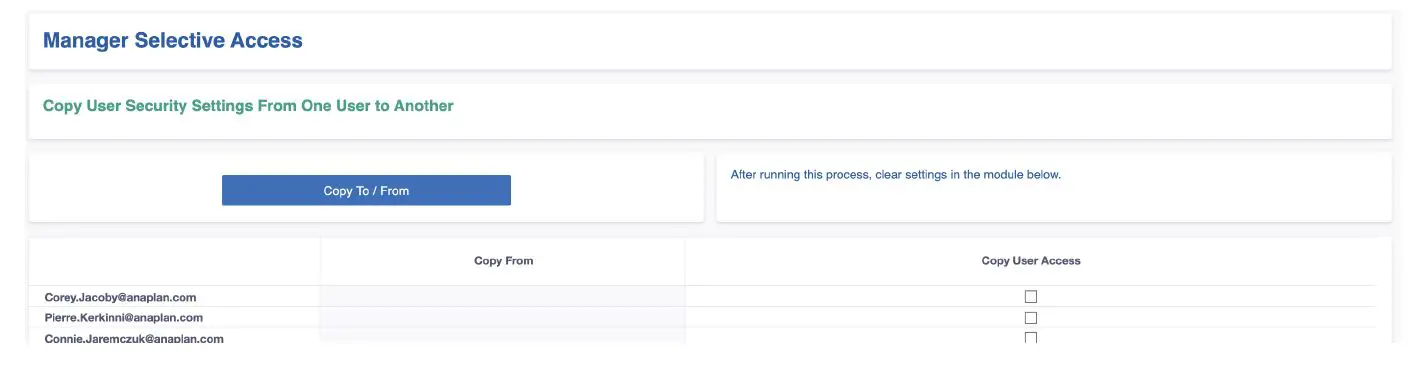
- Publish INP: Copy From/To – DB View saved view


