LEIVI B0B1G5YZBS B01 Series Smart Toilet Seat
Safety precautions
To prevent damage to the unit and possible injury to users, please follow the safety warnings. Please be sure to carefully read through the user’s manual before installation. Keep the user’s manual after installation to refer to for troubleshooting advice.
Symbols and meanings
WARNING: Could result in serious injury or death.
The following symbols are used to indicate important safety precautions when using the product
| Prohibited. | |
| Pay close attention; caution. |
| WARNING | |
| Prohibited | Stop using the product immediately if you observe: Smoke Continued use under these conditions could cause electrical shock, injury, or water leakage. |
| Do not clean the smart bidet with heavy chemical cleaning agents such as paint thinner, gasoline, putty powder, nylon brush, etc. Otherwise, it could trigger a chemical reaction, cause leakage, damage to the product or personal injury. | |
| A loose electrical connection could cause electric shock or a fire. | |
| Do not operate the product or handle the plug with wet hands. This may result in electrical shock or a fire. | |
| Handling the plug during thunderstorms and lightning may cause electrical shock. | |
| Make certain to use the proper voltage. Overloading circuits could overheat and cause a fire. | |
| Do not pour liquids onto the electrical components while it is plugged in as this could result in electrical shock or a fire. | |
| Do not stand or place heavy objects on the product, as it can cause damage. | |
| Do not attempt to disassemble or repair this product yourself. It needs to be taken for professional repair. Otherwise, it may result in damage to the product. | |
| If the electrical plug or line is damaged, unplug the product. Do not attempt to fix the outlet and consult a professional. | |
| Do not block the air openings of the product. Keep the air openings free of lint, hair, and the like. | |
| Do not use while bathing. | |
| WARNING | |
| Caution | Make sure the product is installed in a well-ventilated area. Excess humidity and moisture could cause electrical shock or fire. |
| Disconnect the power supply before removing this product from the toilet to prevent electrical shock or fire. | |
| To prevent electrical shock or fire, disconnect the power supply before cleaning the product and do not apply water directly to it. | |
| Do no expose the product to direct sunlight. | |
| Persons with special health conditions should only use this product with the permission of their doctor. In some instances, supervision or assistance may be necessary when using the product. | |
| Do not use industrial water, wastewater, seawater, reclaimed water and other sewage water. This could cause skin inflammation or other conditions. | |
| Persons (including children) with physical, perceptual, intellectual disabilities or other conditions, need to use the product under the guidance or supervision of someone else, or they may experience electric shock, injury or fire. | |
| All electrical cords and plugs must be waterproof. The electrical plug must be located more than 0.5m above the floor and away from the bathtub and shower. Otherwise, it could cause electrical shock or a fire. | |
| When replacing an existing bidet toilet seat, remove the old hose assemblies and replace them with the included hose assemblies. Do not reuse the old hose assemblies to avoid safety related problems. | |
| Do not allow children to play with this product. Children must have adult supervision when using the product. | |
| The grounding wire must conform to local codes and must use a three-pronged grounding plug for use. | |
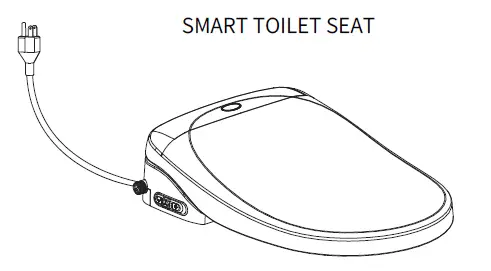
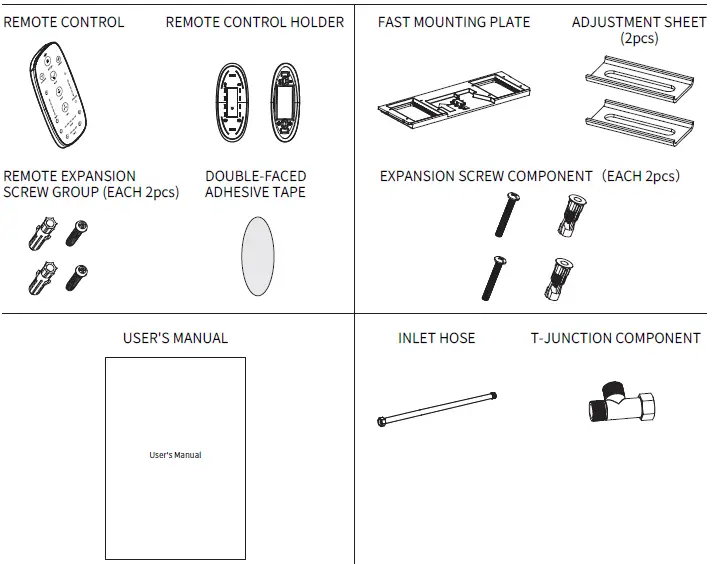
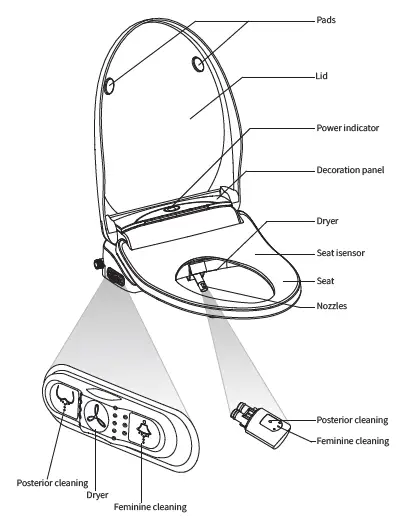
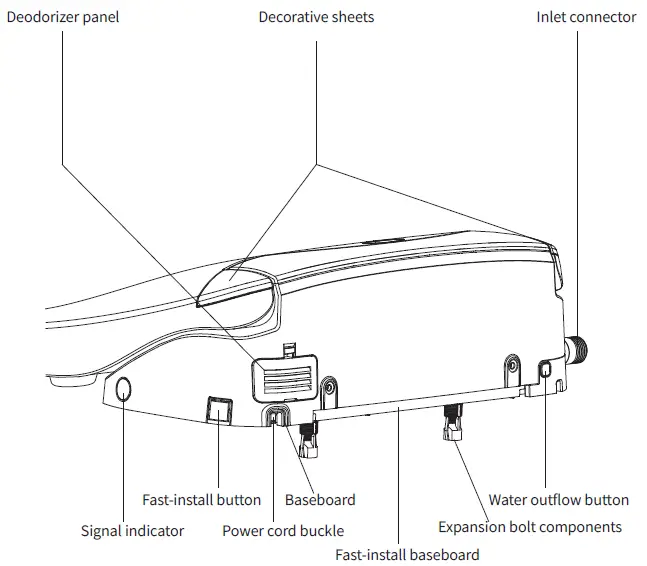
Components
SMART TOILET SEAT
Specifications
| Rated voltage and rated frequency | 110V~ 60Hz | |||||
| Length of wire | About 1.5m | |||||
| Washing equipment | Water yield | Posterior cleaning | About 0.4 – 0.7L/min(hydraulic pressure of 0.2Mpa) | |||
| Feminine cleaning | ||||||
| Swing cleaning | Swing cleaning back and forth | |||||
| Massage cleaning | Interval cleaning. Powerful cleaning | |||||
| The adjustment of the water gear and nozzle place | 5 settings | |||||
| Effluent-water temperature range | About 35°C – 42°C / 95°F – 107.6°F(Top Gear) | |||||
| Safety device | Prevents the circuit from overheating Temperature control switch & Temperature fuse | |||||
| Drying device | Drying temperature control | About 32°C – 57°CF / 89.6°F – 134.6°F(Top Gear) | ||||
| Safety device | Temperature control switch & Temperature fuse | |||||
| Seat cover | Temperature range | About 30°C – 42°C / 86°F – 107.6°F(3 settings) | ||||
| Soft-close control for seat cover | Damper device | |||||
| Safety device | Temperature sensor & Temperature control switch & Temperature fuse | |||||
| Self-cleaning | Antibacterial seat cover/ nozzle | Made from anti-bacteria plastic | ||||
| Self-cleaning nozzle | Self-cleaning | |||||
| Deodorzation | Odor control | Activated carbon deodorant | ||||
| Rated power | 980W | Maximum power | 1600W | Waterproofing grade | IPX4 | |
| Temperature of water supply | 4°C – 35°C / 39.2°F – 95°F | Ambient temperature | 3°C – 40°C / 37.4°F – 104°F | |||
| Water pressure | 0.07MPa(Dynamic)~0.75MPa(Static) | |||||
- Rated power: Water pressure is 0.18MPa + 0.02MPa under an ambient temperature of 23°C±2°C (73.4°F±35.6°F), and the condition of 15℃±0.5℃ (59°F±32.9°F) water-inflow temperature. Increase the water quantity, the seat temperature and the water temperature, to start the posterior cleaning on the average setting
- Maximum power: Water pressure is 0.18MPa+0.02MPa under an ambient temperature of 23°C±2°C (73.4°F±35.6°F), and the condition of 5°C±1°C (41°F±33.8°F) water-inflow temperature. Increase the water quantity, the seat temperature and the water temperature in turn, to start the feminine cleaning on the average setting.
Product diagram
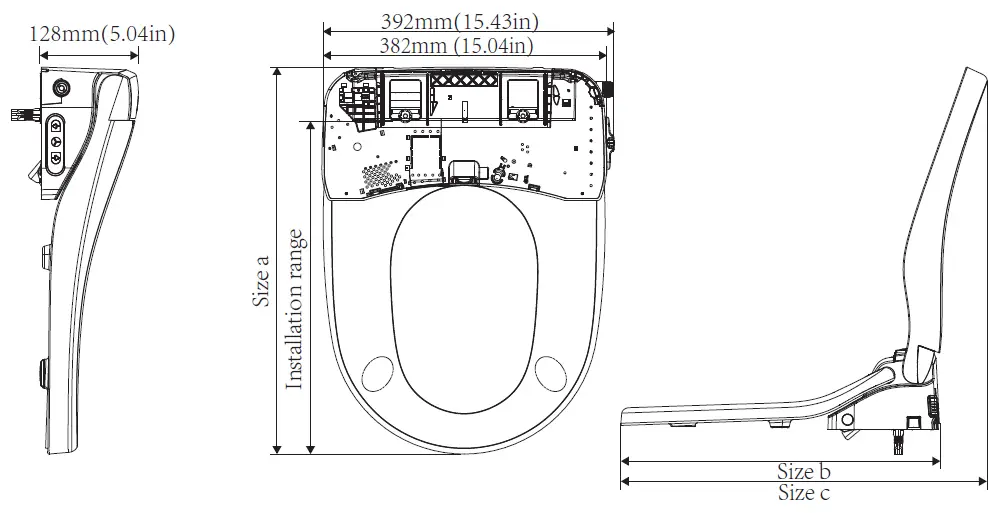
| Model | Size a | Installation range | Size b | Size c |
| ① | 518mm(20.39in) | 452-496mm(17.79-19.53in) | 510mm(20.08in) | 563mm(22.16in) |
| ② | 490mm(19.29in) | 424-468mm(16.69-18.42in) | 482mm(18.97in) | 513mm(20.19in) |
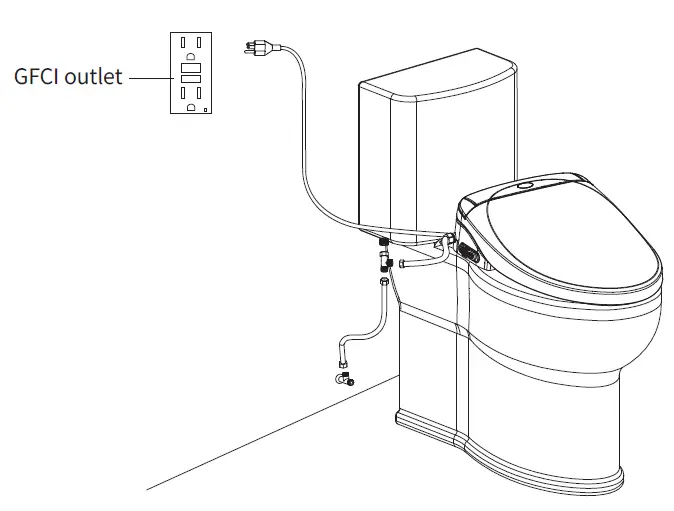
The power outlet and the water inflow connection (Caution)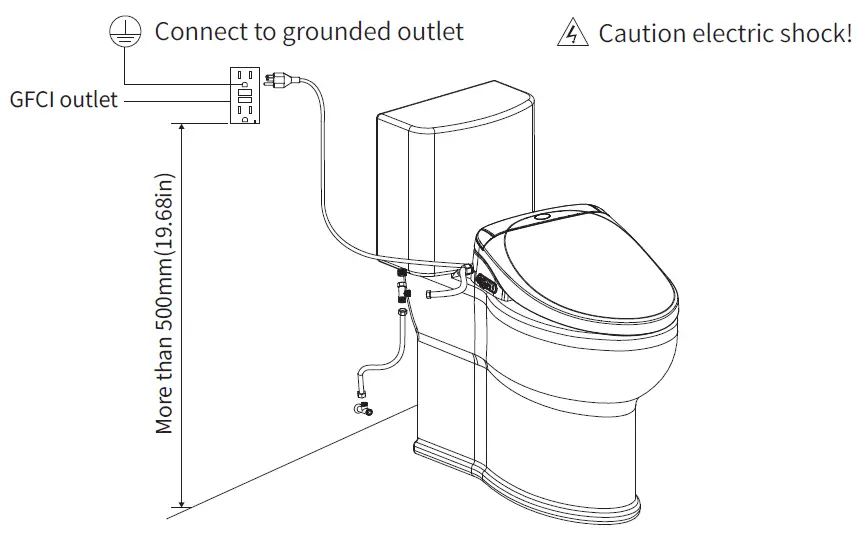
- If the power cord is not long enough, please do not use a extension cord.
- Only for reference. Bathroom sizes and configurations may vary.
Product Functions
Cleansing functions
| Posterior cleaning | Rear cleaning |
| Feminine cleaning | Front cleaning |
| Spray position adjusting | Adjust the nozzle position to expand the areas being cleaned |
| Water flow adjusting | Adjusts water flow |
| Massage cleaning | Variable intensity of the water spray for massaging action |
| Swing cleaning | Swings back and forth to cleanse most area |
Comfort functions
| Seat heated | Heats seat and maintains temperature |
| Dry | Dries cleaned areas with warm air |
| Temperature adjusting | Adjusts temperature of water, seat and warm air for drying |
| Deodorization | Auto-deodorizes after user is seated |
| Seat sensor | Enables cleaning functions after user is seated |
| Soft close function | Soft-close toilet seat and lid |
| LED night light | On-and-off sensor adjusts brightness |
| Prevent low temperature scald | The seat temperature will automatically decrease after the user is seated for 15 min. |
Cleaning functions
| Antibacterial | The cover and seats are antibacterial |
| Nozzle cleaning | Nozzle will be cleaned when it is pulled out or retracted |
| Water emission | Drain the remaining water in the toilet to make the water cleaner |
Functions may not be the same for all models.
Installation
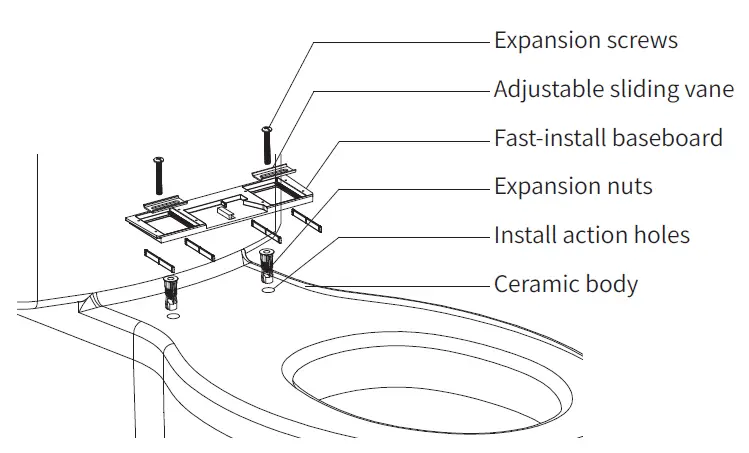
Tips
- Put expansion nuts into installation holes
- Put fast-install baseboard on installation holes
- Put adjustable sliding vane on fast-install baseboard
- Fix adjustable sliding vane and baseboard to ceramic body through expansion screws

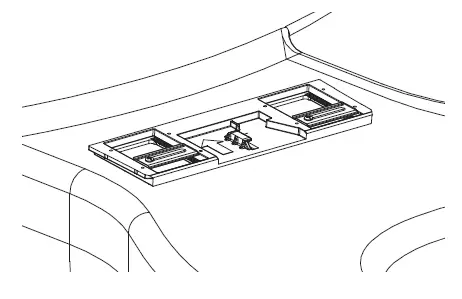
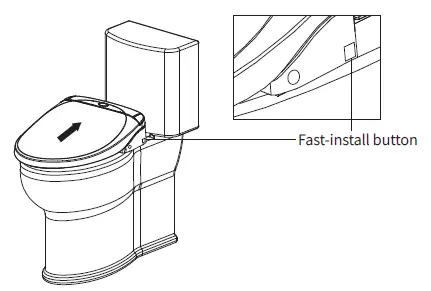
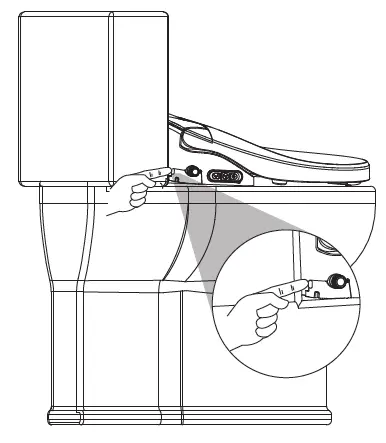
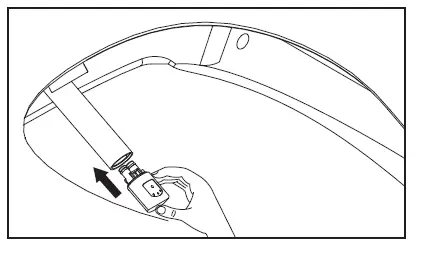
Put the cover seat in the direction of the fast-install baseboard, and push the cover seat as the arrow shown.
The seat is properly installed after a “click” sound. Press the arrow to indicate the fixed power line
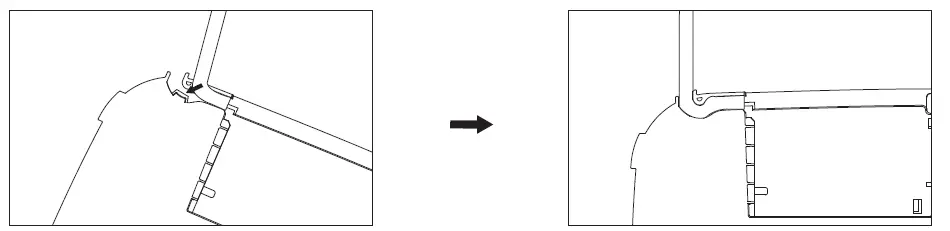
Tips for installation of fast baseboard
- Install the baseboard and cover seat slightly loosened so as to adjust the position.
- Take out the cover seat after pressing the button again.
- Fix the baseboard, then install the cover seat
 Press the arrow to indicate the fixed power line
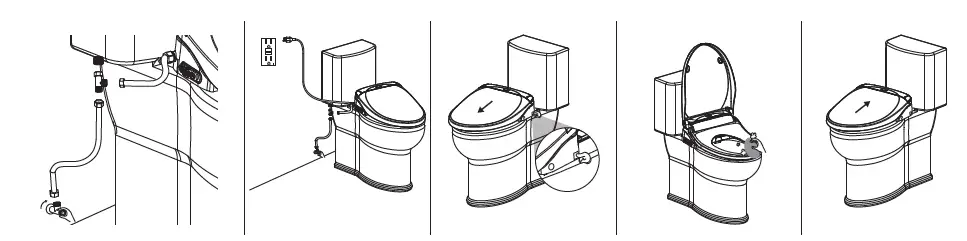
Water supply connection instructions
Note: Turn off shutoff valve and drain the water tank before removing valves to prevent water spillage.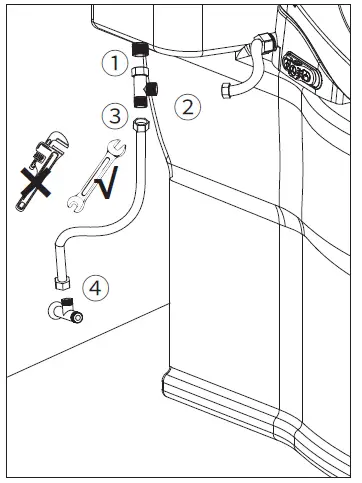
- Connect the T-connector to the toilet inlet valve.
- Connect the included braided hose to the product.
- Connect the original hose to the T-connector.
- Connect the original hose to the inlet valve
WARM PROMPT
This product has been tested with water. It is normal if a small amount of water drips out of the product when it is removed from the packaging.
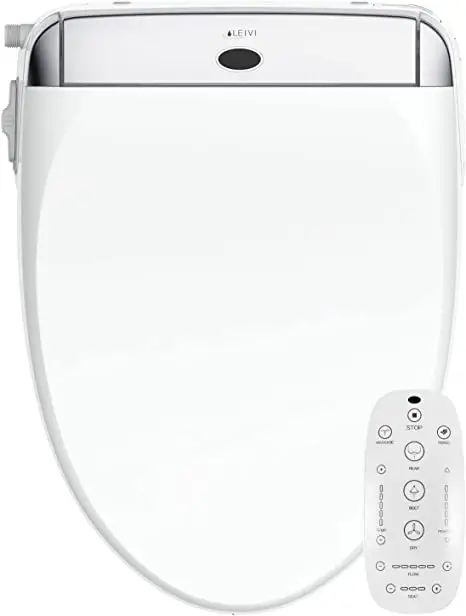
Components
Remote control functions
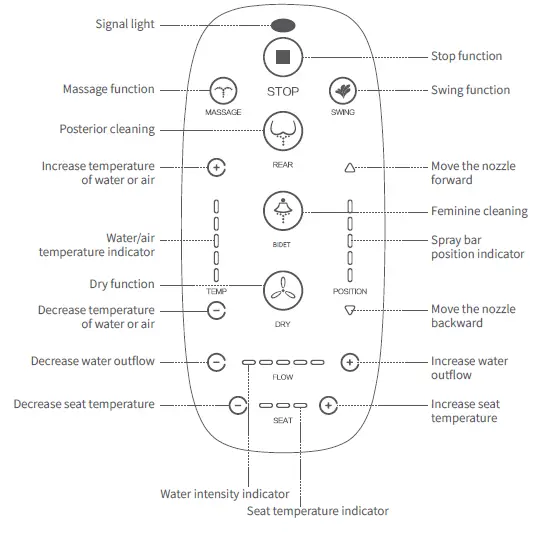
Stop
- Press the button; turns all functions off.
- Atmosphere light will be turned off or on by holding the “stop” button more than 2 sec. (Some models do not have this function).
Posterior cleaning
- Press the button; posterior cleaning function will start after a beep. The function turns off after 2 min. or by pressing the stop button.
- Function will stop if user leaves.
Feminine cleaning
- Press the button; bidet function will start after a beep. The function turns off after 2 min. or by pressing the stop button.
- Function will stop if user leaves.
Drying
- Press the button; drying function will start after a beep. The function automatically turns off after 2 min. or by pressing the stop button.
- Function will stop if user leaves.
Massage
- During Posterior/Feminine Cleaning Mode, press the “Massage” button. Function will start after a beep.
- Interval massage mode: The nozzle sprays with varying pressure.
- Powerful massage mode: The nozzle sprays pressurized water.
Remark: The massage cycle order is interval massage > powerful massage > regular cleaning.
Swing
- During Posterior/Feminine Cleaning Mode, press the “Swing” button. Function will start after a beep. During swing function, the nozzle will oscillate back and forth. Press the “swing” button again to stop swing function. Pressing the “stop” button will stop all cleaning functions.
Water temperature setting
There are 5 settings. When the rear mode or bidet mode is turned on, the starting position is the third setting. Press the button to increase water temperature. Press the button to decease water temperature. The indicator light corresponds to the setting.
Dryer temperature setting
There are 5 settings. When the rear mode or bidet mode is turned on, the starting position is the third setting. Press the button to increase dryer temperature. Press the button to decease dryer temperature. The indicator light corresponds to the setting.
Spray position setting
There are 5 settings. When the rear mode or bidet mode is turned on, the starting position is the third setting. Press the “+” button to move the nozzle forward. Press the button to move the nozzle backwards. The indicator light corresponds to the setting.
Adjust water flow
- There are 5 settings. When the rear mode or bidet mode is turned on, the starting position is the third setting. Press the “+” button to increase water intensity. Press the button to decease water intensity. The indicator light corresponds to the setting.
Adjust seat temperature
- There are 3 settings. When the rear mode or bidet mode is turned on, the starting position is the second setting. Press the “+” button to increase seat temperature. Press the button to decease seat temperature. The indicator light corresponds to the setting.
Note
Adjust the seat temperature to room temperature or low temperature.
To prevent scalding, the seat temperature will automatically decrease after 15 min. of use.
 If the beep sounds twice, it means that the cycle is complete.
Posterior & Feminine cleaning function instructions:
- Function 1:Press Posterior/Feminine cleaning button to start the rear and front cleaning.
- Function 2:When the posterior cleaning or feminine cleaning function is on, press the button again to stop cleaning.
- Function 3: Hold the Posterior/Feminine cleaning button for approximately 2 seconds to start function. The cycle will consist: swing Posterior/Feminine cleaning for 30 sec.; massage function for 60 sec.; drying for 2 min.
Note: For faster access to swing or massage mode, the remote control can be used.
Press the posterior cleaning button more than 5 sec. to turn off/on LED.
Dry function instructions:
- Function 1:Press the Dry button to start the drying function.
- Function 2:Press the button again to stop drying function.
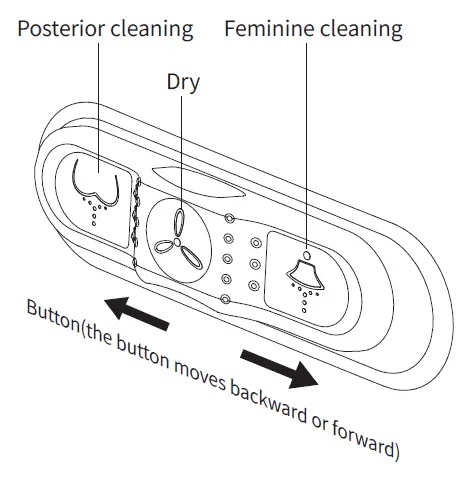
Push button function instruction:
- Function 1:Under posterior/feminine cleaning mode, slide the side button to adjust the position of the nozzle.
(Total of 5 settings. Default is the third gear.) - Function 2:Under posterior/feminine cleaning mode, slide the side button to adjust volume of water.
(Total of 5 settings. Default is the third gear.)
Remark: To switch between the above two functions, hold the dry button for approximately 2 seconds. The switch is complete after a beep. - Function 3:Under the dry mode, slide the side button to adjust the temperature (Total of 5 settings. Default is the third setting)
Method 1
- Install the remote control fixing panel with a magnet on the remote control fixed seat and lock tightly.
Note: Pay attention to the polarity when installing the magnet. Place the larger side of the magnet hole outside the fixed panel, and enclose the small hole surface inside the fixed panel, as shown in FIGURE 1 below. - Put the double sided-tape on the remote control fixed seat.
- Clean dust, grease, water droplets on the walls and wipe them clean.
- Press the remote control fixed seat with double-sided tape on it. Press it evenly for 3 to 5 min. Attach the remote control fixed seat to the wall.
Note: The method is applicable to glazed tiles, glass and smooth walls.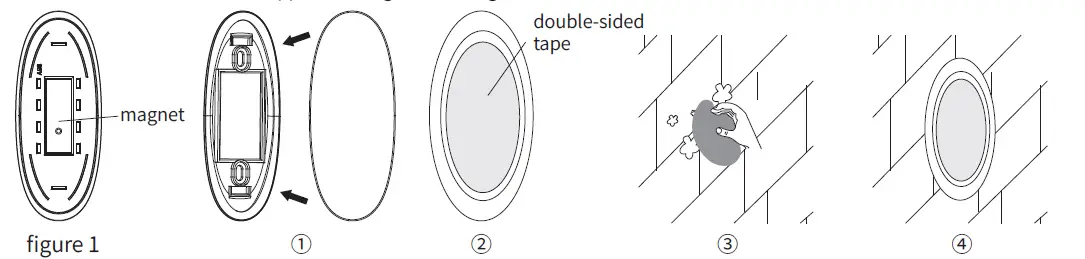
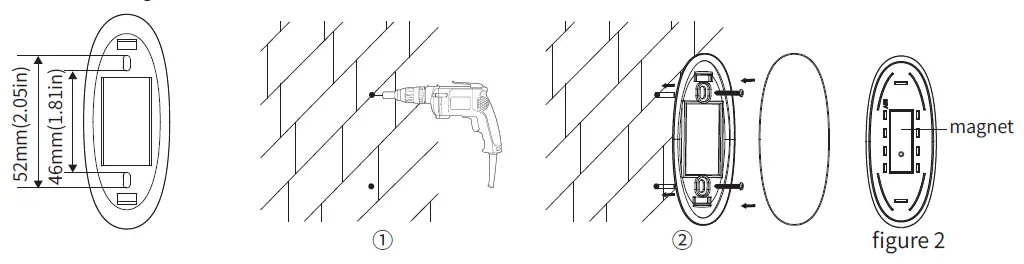
Method 2
- Drill a hole of 46mm~52mm(1.81in~2.05in) length and 22mm(0.86in) depth on the wall with a 6mm(0.24in) diameter drill. Have a user sit on the seat to check the position of the hole in the wall. The user should be able to access the remote control while seated.
- After installing the expansion plug in the wall, align the fixing hole of the remote control at the expansion plug and then lock the bolt. Install the remote control fixing panel with a magnet on the remote control fixed seat and lock tightly.
Note: Pay attention to the polarity when installing the magnet. Place the larger side of the magnet hole outside the fixed panel, and enclose the small hole surface inside the fixed panel, as shown in the below figure 2.
Put the remote control on the fixed base after installing the battery, and the remote control will affix to the base automatically.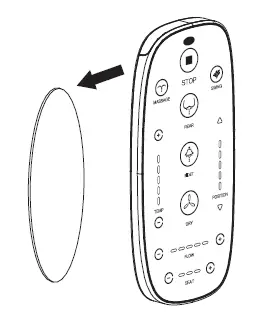
Note:
- Place the remote control on its base when not in use.
- The remote control falling can damage it.
- Do not spill water on the remote control or drop it in water.
Removal & Maintenance
- Unplug the product and turn off the shutoff valve. Remove the braided hose and drain excess water.

- Press the water outflow button to drain water out of toilet.

- Press fast-install button. Remove the cover seat from toilet.


WARM PROMPT
Please check and test before using the product again.
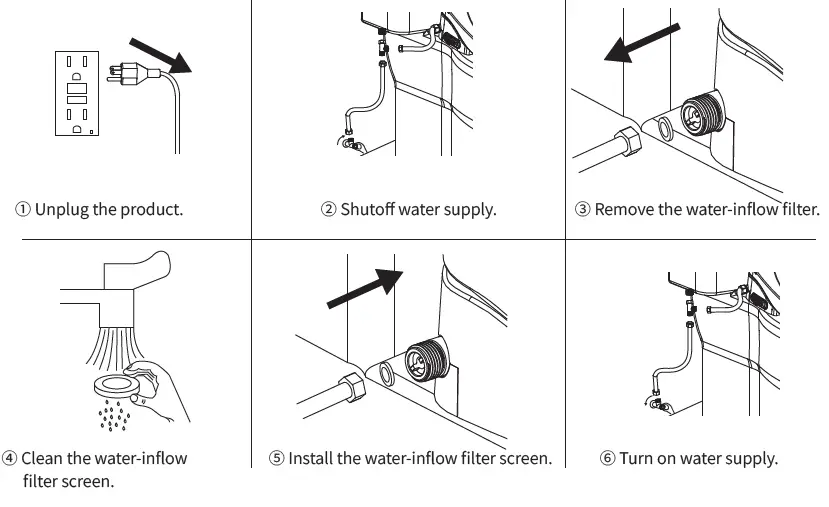
Cleaning
- Close the water shutoff valve.
- Unplug the product and unscrew the braided hose.
- Press the quick installation button and take off the seat cover.
- Wipe the seat cover with a sponge or a smooth cloth. Only use natural cleaning substances.
- Install the seat cover.
Cleaning the water filter
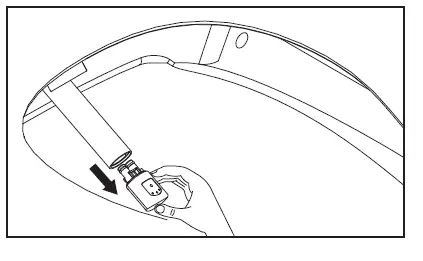
Nozzle cleaning
- Press the Posterior and Bidet Button simultaneously for approximately 2 seconds for the nozzle to extend out. Remove the nozzle.

- Scrub the nozzle and spray rod with a toothbrush, sponge, or smooth cloth with soap or mild detergent.

- After reattaching the nozzle, press the Stop, Posterior, or Bidet Button for approximately 2 seconds. The nozzle will automatically retract into the product.

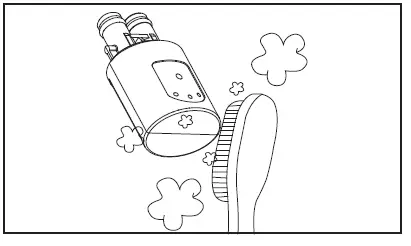
WARM PROMPT
Do not use hydrogen chloride cleaning agents, diluent, pesticides and other non-organic detergents to clean the product and do not use sandpaper or rough cloth to scrub it.
Common troubleshooting
| Phenomenon | Reasons | Measures |
| The product doesn’t work | Check to see if the power supply is plugged in or the leakage protector is disconnected | Switch the power supply on |
| No response when pressing the posterior, bidet, or drying button | No water outflow from nozzle or the water yield is very small | Please press the stop button and wait for the water supply |
| Please open the water-inflow valve if it is closed | ||
| Please clean or replace the filter (optional feature) device if it is blocked | ||
| The seating sensor does not recognize that someone is on the product | Please sit in a manner that covers the sensor | |
| The cleaning stops suddenly | After a mode is selected, the product goes through its selected mode for 2 min. before automatically stopping. | This is correct operation. To continue cleaning, select a new mode |
| The nozzle stops suddenly | If the user moves too fast or leaves the seat, the seat sensor cannot detect the motion. | Ensure that the seat sensor is covered and continue |
| Low water pressure when posterior cleaning or feminine cleaning | Filter (optional feature) may be blocked | Clean the filter screen or replace the filter |
| The water-inflow hose may be leaking | Check the hose and tighten it | |
| Deodorizer does not activate | The seating sensor does not recognize that someone is on the product | Please sit in a manner that covers the sensor |
| Activated carbon filter(optional feature) block or spacer may be blocked | Remove the deodorizing window to clean or replace the carbon filter | |
| Deodorant function continues to work after user leaves | The deodorant function will be continue to work for 20 sec. in order to remove the residual odor after the user leaves | This is correct operation |
| The toilet seat can’t be heated | The seating sensor does not recognize that someone is on the product | Please sit in a manner that covers the sensor |
| The seat temperature is set lower than desired | Adjust the seat temperature with the remote control | |
| Cold water of posterior cleaning and feminine cleaning | The water temperature is set lower than desired | Adjust the water temperature with the remote control |
| The drying temperature is not high enough | The dryer temperature is set lower than desired | Adjust the drying temperature with remote control |
Troubleshooting and alarm maintenance
| Problem | Possible causes | Actions |
| If the power light flashes 1 time as it lights for 2 sec. | The inlet water temperature sensor is faulty or there is a broken circuit. | You should cut off the power supply immediately and stop using the product then contact the local dealer or call service hotline. |
| If the power light flashes 2 times as it lights for 2 sec. | The outlet water temperature sensor is faulty or there is a broken circuit. | |
| If the power light flashes 3 times as it lights for 2 sec. | The drying fan temperature sensor is faulty or there is a broken circuit. | |
| If the power light flashes 4 times as it lights for 2 sec. | The seat temperature sensor is faulty or there is a broken circuit. | |
| If the power light flashes 7 times as it lights for 2 sec. | The dryer fan may be faulty. | |
| When the product is in use, the leakage protection switch on the power supply trips from time to time | Leakage beyond a normal range has been detected. |
WARM PROMPT
Please read the above troubleshooting and follow the instructions.
Maintenance Service Sheet
| Product | Product code | |||
| The selling store | Purchase date | |||
| Province City | Dealer ( signature ): | |||
| Maintenance content | ||||
Free maintain regulation:
| ||||
| Executive standard: CONFORMS TO UL STD. 1431 ASME A112.4.2-2021 Warranty period: within two years from the purchase date | ||||
- Due to the constant improvement about our products, we will keep the final interpretation of products change.
- If the products you bought exist differences from the instruction, please in kind prevail.
NOTE: This equipment has been tested and found to comply with the limits for a Class B digital device, pursuant to Part 15 of the FCC Rules. These limits are designed to provide reasonable protection against harmful interference in a residential installation. This equipment generates uses and can radiate radio frequency energy and, if not installed and used in accordance with the instructions, may cause harmful interference to radio communications.
However, there is no guarantee that interference will not occur in a particular installation. If this equipment does cause harmful interference to radio or television reception, which can be determined by turning the equipment off and on, the user is encouraged to try to correct the interference by one or more of the following measures:
- Reorient or relocate the receiving antenna.
- Increase the separation between the equipment and receiver.
- Connect the equipment into an outlet on a circuit different from that to which the receiver is connected.
- Consult the dealer or an experienced radio/TV technician for help.
KELISS TRADING CO., LTD
ADD:RM4, 16/F, HO KING COMM CTR, 2-16 FAYUEN ST, MONGKOK KOWLOON, HONG KONG


