![]()
Action 2
User Manual
v1.0
![]() Searching for Keywords
Searching for Keywords
Search for keywords such as “battery” and “install” to find a topic. If you are using Adobe Acrobat Reader to read this document, press Ctrl+F on Windows or Command+F on Mac to begin a search.![]() Navigating to a Topic
Navigating to a Topic
View a complete list of topics in the table of contents. Click on a topic to navigate to that section.![]() Printing this Document
Printing this Document
This document supports high-resolution printing.
Using this Manual
Legend![]() Important
Important![]() Hints and Tips
Hints and Tips
Read Before First Use
Read the following documents before using DJI Action™ 2:
- User Manual
- Safety Guidelines
- Quick Start Guide
It is recommended to watch all tutorial videos on the official DJI website (www.dji.com/action-2) or in the DJI Mimo app and read the safety guidelines before using them for the first time. Make sure to review the quick start guide before using it for the first time and refer to this user manual for more information.
Downloading the DJI Mimo App
Scan the QR code or search for “DJI Mimo” on the App Store.

![]() The iOS version of DJI Mimo is compatible with iOS v12.0 and later. The Android version of DJI Mimo is compatible with Android v8.0 and later.
The iOS version of DJI Mimo is compatible with iOS v12.0 and later. The Android version of DJI Mimo is compatible with Android v8.0 and later.
Watching the Tutorial Videos
Watch tutorial videos and other videos on the official DJI website (https://www.dji.com/action-2/video) or scan the QR code before using for the first time.

https://www.dji.com/action-2/video
Product Profile
Introduction
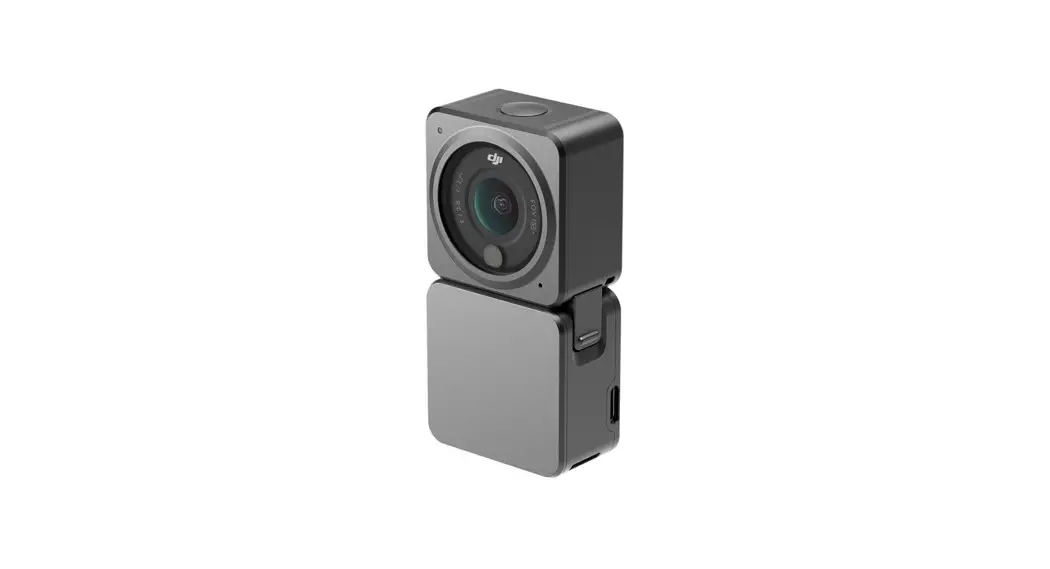
DJI Action 2 is capable of shooting sharp 12MP photos and capturing smooth video at up to 4K/120 fps. With an innovative magnetic design, you can quickly swap accessories such as the front touchscreen module that enables you to see the live view and operate the camera while taking selfies. Users can also record super smooth footage thanks to DJI’s latest EIS technology. HorizonSteady keeps footage level no matter the situation while RockSteady 2.0 ensures stabler footage than ever before.
Get the most out of DJI Action 2 by wirelessly connecting it to DJI Mimo using a mobile device and displaying high-quality video in real-time. The camera unit is also waterproof at depths of up to 10 m and can be connected to the waterproof case to reach as deep as 60 m.
Users can enjoy the full range of DJI Action 2 features with other accessories such as the front touchscreen module, power module, magnetic adapter mount, magnetic ball-joint adapter mount, magnetic clip, remote control extension rod, waterproof case, and macro lens.
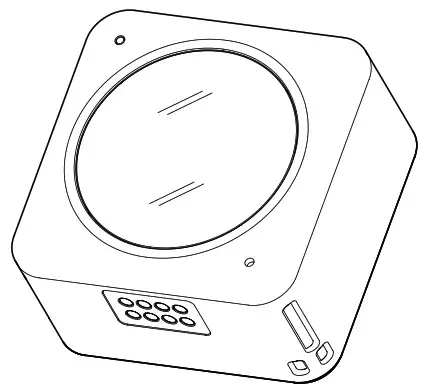
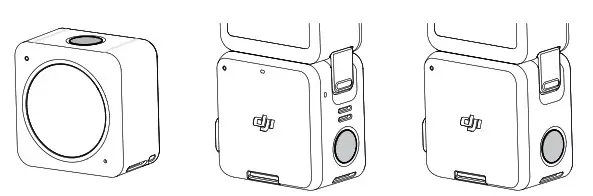
DJI Action 2 Camera Unit
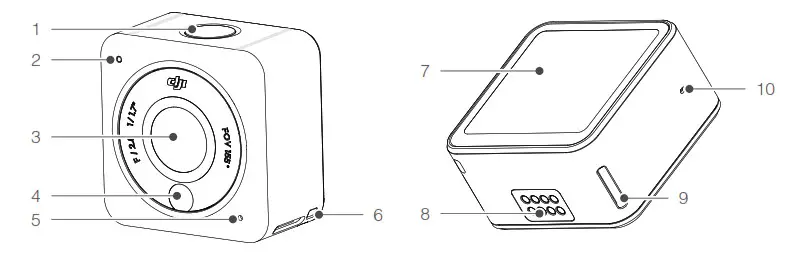
| 1. Power/Record Button 2. Status LED 3. Lens 4. Color Temperature Photo Sensor 5. Microphone | 6. Lanyard Hole 7. Touchscreen 8. Expansion Port 9. Lock Hole 10. Air Pressure Balance Hole |
Accessories
DJI Action 2 Front Touchscreen Module

| 1. Lock Clip 2. Microphone 3. Status LED 4. microSD Card Slot 5. Lock Hole | 6. Power/Record Button 7. Speaker 8. Expansion Port 9. Front Screen 10. USB-C Charging Port |
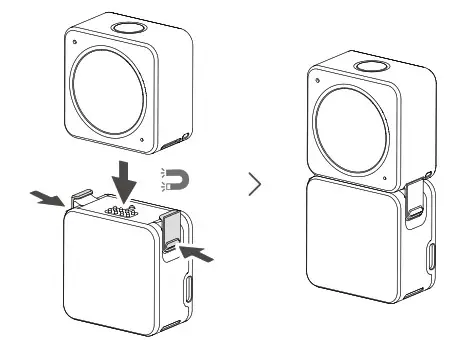
DJI Action 2 Power Module

| 1. Expansion Port 2. Status LED 3. microSD Card Slot 4. Power/Record Button | 5. Lock Hole 6. USB-C Charging Port 7. Lock Clip |
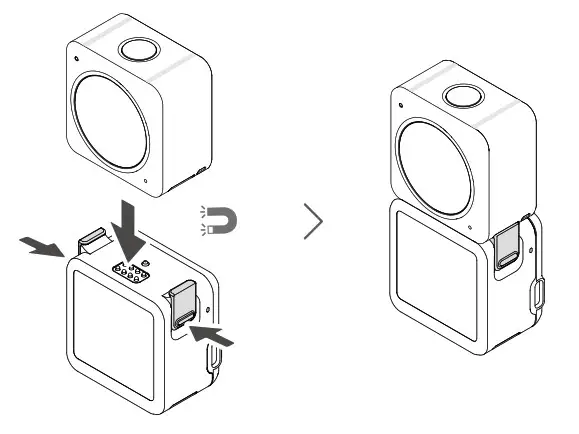
The DJI Action 2 Power Module can be magnetically attached to the camera unit to supply power and extend the operating time. Users can also insert a microSD card to increase the external storage of the camera. Make sure the expansion ports are properly aligned before attaching the magnetic lock clips to the magnetic lock holes on the camera unit and press both clips before removing.
DJI Action 2 Magnetic Lanyard
The magnetic lanyard can be used to carry the camera unit conveniently. The length can be adjusted and it is recommended to attach the camera unit so it hangs below the collarbone.
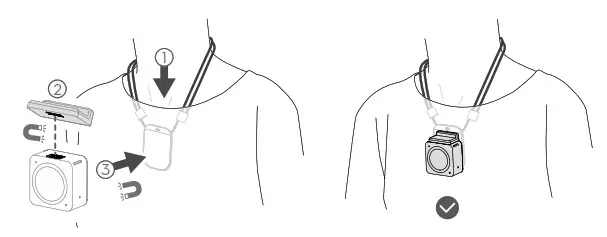

- DO NOT use when wearing thick clothes such as sweaters or jackets. Otherwise, the magnetic connection may be too weak and the camera unit will fall off.
- DO NOT use when performing strenuous exercises such as jumping and running.
- Make sure to keep the magnetic sheet of the magnetic lanyard inside the clothing. Otherwise, the magnetic connection may be too weak and the camera unit will fall off.
- Only attach the camera unit to the magnetic lanyard. DO NOT connect any other accessories.
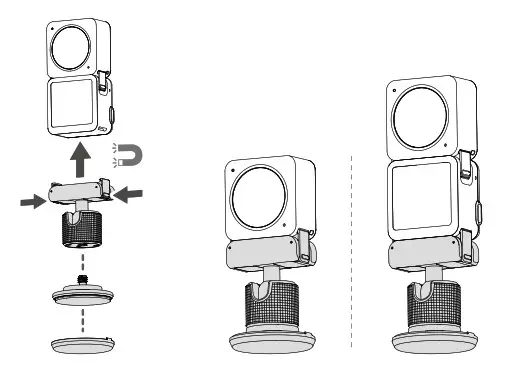
DJI Action 2 Magnetic Ball-Joint Adapter Mount
The DJI Action 2 Magnetic Ball-Joint Adapter Mount can be magnetically attached to the camera unit, the front touchscreen module, or the power module. Make sure the magnetic lock clips are properly attached to the magnetic lock holes on the camera unit or module on both sides and press both clips before removing them. Make sure to press the adhesive base for at least 10 seconds after attaching it to a surface. Otherwise, the adapter mount may not attach firmly. The adhesive base on the bottom of the adapter mount can be used repeatedly after washing and air drying.
![]()
- DO NOT attach the adhesive base to surfaces that are rough, powdered, peeling, covered in dust or sand, or have oil or water stains. Otherwise, the adapter mount may not be attached firmly.
- It is recommended to use the magnetic adapter with the OSMO Action Mounting Kit when recording during strenuous exercise.
DJI Action 2 Magnetic Adapter Mount
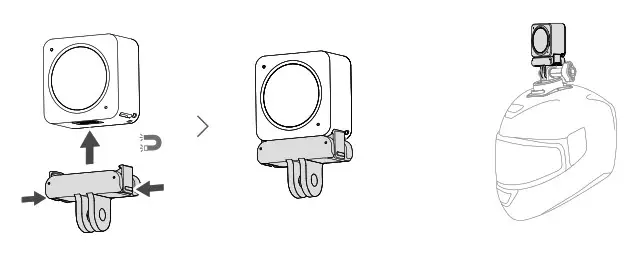
The magnetic adapter mount can be magnetically attached to the camera unit, the front touchscreen module, or the power module. Make sure the magnetic lock clips are properly attached to the magnetic lock holes on the camera unit or module on both sides and press both clips before removing them.
Warnings
- DJI Action 2 contains magnets. Keep the camera away from mag cards, IC cards, hard disks, RAM chips, implantable medical devices such as pacemakers, and other devices to avoid interference.
- The lens cap and expansion port may become hot during use. To avoid scalding, DO NOT touch.
- DO NOT attach the camera unit to the front touchscreen module when there is any dust or liquid on the expansion ports. Otherwise, the camera may corrode or short-circuit.
- The front touchscreen module and the power module are not waterproof. The waterproof case is required when using the front touchscreen module or the power module with the camera unit underwater.
- Charge DJI Action 2 when the battery level is low. Storing the DJI Action 2 for more than four months with a low battery will reduce the battery life. Charge or discharge the DJI Action 2 battery to 40-60% if it will not be used for 10 days or more.
- When attaching DJI Action 2 to the roof or window of a car, the DJI Action 2 may fall off if the car travels too fast, the surface is not clean, or there is bad weather such as high winds or a thunderstorm.
- For better audio quality, DO NOT block the microphone when recording video.
- Connect the camera unit to the front touchscreen module to enable audio during playback. DO NOT block the speaker. Otherwise, the audio performance may be affected.
Preparing
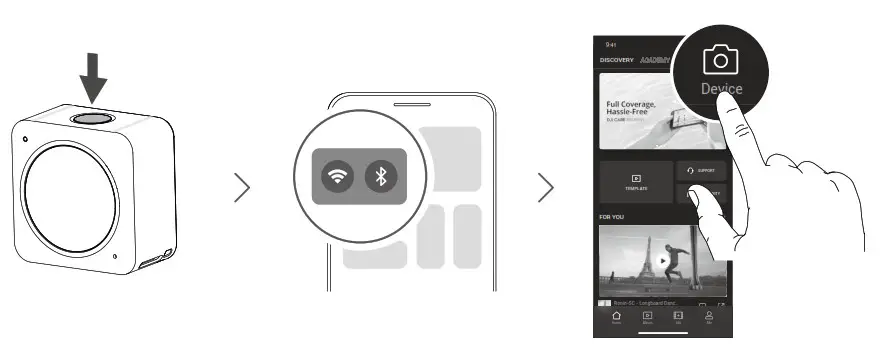
Activation
When using the camera unit, activation is required through DJI Mimo. Follow the steps below to activate.
- Press and hold the power/record button to power on.
- Enable Wi-Fi and Bluetooth on the mobile device.
- Launch DJI Mimo, tap
 , and follow the instructions to activate the camera unit.
Charging DJI Action 2
- Connect a USB adapter (not included) to the USB-C port using the power cable (included).
- The status LED on the front touchscreen module or the power module turns on during charging when powered off. The battery is fully charged when the status LED displays solid green for six seconds and turns off. It takes approximately 90 minutes to fully charge both the camera unit and the front touchscreen module or the power module when they are connected.*
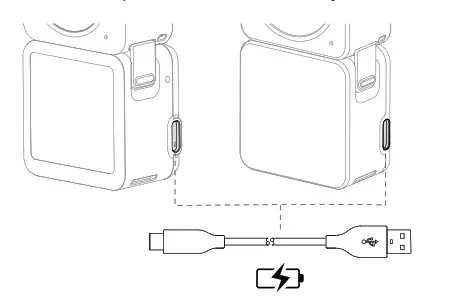
* Measured using a 5V/2A USB adapter in a laboratory environment. Use as a reference only.
- Charge DJI Action 2 when the battery level is low. Storing the DJI Action 2 for more than four months with a low battery will reduce the battery life.
- The camera unit will be charged first if the front touchscreen module or the power module is connected to the camera unit during charging.
Usage
Power/Record Button
- When powered off:
A. Press to power on.
B. Press and hold to quickly power on and begin shooting. The shooting mode will depend on the SnapShot* settings. - When powered on:
A. Press to take photos or to start or stop recording. In settings or playback, press to return to the camera view.
B. Press and hold to enter sleep mode and press again to exit sleep mode. The camera will automatically power off after 60 minutes in sleep mode. In QuickClip mode, press and hold to extend recording time while recording.
C. Press twice to switch shooting mode.
* Coming soon.
![]()
- If the camera unit is not working properly, press and hold the power/record button for 20 seconds to restart the camera unit.
- When the front touchscreen module is disconnected from the camera unit, the front touchscreen displays the battery level and connection tips when the power/record button is pressed.
- When the power module is disconnected from the camera unit, the status LED indicates the battery level when the power/record button is pressed.
- When the front touchscreen module or the power module is connected to the camera unit, the power/record button of the front touchscreen module or the power module functions the same as the button on the camera unit.
Touchscreen
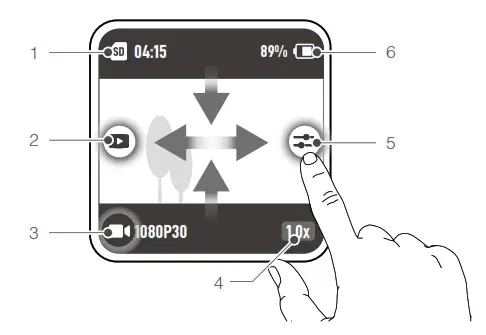
The touchscreen displays the live view after the camera is powered on as well as the shooting mode, battery level, and microSD card information.
![]()
- After connecting to the camera unit, the front touchscreen module displays and functions the same as the touchscreen on the camera unit.
Camera View
- Storage Capacity Information
 : displays either the remaining number of photos that can be taken or the duration of the video that can be recorded according to the current shooting mode. will be displayed if a microSD card is inserted.
 - Playback
 : tap or swipe to the right from the left edge of the screen to preview photos and videos as soon as they are captured.
 - Shooting Mode
 : displays the current shooting mode and parameters. Swipe up or tap to set the shooting mode and parameters.
 - Zoom
 : tap to set the zoom ratio. Zoom is unavailable in slow motion and timelapse.
 - Parameters
 : tap or swipe to the left from the right edge of the screen to adjust the image and audio parameters.
 - Battery Level
 : displays the current battery level of DJI Action 2. Tap the icon to view more detailed information about the battery level.
Swipe Down
Swipe down on the touchscreen to enter settings.
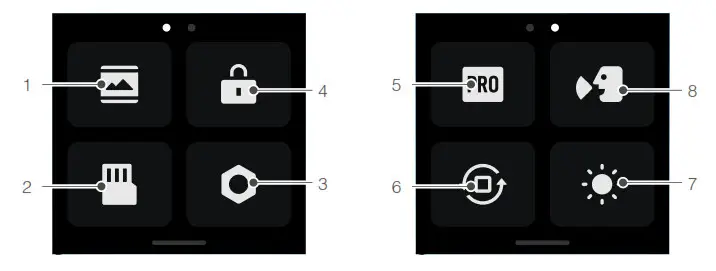
- Screen Settings
Tap the icon to switch between full-screen and letterbox display. - Storage
Tap to switch the storage media, format the microSD card, format the built-in storage, or export the photos and videos from the built-in storage to the microSD card*. - System Settings
Tap to enter system settings.
Voice Control: enable voice control to use the camera with voice commands. Simplified Chinese and English are supported. Voice commands include Start Recording, Stop Recording, Take Photo, and Shut Down.
Vibration Notification: tap to enable or disable. Vibration notification is enabled by default.
SnapShot: use SnapShot to quickly power on and begin shooting when the camera is powered off or in sleep mode. Supported shooting modes include Video, QuickClip, and Timelapse.
Wireless Connection: tap to check the camera name and password, set the Wi-Fi frequency, and reset connections.
Video Compression: tap to switch video encoding format between Compatibility and Efficiency mode. When Compatibility is selected, the video will be encoded in H.264 with higher compatibility. When Efficiency is selected, the video will be encoded in HEVC with a smaller file size. Only Efficiency videos are available in the following situations:
a. Video: 4K (4:3) and supported fps
b. Video: 4K (16:9) 120/100fps* or 1080p 240fps*
c. Slow-Mo: 4K 4x* or 1080p 8x*.
Sounds: tap to enable or disable sounds.
Grid: tap to enable or disable grid.
Anti-Flicker: tap to enable or disable anti-flickering. Anti-flickering detects flickering and times shooting so it will have less of an impact.
Auto-Stop Rec Temp: tap to set auto-stop recording temperature to standard or high. Standard is set by default. Auto-stop recording temperature can not be set to high due to local regulations and policies in some countries and regions.
Scrn Off When Locked: tap to enable so that the screen turns off when the screen is locked.
Scrn Off When Rec: tap to set the timer for when the screen will turn off after recording has started and there has been no operation.
* Coming soon.
Auto Power Off: tap to set the time that the camera will automatically power off.
LED: tap to enable or disable the LED of the camera unit and the front touchscreen module or the power module when connected.
Continue Last Livestream: tap to enable so the camera unit can continue from the last Livestream after Livestream has stopped.
Language: tap to set the language to English, Simplified Chinese, Traditional Chinese, Japanese, Korean, Thai, German, Spanish, French, Italian, Russian, Brazilian Portuguese, Turkish, Indonesian, or Polish.
Factory Reset: tap to reset default settings.
Device Info: tap to view name, serial number, firmware version, and quick start guide.
Compliance Info: tap to view compliance information. - Screen Lock
Tap to lock screen. Swipe up on the touchscreen to unlock the screen. - Pro Switch
Tap to switch to Pro mode and be able to adjust Format, Exposure, and WB settings. - Orientation Lock
Tap to switch between automatic orientation and locked orientation. - Brightness
Tap and slide to adjust the brightness. - Voice Control
Switch Tap to enable voice control so the user can control the camera with set voice commands.
Swipe Up
Swipe up and then swipe left or right to set parameters such as aspect ratio, countdown timer, and resolution.
- In Photo mode:
Set the aspect ratio and countdown timer. - In Video mode:
Set the resolution and frame rate. Tap the upper left corner to set the duration of the loop recording.* Tap on the upper right corner to turn off electronic image stabilization, enable RockSteady, or enable HorizonSteady. Electronic image stabilization is unavailable when using certain resolutions and frame rates. - In QuickClip mode:
Set the resolution and frame rate. Tap the upper left corner to set the duration of the QuickClip. Tap on the upper right corner to turn off electronic image stabilization, enable RockSteady, or enable HorizonSteady. Electronic image stabilization is unavailable when using certain resolutions and frame rates. - In Slow Motion mode:
Set the resolution and speed ratio. - In Timelapse mode:
Select Hyperlapse or Timelapse mode. The speed ratio can be set in Hyperlapse mode. The scene, interval time, and shooting time can be set in Timelapse mode. Tap the upper right corner to set the resolution of Timelapse mode.
Swipe Left or Right
Swipe left or right on the center of the touchscreen to switch between Photo, Video, QuickClip, Slow Motion, and Timelapse shooting modes.
Storing Photos and Videos
The camera unit has a built-in storage capacity of 32 GB*, which can be used to directly store photos and videos. A footage shot on DJI Action 2 can be stored on a microSD card (not included) when connected to the front touchscreen module or power module. A UHS-I Speed Grade 3 rating microSD card is required due to the fast read and writes speeds necessary for high-resolution video data. Insert the microSD card into the microSD card slot as shown.
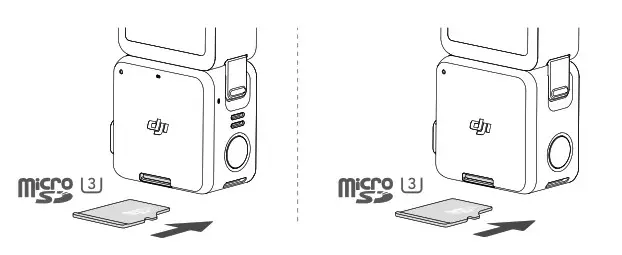
* 22.4 GB of available storage.
![]() DJI Action 2 only supports the exFAT file system. FAT32 is not supported.
DJI Action 2 only supports the exFAT file system. FAT32 is not supported.
Status LED Descriptions
If the front touchscreen module or the power module is connected to the camera unit, their status LED blinking pattern descriptions will be the same as the camera unit. The status LED blinking pattern descriptions is as below.
| Blinking Pattern | Description |
| Solid green | Ready to use |
| Off | No microSD card detected or insufficient microSD card storage |
| Temporarily off | While taking photo |
| Blinks red once every second | While taking video, loop recording*, slow motion, timelapse, hyperlapse, or QuickClip |
| During countdown: 10 to 4 s: blinks red once every second 3 to 2 s: blinks red twice every second 1 to 0 s: solid red After countdown: temporarily off | Countdown to take a photo |
| Blinks red three times | Camera powering off |
| Blinks red and green alternately | Updating firmware |
The table below describes the status LED blinking pattern after pressing the power/record button without the power module connected to the camera unit.
| Blinking Pattern | Battery Level |
| Solid green for 3 seconds and turns off | 90%-100% |
| Blinks green four times | 76%-89% |
| Blinks green three times | 51-75% |
| Blinks green twice | 26%-50% |
| Blinks yellow once | 6-25% |
| Blinks red three times and turn off | 0-5% |
DJI Mimo App
Home Screen
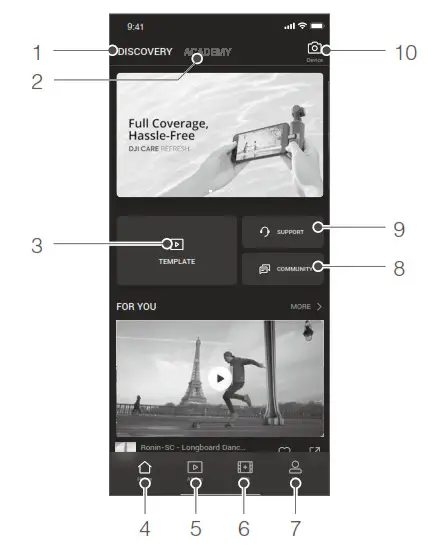
- Discovery: tap to enter the home screen.
- Academy: tap to watch tutorial videos and view manual documents.
 AI Editor: tap to select videos to edit. AI Editor will automatically edit videos with music and transitions that can be shared directly.
 Home: tap to return to the home screen.
 Album: tap to view photos and videos.
 Edit: tap to edit footage from DJI Action 2 or import and edit footage from a mobile device.
 Profile: register or log in to a DJI account. View works and settings, check likes and followers, send messages to other users, and connect with the DJI Store.
 Forum: tap to enter the official DJI forum page.
 DJI Support: tap to enter the official DJI product support page.
- Camera View: tap to enter the camera view.
 Album: tap to view photos and videos.
Camera View
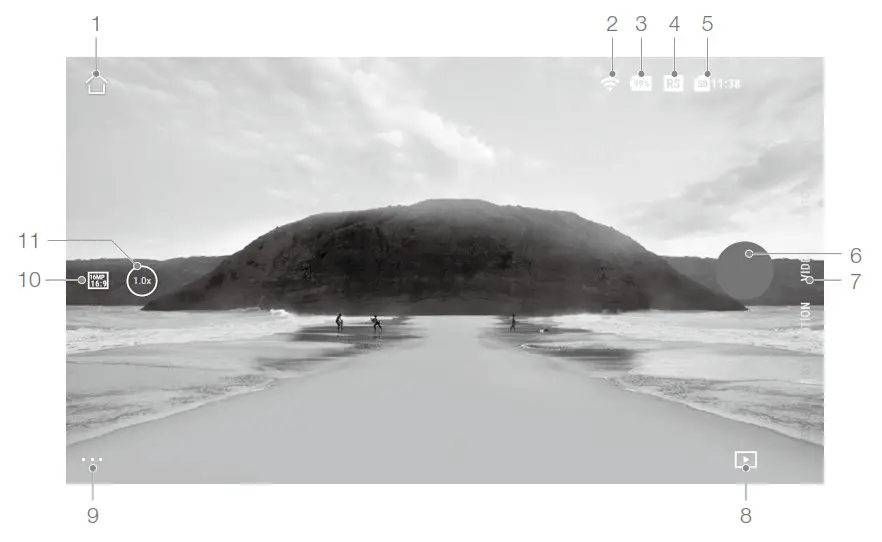
The camera view display may differ depending on the shooting mode. This display is for reference only.
- Home: : tap to return to the home screen.
- Wi-Fi
 : displays Wi-Fi connection.
 - Battery Level
 : displays the current battery level of DJI Action 2.
 - EIS
RS: displays the current electronic image stabilization. - microSD Card Information
SD 11:38: displays either the remaining number of photos that can be taken or the duration of the video that can be recorded according to the current shooting mode. - Shutter/Record Button
 : tap to take a photo or to start or stop recording the video.
 - Shooting Mode
Scroll to select the shooting mode. Choose between Timelapse, Slow Motion, Video, QuickClip, and Photo. - Playback
 : tap to preview photos and videos as soon as they are captured.
 - Setting
•••: choose Basic or Pro mode for the selected shooting mode. Various parameters can be set when using different shooting modes. Video mode is used as an example below:
a. Video Settings
Basic: Loop Recording, FOV, EIS, and Grid are available.
Pro: More settings are available once Pro is enabled including Format, Exposure, and White Balance.
b. General Settings
View storage management, video compression, anti-flicker, auto-stop recording temperature, and about settings such as device name, serial number, and version info. Users can also select connected devices set Wi-Fi names and passwords and switch Wi-Fi frequency. - Recording parameters:
16MP 16:9: tap to set the resolution and frame rate. - Zoom
1.0x: tap and drag to set the zoom ratio.
Maintenance
Firmware Update
DJI Action 2 Camera Unit
The firmware of the camera unit must be updated through DJI Mimo.
A prompt will appear when new firmware is available. Follow the steps below if the update fails.
- Disconnect and reconnect the Bluetooth and Wi-Fi connection on the mobile device, and restart the camera unit.
- Restart DJI Mimo. The firmware update will begin after Mimo and the camera unit are connected.
Accessories
The firmware of the front touchscreen module and power module are included in the camera unit firmware. Follow the steps below to update the firmware:
- Attach the front touchscreen module or power module and power on the camera unit.
- Any updates will start automatically if new firmware is available.
- Make sure that the battery level of the camera unit is at least 15% before updating firmware.
- Contact DJI Support if the firmware is still unable to update.
Underwater Usage Notes
- The camera unit and waterproof case meet the IP68 waterproof standards of GB/T 4208-2017 IEC 60529:2013. The camera unit can be used underwater at depths of up to 10 m. The maximum depth underwater is 60 m when using the waterproof case.
- DO NOT use DJI Action 2 in hot springs. DO NOT allow DJI Action 2 to come into contact with corrosive or unknown liquids.
- Attach the waterproof case when diving, surfing, using underwater for extended periods, or situations involving high-impact water.
- The front touchscreen module and the power module are not waterproof. Attach the waterprcase to use them underwater.
- When using the waterproof case, make sure the inside of the waterproof case is dry and properly locked, and that the waterproof rubber ring is secure. Insert anti-fog inserts to pr fogging. It is recommended to place the waterproof case underwater for approximately 5 minutes to ensure it is working properly before using.
- Avoid jumping into the water at high speed with the camera unit. Otherwise, the impact may result in water leakage. Make sure the camera unit is waterproof before jumping into the water.
- Rinse the camera unit or waterproof case with clean water after using it underwater. Allow it to dry naturally before using it again.
Cleaning Notes
- Keep the lens glass clean. Sand and dust may damage the lens glass. Clean DJI Action 2 with a clean, dry cloth.
- Keep DJI Action 2 away from sand and dust. Wash the camera unit if the holes on DJI Action 2 are blocked by sand, dust, or any other substance.
- All the holes on the camera unit have built-in waterproof material. DO NOT remove the waterproof material or poke the holes. Otherwise, the camera unit will no longer be waterproof.
- DO NOT poke the holes and speaker on the front screen module.
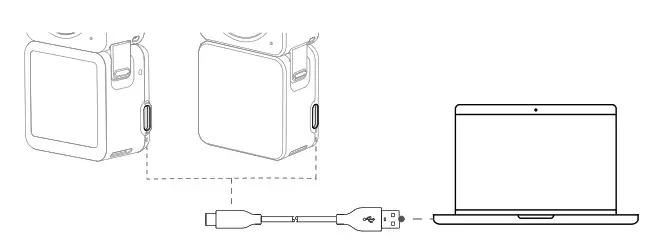
Connecting to a Computer
After connecting to DJI Action 2 to a PC, File Transfer, Webcam, and Cancel will appear on the touchscreen of the camera unit. Select Cancel to charge DJI Action 2. Reconnect DJI Action 2 to the computer if the file transfer is interrupted.
Using Other Accessories (Excluded)
| Accessory List | Diagram |
| DJI Action 2 Remote Control Extension Rod |  |
| DJI Action 2 Waterproof Case | 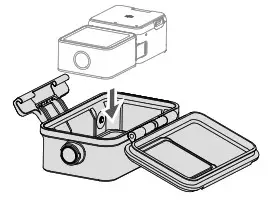 |
| DJI Action 2 Macro Lens |  |
| DJI Action 2 Magnetic Clip |  |
| Scan the QR code or read the corresponding product information or user guide on the official DJI website (www.dji.com/action-2). |  https://www.dji.com/action-2/downloads https://www.dji.com/action-2/downloads |
Specifications
DJI Action 2 Camera Unit
| General Settings | Network ID A (input) |
| Model | MC211 |
| Dimensions | 39×39×22.3 mm |
| Waterproof | 10 m (60 m when using a waterproof case) |
| Weight | 56 g |
| Camera | |
| Screen | 1.76 inches 350 ppi 500±50 cd/m² 446×424 |
| Sensor | 1/1.7” CMOS |
| FOV | 155° |
| Aperture Range | f/2.8 |
| ISO Range | Photo: 100-6400 Video: 100-6400 |
| Electronic Shutter Speed | Photo: 1/8000 to 30 s Video: 1/8000 s to the frames per second limit |
| Max Photo Resolution | 4000×3000 |
| Still Photography Modes | Single photo: 12 MP Countdown photo: Off/0.5/1/2/3/5/10 s |
| Standard Recording | 4K (4:3): 4096×3072 @ 24/25/30/48/50/60 fps 4K (16:9): 3840×2160 @ 100/120 fps 4K (16:9): 3840×2160 @ 24/25/30/48/50/60 fps 2.7K (4:3): 2688×2016 @ 24/25/30/48/50/60 fps 2.7K (16:9): 2688×1512 @ 100/120 fps 2.7K (16:9): 2688×1512 @ 24/25/30/48/50/60 fps 1080p: 1920×1080 @ 100/120/200/240 fps 1080p: 1920×1080 @ 24/25/30/48/50/60 fps |
| Slow Motion Recording | 4K: 4x (120 fps) 2.7K: 4x (120 fps) 1080p: 8x (240 fps), 4x (120 fps) |
| Timelapse | 4K/2.7K/1080: Shooting interval: 0.5s/1s/2s/3s/4s/5s/6s/7s/8s/10s/13s/15s/20s/25s/30s/40s Shooting duration: ∞, 5/10/20/30 min, 1/2/3/5 h |
| Stabilization ① | Electronic Image Stabilization: RockSteady 2.0, HorizonSteady |
| Max Video Bitrate | 130 Mbps |
| Supported File Formats Photo Format | exFAT |
| Video Format | JPEG/RAW |
| Built-in Storage Capacity | MP4 (H.264/HEVC) |
| Max Video Bitrate | 32 G B (22.4 GB of available storage) |
| Supported SD Cards | microSD (Max. capacity 256 GB) |
| Recommended microSD Cards | Recommended MicroSD cards: Samsung EVO 128GB UHS-I Speed Grade 3 microSDHC Samsung EVO Plus 128GB UHS-I Speed Grade 3 microSDXC SanDisk Extreme 64GB V30 A2 UHS-I Speed Grade 3 microSDXC SanDisk Extreme Pro 32GB UHS-I Speed Grade 3 microSDXC SanDisk Extreme 16GB UHS-I Speed Grade 3 microSDXC Lexar 1066x 64GB UHS-I Speed Grade 3 microSDHC |
| Audio Output | 48 kHz, AAC |
| Built-In Battery | |
| Battery Type | LiPo 1S |
| Capacity | 580 mAh |
| Energy | 2.23 Wh |
| Voltage | 3.85 V |
| Operating Temperature Charging Temperature | 0 to 40° C (32° to 104° F) |
| Operating Time | 5 to 60° C (41° to 140° F) |
| Wi-Fi | |
| Operating Frequency | 2.400-2.4835 GHz, 5.150-5.250 GHz, 5.725-5.850 GHz |
| Transmitter Power (EIRP) | 2.4 GHz: <16 dBm (FCC/CE/SRRC/MIC) 5.1 GHz: <14 dBm (FCC/CE/SRRC/MIC) 5.8 GHz: <14 dBm (FCC/CE/SRRC) |
| Protocol | 802.11a/b/g/n/ac |
| Bluetooth | |
| Operating Frequency | 2.400-2.4835 GHz |
| Transmitter Power (EIRP) | <4 dBm |
| Protocol | BLE 5.0 |
| DJI Action 2 Front Touchscreen Module | |
| Dimensions | 39×41.6×24.6 mm |
| Weight | 64 g |
| Screen | 1.76 inch 350 ppi 500±50 cd/m² 446×424 |
| Built-In Battery | |
| Battery Type | LiPo 2S |
| Capacity | 1300 mAh |
| Energy | 5 Wh |
| Voltage | 7.7 V |
| Operating Temperature | 0 to 40° C (32° to 104° F) |
| Charging Temperature | 5 to 60° C (41° to 140° F) |
| Operating Time② | Camera Unit + Front Screen Module: 160 min |
| Charging Time③ | Camera Unit + Front Screen Module: 90 min |
| DJI Action 2 Power Module | |
| Dimensions | 39×41.6×21.4 mm |
| Weight | 56.6 g |
| Built-In Battery | |
| Battery Type | LiPo 2S |
| Capacity | 1300 mAh |
| Energy | 5 Wh |
| Voltage | 7.7 V |
| 0 to 40° C (32° to 104° F) | |
| Charging Temperature | 5 to 60° C (41° to 140° F) |
| Operating Time ④ | Camera Unit + Power Module: 180 min |
| Charging Time③ | Camera Unit + Power Module: 90 min |
- When the video frame rate is 100 fps or above, electronic image stabilization does not support RockSteady 2.0 and the HorizonSteady can support a maximum resolution of 2.7K.
- Measured using 1080p (Power Reserve), 30fps, with sleep mode set to one minute, and electronic image stabilization disabled. Use as a reference only.
- Measured using a 5V/2A USB adapter in a laboratory environment. Use as a reference only.
- Measured using 1080p (Power Reserve), 30fps, and electronic image stabilization disabled. Use as a reference only.
After-Sales Information
Visit https://www.dji.com/support to learn more about after-sales service policies, repair services, and support.
This content is subject to change.
Download the latest version from www.dji.com/action-2 OSMO is a trademark of DJI OSMO.
Copyright © 2021 DJI OSMO All Rights Reserved.


