![]()
ETOE A1171 D2-EVO Android 9.0 Projector
Safety Instructions
Read all instructions before you use this device. Do not make any changes that are not described in this manual. If physical injury, loss of data, or damage is caused by failure to follow instructions, the warranty does not apply.
Setup
- To reduce the risk of fire and/or electric shock, do not expose the device to rain or moisture, and objects filled with liquids, such as vases, should not be placed on the device.
- Do not place the device on soft surfaces such as tablecloths or carpets as doing so could be a fire-hazard.
- Do not place the device in areas susceptible to excessive dust and dirt or near any appliance generating a strong magnetic field.
- To prevent overheating, do not block or clog the ventilation openings. Never place the device in a confined space. Always leave enough space around the device for ventilation.
- Protect the device against direct sunlight, heat, large temperature fluctuations and moisture.
- When the device runs for a long period of time and the surface becomes hot, shut it down and unplug the power cord. Resume operation only after the device has cooled.
- Always handle the device with care. Avoid touching the lens.
- Never place heavy or sharp objects on the device or the power cord. To avoid electric shock, do not disassemble.
- Only use attachments or accessories specified by the manufacturer. Avoid extreme vibration. It may damage the internal components .. Do not allow children to handle the device without supervision.
- under the following conditions, a layer of moisture can appear inside the device which can lead to malfunctions:
- if the device is moved from a cold to a warm area;
- after a cold room is heated;
- when the device is placed in a damp room.
To avoid any moisture, seal the device in a plastic bag before moving it to another room, and wait for one to two hours before you take it out of the bag.
Power Supply
- Use only the provided power adapter.
- Power off the device before removing the power supply from the socket.
- protect the power cord from being walked on or pinched, particularly at plugs, convenience receptacles, and the point where they exit from this device.
- Unplug this device if there are lightning storms or when unused for a long period of time.
- Where the power plug or an appliance coupler is used as the disconnect device, the disconnect device shall remain readily operable.
- Before you make or change any connections, ensure that all devices are disconnected from the power outlet.
- Do not touch the power cable or the power connector with wet hands.
Hearing Safety
To avoid hearing damage, do not listen for extended periods at high volume. Set the volume at a safe level.
Cleaning
- Power off the device and remove it from the power supply before cleaning the surface.
- Use a soft, lint-free cloth. Never use liquid, gaseous, or easily flammable cleansers (like sprays, abrasives, polishes, and alcohol). Wipe over the surfaces gently. Be careful that you do not scratch the surfaces.
- Do not use any liquid cleaning agents to clean the lens as they may damage the protective coating on the lens. Use lens cleaning paper to clean the lens of the projector.
Repairs - Do not make any repairs to the device by yourself. Only have your device repaired by an authorized service center.
- Improper maintenance can result in injuries or damage to the device.
- Refer all servicing to qualified service personnel.
Caution
Do not stare at operating beam. The bright light may hurt your eyes.
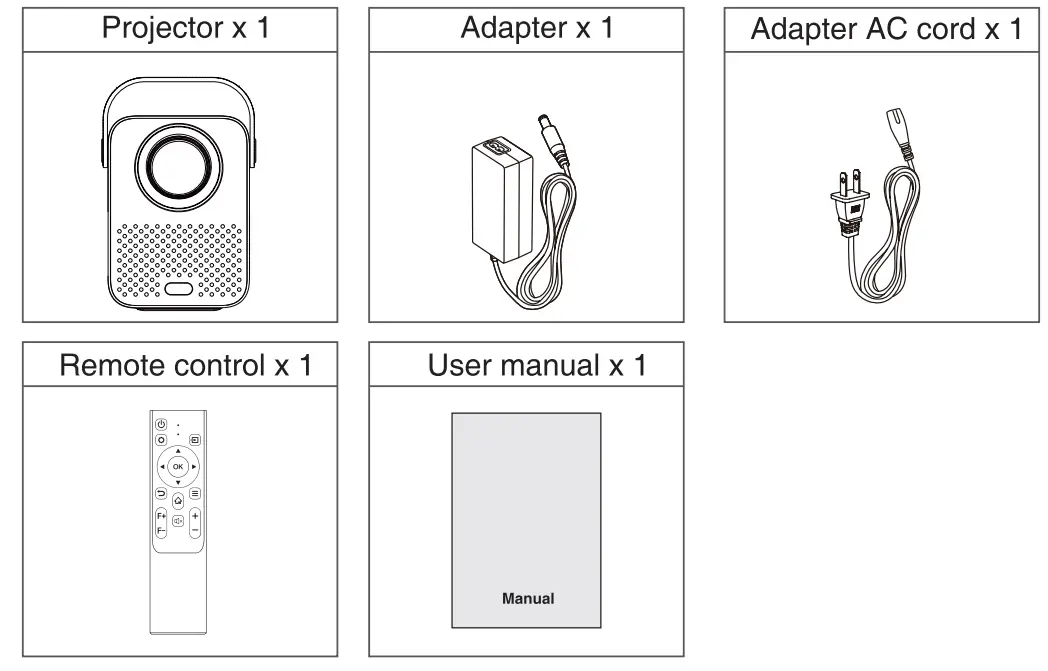
What’s included  Overview
 Overview
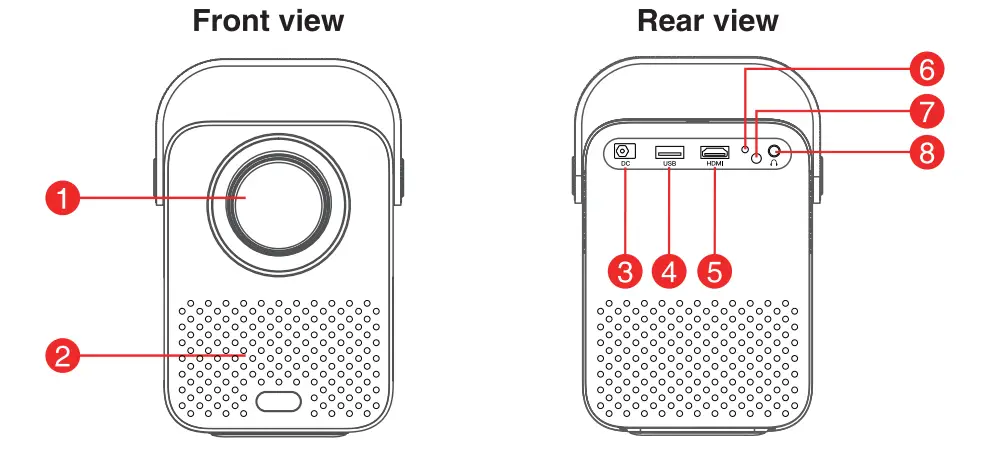
- Lens
- Air ventilation (outlet)
- DC in
- USB 2.0 port
- HDMI 1.4 port
- Indicator
- IR receiver
- 3.5mmAUX
- Power
- Focus adjusting knob
- Pads
- Tripod screw hole

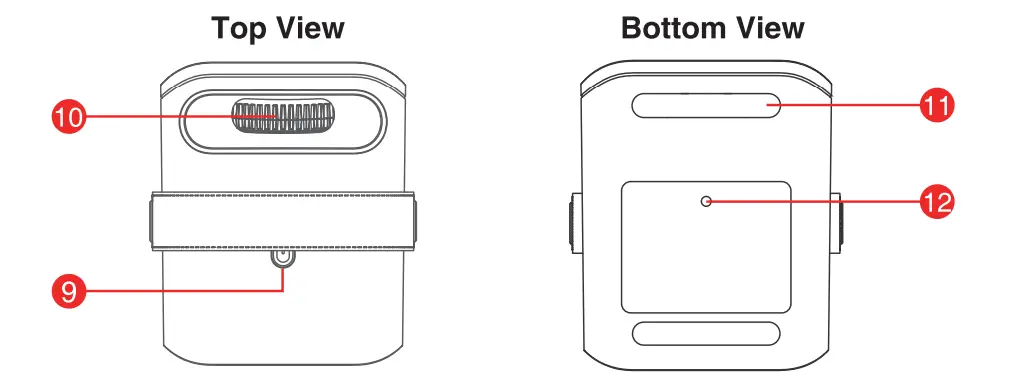
Attention:
- Please do not look into the lens directly to avoid harm for your eyes.
- Please do not block the air ventilation (outlet).
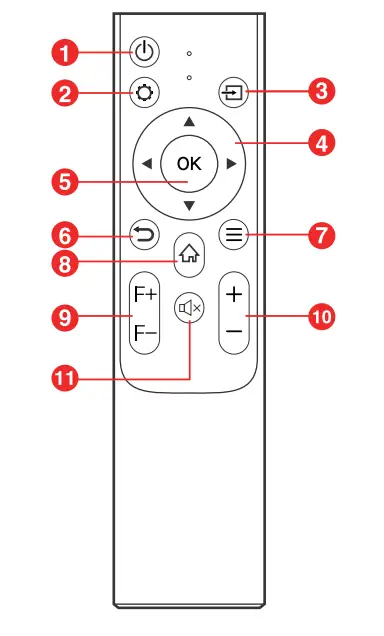
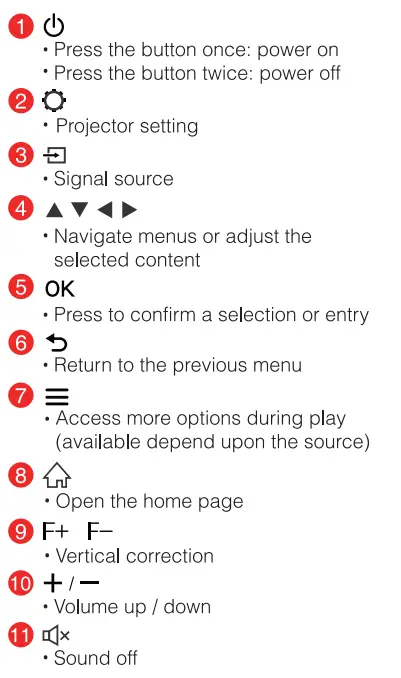
Remote control

Get Started
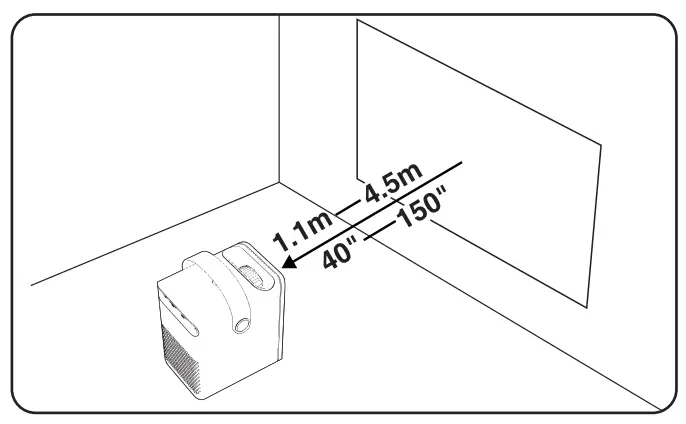
Placement
- Place the projector right towards the projection surface to get a rectangle picture.
- The distance between the projector and the projection surface determines the picture size.
- Check the projection distance and screen size on the specifications part.

Prepare the Remote Control
Install the remote control batteries (batteries not included).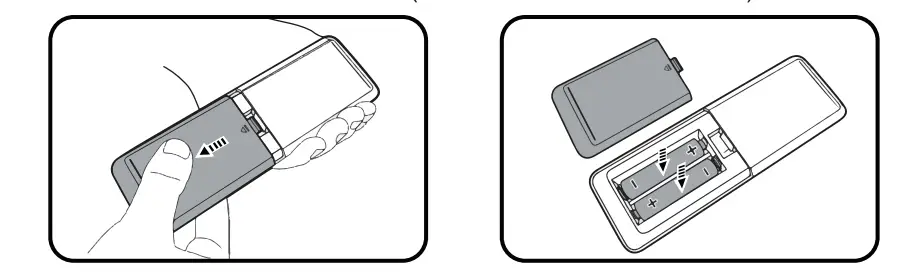
- Press and open the battery cover, as illustrated.
- Install two AAA batteries. Make sure that the positive and negative ends are positioned correctly, as illustrated.
- Place the battery cover back until it clicks into place.
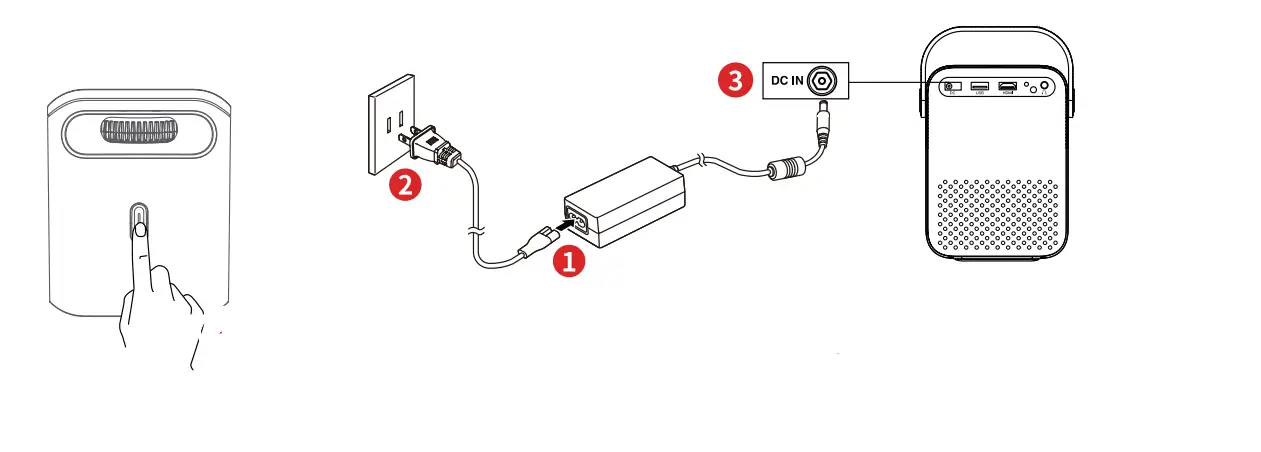
Power On
 Focus
Focus
- Place the projector towards a suitable projection surface or wall, adjust the distance for a proper size of the picture.
- Scroll the [Focus Adjusting Knob] left or right until the picture is crystal clear.
Select Your Language
When start the projector for the first time, you will be guided to a page to select language, use remote control ![]() to select your language. Then press the right button ► and select ‘Complete’ to enter the next page.
to select your language. Then press the right button ► and select ‘Complete’ to enter the next page.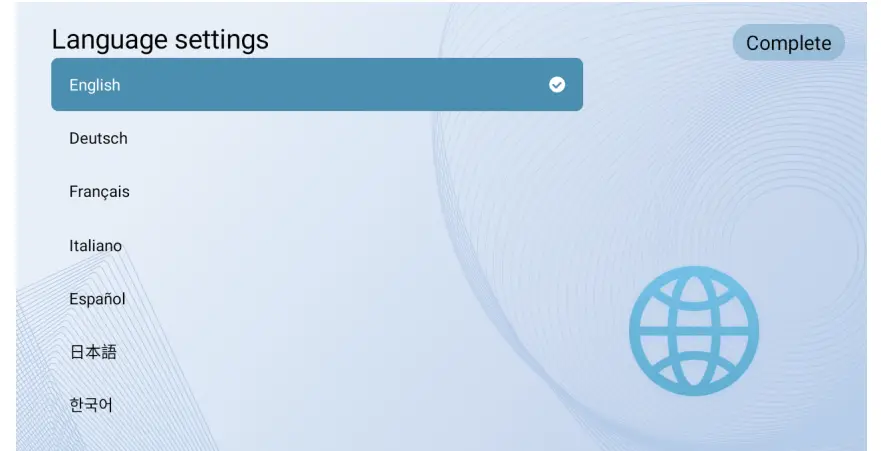
Quick Guide & Help
Quick Guide & Help provides some tips and help.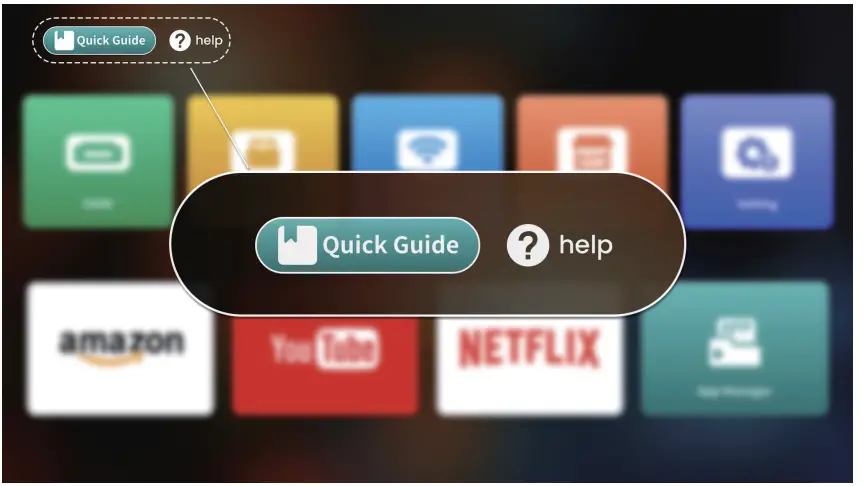
Settings
Go through the set-up process when you turn on the projector for the first time.
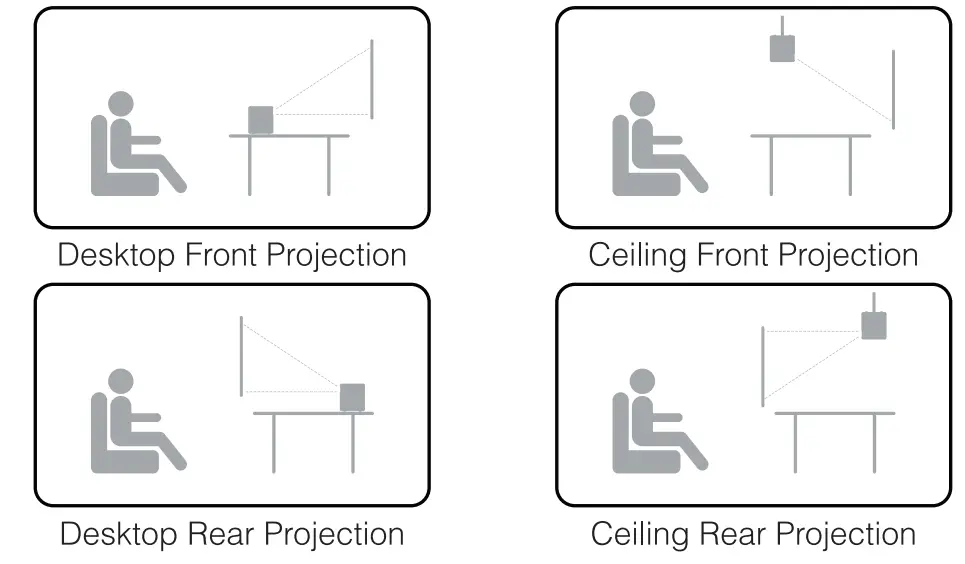
Projection
- Projection Mode

- Zoom in/out
Use the remote control to resize the picture size from 50% to 100% without moving the projector. - Keystone correction
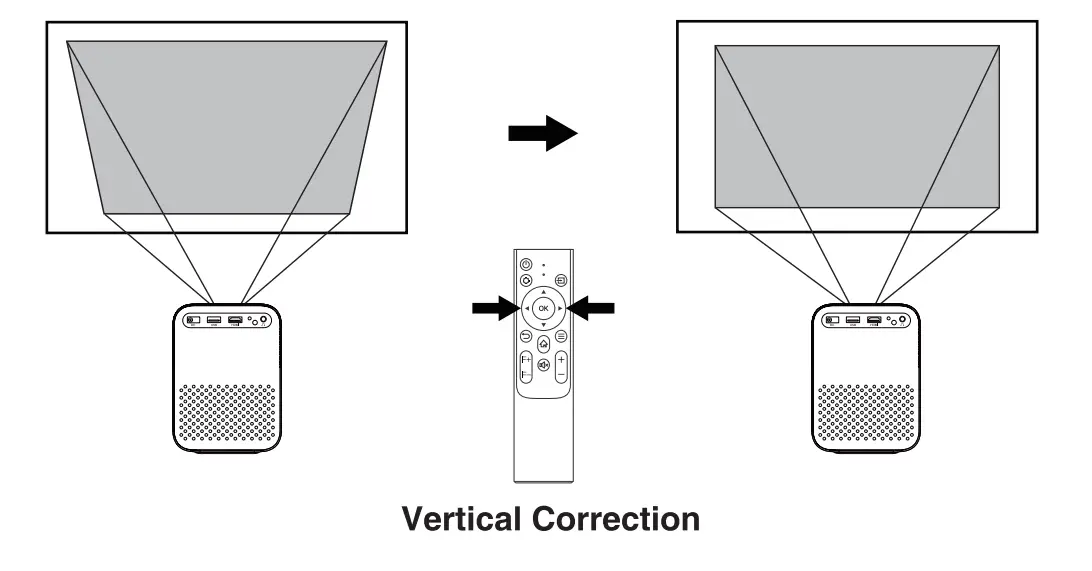
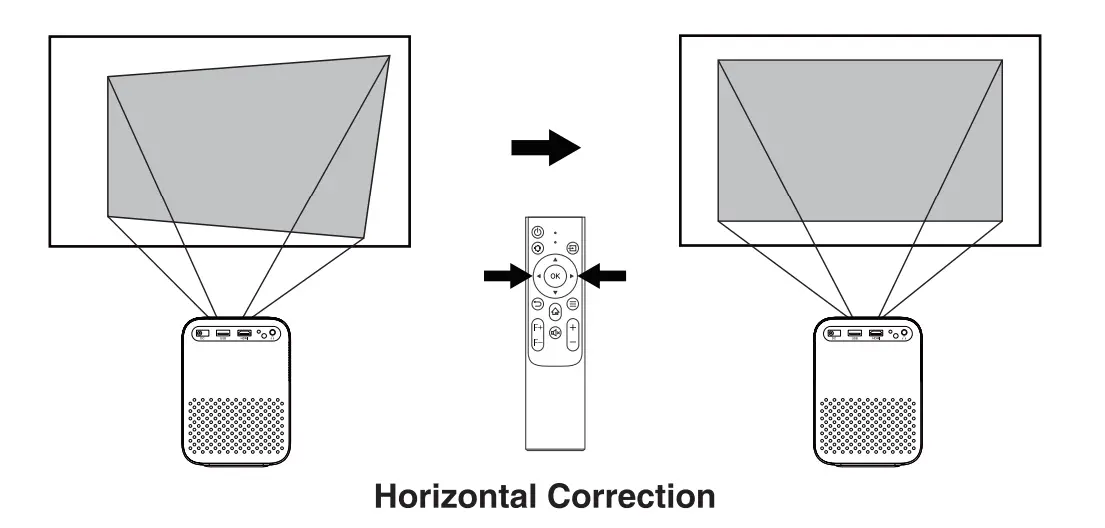
- Digital keystone correction
If the projected image is noticeably wider at one side. Go to homepage, select [Settings] ->[Projection]-> [Vertical Correction]/ [Horizontal Correction], press left or right button on the remote control to adjust.

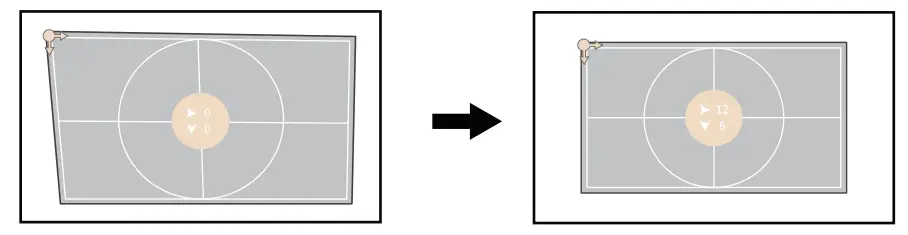
- Four point Correction
If the projected image is stretched or distorted along both axes due to the angle of the projection, go to [Settings] ->[Projection]-> [Four point Correction], choose the corner you want and press left or right button on the remote control to adjust.
- Keystone Correction Reset
To restore the default settings, select Keystone Correction Reset and press “OK”.
- Digital keystone correction
Network
This projector can be connected to the Internet via a wireless(Wi-Fi) connection.
- Go to the homepage, select [Settings]-> [Network].
- Follow the on-screen instructions to complete the network connection.
Bluetooth
Bluetooth speaker mode
The projector works as a Bluetooth speaker.
- Press the button <!) .
- Select “Bluetooth speaker” 0 and stay on this page.
- Turn on the Bluetooth of the Phone/Pad/PC and click on ‘LED_Projector_xxxx” for the connection.
- ou can turn off the screen. Press a random button on the remote control to turn on the screen again.
Projector mode
Connect to an external Bluetooth speaker/Bluetooth headset.
- Return to the Homepage.
- Select “Bluetooth”.
- Connect your bluetooth device.
App Manager
View installed apps. After selecting the APP, click the ‘OK” button to view the basic information of the APP, or select “Delete Cache’ or “Uninstall’.
Language & Keyboard
Select an on-screen disply language and manage keyboards.
Date & Time
Set the date and time. Select Auto Obtain to get the local date and time when connecting to the internet.
Other Settings
Default Input Signal
[HDMI]/ [USB]/[Off]
Select default display signal source from HDMI/USB/Projector Homepage.
Screen Saver
The screen saver automatically starts whenever your projector sits idle for the default time. You could change the default time or turn it off.
Screensaver Timeout Shutdown
Set the automatic shutdown time in the idle state. You could change the default time or turn it off.
Restore Factory Setting
Reset your device and restore factory setting.
About
Check the product information, and upgrade firmware. Select Online Update to check if a new software is available.
App Management
Please go to [Settings]-> [Network] to connect to the network before use.
Install
- Go to [Homepage], select [App Store].
- Click ‘Search’ Q to enter the app name or view ‘category” to find the app you want to install.
- Select an APP and click ‘OK’ to enter the download page.
- Select “Get free to download’ and press ‘OK’ to download.
- Don’t leave the page while downloading the APP.
Open
- Go to [Homepage], Select [App Manager].
- Select the app you want to open.
Uninstall
- Go to [Homepage]-> [Setting]-> [App Manager].
- Select the APP you want to delete.
- Click ‘OK’ and select Uninstall.
Connections
Make sure your device and projector are connected to the same Wi-Fi network.
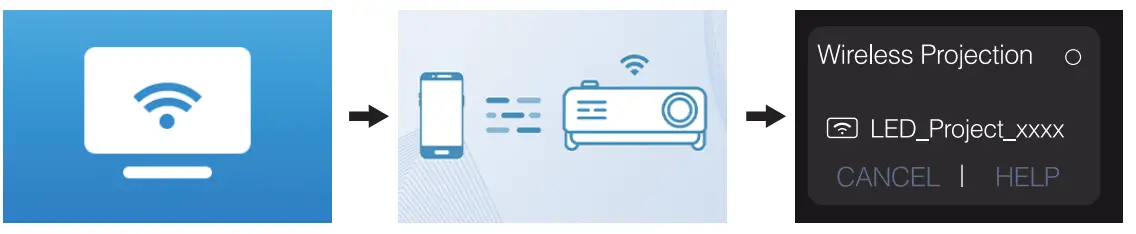
Wireless Connection
For Android devices:
- Press the button ‘::> to go to projector homepage, select WiFi-Cast.
- Tap the Screen Cast button on your device and choose the “LED _Projector _xxxx”.

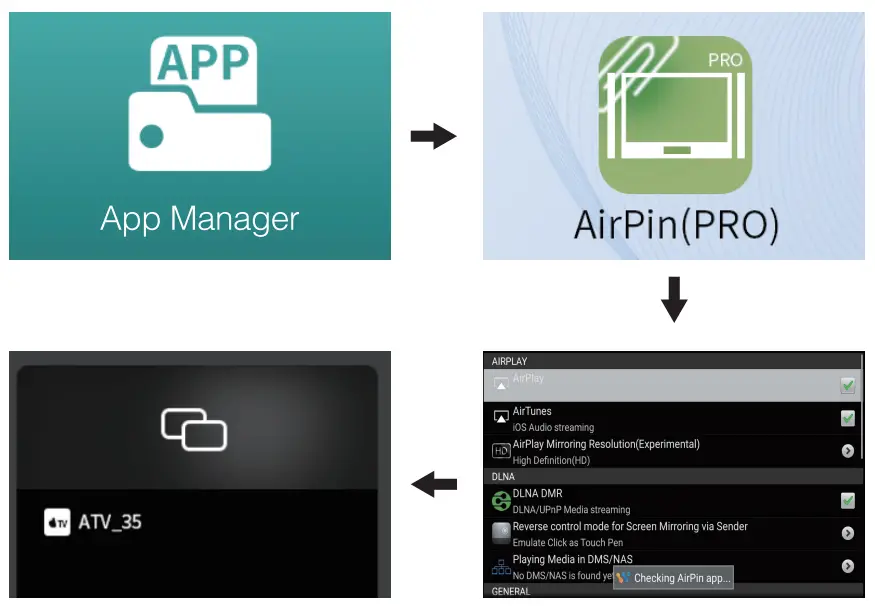
For iOS devices:
- Press the ‘::> button to go to projector homepage, select App Manager. @ Open the AirPin(PRO).
- Tap the Screen Mirroring button on your device and choose the “ATVxxxx”.

Wired Connection
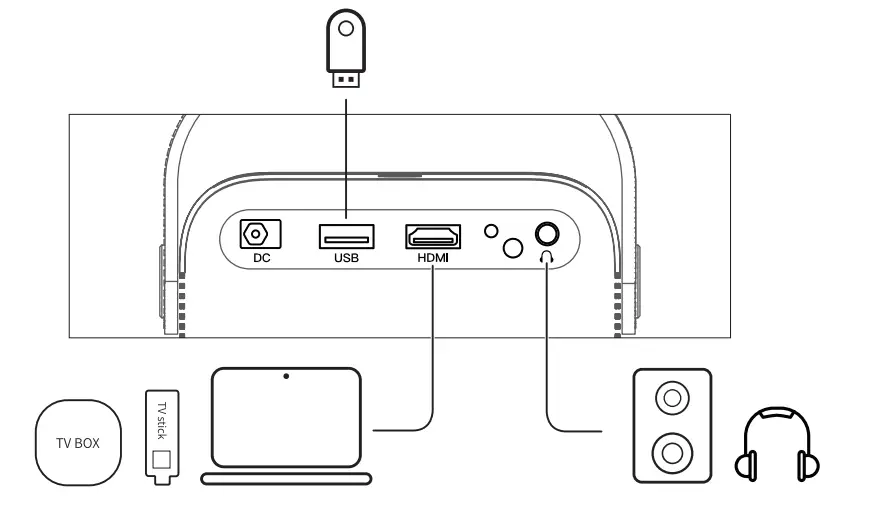
Connect to a HDMI playback device
This projector supports connections with various HDMI playback devices such as PC, TV stick, TV box, DVD players, set-top boxes (STB), game console or other devices.
- Connect this projector to an HDMI playback device with an HDMI cable.
- Press the signal source button
 ) on remote, or select [HDMI] at homepage. (Please set the connected device to HDMI output on the sound control panel if you want sound from the projector).
 ) on remote, or select [HDMI] at homepage. (Please set the connected device to HDMI output on the sound control panel if you want sound from the projector).
Connect to a use flash
With this projector, you can enjoy music, video, and pictures, that are stored on a USB storage device.
- Plug in the USB flash.
- Press the signal source buttonon the remote, or select [USB] at homepage.
- Select the file you plan to play, then press [OK].
Connect to a headphone via AUX cable
You can connect a headphone or speakers to this projector via AUX cable as well.
- Plug in the 3.5mm AUX cable connector to this projector AUX port.
- Plug the other connector of the 3.5mm AUX cable to your headphone or speaker.
- Play your media on projector.
Long-press the menu button to pop up the shortcut menu.
| Image Mode | Standard | Keeps natural looking colors with a balance of warm and cool tones |
| Light | Provides more picture details and color sharpness | |
| Soft | Provides warm colors with lower light | |
| Personal | Manually set the Brightness, Contrast, Saturation, Sharpness and Hue | |
| Color Temp | Cold | Provides cold color temp |
| Normal | Provides cold normal temp | |
| Warm | Provides cold warm temp | |
| Personal | Manually set the Red, Green and Blue | |
| Sound Mode | Standard | Provides standard tones |
| Music | Provides more detailed tone | |
| Movie | Provides home theater-style sound | |
| Personal | Manually set the sound of each frequency band | |
| Projection Setting | Zoom In/Out | Zoom in or out of the projection image |
| Vertical Correction | Perform keystone correction | |
| Horizontal Correction | ||
| Four Point Correction | ||
| Keystone Correction Reset | Reset keystone correction |
Specifications
- System: Android 9
Power supply: DC 19V 3A
Native resolution: 1920 x 1080
Throw ratio: 1.22
Contrast ratio: 3000: 1
Aspect Ratio: 16:9/4:3 Adaptive
Connection port: HDMl’1; USB’1; AUX’1 Projection image size: 40′-150″
Speaker driver: 2 x 3W
Recommended ambient: 41 °F to 95°F / 5°C to 35°C Relative humidity: 15% – 85% (non-condensing)
Warranty
30-Day Money-Back Guarantee for Any Reason
You may return your undamaged product within 30 days of the date of purchase to receive a full refund for any reason.
For non-quality related warranty claims, the buyer is responsible for shipping costs.
12-Month Warranty for Quality-Related Issues
Every ETOE product comes with one year of quality-related issues coverage. If you submit a claim to our support mail, ETOE will, at its option:
- Replace the ETOE Product with a replacement product of the same model and cover any return shipping costs.
- Exchange the ETOE Product for a refund of your purchase price.
Projection distance and Screen Size
| Screen size (inch) | Width (inch) | Hight (inch) | ||||
| 40 | 34.9 | 88.6 | 19.6 | 49.8 | 3.5 | 108.0 |
| 60 | 52.3 | 132.8 | 29.4 | 74.7 | 5.3 | 162.1 |
| 80 | 69.7 | 177.1 | 39.2 | 99.6 | 7.1 | 216.1 |
| 10(1 | 87.2 | 221.4 | 49.0 | 124.5 | 8.9 | 270.1 |
FCC Notice
This device complies with the FCC rules, Part 15. Operation is subject to the following two conditions:
- This device may not cause harmful interference, and
- This device must accept any interference received, including interference that may cause undesired operation.
warning: Changes or modifications not expressly approved by the party responsible for compliance could void the user’s authority to operate the equipment.
Note: This equipment has been tested and found to comply with the limits for a ClassB digital device, pursuant to part 15 of the FCC Rules. These limits are designed to provide reasonable protection against harmful interference in a residential installation. This equipment generates, uses and can radiate radio frequency energy and, if not installed and used in accordance with the instruction energy and, if not installed and used in accordance with the instruction manual, may cause harmful interference to radio communications. However, there is no guarantee that interference will not occur in a particular installation. If this equipment does cause harmful interference to radio or television reception, which can be determined by turning the equipment oft and on, the user is encouraged to try to correct the interference by one or more of the following measures:
- Reorient or relocate the receiving antenna.
- Increase the separation between equipment and receiver,
- Connect the equipment into an outlet on a circuit different from that to which the receiver is connected.
- Consult the dealer or an experienced radio/ TV technician for help.
RF Exposure Warning Statements
This equipment complies with FCC radiation exposure limits set forth for an uncontrolled environment. This equipment should be installed and operated with minimum distance 20cm between the radiator & your body.
Model: A1171
© ETOE Technology Limited.
All rights reserved. ETOE and the ETOE logo are trademarks of ETOE Technology Limited, which is registered in the United States and other countries. All other trademarks are the property of the irrespective owners.
Manufacturer: HUNAN ETOE Technology Co., Ltd
Address: Room 603, Building 3, Zone A, Jindaoyuan, N0.169, Huizhi Zhong Road, High-tech District, Changsha
E-mall: [email protected]
Made in China
FAQS
Which bulb is used in projector?
Metal halide and UHP (Ultra High Performance) are the most common types of projector lamps. Metal halide lamps, invented in the late 1960s, use a combination of rare earth metal salts and mercury vapor to deliver light. They last about 3,000 hours.
What is Eco mode in projector?
ECO: reduces lamp brightness and fan noise, and saves power and lamp life. Light Optimizer. On. Off. When Power Consumption is set to Normal and both Auto Iris and Multi Projection are turned off, the lamp brightness is adjusted based on the projected image; you can set this option for each color mode.
How high should a projector screen be from the floor?
The screen height should be roughly one-third of the distance from the display to the seats in the media room. Place it 24” to 36” inches above the floor as the optimum vertical Viewing angle is in the range of 15 to 20 degrees.
Why is my projector changing colors?
This problem is typically caused by a faulty prism in the projector or in the lamp housing. The lamp inside the projector projects bright white light, which projects through a series of prisms or pieces of glass that are designed to allow certain types of light or colors to come through.
What causes a projector to overheat?
Projectors utilize different types of lamps, bulbs or lasers to produce a certain amount of heat needed to make clear and bright projections. These different types of lamps produce incredibly high temperatures, and if there is restricted airflow, it quickly causes your projector to overheat.
How long does a projector battery last?
Although you are using your projector just for entertainment, it wouldn’t hurt to get another one as you might be annoyed if it breaks down in the middle of an interesting movie. Average batteries of the projectors in the market last between 90 minutes and 2½ hours.
Can you just replace the bulb in a projector?
Replacing a bare projector bulb is much more labor-intensive than simply plugging in a new module and fitting it into the projector. For replacing the bulb, there are often numerous screws keeping the bulb in place, as well as electrical connectors between the bulb and cage.
Why is my projector blinking on and off?
This is a common issue and can arise in virtually any projector, but this issue is more common in certain models of projectors. The flickering is caused by what is called “arc wander.” The point at which the arc strikes begins to move slightly on the electrode and makes a track that the arc “wanders” along
What is the best distance for a projector?
The absolute “best” distance between the projector screen and room seating is hard to calculate. Instead, a general rule is that seats should be located a distance that is no less than double the width of the projected image, and no more than five times the width of the image (the furthest seat from the screen.)
Why is my projector blinking red?
flashing red light by lamp indicates the lamp is reaching the end of its usable life and must be replaced soon. A SOLID red light indicates that the lamp is burnt out and must be replaced immediately.
Why is my projector turning off?
If the projector’s lamp shuts off unexpectedly, it may have entered standby mode after a period of inactivity. Press the power button to wake the projector. If the projector’s lamp shuts off and the power and Temp lights are red, the projector has overheated and shut off. Check the solutions for this light status.
What happens when a projector lamp dies?
Unlike other bulbs that go out once expended, the high-pressure mercury and xenon used in projector lamps cause bulbs to dim over time. Once the lamp light is at about half its original luminescence, it’s time to replace it. You can continue to use the bulb until complete failure, but doing so impacts image quality.


