TRX420 Kolpin Outdoors Quick Mount Steel Cable Winch 2500lb Honda
Application: Honda Rancher 420 / Foreman 500 / Rubicon, verify accessory fitment at Kolpin.com.
Before You Begin: Read these instructions and check to be sure all parts and tools are accounted for. Please retain these installation instructions for future reference and parts ordering information.
Note: If any hardware is missing, do not return to the store. Call us to help, Toll Free 1-877-956-5746.
PARTS
This Kit includes:
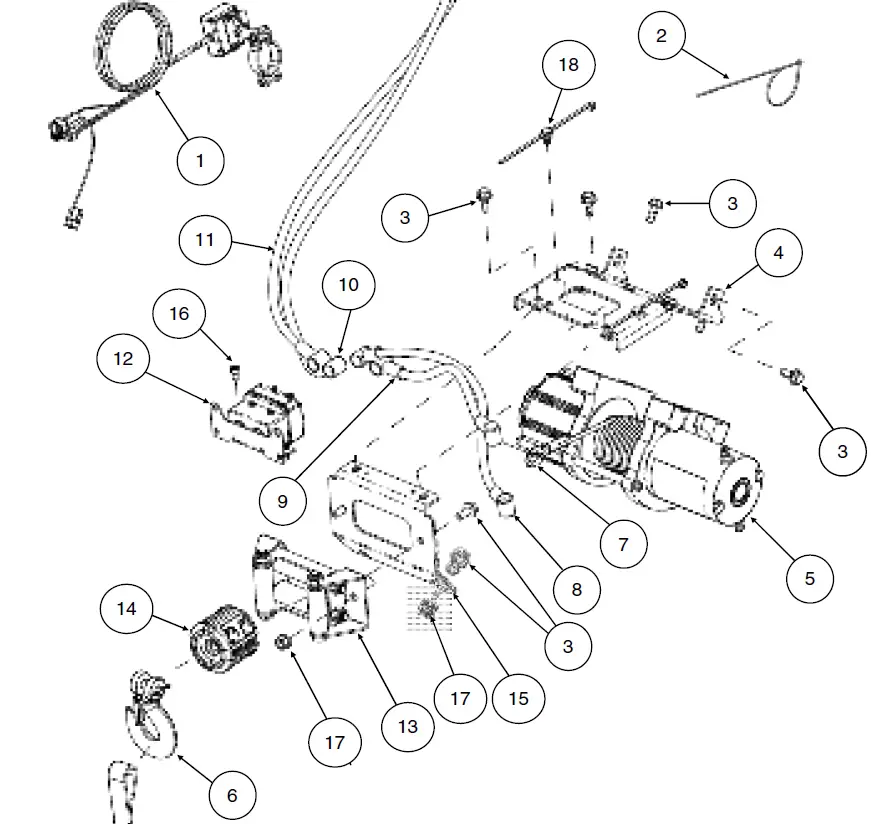
Item | Qty | Part Description | Part Number | |
| 26-1020 | 26-1030 | |||
| 1 | 1 | Handlebar Switch & Accessory Power Harness | 26-1020-85066 | |
| 2 | 5 | Cable Ties, Nylon | – | |
| 3 | 12 | Hex Flange Screw, Zinc Plated, M8 x 1.25 – 20mm LG | 7518450 | |
| 4 | 1 | Winch Mounting Bracket | 25-1270 | |
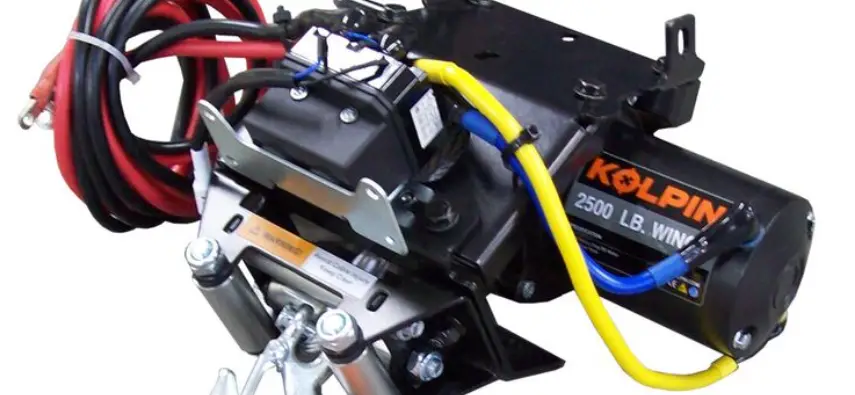
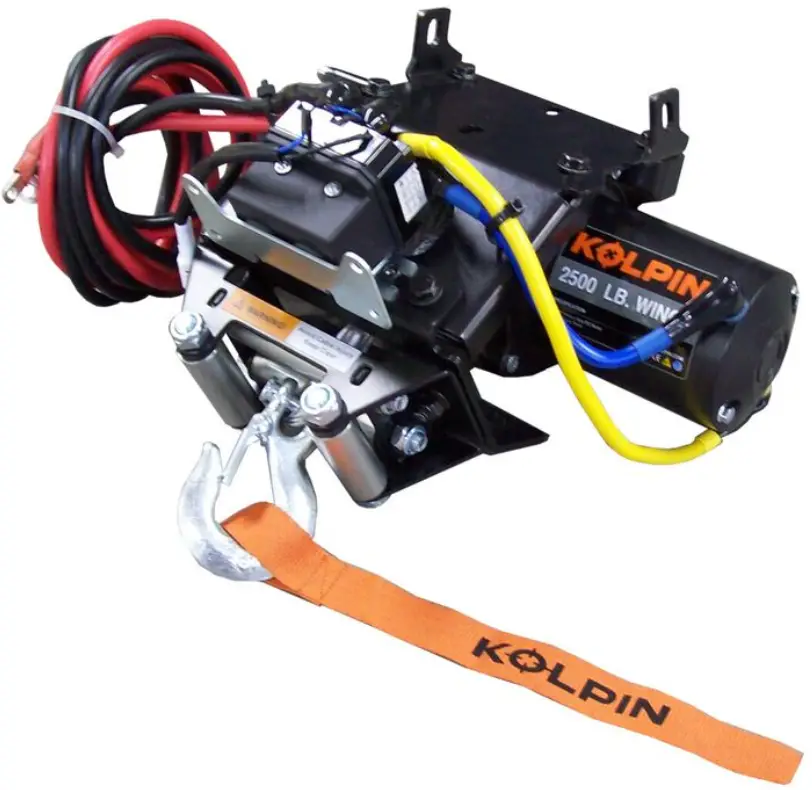
| 5 | 1 | Winch – Kolpin, 2500lb. / 3500lb. | 25-9250R | 25-9350R |
| 6 | 1 | Hook, Winch Latch | RPR0108 | |
| 7 | 1 | Winch Cable, (Steel – 2500lb.) / (Synthetic – 3500lb.) | 85062 | 85064 |
| 8 | 1 | Winch Connection Cable, Yellow 6 GA (342mm) | – | |
| 9 | 1 | Winch Connection Cable, Blue 6 GA (203mm) | – | |
| 10 | 1 | Power Connection Cable, Black 6 GA (2134mm) | – | |
| 11 | 1 | Power Connection Cable, Red 6 GA (2184mm) | – | |
| 12 | 1 | Contactor, Solenoid, 12V | 85068 | |
| 13 | 1 | Roller Fairlead | 85069 | |
| 14 | 1 | Rubber Winch Stopper (only included on 3500lb.) | – | 85080 |
| 15 | 1 | Roller/Contactor Mounting Bracket | 25-1270 | |
| 16 | 2 | Socket Head Cap Screw, Zinc Plated, M6 x 1.0 – 10mm LG | 7517337 | |
| 17 | 4 | Hex Flange Locknut, Zinc Plated, M8 x 1.25 | 7547317 | |
| 18 | 2 | Routing Clip Cable Tie, Nylon | 7081496 | |
| 19 | 1 | Instruction Guide (not shown) | – | |
| 20 | – | Service Free Spool Handle Knob (not included in kit) | 85072 | |
Tools Required:
- Safety Glasses
- Socket Set, Metric
- Wrench Set, Metric
- Torque Wrench
- Pliers
- Torque Wrench
Assembly Time: Approximately 30 minutes
Note: The 26-1020 / 26-1030 kits come mostly assembled from factory. Some assembly is required.
Important: Your Kolpin Honda ATV Quick-Mount Winch Kit is exclusively designed for your vehicle. Please read the installation instructions thoroughly before beginning. Installation is easier if the vehicle is clean and free of debris. For your safety, and to ensure a satisfactory installation, perform all installation steps correctly in the sequence shown.
PREPARATION:
- Shift vehicle transmission into “NUETRAL” and set the PARKING BRAKE. Turn key to “OFF” position and remove from vehicle.
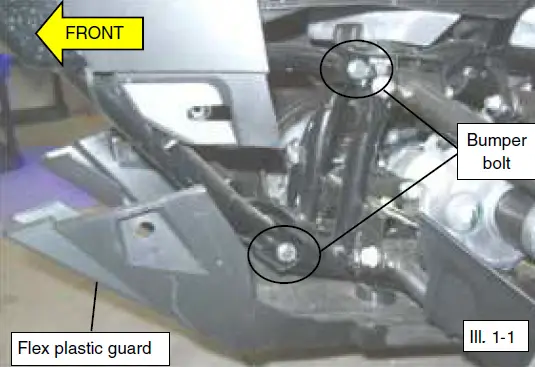
- Remove the OEM bolts that secure the front half of the bottom plastic engine guard. The front half of the plastic guard will flex downwards, providing access to install winch kit as shown. If more access is desired, the entire plastic guard can be removed from vehicle. Retain bolts for use during reinstallation.

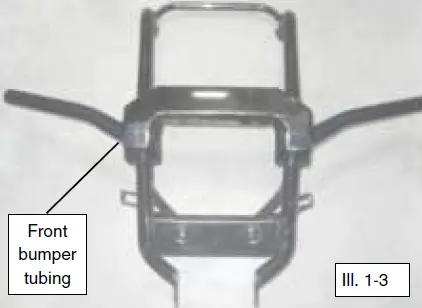
- Remove the front bumper tubing from the vehicle as shown by removing the eight OEM fasteners (two on front rack, two secure plastic center grille and four attach frame tubing to vehicle main chassis). Retain bolts for use during reinstallation.

 Note, the front bumper shape will vary slightly depending on vehicle model.
 - Remove the seat and tank cover assembly from the vehicle as shown. Note, the tank cover assembly is held into position using body panel locating tabs pressed into rubber grommets. Refer to the service manual for extra details.

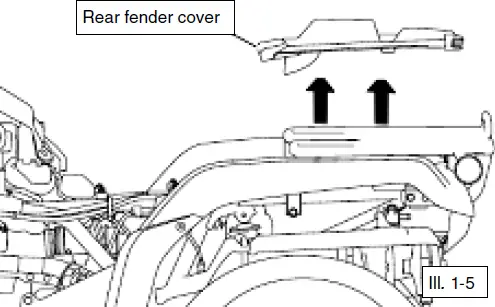
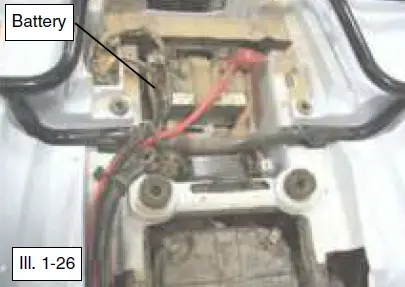
- Remove the rear fender cover to access the battery. Disconnect black (negative) and red (positive) cables from battery as shown. Retain bolts for use during reinstallation.
 WARNING
ALWAYS disconnect black negative (-) cable from battery FIRST. Failure to do so will result in high current electrical arc, and may result in battery explosion if tool touches grounded frame. Death or serious injury may occur. - Remove the Honda ATV winch sub-assemblies from the packaging.
 Note, the front bumper shape will vary slightly depending on vehicle model.
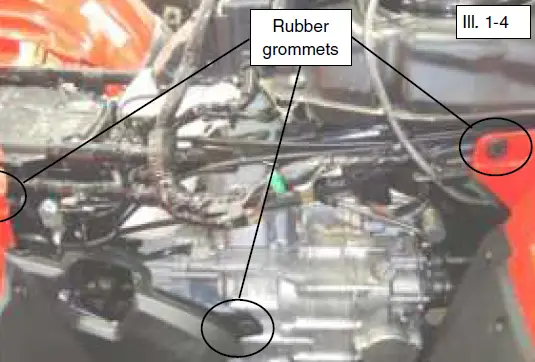
 WARNING
INSTALLATION:
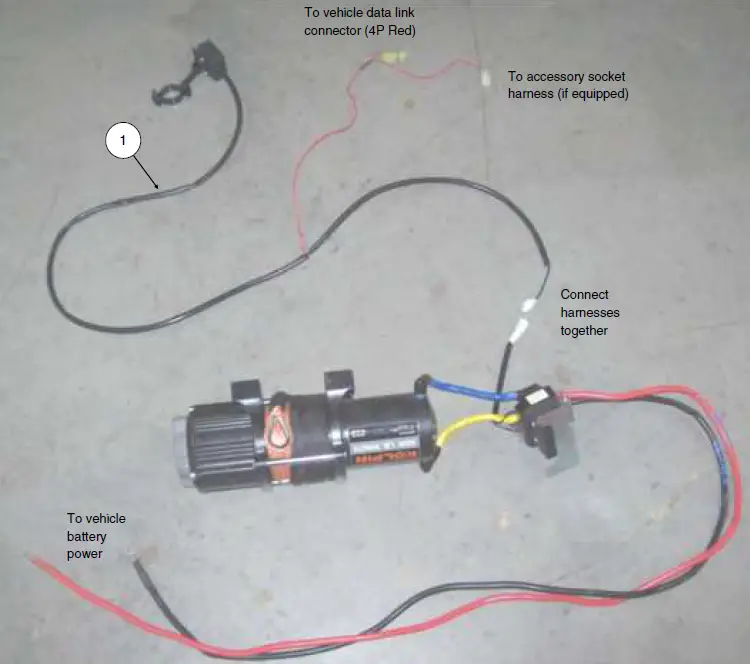
NOTE: See the Electrical Connections Reference Guide section of the instruction manual for detailed
photos of each part and their respective connections.
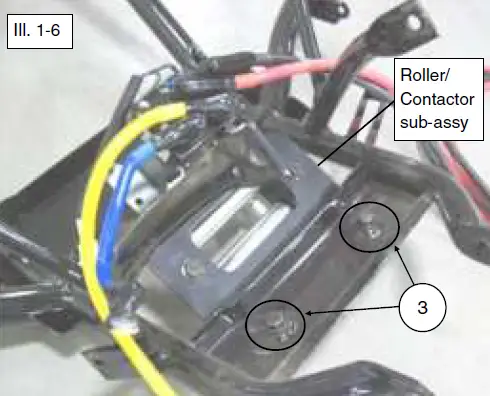
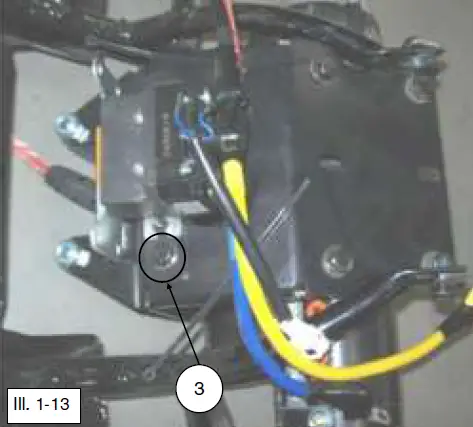
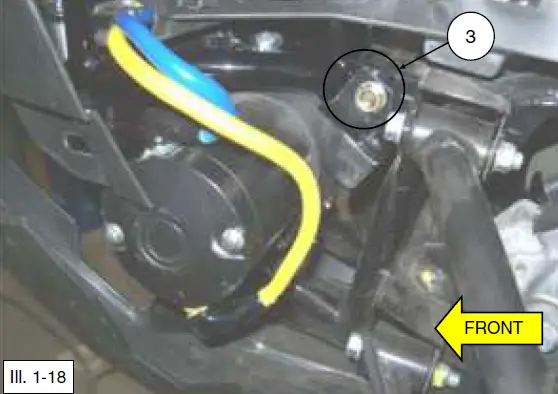
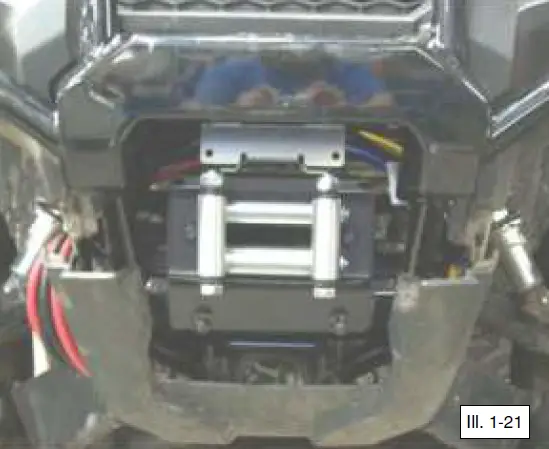
- Position the roller/contactor sub-assembly into the front bumper as shown. Fasten the sub-assembly into front bumper using the M8 bolts (item #3) and M8 locknuts (item #17).


- Tighten to specification.
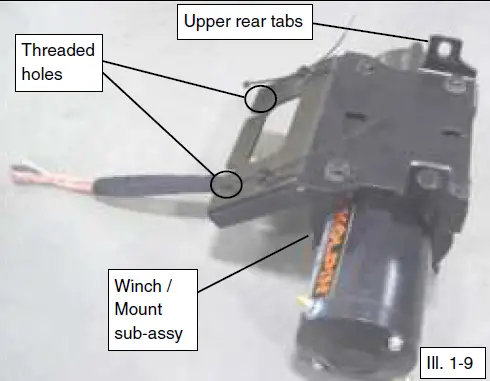
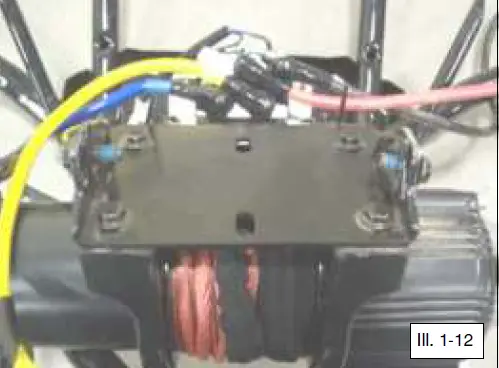
- Unspool a short portion of the cable from the winch mount sub-assembly as shown.

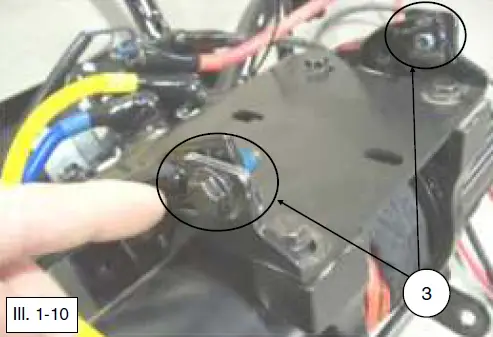
- Position the winch/mount sub-assembly into the bumper and align into the roller/contactor sub-assembly as shown. Align the rear upper tabs of winch/mount sub-assembly into the bumper and temporarily insert M8 bolts (item #3) into the holes, this will help keep the mounts aligned into the bumper.


- Fasten the winch/mount sub-assembly to the roller/contactor sub-assembly using the M8 bolts (item #3) inserted into the thread holes as shown. Tighten to M8 specification.

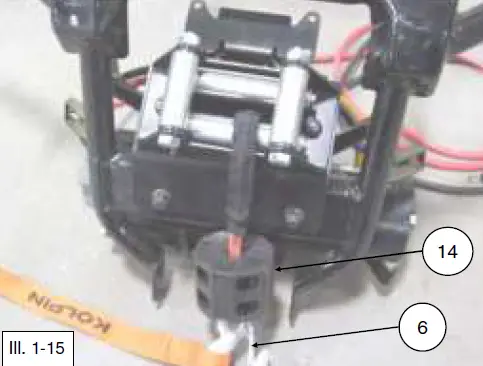
- Route the cable rope thru the roller fairlead and attach the clevis hook (item #6) onto the thimble end as shown and if equipped, the rubber bumper (item #14). The winch cable needs to be routed thru the roller fairlead off the top .

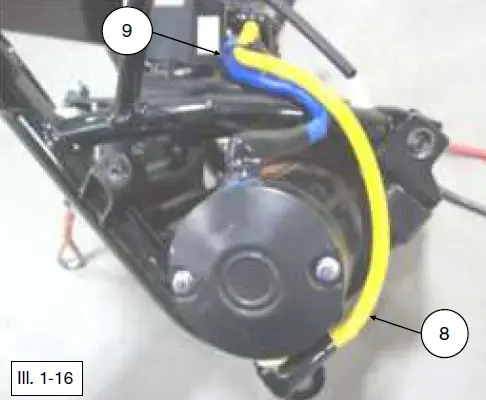
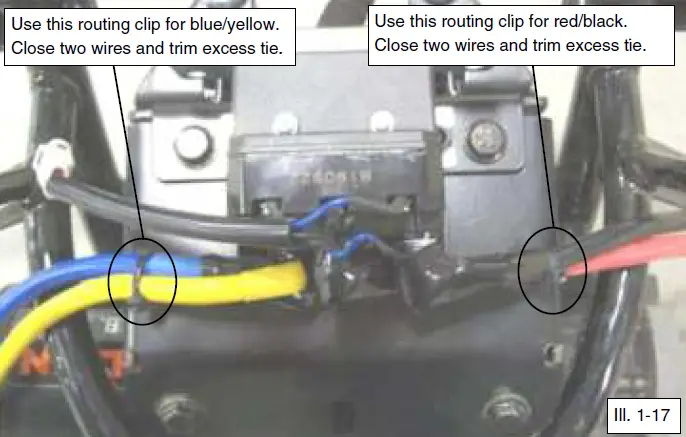
- The blue and yellow connections cables can now be routed and fastened to the winch motor terminals. Check and confirm wire routing and connections are as shown and make necessary adjustments before moving to next vehicle installation steps.


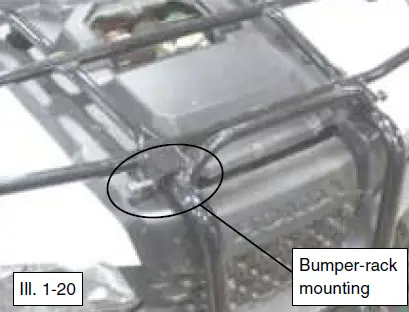
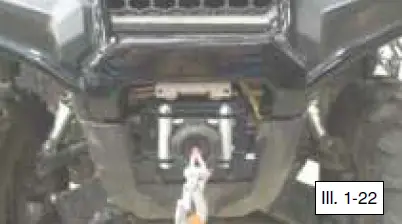
- Install front bumper-winch assembly onto the vehicle frame using the longer M8 bolts (item #3) for the two upper bumper locations as shown. Re-install the lower OEM M8 screws and OEM M6 shoulder screws. Re-install the rack mounting M8 bolt and nut. Reinstall the plastic engine guard.


 Note, the plastic engine guard can be flexed downwards to provide install access.
 - Tighten all fasteners to specifications.
- Check that all wires are free to move and not pinched between the vehicle chassis and the winch assembly.
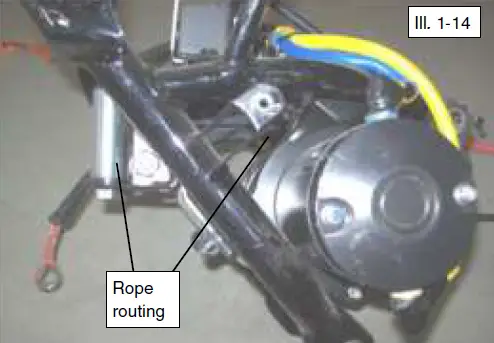
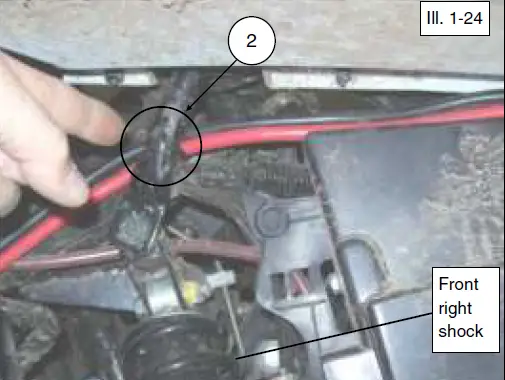
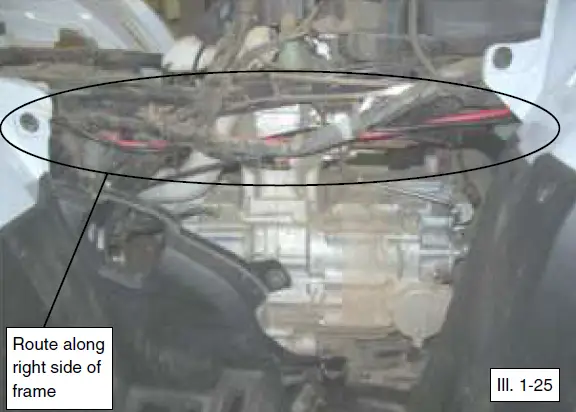
- Route the black (item #10) and red (item #11) power cables towards the right, in front of the radiator grill center cover as shown. Continue routing the red and black cables up over the front shock and then along existing wiring bundle back towards the battery. Attach cables to chassis frame at required locations using cable ties (item #2).


 Note, do not connect the winch cables to the battery at this time.


 Note, the plastic engine guard can be flexed downwards to provide install access.
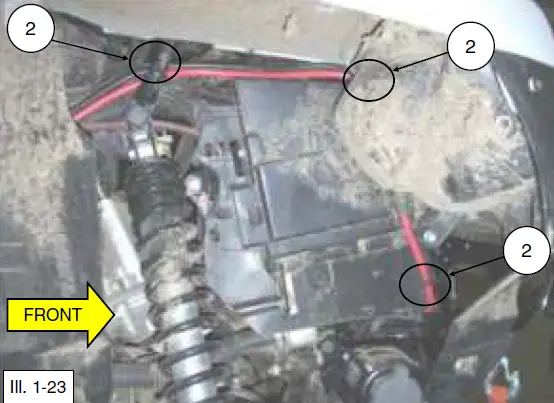
 Note, do not connect the winch cables to the battery at this time.
HANDLEBAR SWITCH INSTALLATION:
NOTE: See the Electrical Connections Reference Guide section of the instruction manual for detailed photos of each part and their respective connections.
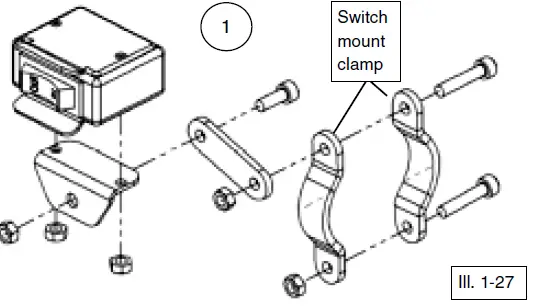
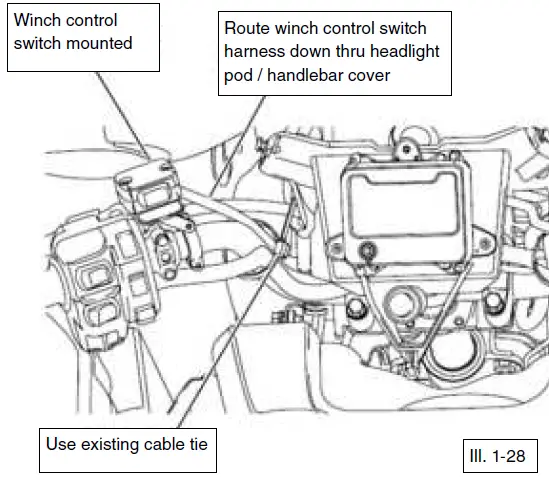
- Using the supplied screws, install the winch control handlebar switch (item #1) to the vehicle left handlebar and route the wire harness as shown. Torque screws to the specification listed, being careful not to overtighten.


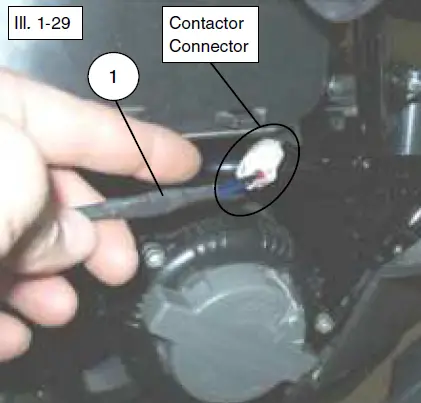
- Connect the white harness connector of the switch harness (item #1) to the winch contactor connector as shown.

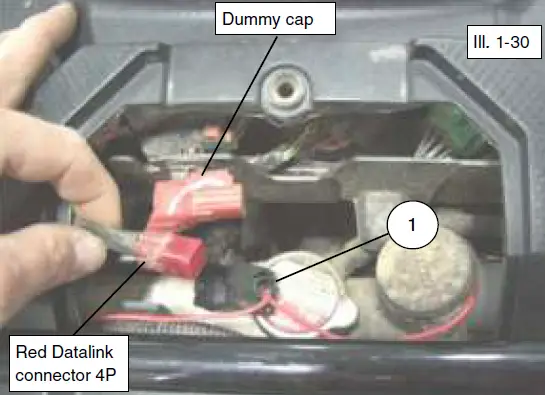
- Remove the radiator cap lid and route the red end (12V accessory power) of switch harness to area under front rack. Remove the dummy cap or accessory socket harness from the DLC 4P red connector as shown. Connect the switch harness (item #1) into the DLC connector and if equipped, connect the other end to the accessory socket harness, so 12V accessory power can be used at same time of winch operation. Secure winch harness to vehicle using cable ties (item #2).

FINAL INSPECTION:
- Confirm that all wiring is correct.
- Confirm that there are no exposed wires or terminals.
- All loose wires need to be wrapped tight, and secured away from moving parts and heat sources.
REINSTALLATION:
- Reinstall the radiator cap cover on vehicle.
- Reinstall red and black cables to battery terminals along with winch power cables (items #10 and #11) using OEM screws as shown.
- Reinstall the rear fender cover, tank cover and seat on the vehicle that were previously removed in step 4.
- With vehicle key in the ON position, check winch for proper operation.
HANDLEBAR SWITCH OPERATION:
When properly installed, the handlebar switch allows you to operate the winch while seated on the vehicle. Proper switch operation is shown.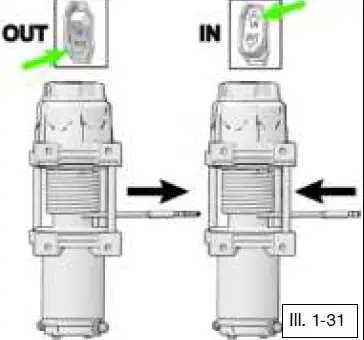
Five Year Mechanical Limited Warranty and Three Year Electrical Limited Warranty
For the period of five (5) years from the purchase date, Kolpin will replace for the original purchaser, free of charge, any mechanical part or mechanical parts found upon examination by Kolpin to be defective in material, workmanship, or both. For the period of three (3) years from the purchase date, Kolpin will replace for the original purchaser, free of charge, any electrical part or electrical parts found upon examination by Kolpin to be defective in material, workmanship, or both.
All transportation costs incurred submitting product to Kolpin for warranty consideration must be borne by the purchaser. If Kolpin determines that the product must be returned to the factory for credit, please call 1-877-956-5746 for a Return Merchandise Authorization (RMA) number and shipping instructions.
This warranty does not apply to parts that have been damaged by accident, alteration, abuse, improper maintenance, normal wear, or other causes beyond the manufacturer’s control. In order to protect you and your ATV, certain parts of the winch/plow system and/or hardware are designed to fail when the equipment is over-stressed. Parts that are lost due to loosening and improper maintenance are not covered under warranty. This warranty does not cover removal or reinstallation labor fees of the winch/plow system and related components.
Peripheral products such as engines, electric motors, and actuators may carry an original manufacturer’s warranty. Most hardware is general in nature and is easily obtained locally. Be sure to replace with minimum metric class 8.8 specification.
Kolpin Outdoors, Inc.
www.kolpin.com
TROUBLESHOOTING
If your winch is not functioning properly, below is a short guide that can help you diagnose and correct the problem.
Symptom | Possible Causes | Recommended Solution |
|
Winch will not operate | Contactor not receiving power | Turn vehicle key on. |
| Connections between components not in proper order | Check connections. Connect wired handlebar switch connection from vehicle main wire harness directly to contactor to make sure a direct connection will operate the winch. If connections are not in the order shown in the pictures in the last page, the whole system may not function or only certain parts of it will function. | |
| Loose battery cable connections | Tighten nuts on all cable connections. | |
| Keyed power circuit (orange wires) not properly powered | Check fuse box for 10A accessory circuit. Check voltage in certain places, especially orange wires coming out of the main harness by the steering post. | |
| Contactor malfunctioning | Tap contactor to loosen contacts. Apply 12 volts to coil terminals directly. A clicking indicates proper activation. | |
| Defective switch assembly | Replace switch assembly. | |
| Defective motor | Check for voltage at armature port with switch pressed. If voltage is present, replace winch assembly. | |
| Nested and bounded cable within winch assembly | Move free spool knob to the “free spool” position. Manually pull cable out of winch until end is met and then re-spool cable back into winch. | |
| Water has entered motor | Allow to drain and dry. Run in short bursts without load until completely dry. | |
| Winch makes noise but rope does not move | Contactor powered, but not winch | If you can hear a clicking sound when you press the winch control but the winch does not make any sounds, check the connections between the winch and the contactor. |
| Winch not in proper gear | Move free spool knob to the “locked spool” position, then recheck. If problem persists, a qualified technician needs to check and repair. | |
| Winch operates too slowly | Winch improperly loaded | Check that the winch is clear and the rope is not bound up and that there is no load pulling on the rope. |
| Insufficient current or voltage | The battery is weak, recharge. Run winch with vehicle motor running (battery should have a strong charge). | |
| Loose or corroded battery cable connections | Clean, tighten, or replace. | |
| Winch overheating | Winch running time too long | Allow winch to cool down periodically. |
| Winch operates in one direction only | Defective or stuck contactor | Tap contactor to loosen contacts. |
| Repair or replace contactor. | ||
| Defective switch assembly | Replace switch assembly. | |
| Defective brake assembly | Replace winch assembly. |
Note: If any hardware is missing, do not return to the store. Call us to help, Toll Free 1-877-956-5746.
ELECTRICAL CONNECTION REFERENCE GUIDE:
Winch with Roller Fairlead and Handlebar Switch