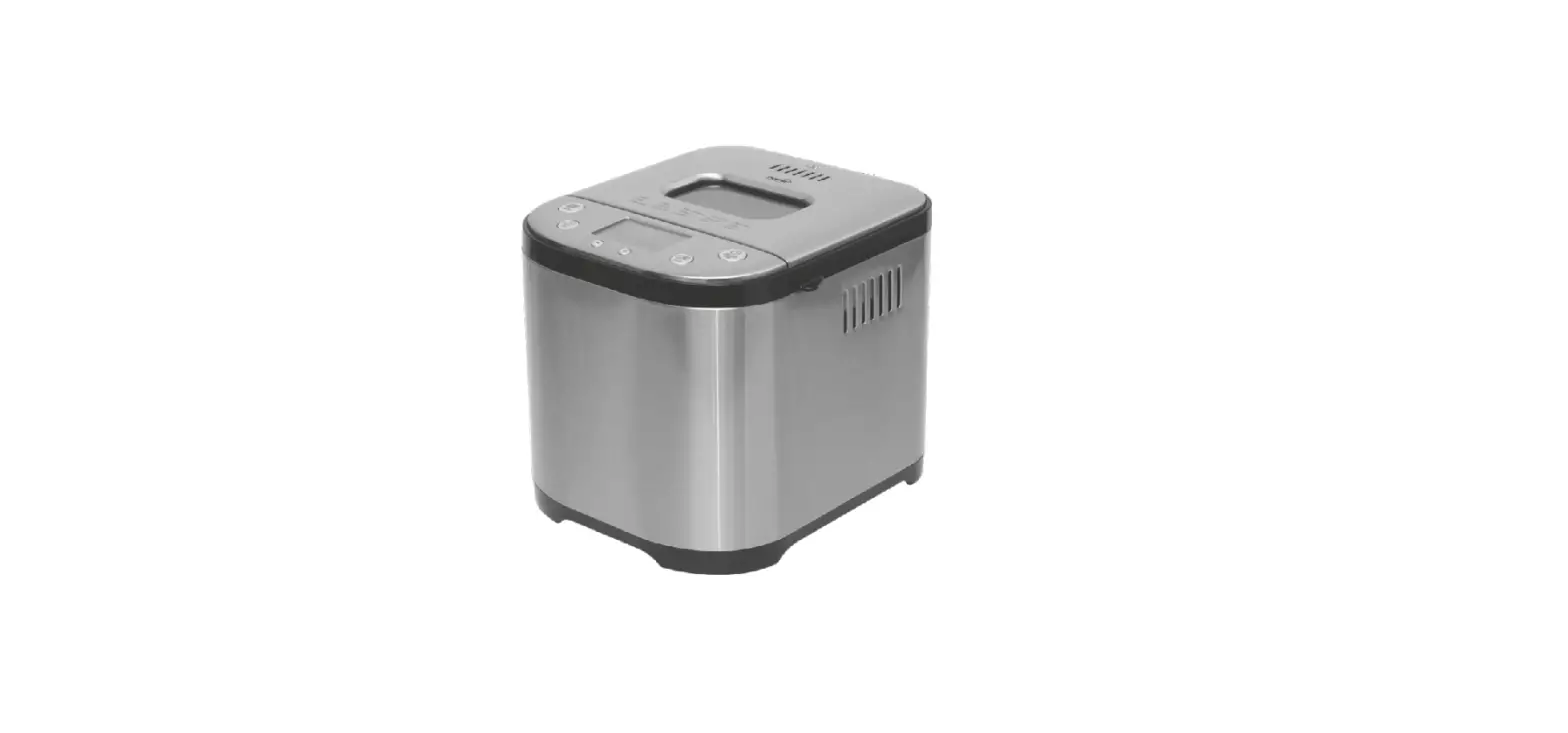
somogyi HG KS 900 Bread Maker

OVERVIEW
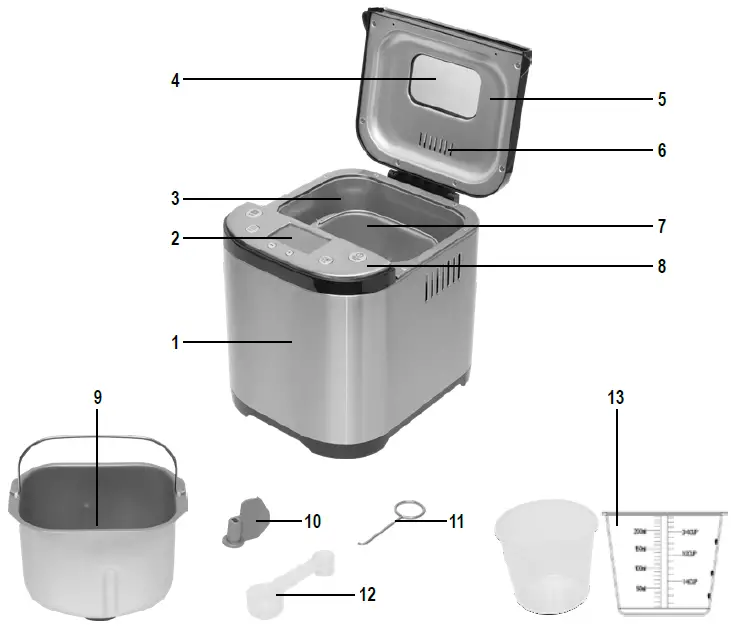
- stainless cover
- baking space
- baking space
- view window
- lid
- vent
- bread making pan
- control panel
- bread making pan
- kneading lever
- hook
- measuring spoon (small and big)
- measuring cup

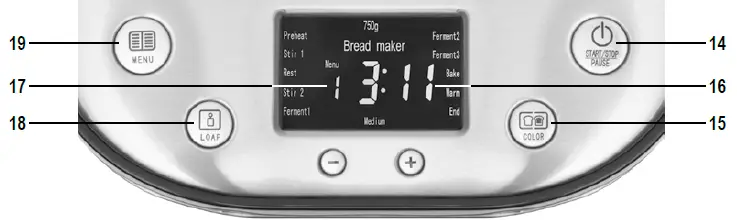
- switch on/off, pause
- baking colour
- time left
- number of program selected
- weight of bread
- program selection
IMPORTANT SAFETY INSTRUCTIONS
READ THE INSTRUCTION MANUAL CAREFULLY BEFORE USE AND RETAIN IT FOR LATER REFERENCE!
WARNINGS
- Before using the product, please read the following instruction manual and keep it for later reference. The original description was written in Hungarian language.
- This device can only be used by people with reduced physical, sensory or mental capabilities, or lack of experience and knowledge, as well as by children from the age of 8, only if they are under supervision or they receive relevant instructions for safe use of the device and understand the dangers arising from their use. Children must not play with the device. Children over the age of 8 may only clean or perform user maintenance on the device under supervision.
- Keep children under the age of 8 away from the device and its power cord!
- Make sure that the device has not been damaged during transport!
- Do not use where flammable vapors or explosive dust may be released! Do not use it in flammable or explosive environments!
- Do not put anything on top of the device!
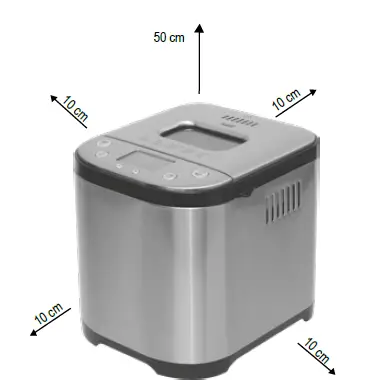
- Place the device on a solid, horizontal surface!
- Observe the minimum placement distances indicated in Figure 7! Take into account the safety regulations valid in the respective country!
- The device must not be connected to a program switch, time switch or separate remote control systems, etc. used together, which can turn it on independently
- Can only be used in dry indoor conditions! Protect from humid environments (e.g. bathroom, swimming pool)!
- DO NOT use the device near a bathtub, sink, shower, swimming pool or sauna!
- Unplug the appliance and let it cool down before moving or cleaning it.
- Pull the power cable out of the outlet by the plug, not the cord.
- Do not place the device on or near an electric or gas stove or other heat sources.
- It can only be operated under continuous supervision!
- Do not operate near children without supervision!
- The appliance may only be switched on with the bread pan that is perfectly in place and filled according to the recipe.
- The maximum amount of flour that can be loaded is 500 g. The maximum amount of yeast or baking powder that can be used: 2 small measuring spoons (accessory).
- Do not touch the device when it is under power! Do not touch the rotating mixing paddle.
- The lid must only be opened by its side tabs!
- BEWARE! When opening, hot air and steam may escape from the oven!
- If you notice any abnormality (e.g. you hear an unusual noise from the device or you smell a burning smell), switch it off immediately and unplug it!
- Protect from dust, moisture, sunlight and direct heat radiation!
- Never touch the device and the connection cable with wet hands!
- Check that the power cord and plug do not come into contact with water or other liquids!
- Unwind the connection cable completely!
- It may only be connected to a 230V~ / 50Hz grounded wall socket!
- Do not use an extension cord or splitter to connect the device!
- The power cable must not come in touch with a hot surface!
- Place the device in such a way that the plug is easily accessible and can be pulled out!
- Guide the connection cable in such a way that it cannot accidentally pull out or hang from the edge of the table!
- The device’s heating elements / heated surfaces are still warm for some time after switching off!
- Switch off the device by unplugging it after each use! Let the device cool down, clean it, and then store it in a dry, cool place!
- Due to continuous improvements, technical data and design may change without prior notice.
- The current user manual can be downloaded from the website www.somogyi.hu.
- We are not responsible for any typographical errors, and we apologize.
- Only private use is allowed, not industrial!
- Caution! Hot surface! Hot air or steam can escape from the ventilation hole next to the sign! Do not touch the lid as it may heat up during use!
- Caution: Risk of electric shock! Do not attempt to disassemble of modify the unit or its accessories. In case any part is damaged, immediately power off the unit and seek the assistance of a specialist.
- If the mains connection cable is damaged, it can only be replaced by the manufacturer, its repair service provider or a similarly qualified person!
COMMISSIONING
- Before installation, carefully remove the packaging, and make sure not to damage the unit or the power cord. If you find any damage, the unit must not be operated!
- Set the device on a solid, level surface.
- The ideal environment for preparing the recipes enclosed: -10 – 40 °C temperature; relative humidity (RH) <95%

- Observe the minimum placement distance shown in Figure 7! Observe the requirements effective in the country of use.
- Make sure that all parts are available!
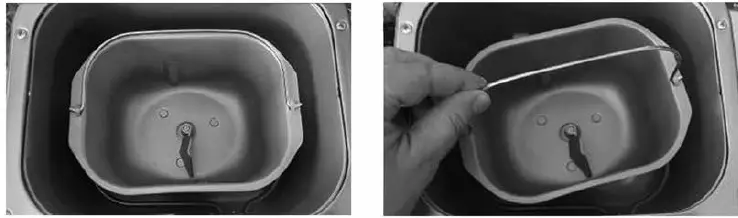
- Remove the bread-making pan from the appliance by turning it to the left and lifting it out.

- Remove the kneading lever from its shaft.
- Do not clean it in a dishwasher.
- Use dishwashing liquid and hand wash the bread making pan, kneading lever, hook, measuring cup and measuring spoon. Rinse with clean water and dry the washed parts!
- Put it back in its place and secure the bread-making pan by turning it to the right! Put the kneading lever back on its shaft.
- Plug the unit into a standard grounded wall socket. Now the unit is ready for operation! The appliance switches on in the default state: program 1, 750 g weight, medium colour.
- Select program 14 and start it. This is a 10-minute baking program with which you can sterilise the factory appliance. You may sense a mild smoke odour which is not harmful and disappears quickly. At the end of the program, switch the appliance off by unplugging the plug and allow it to cool down before using it again.
CLEANING, MAINTENANCE
Cleaning of the appliance house
- Before cleaning, unplug the device from the power supply.
- Let the device cool down!
- Clean the outside of the device with a slightly damp cloth. Do not use aggressive cleaning agents! Water must not get inside the device or on the electrical components!
- Do not submerge the device in water!
Cleaning of parts
- Parts must be cleaned after each use!
- Do not clean it in a dishwasher.
- Use dishwashing liquid and hand wash the bread-making pan, kneading lever, hook, measuring cup and measuring spoon. Do not scrape non-stick surfaces (bread making pan, kneading lever)
- Rinse with clean water and dry the washed parts!
- Put it back in its place and secure the bread-making pan by turning it to the right! Put the kneading lever back on its shaft.
STORAGE
After cleaning, place all parts in the bread-making pan. Store in a dry, cool place.
TROUBLESHOOTING
| Error observed | Possible cause of the error | Possible resolution of the error |
| The bread maker does not mix the flour, it does not work | Check the mains connection | Start the appliance by pressing the ‘Start/Stop’ (14) button |
| Check if a delay is set | If the display flashes ‘:’, then a delayed start is set. | |
| The appliance has malfunctioned | Contact an authorised service shop. | |
| Unusual noise | There is hard material or crumbs in the pan | Remove these foreign materials from the pan |
| The pan is not exactly in place | Correct the position of the pan | |
| Unusual smell | Damaged power cord | Keep the power cord away from hot surfaces |
| Something is touching the heating filament | After it has cooled down, clean the heating filament | |
| The display shows ‘E00’ | The temperature inside the product is below -10 °C | The product can be used at temperatures from -10°C to 40°C. |
| The display shows ‘E01’ | When switched on, the temperature inside the product is over 50 °C | Cool the room/product with a fan or air conditioner so that the temperature is below 40 °C |
| The display shows ‘EEE’ or ‘HHH’ | Sensor error | Contact an authorised service shop. |
| The bread is partly raw | Too much water added | Add less water |
| The ingredients were added in the wrong amounts | Follow the recipe |
DISPOSAL
Waste equipment must be collected and disposed separately from household waste because it may contain components hazardous to the environment or health. Used or waste equipment may be dropped off free of charge at the point of sale, or at any distributor which sells equipment of identical nature and function. Dispose of product at a facility specializing in the collection of electronic waste. By doing so, you will protect the environment as well as the health of others and yourself. If you have any questions, contact the local waste management organization. We shall undertake the tasks pertinent to the manufacturer as prescribed in the relevant regulations and shall bear any associated costs arising.
FEATURES
- 15 programs, e.g., quick baking, gluten-free, whole wheat or yogurt making
- baking dish capacity: 900 g
- choice of bread size: 500g, 750g, 900g
- 710 W output
- 60-minute keep-warm function
- 15-minute blackout memory
- fingerprint-proof stainless steel surface
- accessory measuring cup, measuring spoon
Features of the buttons and display of the appliance 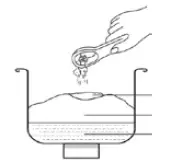
- MENU: You can select one of the 1 – 15 programs, which also appears on the display (17.)
- You will find the recipes for the programs at the end of the operating instructions).
- LOAF: You can set the baking weight (500g / 750 g / 900 g) for the following programs: 1-9, 13.
- COLOUR: You can select the color of the bread by selecting Light/Medium/Dark for the following programs: 1-10, 13, 14.
- START/STOP/PAUSE: You can start the selected program with this button (START).
- If you press the button briefly during operation, the operation stops temporarily (PAUSE), the time left flashes; you can then add more ingredients. Briefly press the button again to restart the operation and the countdown of the time left.
- If you keep the button pressed for more than 3 seconds in operation or PAUSE mode, the program stops (STOP).
- + / -: You can increase or decrease the time left that belongs to the selected program with the +/- buttons, if you want the food to be ready after the time set in this way. You can set the time by using the + / – buttons. If you reach the minimum time and press the ‘-’ button, the maximum set time will be displayed and will decrease from there. Similarly, if you press the ‘+’ button to reach the maximum set time and press the ‘+’ button again, the minimum set time will be displayed and will increase from there. For example, if you are preparing the ingredients for a loaf of bread at 7pm and you want it to be ready by 7am, set the time left to 12:00.
- Working phases: The different programs of the bread maker include different working phases, such as kneading or baking. The name of the current working phase flashes on the display. See the working phases in Table 1 at the end of the operating instructions.
SOUND SIGNALS
A short sound signal can be heard in the following cases:
- when connecting to a power source
- when pressing the push buttons
- at the end of programs
You will hear a long sound signal during kneading, warning you that you can now add more ingredients to the dough. An intermittent sound signal is heard when the ‘keep warm’ function ends.
BLACKOUT MEMORY
If the appliance is running a baking program and switches off, e.g., due to a blackout, it remembers the operation for 15 minutes and resumes it after it is under current again. In the event of a blackout lasting longer than 15 minutes, it forgets the program currently running and switches on in the default state. (program 1, 750 g weight, medium colour)
USEFUL ADVICE BEFORE BREAD BAKING
- Flour: Not all flours are suitable for baking bread with the perfect consistency. Use bread flour for the best results.
- Yeast powder: Please do not substitute the prescribed yeast powder with baking powder or baking soda in recipes. Use only yeast powder within its expiry date.
- Egg and sugar: These two ingredients make the baked bread more colourful and darker. If you add too much of these, it can lead to the bread burning. If the recipe calls for it, beat the egg in e.g., a measuring cup, and add it to the mixture.
- Correct flour-water ratio: Different flours, even of the same brand and type, but also of different manufacturers, may have different water absorption capacities. Therefore, check the consistency of the dough you are about to knead at the beginning of the kneading process.

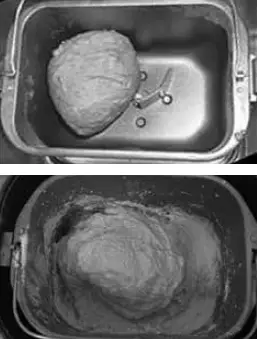
- Perfect flour-water ratio: After 5 minutes of kneading, the dough will separate from the sides of the dish and form a ball. It is not sticky to the touch. The top of the bread baked from this will be domed and the texture will be elastic with medium-sized holes.
- Too much water: After kneading for 5 minutes, the dough is sticky, soft, does not ball up and does not separate from the sides of the dish. The top of the bread baked from it has a flat and rough surface, the texture is inelastic, with large holes. It is recommended to add a tablespoon of flour to the dough and check the result after 5 minutes of kneading.

- Too little water: After 5 minutes of kneading, there is dry flour at the bottom of the dish, the dough does not ball up. The top of the bread baked from it is flat and rough, with a dense texture and small holes. It is recommended to add a tablespoon of water to the dough and check the result after 5 minutes of kneading.
BREAD BAKING
- Disconnect the bread maker by pulling out the mains plug.
- Remove the bread making pan from the baking space by turning it to the left and lifting it out.

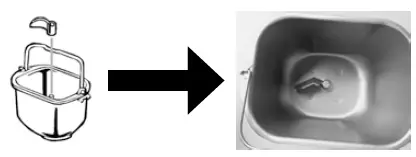
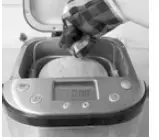
- Place the kneading arm on the shaft. (Figure 3)
- Put the ingredients listed in the recipe, first water, egg, butter, then flour and other dry ingredients, into the bread making pan, and the yeast powder at the end. (Figure 4) It is IMPORTANT that the yeast powder does not come into contact with water or other wet ingredients, and that it does not come into contact with salt or sugar, as this may reduce or prevent the yeast from working.
- Put the pan back in the baking space and turn it to the right, until it stops in place. Close the lid.
- Connect the bread maker to the mains.
- Select the program for the recipe, the weight and colour of the bread, possibly change the time left to delay the start of the program (see: description of the +/- buttons)
- It is IMPORTANT that, for a delayed start program, you consider the use of eggs, as they may spoil after a long delay. Cover the yeast with flour during delayed start, so that its activity is not reduced by the time the machine starts mixing the ingredients.
- Press the START/STOP/PAUSE button to start the program. The time left counts down. If you have chosen a delayed start, ‘Reservation’ will appear on the display.
- When the countdown shows 0:00, the appliance gives a sound signal, and the 1-hour keep warm function starts. If this also expires, the program will end, or by pressing the START/STOP/PAUSE button for at least 3 seconds we can stop it immediately.
- Disconnect the device by pulling out the mains plug.

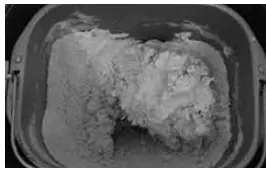
- Caution, it is hot! Remove the bread making pan with the bread. (Figure 5)
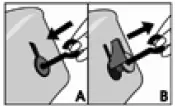
- Shake slightly, then remove the freshly baked bread from the bread making pan, e.g., tip it out from it. If the kneading lever bakes into the bread and is difficult to get it out, use the hook as shown in Figure 6.
PROGRAMS, RECIPES
- For the programs and the corresponding recipes, see Table 2 at the end of the operating instructions.
TECHNICAL SPECIFICATIONS
- power supply:…………………………………………………….. 220-240 V~ 50 Hz
- output……………………………………………………………….. 710 W
- baking dish capacity:…………………………………………… 900 g
- environment temperature
- for operation:…………………………………………….. 10 °C – 40 °C
- for storage:……………………………………………….. -10 °C – 50 °C
- dimensions:……………………………………………………….. 280 x 290 x 325 mm
Working phases
- Preheat
- Stir
- Rest
- Ferment
- Bake
- Warm
- End
Recipes
| Soft | Small spoon |  | Big spoon |
| 500 g | 750 g | 900 g | |
| water | 160 ml | 240 ml | 290 ml |
| butter | 2 Big spoon | 2 Big spoon | 3 Big spoon |
| tablesalt | 1/2 Small spoon | 1/2 Small spoon | 1 Small spoon |
| sugar | 1 Big spoon | 2 Big spoon | 3 Big spoon |
| milkpowder | 2 Big spoon | 3 Big spoon | 5 Big spoon |
| flour | 300 g | 400 g | 475 g |
| yeastpowder | 1 Small spoon | 1 Small spoon | 1 Small spoon |
| Sweet | Small spoon | | Big spoon |
| 500 g | 750 g | 900 g | |
| water | 160 ml | 240 ml | 310 ml |
| butter | 2 Big spoon | 2 Big spoon | 3 Big spoon |
| tablesalt | 1/2 Small spoon | 1/2 Small spoon | 1 Small spoon |
| sugar | 4 Big spoon | 6 Big spoon | 6 Big spoon |
| milkpowder | 2 Big spoon | 3 Big spoon | 4 Big spoon |
| flour | 300 g | 400 g | 500 g |
| yeastpowder | 1 Small spoon | 1 Small spoon | 1 Small spoon |
| Natural sourdough | Small spoon | | Big spoon |
| 500 g | 750 g | 900 g | |
| water | 160 ml | 200 ml | 240 ml |
| sugar | 1 Big spoon | 1 Big spoon | 2 Big spoon |
| milkpowder | 2 Big spoon | 3 Big spoon | 4 Big spoon |
| butter | 1 Big spoon | 1 Big spoon | 2 Big spoon |
| tablesalt | 1/2 Small spoon | 3/4 Small spoon | 1 Small spoon |
| flour | 275 g | 350 g | 400 g |
| yeastpowder | 1/3 Small spoon | 1/3 Small spoon | 1/3 Small spoon |
| French Bread | Small spoon | | Big spoon |
| 500 g | 750 g | 900 g | |
| water | 200 ml | 260 ml | 320 ml |
| butter | 2 Big spoon | 2 Big spoon | 3 Big spoon |
| tablesalt | 1/2 Small spoon | 1/2 Small spoon | 1/2 Small spoon |
| milkpowder | 2 Big spoon | 3 Big spoon | 4 Big spoon |
| flour | 300 g | 400 g | 500 g |
| yeastpowder | 1 Small spoon | 1 Small spoon | 1+1/4 Small spoon |
| Whole-wheat | Small spoon | | Big spoon |
| 500 g | 750 g | 900 g | |
| water | 210 ml | 280 ml | 340 ml |
| butter | 2 Big spoon | 2 Big spoon | 3 Big spoon |
| tablesalt | 1/2 Small spoon | 1 Small spoon | 1+1/2 Small spoon |
| flour | 150 g | 200 g | 250 g |
| wholewheatflour | 150 g | 200 g | 250 g |
| sugar | 2 Big spoon | 3 Big spoon | 4 Big spoon |
| yeastpowder | 1 Small spoon | 1+1/4 Small spoon | 1+1/2 Small spoon |
| Quick | Small spoon | | Big spoon |
| 500 g | 750 g | 900 g | |
| (40-50 °C) water | 180 ml | 240 ml | 300 ml |
| butter | 2 Big spoon | 2 Big spoon | 3 Big spoon |
| tablesalt | 1/2 Small spoon | 1/2 Small spoon | 1/2 Small spoon |
| flour | 280 g | 375 g | 450 g |
| sugar | 1 Big spoon | 2 Big spoon | 3 Big spoon |
| milkpowder | 2 Big spoon | 3 Big spoon | 4 Big spoon |
| yeastpowder | 2 Small spoon | 3 Small spoon | 4 Small spoon |
| Sugar-free | Small spoon | | Big spoon |
| 500 g | 750 g | 900 g | |
| water | 120 ml | 180 ml | 240 ml |
| butter | 2 Big spoon | 2 Big spoon | 3 Big spoon |
| tablesalt | 3/4 Small spoon | 1 Small spoon | 1+1/4 Small spoon |
| flour | 280 g | 375 g | 450 g |
| egg | 1 | 1 | 1 |
| Xylitol | 3 Big spoon | 4 Big spoon | 5 Big spoon |
| milkpowder | 2 Big spoon | 3 Big spoon | 4 Big spoon |
| yeastpowder | 1 Small spoon | 1 Small spoon | 1 Small spoon |
| Multigrain | Small spoon | | Big spoon |
| 500 g | 750 g | 900 g | |
| water | 120 ml | 170 ml | 210 ml |
| butter | 2 Big spoon | 2 Big spoon | 3 Big spoon |
| tablesalt | 1/2 Small spoon | 3/4 Small spoon | 1 Small spoon |
| wholewheatflour | 50 g | 75 g | 100 g |
| oatmeal | 50 g | 75 g | 100 g |
| flour | 200 g | 250 g | 300 g |
| egg | 1 | 1 | 1 |
| yeastpowder | 1 Small spoon | 1 Small spoon | 1 Small spoon |
| Milky loaf | Small spoon | | Big spoon |
| 500 g | 750 g | 900 g | |
| milk | 120 ml | 180 ml | 240 ml |
| butter | 2 Big spoon | 2 Big spoon | 3 Big spoon |
| sugar | 2 Big spoon | 3 Big spoon | 4 Big spoon |
| flour | 280 g | 375 g | 450 g |
| tablesalt | 1/2 Small spoon | 3/4 Small spoon | 1 Small spoon |
| egg | 1 | 1 | 1 |
| milkpowder | 2 Big spoon | 3 Big spoon | 5 Big spoon |
| yeastpowder | 1 Small spoon | 1 Small spoon | 1 Small spoon |
| Cake Small spoon Torta | |
| egg | 4 |
| butter | 100 g |
| sugar | 150 g |
| cakeflour | 380 g |
| tablesalt | 1 Small spoon |
| baking soda | 3,5 g |
| This program bakes the dough | |
| Raw dough Small spoon Presno testo / Syrové těsto / Sirova tjestenina | |
| water | 280 ml |
| butter | 2 Big spoon |
| egg | 2 |
| tablesalt | 1+1/3 Small spoon |
| sugar | 1 Big spoon |
| flour | measuring cup (13) |
| The program mixes the dough but does not bake it. | |
| Leaven dough | Small spoon Big spoon |
| water | 240 ml |
| butter | 2 Big spoon |
| tablesalt | 1+1/2 Small spoon |
| sugar | 1 Big spoon |
| flour | 3 measuring cup (13) |
| yeastpowder | 1+1/2 Small spoon |
| The program mixes the dough, ferments it but does not bake it. | |
| Gluten-free | Small spoon | | Big spoon |
| 500 g | 750 g | 900 g | |
| water | 120 ml | 180 ml | 240 ml |
| butter | 2+1/2 Big spoon | 3 Big spoon | 3+1/2 Big spoon |
| tablesalt | 1/2 Small spoon | 1 Small spoon | 1+1/2 Small spoon |
| vegetable oil | 2 Big spoon | 2+1/2 Big spoon | 3 Big spoon |
| gluten free flour | 140 g | 210 g | 280 g |
| cornflour | 140 g | 210 g | 280 g |
| yeastpowder | 1 Small spoon | 1+1/4 Small spoon | 1+1/2 Small spoon |
| Bake |
| If you are already experienced enough in baking bread, you can bake any type of dough you have prepared with this bake program 12 right away. The baking time can be adjusted in 1-minute increments between 10 minutes and 1 hour 10 minutes. |
| Yogurt | Small spoon Big spoon |
| milk | 350 ml |
| yogurt | 50 ml |
| sugar | 3 Big spoon |
| The default preparation time is 8 hours, adjustable in 10-minute increments from 5 hours to 13 hours. | |
CONTACTS
Producer
- SOMOGYI ELEKTRONIC®
- H – 9027 Győr, Gesztenyefa út 3.
- www.somogyi.hu
SOMOGYI ELEKTRONIC SLOVENSKO s. r. o.
- Ul. gen. Klapku 77, 945 01 Komárno, SK
- Tel: +421/0/35 7902400
- www.somogyi.sk
Distribuitor: S.C. SOMOGYI ELEKTRONIC S.R.L.
- J12/2014/13.06.2006 C.U.I.: RO 18761195
- Cluj-Napoca, judeţul Cluj, România, Str. Prof. Dr. Gheorghe Marinescu, nr. 2, Cod poştal: 400337
- Tel: +40 264 406 488,
- Fax: +40 264 406 489
- www.somogyi.ro


