![]()
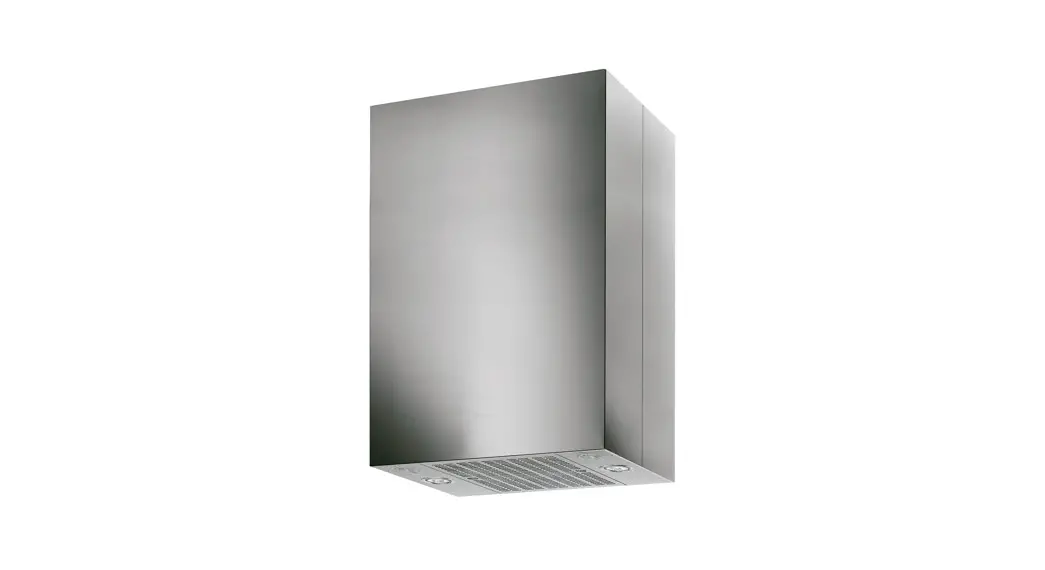
RØROSHETTA SENSE
![]()
Installation instructions Suspended
403103, 2022-03-22
TYPES OF VENTILATION
TYPES OF VENTILATION
The product is manufactured for different types of ventilation.
Before installation, check which type of ventilation the product is intended for.
| Duct out + Recirculation | (DR) |
| Balanced ventilation + Common Exaust | (BC) |
| External engine + Central ventilation | (EC) |
SAFETY AND RECOMMENDED TOOLS
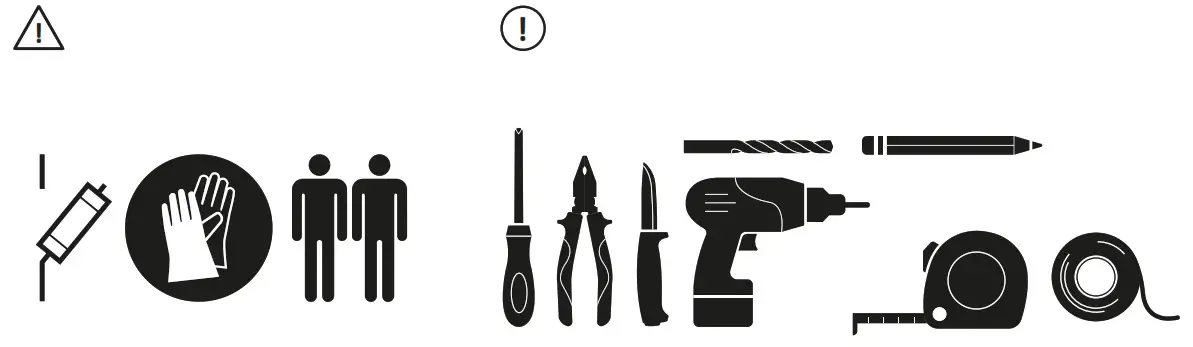
SAFETY![]() Read, understand and follow the instructions to avoid personal injury and product damage.
Read, understand and follow the instructions to avoid personal injury and product damage.
Warning levels![]() Danger indicates that an accident will occur if the instructions are not followed. The accident leads to serious personal injury or possibly death.
Danger indicates that an accident will occur if the instructions are not followed. The accident leads to serious personal injury or possibly death.![]() Warning indicates that an accident may occur if the instructions are not followed. The accident can lead to serious personal injury or possibly death.
Warning indicates that an accident may occur if the instructions are not followed. The accident can lead to serious personal injury or possibly death.![]() Caution indicates that an accident may occur if the instructions are not followed. The accident can lead to personal injury.
Caution indicates that an accident may occur if the instructions are not followed. The accident can lead to personal injury.
Installation and maintenance![]() Electrical connection to 230 VAC with protective earth.
Electrical connection to 230 VAC with protective earth.
Cut the power to the product by the circuit breaker before installation and maintenance.
The product is supplied with cable and earthed plug to be connected to earthed wall socket. The wall socket must be installed by an authorized electrician.
To minimize the risk of accidents, permanent installation, replacement of cable racks or other type of connection must be carried out by an authorized electrician.
LED lights should be replaced with original spare part.
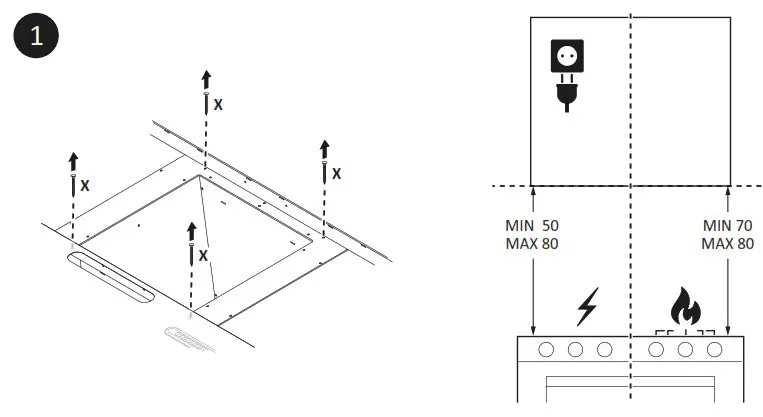
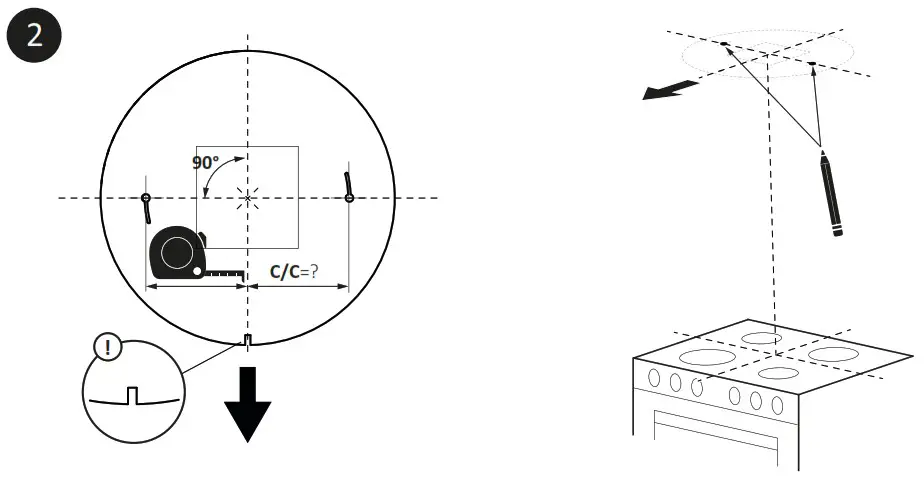
Please contact Customer service, see section Service and warranty.![]() Warning! The distance between stove and product must be 50–80 cm for an electrical stove and 70–80 cm for a gas hob.
Warning! The distance between stove and product must be 50–80 cm for an electrical stove and 70–80 cm for a gas hob.
If a higher mounting height is recommended by the gas hob manufacturer, this must be taken into account.
Note! If the product shall be supplemented with a Power Control Unit (PCU) see separate section.
![]() Caution!
Caution!
Class 3R laser is used as a component for the air quality sensor system. Service of the sensor unit sould be done by Class 3R laser authorized personnel. Please contact Customer service, see section Service and warranty. In case of damage exposing the visible red laser beam, avoid direct eye exposure to the beam and do not inspect it with optical instruments.
![]() Caution!
Caution!
Different wall and ceiling materials require different types of fasteners. If necessary, supplement with plugs and replace screws with those intended for the material.
Diversion of the exhaust air shall be carried out in accordance with regulations issued by the relevant authority.
Utblåsningsluften får inte ledas in i rökkanal som används för avledning av rökgaser från t.ex. gasspisar, gas- eller braskaminer, ved- eller oljepannor, etc.
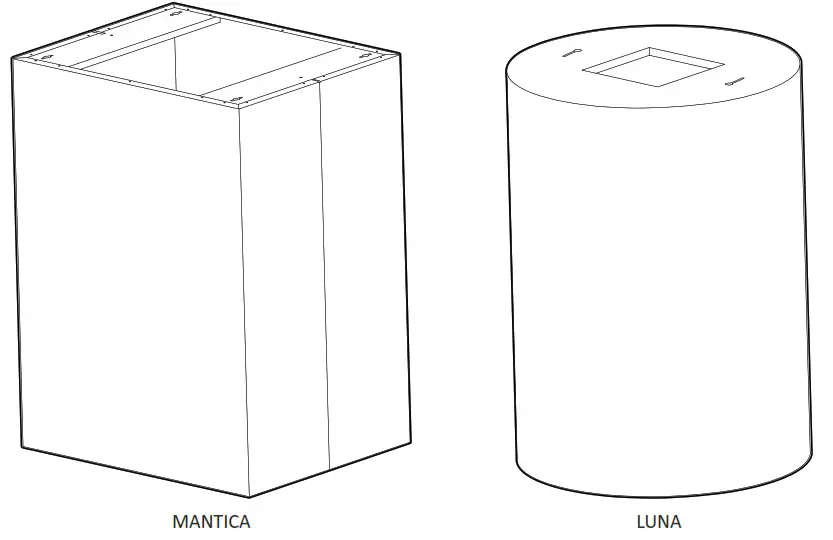
CONTENT IN DELIVERY
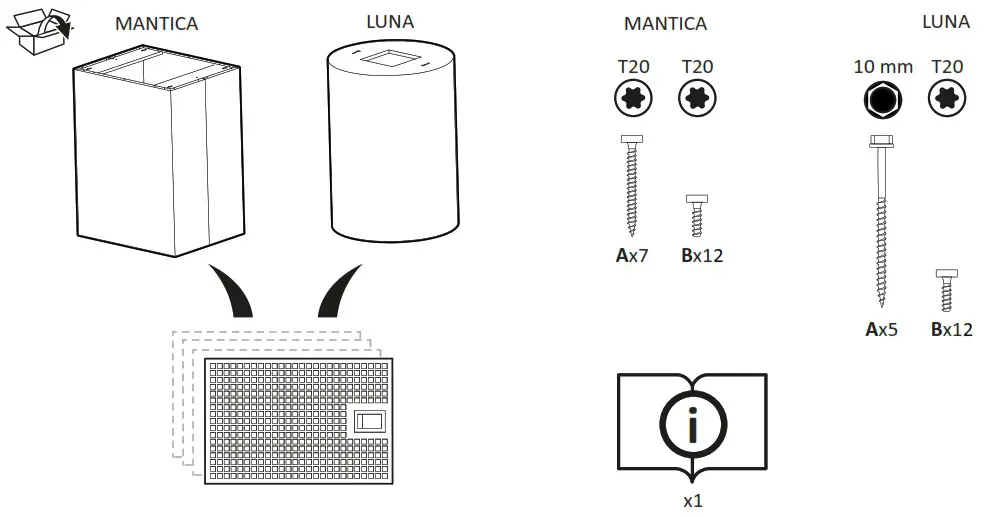
![]() Intended for: Ø160 mm / Ø125 mm
Intended for: Ø160 mm / Ø125 mm
Duct out + Recirculation (DR)
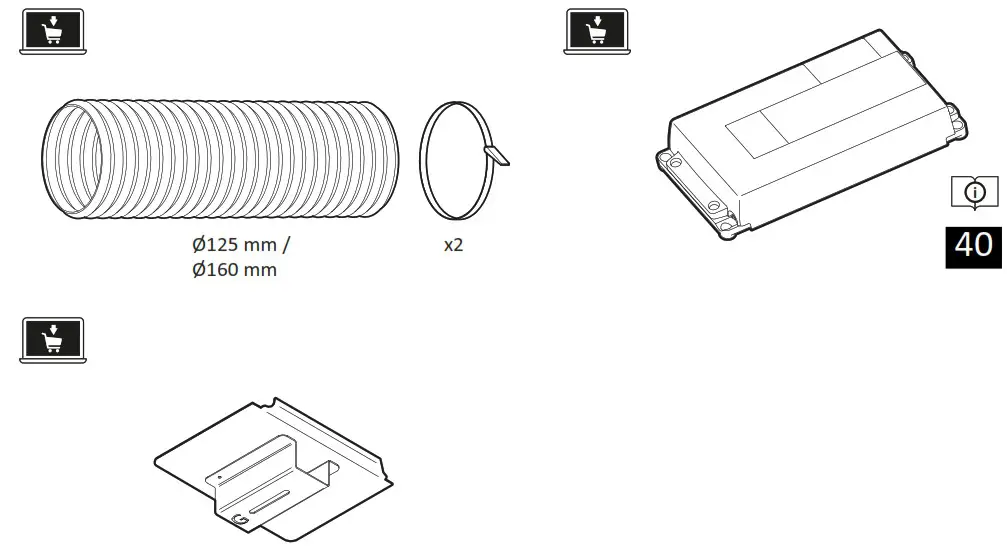
MANTICA
Duct out + Recirculation (DR)
PRIOR TO INSTALLATION
Note. If the product shall be supplemented with a Power Control Unit (PCU) see separate section.
INSTALLATION
POWER AND IO UNIT
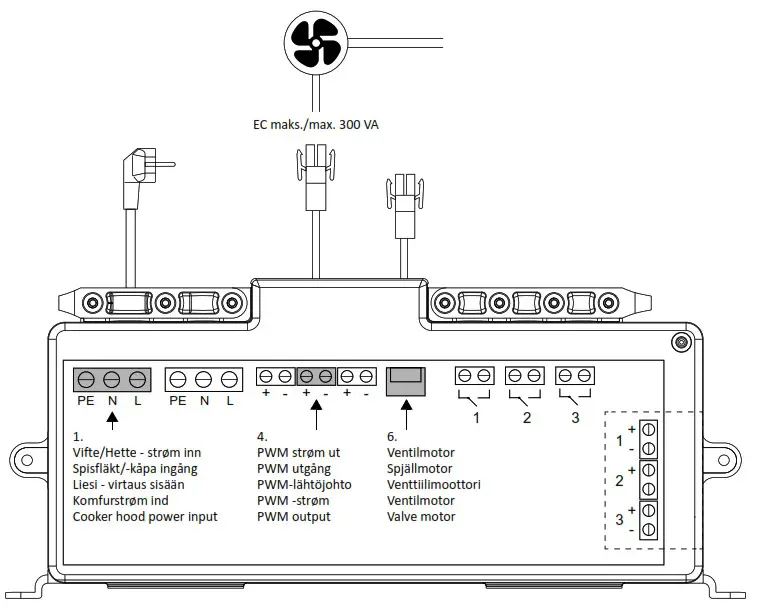
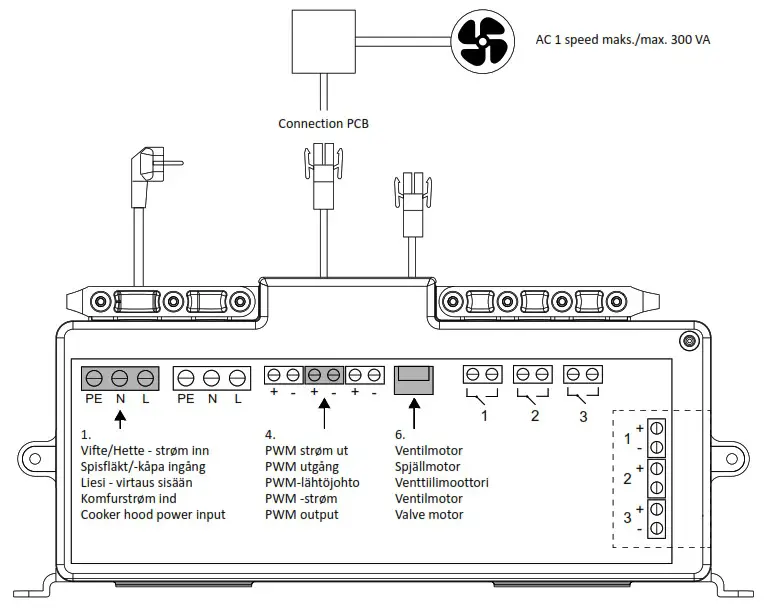
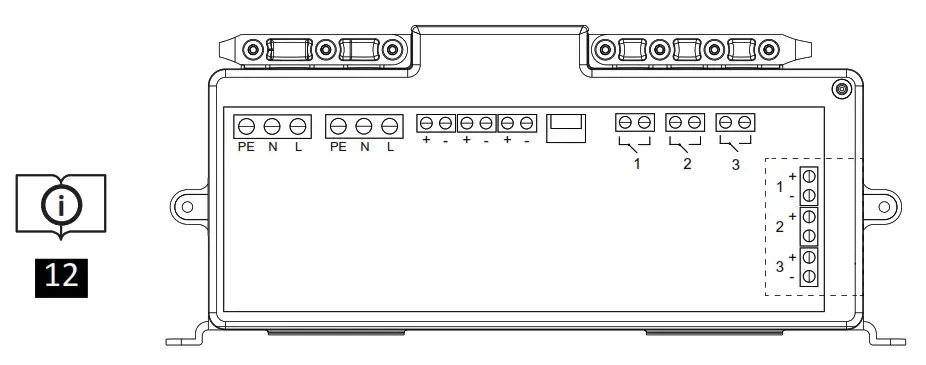
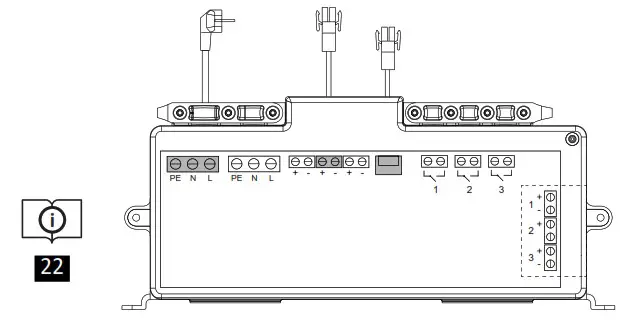
CONNECTION DIAGRAM
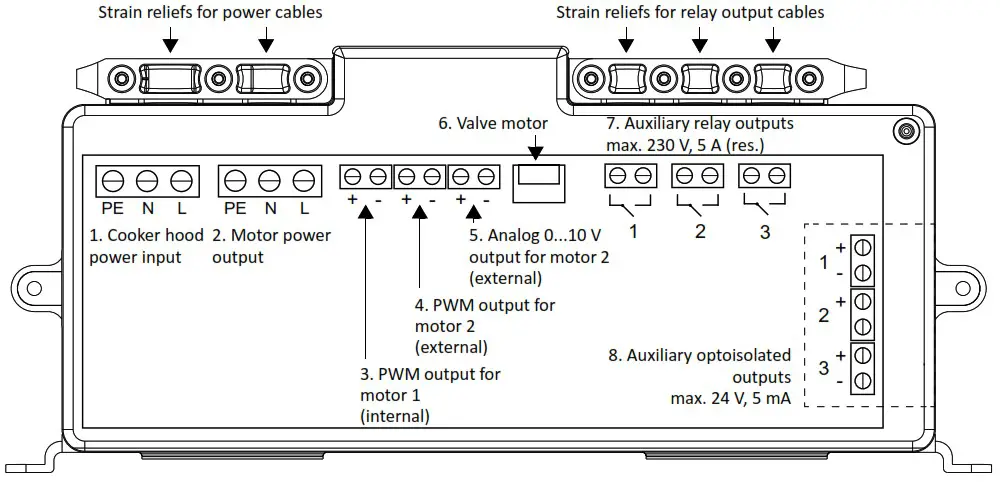
Connection diagram PIO, standard
Warning! The Power and IO Unit (PIO) contains dangerous voltages. Connections should be made only by a qualified electrician. All power input and output cables should be disconnected from mains voltage before opening the PIO Unit. Only the auxiliary optoisolated outputs [8] covered by a separate lid may be opened and connected by the user.
The PIO Unit of the Røros Sense C system allows additional external wired connections for
many purposes. Most common are the PWM and 0…10 V control signals for standard EC fans and ventilation units.
PIO UNIT SPECIFICATIONS
| Power Supply and IO Unit (PIO) | ||
| Model names Sense CR PIO PRO (PIO-R1) | ||
| Power supply | Total cooker hood input power: 230 V, 50 Hz, 0.5…30 W depending on operating mode | |
| 2 | Power output to external motor | 230 V, max 5 A. This output is not switched, only passed through from the cooker hood input to the external motor output. |
| 3 | Control output to motor 1 (internal) | 10 V PWM, not isolated. Motor input is PELV safe. |
| 4 | Control output to | Two optional terminals (same control |
| 5 | motor 2 (external) | value is sent to both): 1) 10 V PWM, not isolated. Must be connected to another PELV safe system. 2) 0…10 V Analog, not isolated. Must be connected to another PELV safe system. |
| Power output for LED lamps (2x) | Two output channels with 3,3 V positive control signals | |
| 7 | Auxiliary relay outputs (3x) | Max. 230 Vac, 5 A (resistive) |
| 8 | Auxiliary optoisolated outputs (3x) | Max. 24 VDC, 5 mA |
| Operational temperature | 0…50 °C (long-term) 0…70 °C (short-term) | |
MANTICA
Balanced ventilation + Common Exaust (BC)/ External engine + Central ventilation (EC)
C. PRIOR TO INSTALLATION
Note. If the product shall be supplemented with a Power Control Unit (PCU) see separate section.
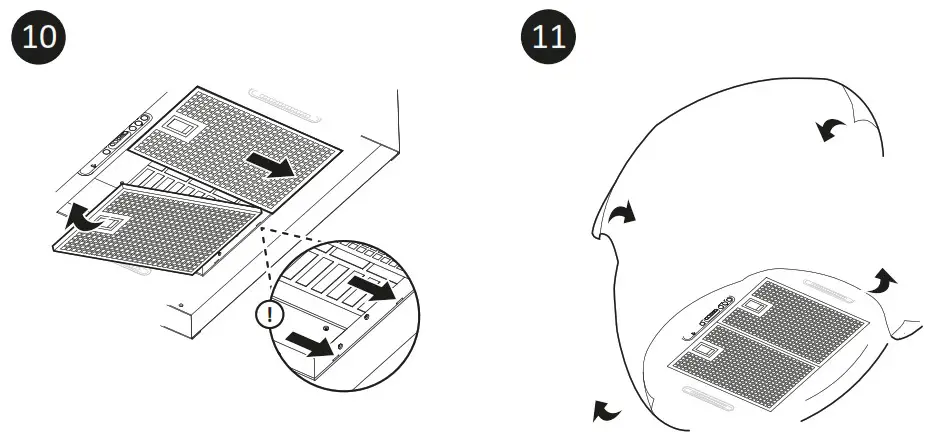
REPLACEMENT OF SEALED DAMPER HATCH WITH DAMPER HATCH (BASIC VENTILATION)
Note Only applicable where basic ventilation takes place via the cooker hood.![]() Caution! The cooker hood is fitted with a sealed damper hatch.
Caution! The cooker hood is fitted with a sealed damper hatch.
If the cooker hood shall be used in a kitchen that does not have separate basic flow ventilation the cooker hood must be equipped with damper hatch (basic ventilation).
Replace the damper hatch prior to installing the cooker hood, see separate instructions.
INSTALLATION
POWER AND IO UNIT
Connection Diagram PIO Unit Specifications
ELECTRICAL INSTALLATION
EC FAN
AC FAN
Connection Diagram
ADJUSTING DAMPER
![]() Warning! Damper adjustment should be made only by a qualified professional.
Warning! Damper adjustment should be made only by a qualified professional.
FORCED VENTILATION
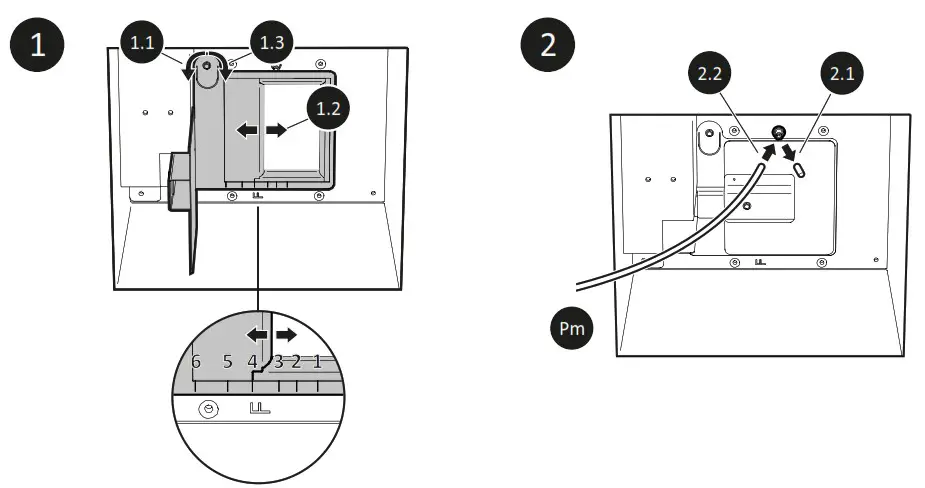
1.2 Move the damper hatch in the desired position corresponding to the diagram, see section Forced ventilation, Adjustment diagram.
2.2 Measure the P pressure to check that the value of the m desired forced ventilation is obtained, see section Forced ventilation, Adjustment diagram.
BASIC VENTILATION
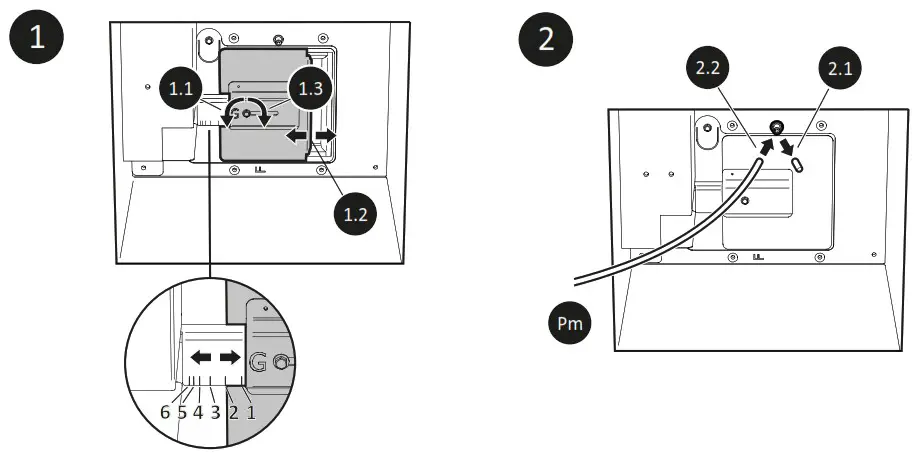
1.2 Move the damper hatch with the curved side in the desired position corresponding to the desired value, see section Basic ventilation, Adjustment diagram.
2.2 Measure the P pressure to check that the wished basic m ventilation value is obtained, see section Basic ventilation, Adjustment diagram.
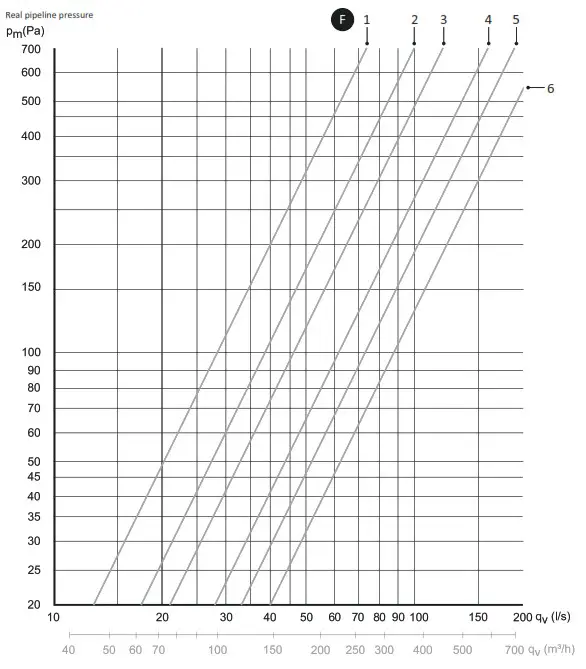
FORCED VENTILATION
SIZING DIAGRAM
ADJUSTMENT DIAGRAM
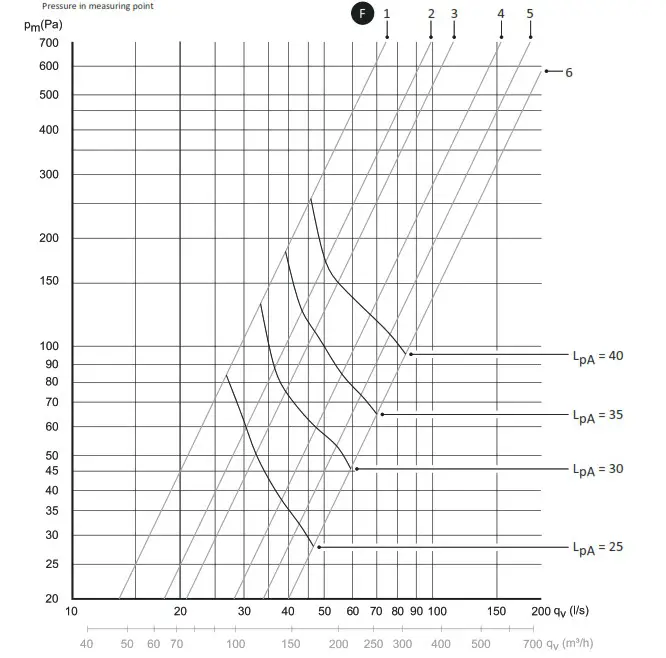
LpA = The A-weighted sound pressure level at 10 m² Sabin
(Lpw = Relative A-weighted sound power level 1pW)
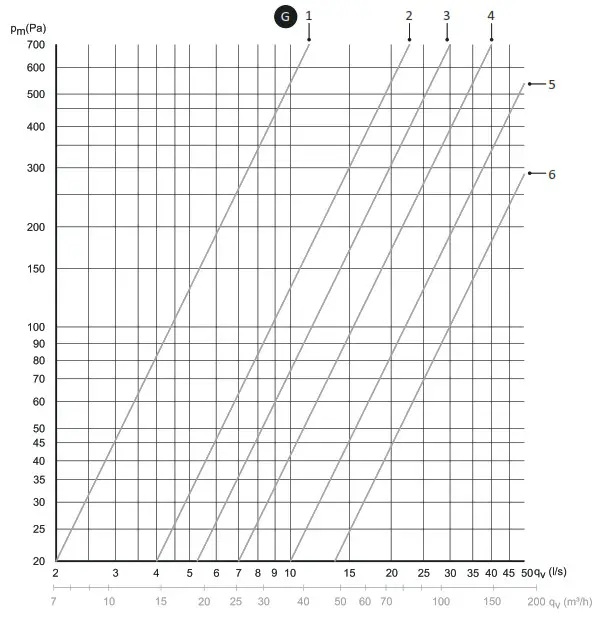
BASIC VENTILATION
SIZING DIAGRAM
Real pipeline pressure
ADJUSTMENT DIAGRAM
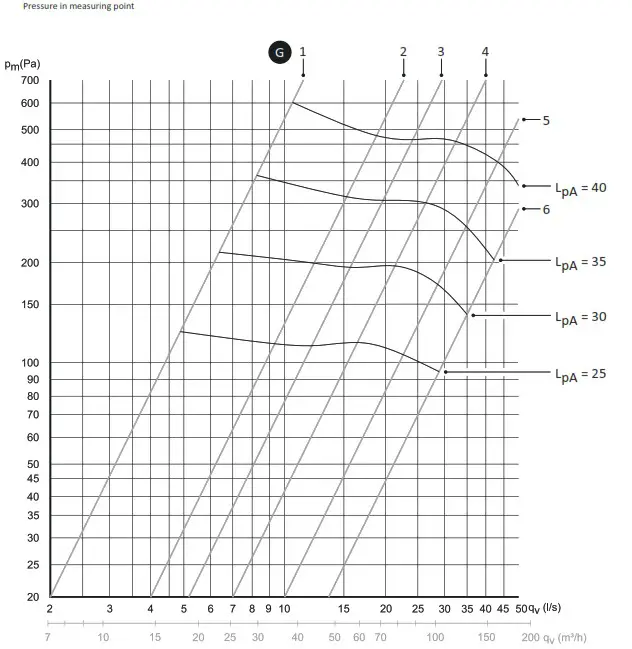
LpA = The A-weighted sound pressure level at 10 m² Sabin
(Lpw = Relative A-weighted sound power level 1pW)
LUNA
Duct out + Recirculation (DR)
C. PRIOR TO INSTALLATION
Note. If the product shall be supplemented with a Power Control Unit (PCU) see separate section.
D. INSTALLATION
POWER AND IO UNIT
Connection Diagram PIO Unit Specifications
LUNA
Balanced ventilation + Common Exaust (BC)/ External engine + Central ventilation (EC)
C. PRIOR TO INSTALLATION
Note. If the product shall be supplemented with a Power Control Unit (PCU) see separate section.
REPLACEMENT OF SEALED DAMPER HATCH WITH DAMPER HATCH (BASIC VENTILATION)
Note Only applicable where basic ventilation takes place via the cooker hood.![]() Caution! The cooker hood is fitted with a sealed damper hatch. If the cooker hood shall be used in a kitchen that does not have separate basic flow ventilation the cooker hood must be equipped with damper hatch (basic ventilation). Replace the damper hatch prior to installing the cooker hood, see separate instructions.
Caution! The cooker hood is fitted with a sealed damper hatch. If the cooker hood shall be used in a kitchen that does not have separate basic flow ventilation the cooker hood must be equipped with damper hatch (basic ventilation). Replace the damper hatch prior to installing the cooker hood, see separate instructions.
D. INSTALLATION
POWER AND IO UNIT
Connection Diagram PIO Unit Specifications
F. ELECTRICAL INSTALLATION
EC fan
AC fan
G. ADJUSTING DAMPER
![]() 23
23
Forced ventilation
Basic ventilation
H. FORCED VENTILATION
![]() 25
25
Sizing diagram
Adjustment diagram
I. BASIC VENTILATION
![]() 27
27
Sizing diagram
Adjustment diagram
Power Control Unit (PCU)
SAFETY
![]() Warning! The cooker hood controls the stove and/or oven only if it is equipped and correctly coupled with the optional Power Control Unit (PCU).
Warning! The cooker hood controls the stove and/or oven only if it is equipped and correctly coupled with the optional Power Control Unit (PCU).
PAIRING SENSOR UNIT WITH A POWER CONTROL UNIT (PCU)
PAIRING AND TESTING
Method A: Pairing with a PCU using the App
- Electrically install the Power Control Unit (PCU). See separate instructions.
- Open RørosHetta app.
- Go to the Installation Guide section.
This section may also launch automatically during a new device installation.
The app guides you through the PCU pairing and testing process with questions regarding kitchen, stove and oven type for optimizing the system performance.
Method B: Pairing with a PCU manually
- Electrically install the Power Control Unit (PCU). See separate instructions.
- Hold down the OK and plus buttons simultaneously for five seconds until you hear a signal and the OK indicator on the sensor panel illuminates purple.
- Put back the fuses or enable the circuit breaker for the cooker and oven or connect the PCU power cord to the wall socket.
The PCU will now pair with the sensor unit, an alarm is issued with a sound (···) and light signal (the OK indicator on the sensor panel blinking green). - Test the system. See separate section.
Testing the system manually
- Turn on one cooker plate on maximun power.
Note With an induction cooker use a suitable dish. - Hold down the OK button for five seconds. The system should cut off the cooker power.
- Test that none of the cooker plates and oven, if connected to the PCU, are operable. If ok, switch off cooker and oven.
- Press the OK button on the sensor unit to return the cooker power.
The OK indicator should blink green once.
TROUBLESHOOTING
SENSOR UNIT
Press the OK button to perform a function check.
- When the OK button blinks green once, the cooker hood and sensor unit are working properly.
- All other colors indicate an error according to the table below.
| Fault | Probable cause | Action |
| Blinks yellow once | Fault in the sensor unit. | Contact Customer service. |
| Blinks yellow twice | Fault in sensor unit components or software. | Contact Customer service. |
| Blinks yellow three times | Incorrect installation of the sensor unit. | Contact Customer service. |
Product equipped with a Power Control Unit (PCU)
| Fault | Probable cause | Action |
| Blinks blue once | Connection problems between sensor unit and PCU. | Disconnect and then connect the fuse. If the indicator light is still on, contact Customer service. |
| Blinks blue twice | Fault in PCU. | Same as above. |
| Blinks blue three times | PCU is overheated. | Contact Customer service. |
| Problem | Remedy |
| Faulty installation position of the Sensor Unit | Sensor Unit has detected that it is not installed on a level surface, pointing directly at the stove. If mounted under cooker hood, check that the cooker hood bottom surface is perfectly level. Also check that the sensor distance from the stove is within the limitations in section Safety. |
| The appliance repeatedly gives false alarms | Test the system according to separate section. If the product is in working order, but gives repeatedly false alarms, re-run the “Installation Wizard” in the RørosHetta App to make sure that all kitchen and cooker related parameters are correct. |
 Installation animation Wall-mounted
https://vimeo.com/544722789
 https://apps.apple.com/fi/app/roroshetta/id1588858325 |  https://play.google.com/store/apps/details?id=fi.safera.safera |
![]()
Røros Metall AS
Stamphusveien 11, NO-7374 Røros, Norway
Tel. +47 72 40 94 00 | [email protected]
www.roroshetta.no ![]()
 Provide feedback on instructions
403103, 2022-03-22


