![]()
QUALITY POWER TOOLS
| GLM 40/124 P EASY | |
| GLM 42/124 SP EASY | |
| GLM 46/140 SP PLUS | |
| GLM 51/160 SP PLUS |
ORIGINAL INSTRUCTIONS
EXPLANATION OF SYMBOLS


|
|
|
|
| To reduce the risk of injury, the user must read and understand this manual before using this product | Damage to hearing if effective hearing protection is not worn. | The machine must not be damped and must not be operated in a wet environment. | Important, danger, warning, or caution |


 |  |
| |
| Engines generate carbon monoxide, an odorless, colorless, toxic gas. If carbon monoxide is inhaled, it can cause nausea, loss of consciousness, or death. | Fuel and fuel vapors are extremely highly inflammable and explosive. Starting the engine gives rise to sparks. | Running engines generate heat. Parts of the engine, especially the exhaust, get extremely hot. Switch off the engine and let it cool down. | Conforms to relevant safety standards |
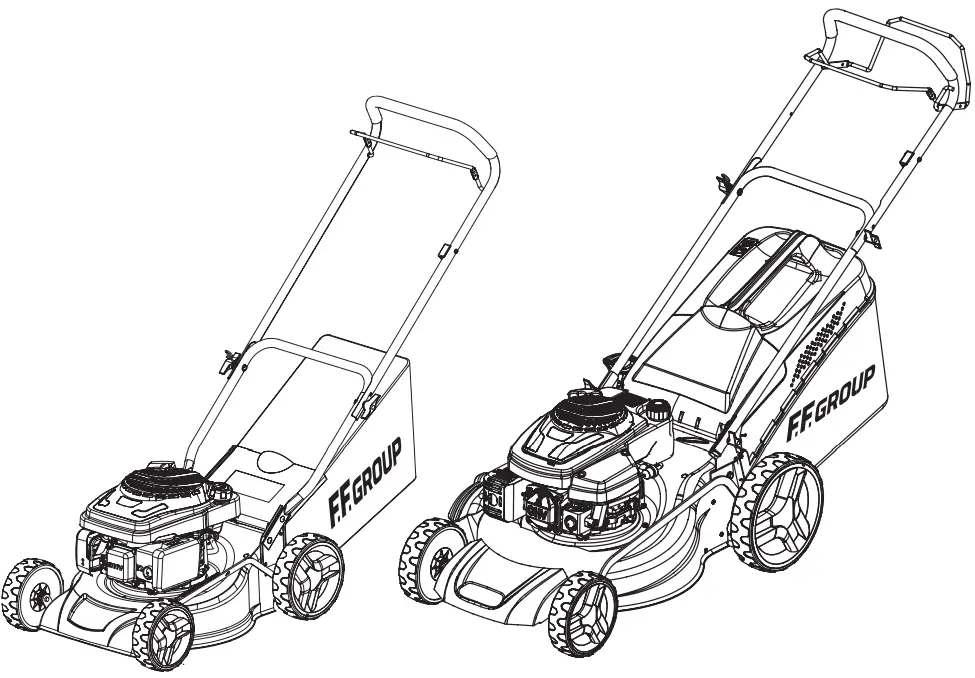
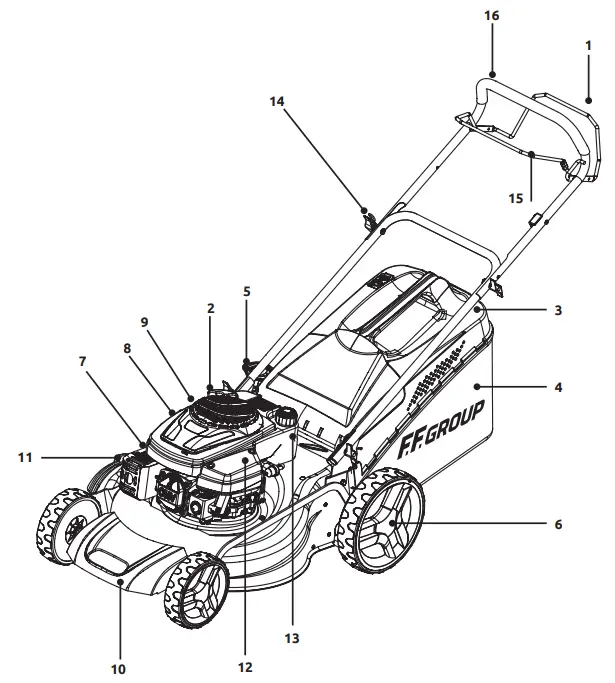
LAWN MOWER IDENTIFICATION
- Drive lever
- Handle
- Upper grass box
- Lower grass bag
- Height adjustment handle
- Wheel and wheel cover
- Side discharge guide plate
- Deck cover
- Oil dipstick
- Front cover with handle
- Spark plug
- Air filter
- Fuel tank
- Flash nut
- Brake lever
- Soft grip
SAFETY GUIDELINES
WARNING! The information contained within this safety section is extremely important. Personal injury to the user and to others may result if this section is not read and acted upon at all times.
- Before starting your mower inspect it carefully to ensure that there are no loose parts and that it is in a good working condition.
- Protect your footing. Always walk, never run, when operating the lawnmower.
- Clear the area to be mowed of any stones, sticks, wire, and debris before its operation, and always ensure that you mow by keeping a safe distance away from adults, children, or animals (at least 14m distance).
- Keep hands, feet, and clothing away from the mower’s moving parts, and always wear appropriate footwear (avoid sandals or open shoes).
- Never put your hands or feet underneath the chassis of the lawnmower, while the engine is running.
- Be aware that the machine’s exhaust area and other parts of the lawnmower get very hot during, and right after use.
- Turn off the engine and disconnect the spark plug cap before cleaning, transporting, or making adjustments, and never leave the mower unattended.
- Mow across the face of slopes, not up & down, and avoid mowing on very steep slopes. We recommend avoiding mowing when it is raining or after nightfall.
- Do not operate the machine by pulling it towards you as you risk pulling it onto your feet. Instead, always push and walk behind your lawnmower.
- Do not fill the tank, or start the lawnmower indoors, or in a poorly ventilated area, as exhaust gases contain poisonous substances and petrol fumes are flammable and dangerous.
- Always use unleaded petrol no more than 3 months old. Fill the tank using a funnel, but never completely. Clean up any overflow or splashes before operation.
- To inspect the underside of your mower, only tilt the lawnmower to your right when standing behind it (this is the side where the exhaust is near the ground), otherwise oil may leak into inappropriate areas of the engine. Never tilt the lawnmower when the engine is running.
- Turn off the engine before emptying the grass-catcher, and before clearing any grass caught in the rear flap where the catcher fits.
- Do not alter engine governing settings, as excessive speed is dangerous and can reduce engine life.
- Never open the fuel filler cap, or fill the tank, if the engine is still hot after use, and please ensure that you securely tighten the petrol cap after filling.
- Do not transport the mower in a vehicle if there is any petrol left in the tank.
- Store fuel and oil in a cool, well-ventilated place, away from direct sunlight and not near gas cylinders or hot water heater systems.
- Do not smoke when filling the fuel tank, using the machine, or when petrol is in the immediate area. Never use or store the mower near flames.
- We recommend wearing a safety helmet, ear protectors, safety goggles, and safety boots when using a lawnmower.
- All servicing and repair work under warranty must be carried out by an authorized service.
ASSEMBLY INSTRUCTIONS
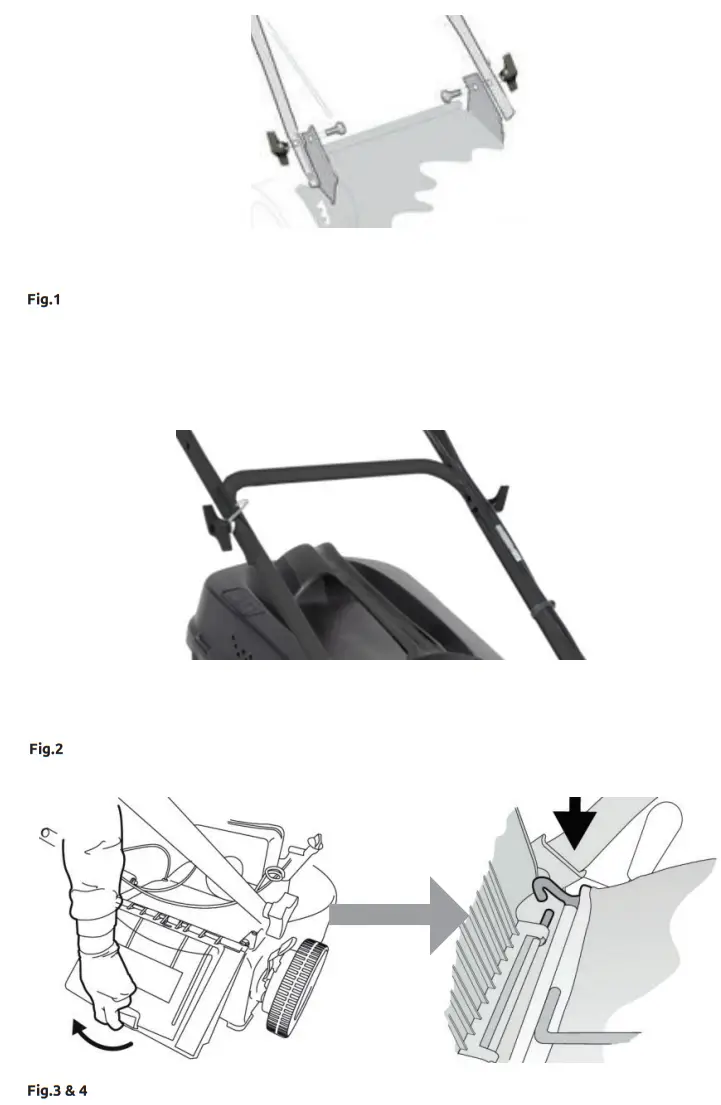
LOWER HANDLEBAR ASSEMBLY
Attach lower handlebar bolts. Take the weight of the handlebar and fit the lower bolt first (fig.1).
UPPER HANDLE BAR ASSEMBLY AND FIT CABLE CLIP
Fit the right-side handle adjustment assembly and spring cord guide. Fit the left side handle adjustment assembly, then fit cable clip to fix left side cables and fit cable ties to fix right side cables (fig.2).
ATTACH THE GRASS CATCHER
Lift the Rear Flap with one hand, and lower the grass catcher hooks onto the bar, left & right (fig.3 & 4).
BEFORE OPERATION
WARNING! The following procedures must be carried out before you start the engine of your lawnmower.
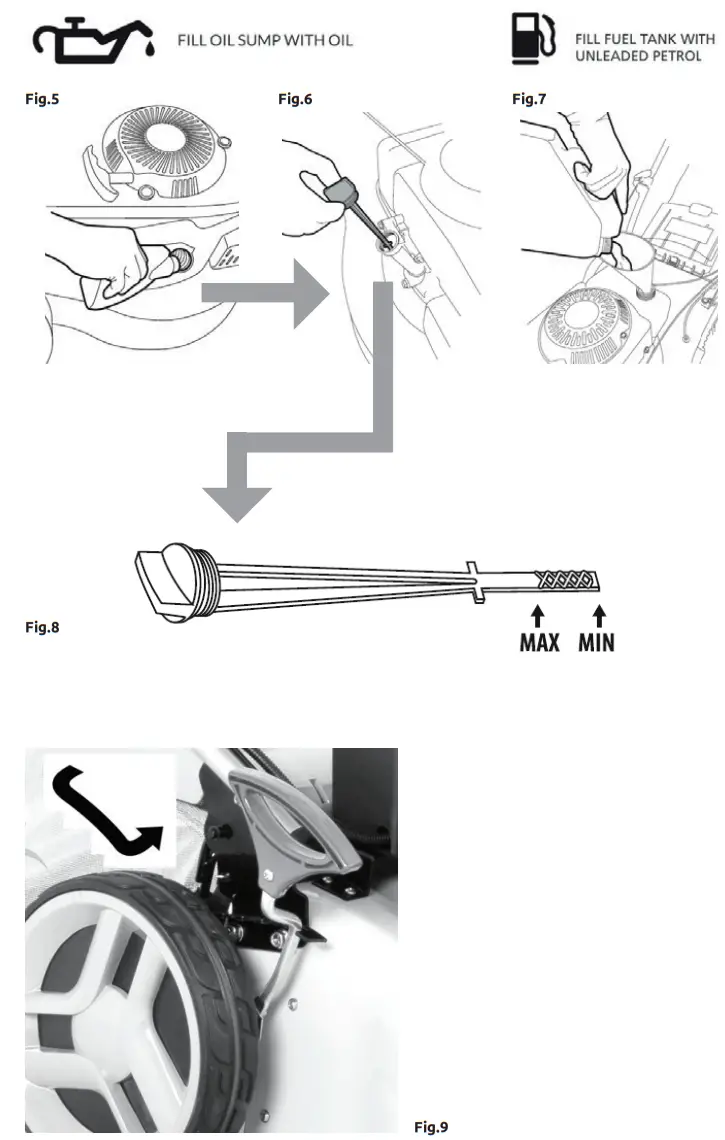
FILLING OIL SUMP WITH OIL
The mower is NOT supplied with oil in the engine, for safety reasons. You have to add oil prior to its first operation, according to the technical specifications of each model.
- Firstly, remove the warning label from the dipstick, then remove the dipstick and slowly pour SAE15W/40 SF lawnmower grade engine oil into the engine via the oil filler (fig .5). Replace the dipstick and tighten.
- Before you use the mower each time, check the oil level (fig. 6) and if necessary top up with SAE15W/40 SF oil. To check the oil level, unscrew the dipstick, wipe with a rag and replace it with the oil filler (do not screw it back in place), remove the dipstick again and check the level.
- The oil level must be between the min and max marks on the dipstick (fig.8). Replace the dipstick and screw it into place.
FILL FUEL TANK WITH PETROL
Petrol is highly flammable so extreme caution must be taken when handling it. Always store petrol in approved containers and you must ensure that you use fresh petrol that it is less than 4-6 weeks old. Do not mix oil with petrol. - To put petrol in the fuel tank, firstly remove the warning label from the petrol cap. It’s best to fill the tank using a clean funnel but never fill it completely (fig. 7). Instead, leave at least 13mm from the bottom of the filler neck to allow for expansion. Ensure that you securely tighten the petrol cap after filling. (Funnel & fuel not supplied).
WARNING! Turn the mower off before adjusting the cutting height lever.
CUTTING HEIGHT ADJUSTMENT
For best results adjust the cutting height of your mower to suit your mower conditions. Do not try to remove too much grass in one pass. Adjustment of the cutting height is made centrally. Hold the Cut Height Adjustment Lever, positioned on the mower’s right-hand rear wheel. Move the lever outwards to release it from its locating notch. Move the lever towards the front of the machine in order to increase the cutting height, or towards the rear in order to reduce the cutting height. Return the lever to the locating notch to set the desired cutting height. Make sure the handle fits snugly and securely into its serrated holder (see fig 9).
STARTING THE ENGINE
WARNING! Keep hands, feet, and clothing well away from moving parts, the exhaust, and the engine cowling. Refer to “Safety Guidelines”.
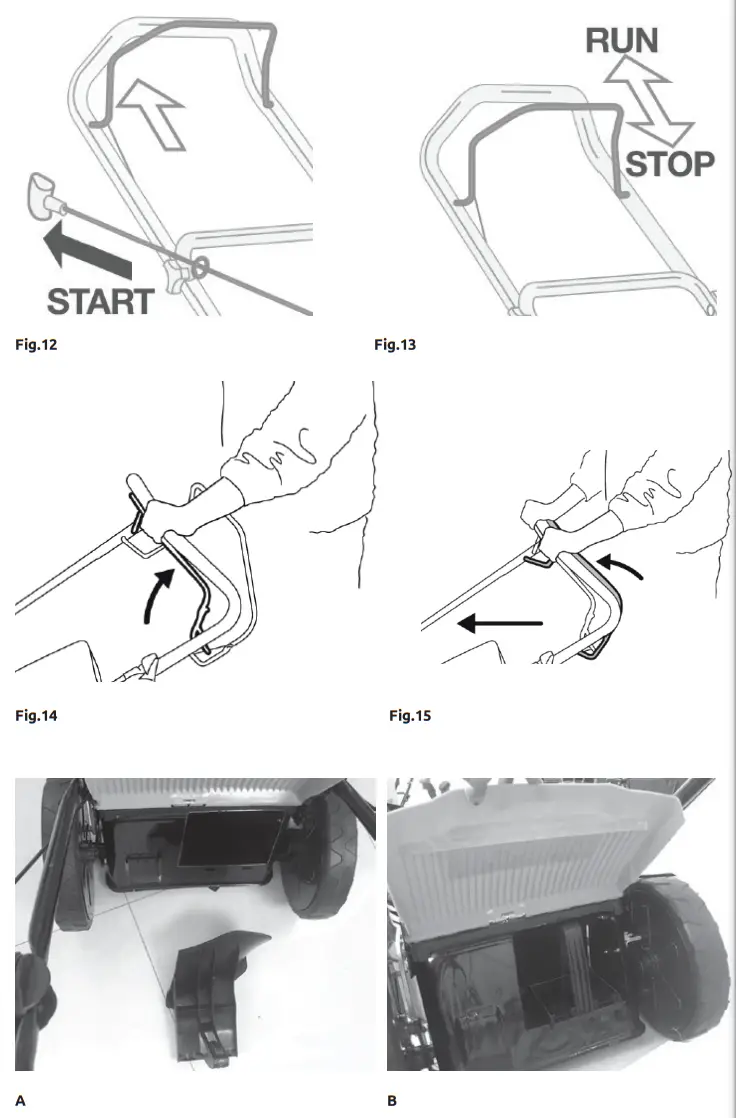
ONCE THE MACHINE HAS BEEN SET UP PROPERLY, START THE ENGINE AS IT FOLLOWS:
- 1. Start the mower in a clear, level area. Do not start the engine if the cutting blade is resting on rough and uncut grass as this may cause difficulties at start-up.
- 2. Push the red primer three times (fig.10) Note: Priming is usually unnecessary when restarting a
warm engine. Note: If you push the primer too many times, excessive fuel will flood the carburetor and the engine will be difficult to start. - 3. Stand behind the handlebars. Move the operator control lever positioned in front of the handlebars rearwards so that the lever is resting against the handlebars (fig.11). Take hold of the starter handle firmly with the other hand.
- 4. Pull back the starter until you feel resistance and then pull the handle firmly and briskly to turn the engine (fig. 12).
- 5. Repeat the above procedure as necessary until the engine starts.
- 6. To turn off your mower, directly release the operator control lever to stop the engine (fig.13).
WARNING! The cutting blade turns when the engine is being started.
MOWING
Start your mower (see: starting the engine). Keep hold of the Brake (OPC) Lever (see fig.14). Releasing the Brake (OPC) Lever will stop the engine to avoid accidents (fig.13). To power the mower forward, move the Drive Lever up and forward (fig.15). The Mower can be pushed with the drive disengaged for more precise handling. After mowing and before emptying the Grass Catcher, ensure that the engine has been turned off.
STOPPING THE MOWER
To stop the mower, release the operator control lever. The engine and the blade will stop turning automatically. If there is a build-up of grass beneath the chassis, stop the engine, remove the spark plug cap and wait until the engine has been cooled before clearing the grass.
when the engine has been switched off, the cutter continues running for several seconds therefore do not touch the underside of the mower until the cutter has come to a
standstill!
MULCHING INSERT AND SIDE DISCHARGE ATTACHMENT
MULCHING INSERT
The mulching insert prevents grass from being collected by blocking the collection chute. This allows the grass clippings to be deposited back on the lawn during cutting.
- Open the rear deflector guard, hold it in position and insert the mulching insert into the rear discharge chute (Fig. A). Ensure the lower side of the handle snaps in place.
- Press the lower side of the handle to release and re¬move the mulching insert (Fig. B).
- When removing the mulching insert, you should drag it to the left side and remove it from the mower deck.
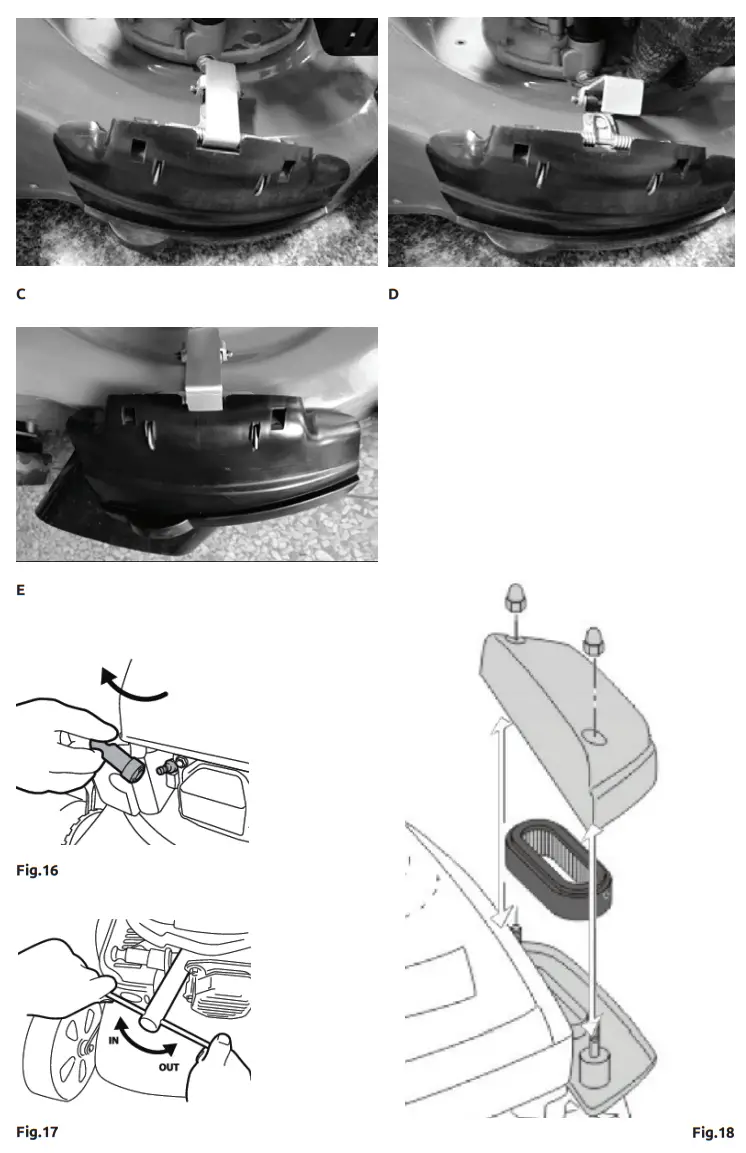
SIDE DISCHARGE ATTACHMENT
Use the side discharge attachment when using the product for side discharging.
Before using the side discharge function, press down the end of the lock. (Fig. C & Fig. D).
Lift the side deflector guard and attach the lugs of the chute to the guard bar (Fig E).
BASIC MAINTENANCE
WARNING! Before inspecting, cleaning, or servicing the machine, disconnect the Spark Plug from the machine. Failure to follow the instructions can result in serious personal injury or property damage.
WARNING! Turn off your mower before undertaking any cleaning.
If the cut grass is damp, regularly clean the lawnmower after each use, in order to ensure better functioning of the machine and reduce the risk of corrosion or seizure. Having finished mowing, allow the engine to cool and then remove the accumulated grass clippings from and around the engine with a brush. Clean the grass collector regularly with a brush, or gently spray water and allow it to dry. Clean the underneath of the deck regularly – disconnect the spark plug and tilt the machine backward. Remove the cut grass with a scraper or brush.
DO NOT USE
pressure washers or hot water to clean the mower. Dry off the machine before storing, by leaving it running for a few minutes on a flat, clean surface to prevent corrosion or seizure.
STORING YOUR MOWER
Store the mower in a dry, well-ventilated area away from flames, sparks, or heat sources. Disconnect the spark plug. Avoid storing underneath a tarpaulin or similar cover as it may cause condensation resulting in corrosion.
WINTER STORAGE: Thoroughly clean the mow-er. Run the engine outdoors until the fuel tank is empty). Alternatively, use a suction pump to remove the fuel when the engine is off and then run the engine until the remaining fuel is consumed. Dispose of the discarded fuel safely and responsibly. Remove the spark plug and pour a tablespoon with SAE15W/40 SF of 4-stroke engine oil into the cylinder opening. Gently pull the recoil rope several times to distribute oil around the engine, to protect the cylinder over winter. Replace and tighten the spark plug.
TRANSPORTING THE MOWER
Ensure the fuel tank is empty. Run the engine until any remaining fuel is consumed. Allow the engine to cool.
BLADE MAINTENANCE
WARNING! Blades are sharp. When handling the blade assembly, wear non-slip, heavy-duty protective gloves. Do not place your naked hand or fingers on the blade or in any position where they could get cut. NEVER touch the blades or service the unit when the engine is running.
SHARPENING
Never attempt to sharpen the blade yourself. The blade must remain balanced; an unbalanced blade will cause excessive vibration through the machine. Always have a blade sharpened by a professional. Always check for any damage before each use and replace a damaged blade immediately, with an approved replacement part.
AIR FILTER inspects the air filter each time the engine is operated (Fig.18). You will need to clean the air filter more frequently if you operate the engine in very dusty areas. Always replace with original parts.
NOTE: Operating the engine without an air cleaner, or with a damaged air cleaner, will allow dirt to enter the engine, causing rapid engine wear. This type of damage is not covered under the Warranty. Remove the air filter cover lid & remove the filter cartridge. Knock it out against a hard surface until the dirt has been removed. Do not brush out! Reinstall the filter. Insert the filter cartridge into its housing and replace the filter lid, ensuring that each component is properly installed. Check the spark plug initially after the first five hours of mower use. Thereafter, maintenance of the sparkplug should take place every 25 hours. Remove the spark plug cap (Fig.16) using a rotary motion & then remove the spark plug with the wrench provided (Fig.17). Clean off any carbon deposits using a copper brush and check the electrode gap with a feeler gauge (the gap should be 0.6-0.8 mm). Replace and tighten the serviced spark plug and replace the cap. If the spark plug is worn or damaged, replace it with a new spark plug of the same or suitable type for the engine. If in doubt, contact your point of purchase or local dealer.
![]() ENVIRONMENTAL PROTECTION
ENVIRONMENTAL PROTECTION
Recycle raw materials instead of disposing of as waste. Machine, accessories, and packaging should be sorted for environment-friendly recycling. The plastic components are labeled for categorized recycling.
GUARANTEE
This product is warranted In accordance with the legal/country-specific regulations, effective from the date of purchase by the first user. Damage attributable to normal wear and tear, overload or improper handling will be excluded from the guarantee. in case of a claim, please send the machine, completely assembled, to your dealer or the service center for electric power tools.
REGULAR SERVICE PERIOD
| REGULAR SERVICE PERIOD | |||||||
| ITEM | Before each use | First Month or 5 Hours | Every 3 Months or 25 Hours | Every 6 Months or 50 Hours | Every Year or 100 Hours | Every Two Years or 250 Hours | |
| Perform at every indicated month | |||||||
| or operating hour interval, whichever | |||||||
| comes first. | |||||||
| Engine Oil | Check | ό | |||||
| Replace | ό | ό | |||||
| Air Cleaner | Check | ό | |||||
| Replace | ό | ||||||
| Spark Plug | Check-adjust | ό | |||||
| Replace | ό | ||||||
| Fuel Tank & Filter | Clean | ό | |||||
| Fuel Tube | Check | Every 2 years (Replace if necessary) | |||||
| Blade | Check | ό | |||||
| Replace | ό* | ||||||
*Blade should be replaced if any damage is noticed.
FAST TROUBLE SHOOTING
| FAST TROUBLE SHOOTING | ||
| Problem | Likely cause Suggested remedy | |
|
Engine does not start | Out, or almost out, of fuel | Fill tank with unleaded petrol |
| Spark plug depleted | Replace with a suitable new spark plug | |
| Spark plug dirty | Clean or replace with a new spark plug | |
| Spark plug not connected | Press firmly on the terminal cover | |
| Flooded engine | Turn fuel “off” then pull the starter rope until the mower starts, then turn the fuel on | |
| Old petrol in the tank | Drain stale fuel and replace it with new unleaded | |
| Water in the fuel tank | Contact an authorized dealer | |
| Engine stops often | Blocked fuel supply | Ensure the fuel line is not pinched or blocked |
| Fuel cap is not venting | You may need to slightly loosen the fuel cap | |
| Wrong type of fuel | Drain petrol tank and fill with new unleaded | |
| Engine loses power | Dirty air cleaner filter | Clean or replace with a new air filter |
| Incorrect height adjustment | Raise the mower’s cutting height lever | |
| Blocked fuel cap vent holes | Ensure the 3 holes in the fuel tank cap are clear | |
| The mower vibrates too much | Loose cutting blade | Check and tighten bolts and nuts |
| Bent or broken blades | Replace blades | |
| Excessive grass/dirt build-up | Clean and ensure the underside is clear of build-up | |
| Disc or blades worn/damaged | Replace blades | |
TECHNICAL SPECIFICATIONS
| TECHNICAL SPECIFICATIONS | ||||
| Article Number | 45 681 | 45 682 | 45 697 | 45 698 |
| Model | GLM 40/124 P EASY | GLM 42/124 SP EASY | GLM 46/140 SP PLUS | GLM 51/160 SP PLUS |
| Cutting width | 400mm | 420mm | 460mm | 510mm |
| Engine model | DK1P62FE/P | DK1P62FE/P | SL140 | SL160A |
| Engine displacement | 124.4 cm3 | 124.4 cm3 | 140 cm3 | 160 cm3 |
| Engine rating power | 2,4hp | 2,4hp | 2,7hp | 3,1hp |
| Drive system | Hand-push | Self-propelled | Self-propelled | Self-propelled |
| Volumes of fuel tank | 0,85 L | 0,85 L | 0,9 L | 1,2 L |
| Volumes of the lubricating oil tank | 0,4 L | 0,4 L | 0,45 L | 0.5 L |
| Rated speed | 2850 min-1 | 2850 min-1 | 2900 min-1 | 2900 min-1 |
| Front wheel diameter | 175mm | 175mm | 200mm | 200mm |
| Rear wheel diameter | 200mm | 210mm | 280mm | 280mm |
| Sound power level | 96 dB(A) | 96 dB(A) | 96 dB(A) | 98 dB(A) |
| Weight | 21,3kg | 23,4kg | 31,5kg | 35,8kg |
| Grass bag capacity | 50L | 50L | 70 L | 70 L |
| Adjustable cutting height | 20 – 68 mm / 7 stages | 25 – 85 mm / 7 stages | 25 – 70 mm / 7 stages | 25 – 70 mm / 7 stages |
| Mulching plug | / | / | Yes | Yes |
| Side discharge | / | / | / | Yes |
| EU DECLARATION OF CONFORMITY | We declare under our sole responsibility that the stated products comply with all applicable provisions of the directives and regulations listed below and are in conformity with the following standards. | |
| ENGINE | Article number | |
| GLM 40/124 P EASY GLM 42/124 SP EASY GLM 46/140 SP PLUS GLM 51/160 SP PLUS | 45681 45682 45697 45698 | EU 2016/1628 |
Technical file at
FF GROUp TOOL INDUSTRIES,
19300, Aspropyrgos-Greece
Loudovikos Tsirigiotis
Operations & Engineering
FF GROUP TOOL INDUSTRIES, 19300
Aspropyrgos-Greece. 04/08/2020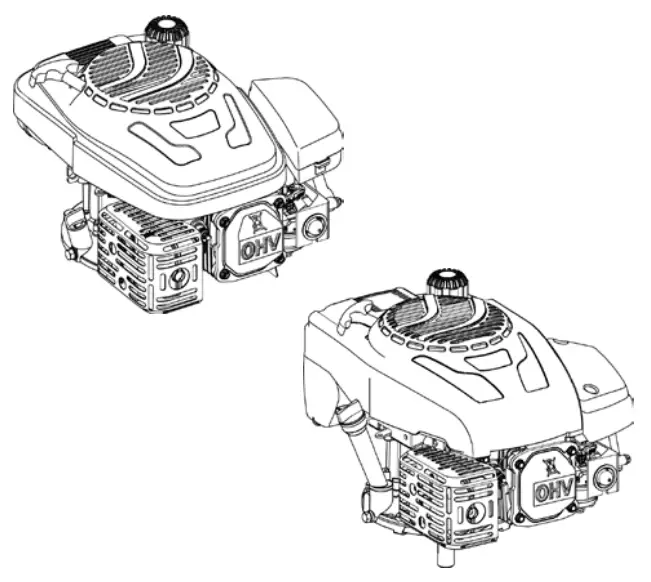
![]() QUALITY POWER TOOLS
QUALITY POWER TOOLS
| FF Group Tool Industries | |
 | 9,5 km Attiki Odos, Aspropyrgos |
| 19300, Athens, Greece | |
 | +30 210 55 98 400 |
| @ | [email protected] |
| www.ffgroup-tools.com |


