Smart Wireless Floodlight Camera
User Manual
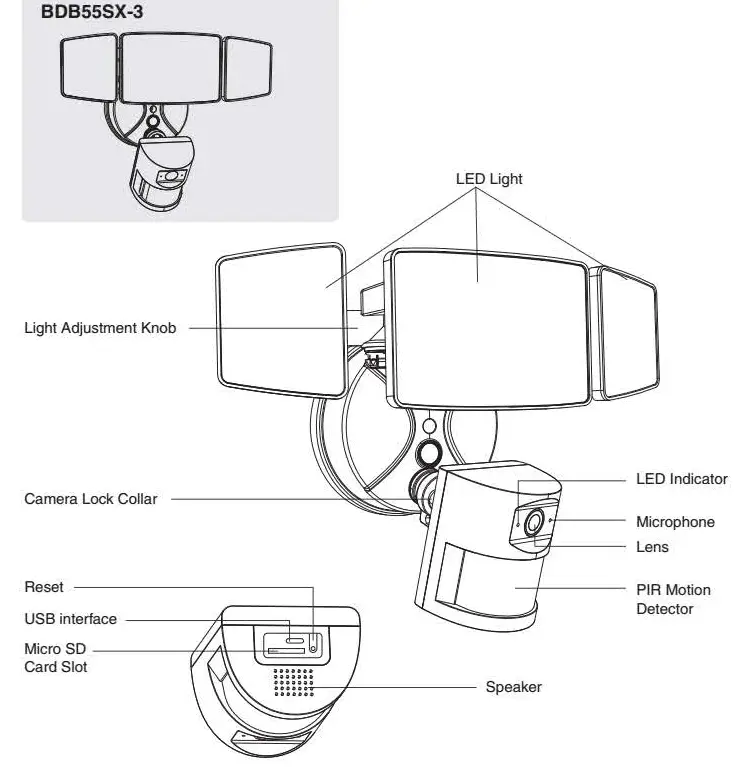
Model: BDB55SX-3
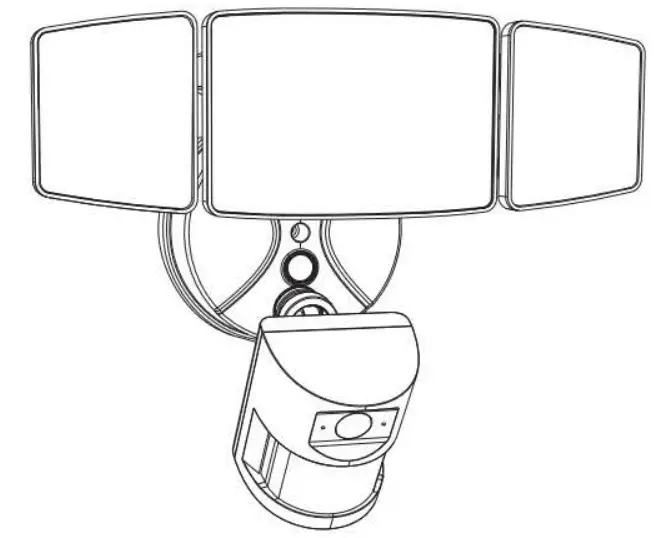
COMPONENTS AND STRUCTURE
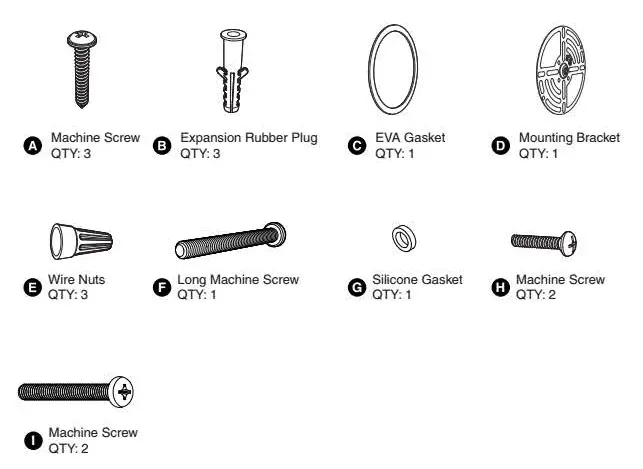
PARTS LIST
| LED Floodlight | |
| Model | BDB55SX-3 |
| Input Voltage | 100-240V —50/60Hz |
| Input Current | 0.6A |
| Rated Power | 55W |
| Luminous Flux | 5500lm |
| CCT | 65COK |
| CRI | a80 |
| Power Factor | a0.9 |
| L70850 lifetime | 30000hours L70850 025° |
| Beam Angle | 120° |
| fa | -20-40°C/-4°F-104°F |
| Luminaire Location | SUITABLE FOR WET LOCATIONS |
| Camera | |
| Video | 1080p HD, HDR |
| Field of View | 125° Wide viewing angle |
| Motion Detection | 170°Advanced PIR motion detecting distance up to 32.8ft |
| Audio | Two-Way Talk with Audio and advanced noise cancellation. |
| Siren | Remote-activated 67db siren (level measured at 16.4ft distance). |
| Internet Requirements | Recommended minimum upload speed of 2 Mbps per device. |
| Connectivity | 802.11 b/g/n/ac Wi-Fi connection @2.4GHz 902-928 Mhz Radio |
| Storage | Micro SD Card up to 128GB (not included) |
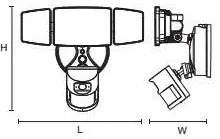
| DIMENSIONS | |
| Model | BDB55SX-3 |
| Dimensions (LxHxW) | 274x143x225mm/ 10.79×5.63×10.04 in |
| Weight | 0.9kg/1.98 lb |
 |
SAFETY INFORMATION
 WARNING: Risk of electrical shock
- Disconnect power at the fuse or circuit breaker before installing.
- Verify that the supply voltage is correct. Connect fixture to a 100-240V 50/60Hz power source.
Properly ground fixture.
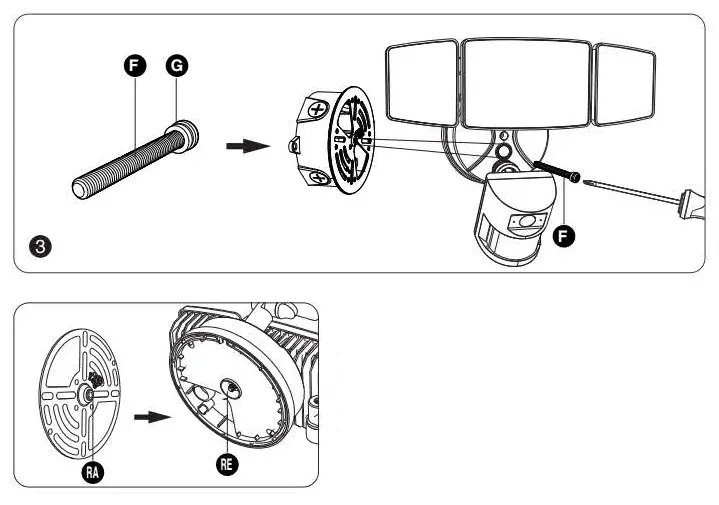
Always follow code standards when installing wire connections. If you are outside of North America. installation and wiring must be performed by a licensed electrcian.
CAUTION: Risk of fire
Do not install near combustible or flammable surfaces.
NOTICE Do not connect this light fixture to a dimmer switch or timer. Floodlight Camera must be installed on a wall and on a UL listed junction box.
WARNING: THIS PRODUCT MUST BE INSTALLED IN ACCORDANCE WITH THE APPLICABLE INSTALLATION CODE BY A PERSON FAMILIAR WITH THE CONSTRUCTION AND OPERATION OF THE PRODUCT AND THE HAZARDS INVOLVED.
DO NOT CONNECT THIS LIGHT FIXTURE TO AN UNGROUNDED ELECTRICAL SYSTEM. ATTACH GROUND FIXTURE WIRE TO EITHER GREEN GROUND SCREW ON MOUNTING PLATE OR THE GROUND WIRE IN THE OUTLET BOX.
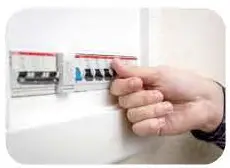
SHUT POWER OFF AT THE BREAKER
Turn off power to work area at main circuit breaker of fuse box Caution: Please make sure your wall switch and power at main circuit breaker both off.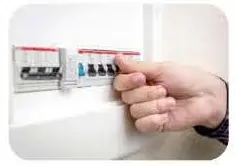 If you don’t know where your breaker is or how to turn off power to your floodlight circuit, consult with a licensed electrician.
PREPARATION
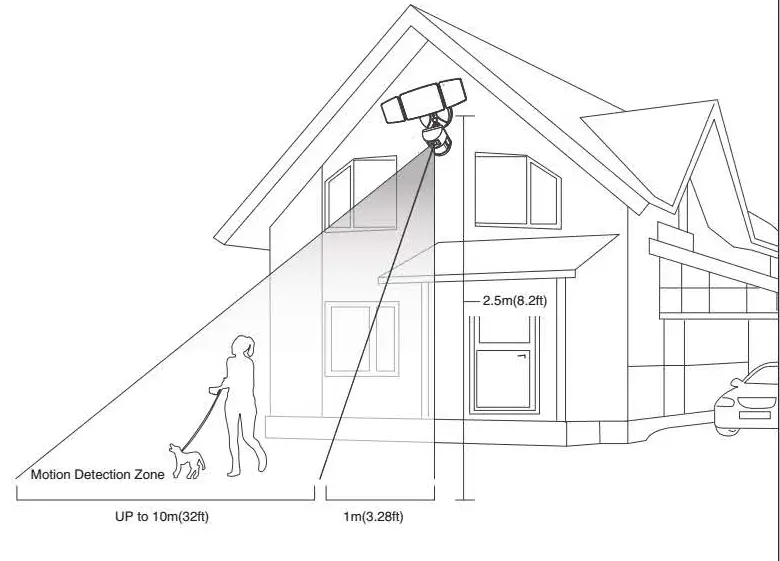
NOTE: Before beginning assembly of product. make sure all parts are present. Compare parts with parts list. If any part is missing or damaged. do not attempt to assemble the product. Estimated Assembly Time: 30-60 minutes. Recommended to be installed 2.5m (8.2ft) above the ground but not higher than 5m (16.4ft). Product appearance may vary from image shown.
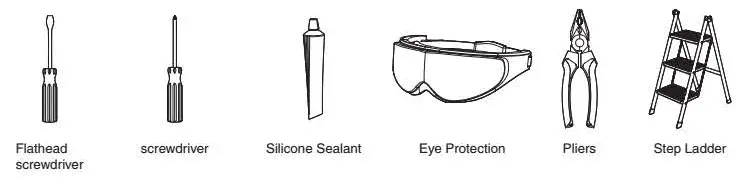
TOOLS REQUIRED ( not included)

PROPER INSTALLATION HEIGHT
The proper installation height to optimize the motion sensor performance is around 2.5m (8.2ft)
INSTALLATION STEPS
FOR WET LOCATION, MAKE SURE FILL FULL THE GAP OF EVA GASKET AND MOUNTING SURFACE WITH SEALING COMPOUND OR SILICONE GLUE.
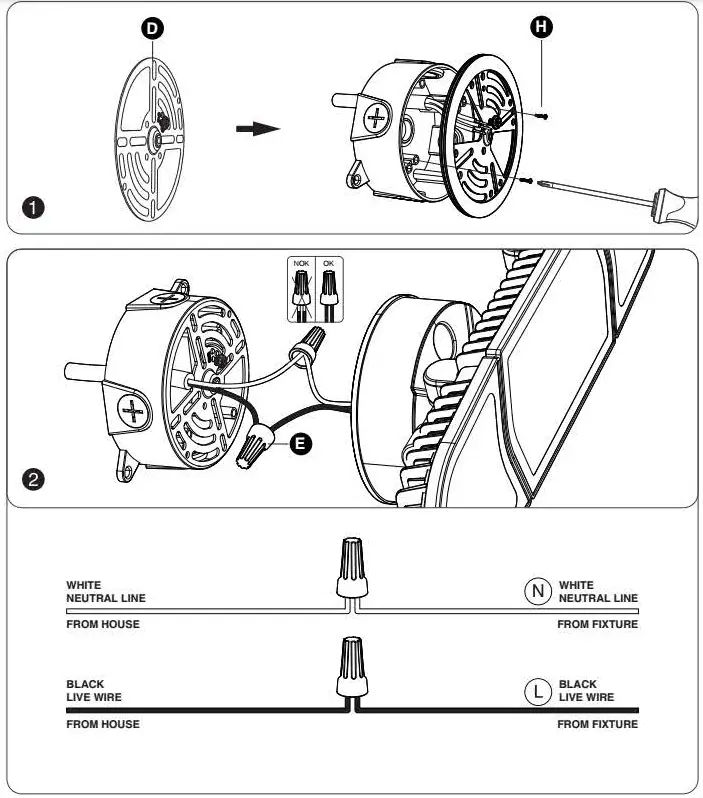
Note: The raised part (RA) of the metal plate must be engaged with the recessed part (RE) of the base, otherwise it cannot be installed.
RESTORE POWER AT THE BREAKER
 After restoring power. the lights will turn on and your Floodlight Camera will begin speaking to you to let you know it’s in setup mode.
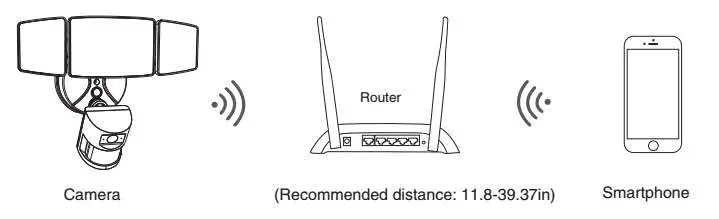
CONNECTION PREPARATION
Please install the Floodlight Camera within Wi-Fi overed area to ensure the best working performance. Make sure smart phone is connected with your wireless router. Please note that the camera only works with 2.4G Wi-Fi and does not support SG Wi-Fi. Smartphones (iOS 9.0 or Android 4.4 and above) are supported. Tablets. Mac or Windows computers are not supported. Please don’t use special characters. symbols to name the Wi-Fi and its password.
PAIRING FLOODLIGHT CAMERA WITH “Onforu Home” APP
Get the App and the Account
Step 1: ‘Onforu Home’ App Download. There are 2 options for obtaining and downloading the ‘Onforu Home’ App on your smart device.
1. Scan the QR code on the right.
2. Search for ‘Onforu Home’ in the App Store or Google Play.

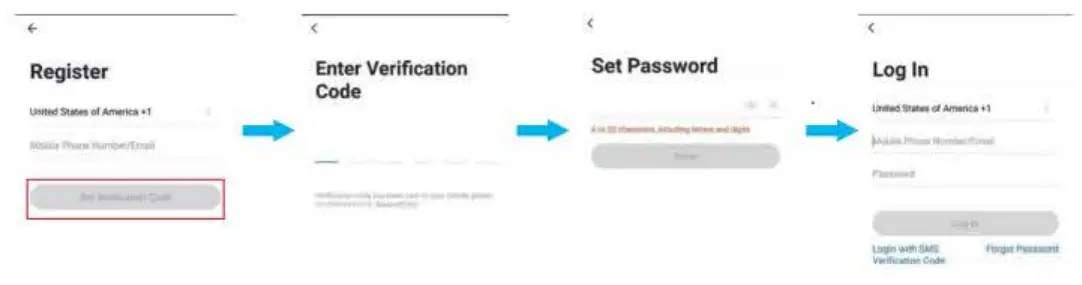
Step 2: Enter the “Onforu Home’ App. Register an account and log In. If you already have an account for Onforu Home App, Please select ‘Log in with existing account’. Note: You will need your ‘Onforu Home” App usemame and password to pair with Amazon Alexa and/or Google Assistant.

Step 3: Please turn on the Wi-Fi and Bluetooth before connecting LED lights to the ‘Onion, Home” App.
PAIRING FLOODLIGHT CAMERA WITH “Onforu Home” APP
Connect the App
1. Power the device on and make sure the indicator is red and flashing quickly or a prompt tone is heard.
Note: After turning on the light, the indicator will first turn on blue light, then red constant light, and then will become a red flashing light. This process takes about 40-60s. Note: If the indicator is not red and flashing quickly, long press the reset button for 3.5$.
Note: What if I can’t connect to the camera? Please contact the seller and provide the number posted on the camera. We will help to solve the problem.
2. After it becomes a red flashing light, you can start connecting the device.

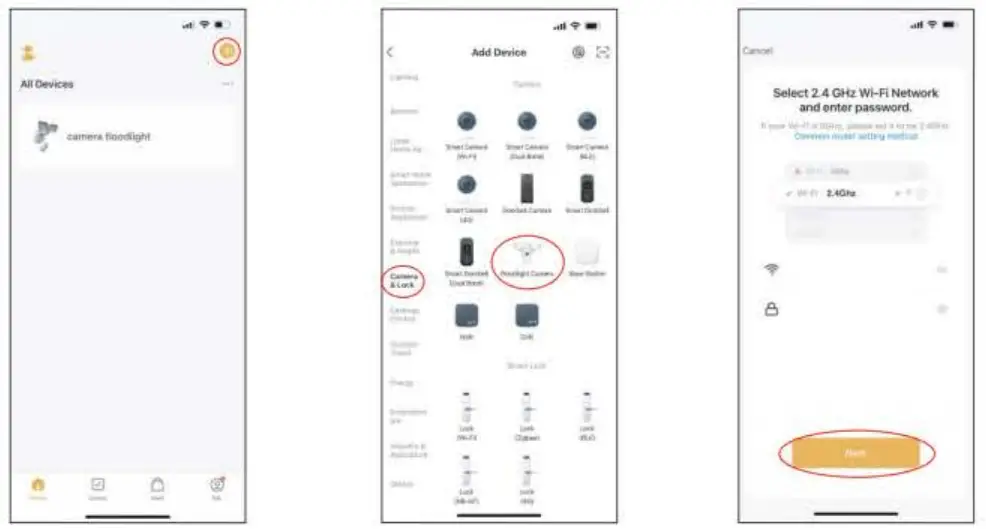 | ||
| 1. Tap ‘+’ button on top right corner and tap ‘Add Device’ to add device. | 2. Tap tamera&Lock’ and then ‘Floodlight Camera’ to enter next page. | 3. Tap the ‘Next’ button to pair the LED Light |
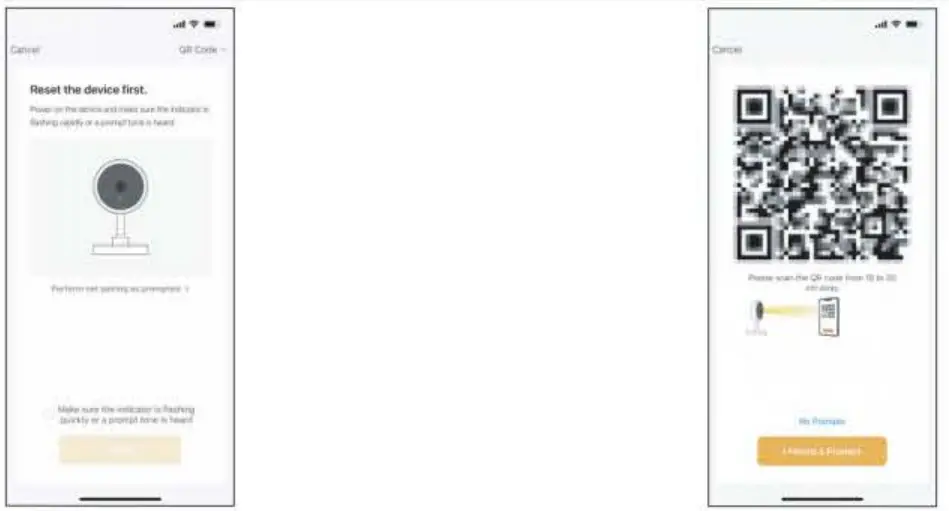 | |
| 4. Enter Wi-Fi password to join your network. Please Note: a. This smart LED Light can only support 2.4 GHz network and cannot work with 5.0 GHz network. b. Please check if your home network is 2.4 GHz and make sure that your phone has been connected to your W-Fi network. Please ensure your network is not hidden. | 5. Put the OR code that appears on the APP in front of the Camera at a distance of 15-20cm (5.9-7.87in). Let the Camera scan the code . |
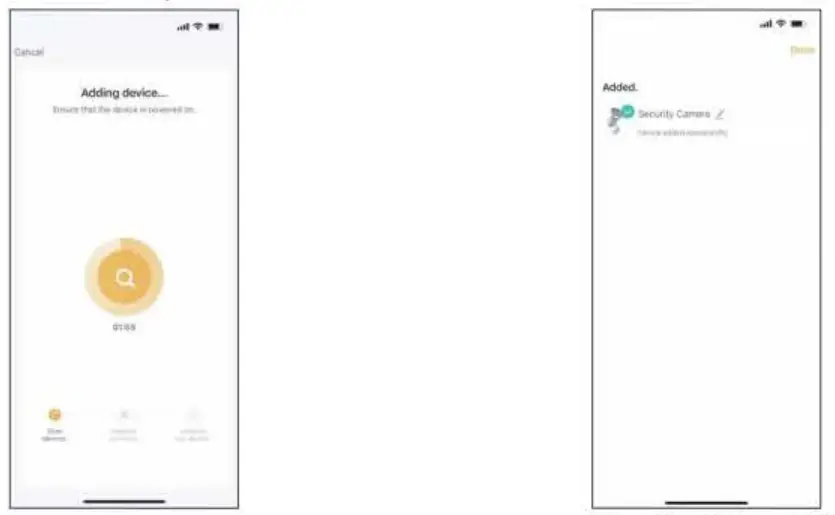 | |
| 6.Wait for the device to register (about 40-60s). Note: At this time. the indicator light flashes blue. | 7.Tap ‘Done’ to complete the light pairing Note:The blue light is on, camera is ready for viewing. |
CAMERA LED INDICATOR
| PM | LED Status | Camera Status |
| 1 | Red LED on | System starting up |
| 2 | Red LED blinks | Standby for configuration |
| 3 | Blue LED blinks | Network pairing |
| 4 | Blue LED on | Camera online |
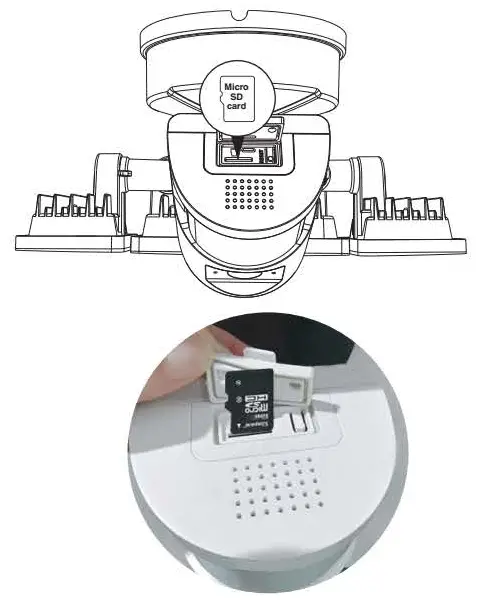
Micro SD Card
- To ensure Micro SD Card video recording works steady. we recommend Class 10 or higher speed Micro SD Card.
- To make sure the device works normally. please format the Micro SD Card to FAT32 before the first time use.
- Before insert or pull out the Micro SD Card, please power off the device. Insert the Micro SD Card properly into the slot as below.
- Micro SD Card up to 128GB not included .
HOW TO OPERATE THE APP
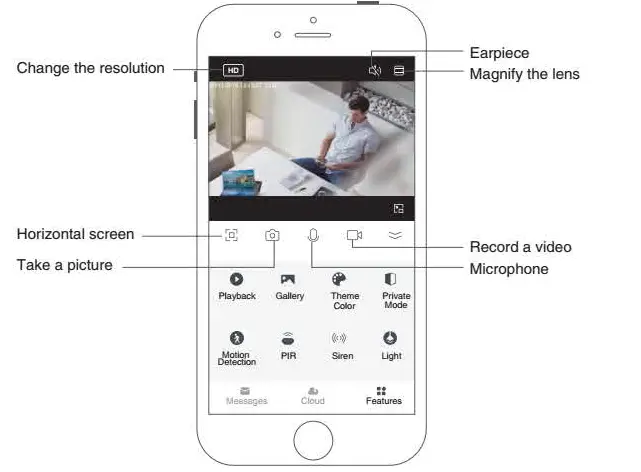
| Playback | You can watch back the previous video recordings here. Note. Micro SD Card is required to watch back. |
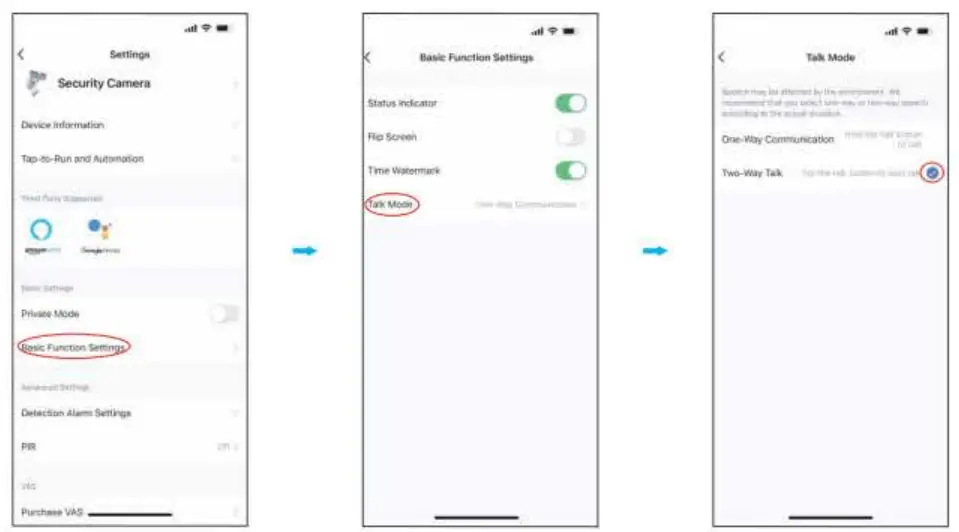
| Microphone & Earpiece | If two way audio is needed, please set in ‘Settings ° – ” Basic function settings °-” Talk Mode “- turn on ° Two-way talk”. |
| Motion Detection | Switch for motion detection. |
| PIR | Activate the PIR and adjust its sensitivity. |
| Motion Detection&PIR | To activate the motion detection and monitoring functions, you need to turn on ‘Motion Detection’ and ‘PIR” at the same time.With these functions, you can receive photos and alert notifications that the camera automatically captures when detecting a motion. |
| Siren | Press “Siren”to start the alarm. |
| Light | Manually switch on/off the lamp, adjust the brightness and set a timer. |
| Message | Check the monitored information. |
HOW TO OPERATE THE APPMotion detection and monitoring functions Two-way talking is supported 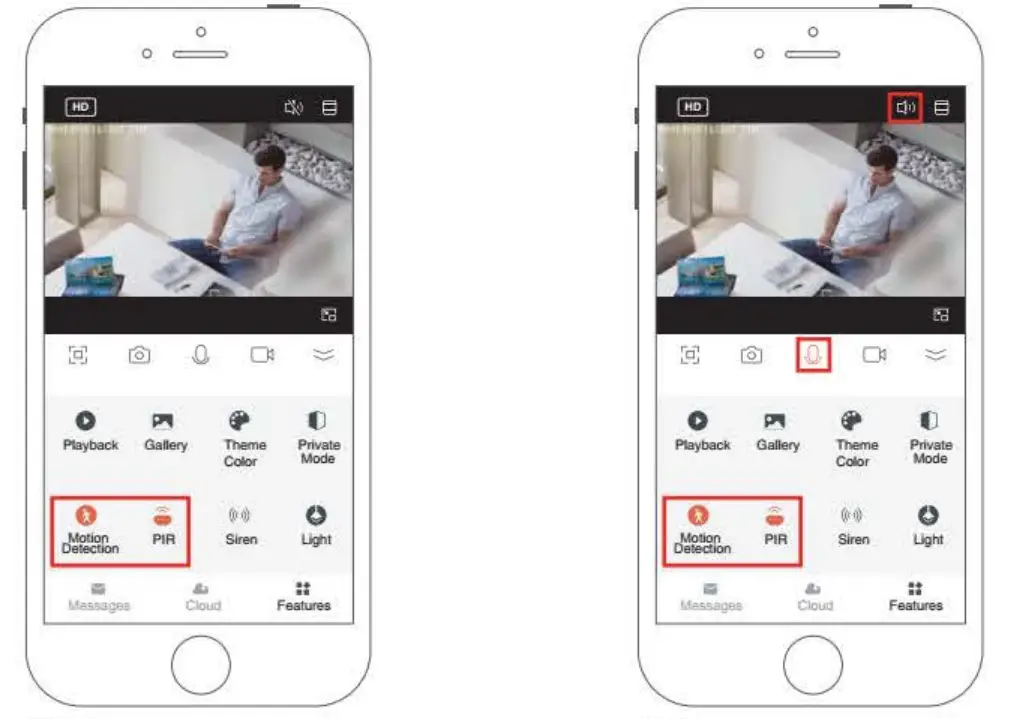
Note: To activate the motion detection and monitoring functions. you need to turn on ‘Motion Detection’ and ‘PIP’ at the same time. With these functions. you can receive photos and alert notifications that the camera automatically captures when detecting a motion. After setting Motion Detection and PIR, lamp can be triggered to turn on automatically if camera is in the darkness. Note: To activate the communication mode. be sure to remove the slash on the “Earpiece’ and turn on the ‘Microphone’.
Disable pushing of motion monitoring notifications
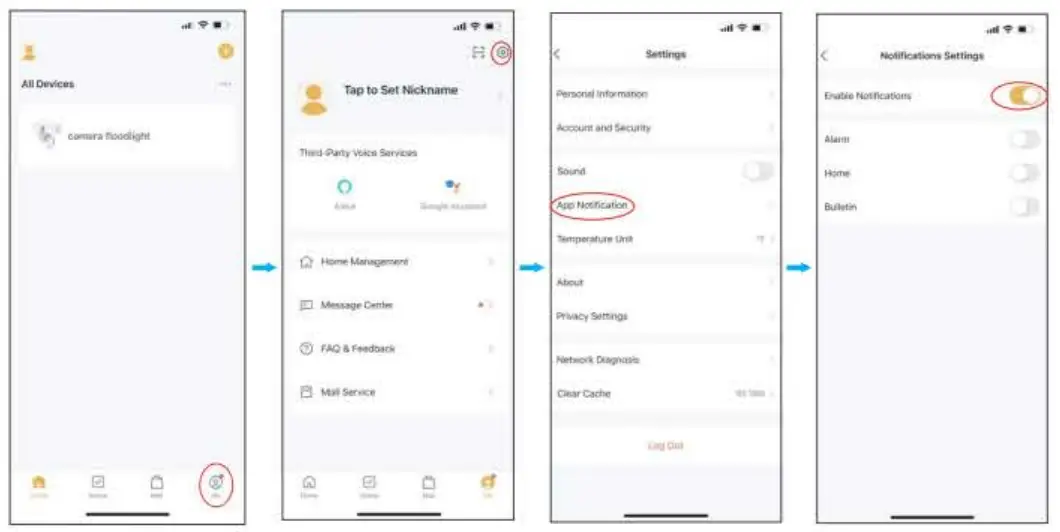
If you want to activate the motion monitoring function, but do not want to frequently receive notifications, you can disable the notification push feature.
One-way/two-way communication mode settings
Share the device
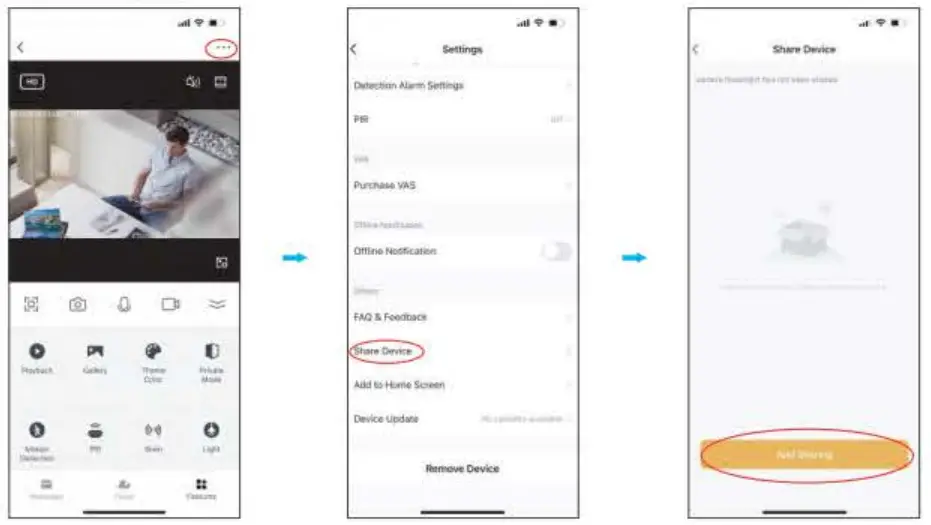
You can choose to share the device to other members of the family.
Note: Shared family members can only view monitoring and notifications, but cannot set up the monitor.
Remove the device
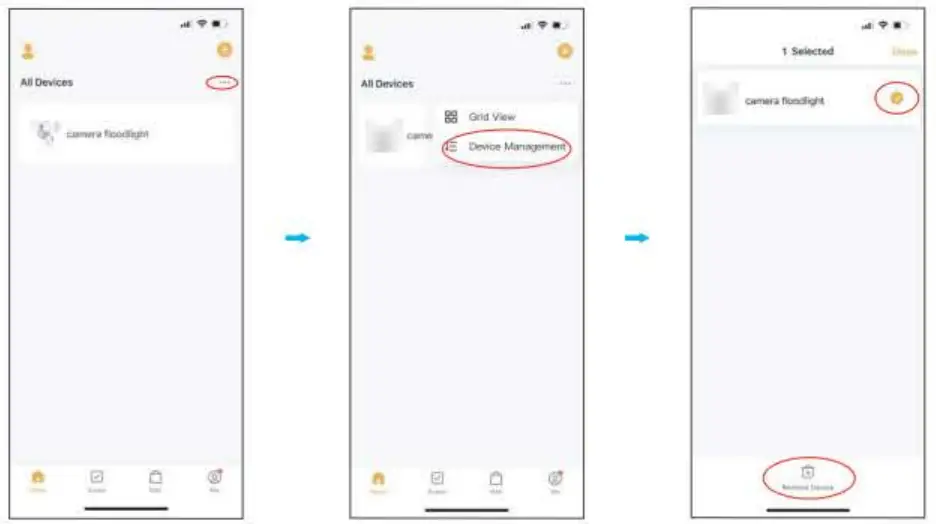
When you replace your phone. or someone else wants to connect to the device, be sure to remove the device from your old phone first.
Note: For security reasons, the device can only be connected by one person at a time. If someone else wants to see the camera information at the same time. you can refer to °Share, the device’.
HOW TO CONNECT WITH ALEXA SHOW AND GOOGLE ASSISTANT APP
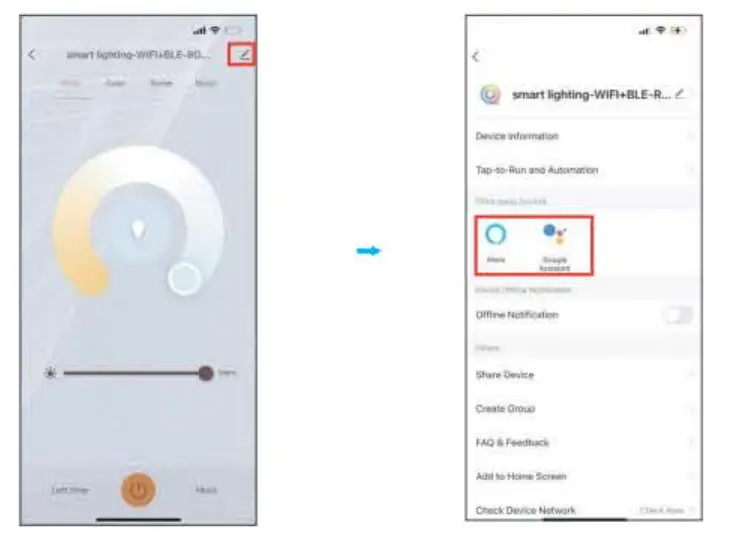
Tap “![]() ” and find the third-party voice device you want to connect to and tap it, then follow the steps to connect.
” and find the third-party voice device you want to connect to and tap it, then follow the steps to connect.
FCC ID: 2A3W8BDB55SX-3
FCC Warning:
Any Changes or modifications not expressly approved by the party responsible for compliance could void the user’s authority to operate the equipment. This device complies with part 15 of the FCC Rules. Operation is subject to the following two conditions: (1) This device may not cause harmful interference, and (2) this device must accept any interference received, including interference that may cause undesired operation.
Note: This equipment has been tested and found to comply with the limits for a Class B digital device, pursuant to part 15 of the FCC Rules. These limits are designed to provide reasonable protection against harmful interference in a residential installation. This equipment generates uses and can radiate radio frequency energy and, if not installed and used in accordance with the instructions, may cause harmful interference to radio communications. However, there is no guarantee that interference will not occur in a particular installation. II this equipment does cause harmful interference to radio or television reception, which can be determined by turning the equipment off and on, the user is encouraged to try to correct the interference by one or more of the following measures:
- Reorient or relocate the receiving antenna.
- Increase the separation between the equipment and receiver.
- Connect the equipment into an outlet on a circuit different from that to which the receiver is connected.
- Consult the dealer or an experienced radio/TV technician for help.
This equipment complies with FCC radiation exposure limits set forth for an uncontrolled environment.
This equipment should be installed and operated with minimum distance 20cm between the radiator & your body.
FAQ
– lease contact the seller and provide the number posted on the camera. We will help to solve the problem.
– First we suggest these famous and popular brands. like Samsung. SanDisk. Kingston etc. with at least class 10 Second, please format it to FAT32, which is the only format that camera can support.
– We designed it to be triggered only at night. Before that. please make sure *Motion Detection” and °PIP’ are set well.
– Siren is designed to be turned on manually to avoid disturbing your neighbors.
– Please go to ‘Settings -‘ Basic function settings’-“Talk Mode– turn on -Two-way talk*.
– Please first make sure the camera is installed as close as possible to your router.
– It is not recommended to install the camera in a place where there are two thick walls away from the router.
– Please test your network and make sure it works well. For more questions, please send them via the “Settings” – “FACi&Feedback” within the app.

Manufacturer / Hersteller.
Shen Zhen Shi Meng Zhi Tuo Ke Ji You Xian Gong Si
Address: qian wan yilu 1 hao A dong 201 shi qian hat shen gang he zuo qu Shen Zhen. Guang Dong, 518000. CN
[email protected] www.onforuleds.com![]() MDH LIGHTING LTD
MDH LIGHTING LTD
Suite 302. 292 Strovolos Avenue. 2048 Strovolos Nicosia. Cyprus I [email protected]![]() MDH LIGHTING LTD
MDH LIGHTING LTD
69 Aberdeen Avenue, Cambridge CB2 8DL. United Kingdom [email protected]
Made in China


