![]() Thermomirror Mirror Demisters
Thermomirror Mirror Demisters
Installation Guide
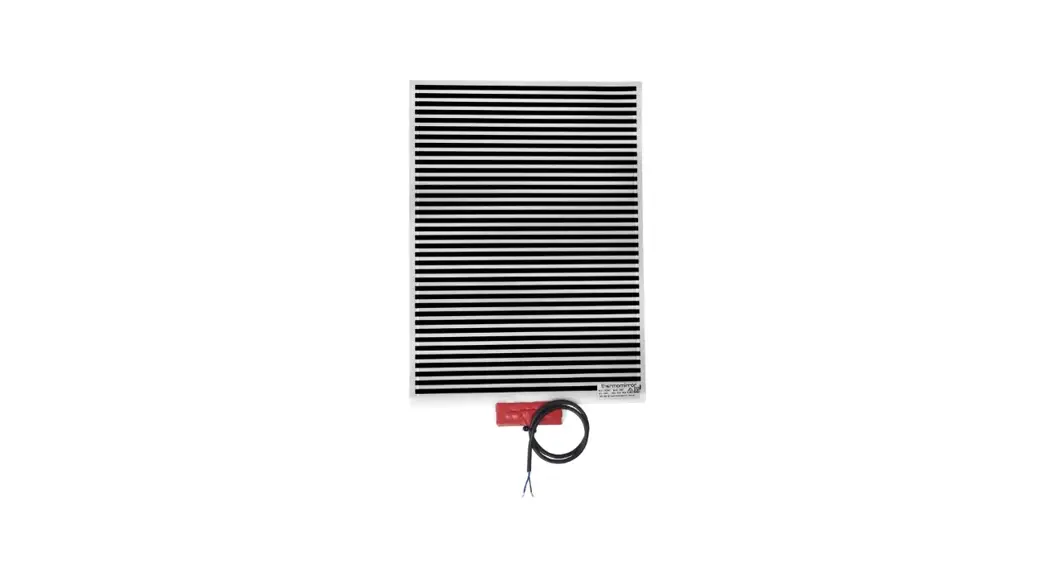
TM2841 Mirror Demister Pad
Thank you for your purchase
Thank you for choosing a Thermogroup product. Our commitment to simple, honest, on-time, quality service ensures that we are here to help throughout every stage of your project from idea to installation and, most importantly, after sales support.
This document will provide a step-by-step guide to a perfect installation as well as details on the warranty and how to get technical support should you need it. To ensure a safe, hassle-free installation to be proud of, please take the time to read this guide in full before you start.
If you have any questions about your Thermomirror Mirror Demister or any of our other products call our technical support team on 1300 989 464. We will do our best to find a solution and will always give that little bit extra…
Thanks again for choosing a Thermogroup product.
Safety Information
Thermomirror demisters should be installed and tested by a qualified electrician and in accordance with current local regulations. The Thermomirror demister cannot be cut or pierced. Ensure the demister is a suitable size to allow for the mirror fixings/brackets or to allow for 100mm spacing on all sides in a glue-to-wall installation.
If you remove the Thermomirror demister pad from the back of the mirror it cannot be reused as removal could easily damage it and prevent it from working correctly.
Please read and understand this installation guide in full before commencing installation. If you have any queries regarding installation, please call 1300 989 464.
This appliance is not intended for use by persons (including children) with reduced physical, sensory or mental capabilities, or lack of experience and knowledge, unless they have been given supervision or instruction concerning use of the appliance by a person responsible for their safety. Children should be supervised to ensure that they do not play with the appliance.
Means for disconnection must be incorporated in the fixed wiring in accordance with the wiring rules. The disconnection may be achieved by incorporating a switch in the fixed wiring in accordance with the wiring rules.
| Do’s | Dont’s |
Installation
The Thermomirror demister is to be installed directly on the back of the mirror.
Before starting installation ensure that the demister is a suitable size for the mirror.
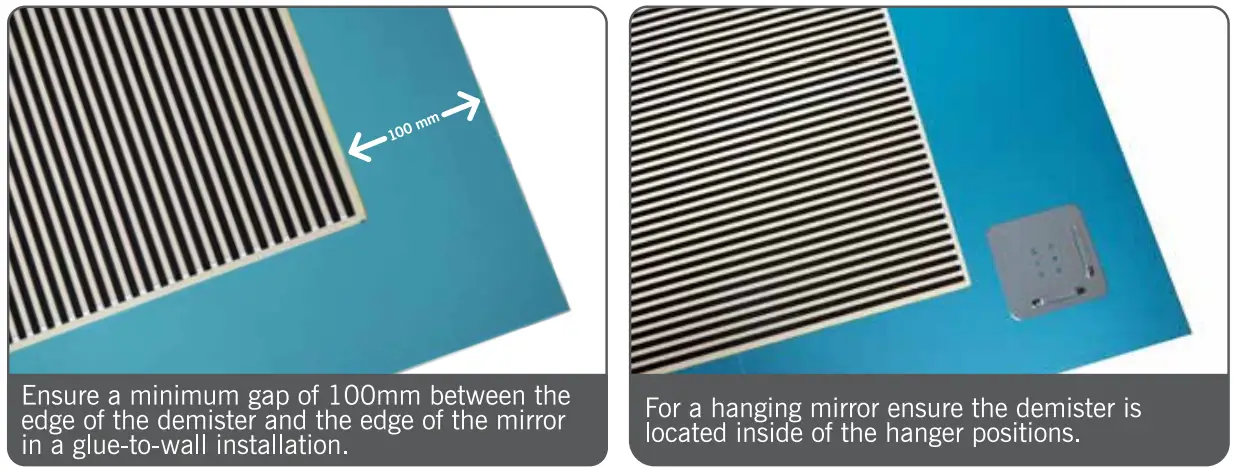
For a glue-to-wall mirror installation, ensure there is 100mm spacing around all edges of the Thermomirror to allow for sufficient adhesion between the mirror and the wall.
For a hanging mirror, ensure the demister is located inside of the hanger positions and that it will not cover any fixings or hangers.
The demister will not cover the entire mirror and will only demist the section where the demister pad is applied so ensure that you install the demister in the section of the mirror that will be suitable for use when the mirror is installed.
The Thermomirror demister is a hardwired unit and needs to be installed by a qualified electrician. This will need to be wired into the lighting circuit or to a separate switch in
order to control the operation of the demister.
Ensure the mains power supply is switched off before attempting to carry out any electrical work.
Bring the mains supply to the position of the demister and wire into a suitable wall junction box. Ensure that the connections are not accessible by the user.
Clean the back of the mirror to ensure there is no dust or dirt that will affect the adhesion of the demister pad to the mirror. Do not use any chemicals to clean the mirror. Wipe over with a soft damp cloth and allow to dry completely before proceeding.
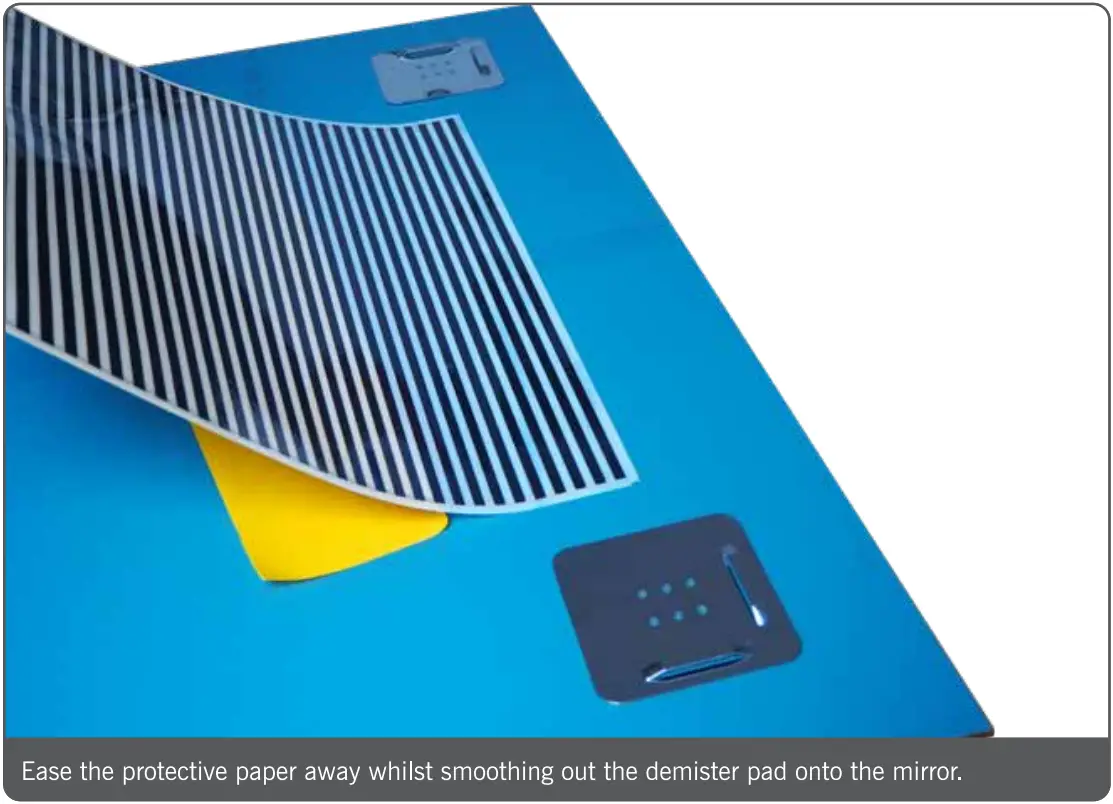
Peel off the protective backing paper from the Thermomirror and adhere to the back of the mirror. For a glue-to-wall mirror, ensure that 100mm spacing is left around all edges the demister. For a hanging mirror, the demister pad needs to be located inside of any fixing/bracket positions — it cannot cover the fixings or be cut or pierced.
To avoid air bubbles whilst sticking the demister pad, peel off the protective paper a quarter of the way then stick the first part down and ease the protective paper away whilst smoothing out the demister pad onto the mirror. Gently rub over the demister surface to make it adhere firmly to the back of the mirror.
Wire up the lead from the demister into the junction box ensuring that the lead does not rub against or become trapped against the edge of the mirror.
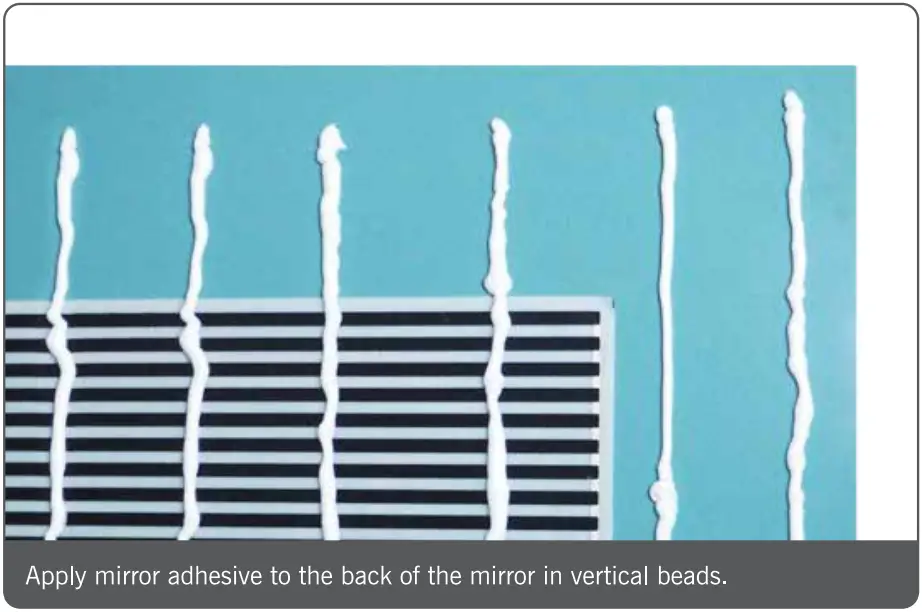
Glue-to-wall mirrors must be installed onto a firm, flat, dry wall. Make sure the mirror adhesive selected is neutral cure and is compatible with mirrors as some adhesives will damage the mirror backing. Apply mirror adhesive to the back of the mirror. Ensure the adhesive is run in vertical beads so that the condensation behind the mirror can drain
away. Stick the mirror in position. The use of timber supports cut to the height required off the vanity is also recommended for ease of installation, this will keep the mirror at
the desired height and support the mirror until the adhesive cures.
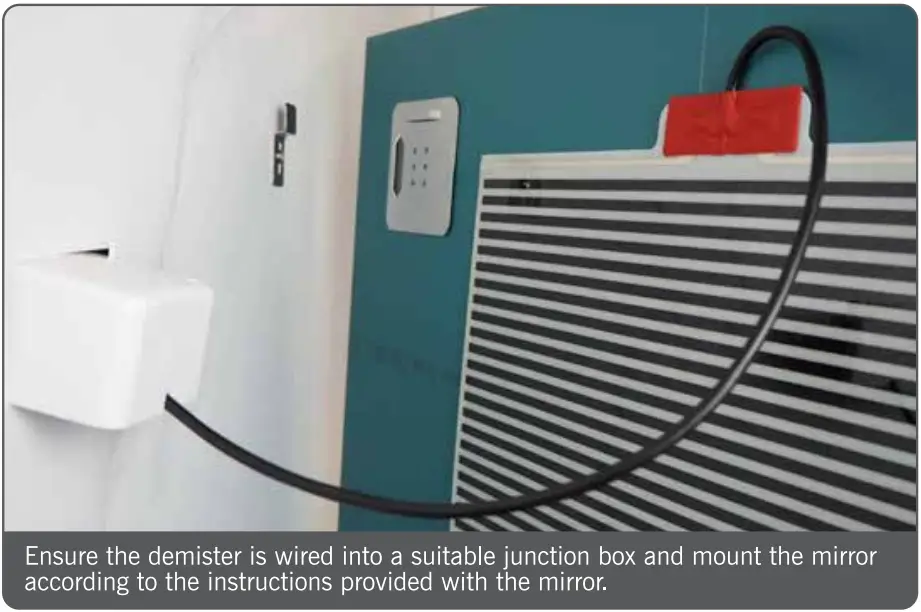
For a hanging mirror, follow the instructions provided with the mirror to obtain suitable fixings and mount the mirror.
Warranty Information
Thermogroup covers all its products with a satisfaction guarantee. In addition, Thermogroup will supply a replacement product where a fault is shown to be caused by manufacture, materials or workmanship providing the goods have been installed correctly and according to installation instructions. This guarantee does not include removal, freight or installation costs.
To use the warranty, repair or service the customer must provide purchase invoice/receipt.
If the product develops a fault within the warranty period due to normal wear and tear, Thermogroup at its discretion will recognise whether it’s a faulty product or not. If it is impossible or not economical for the manufacturer to repair the product, the manufacturer will replace the faulty product with a new unit of the same model or if there is no stock available of the same model as the product, the manufacturer will replace the product with a new unit of a similar size. No responsibility can be taken for altered dimensions and lining up of existing holes.
The repair service offered within the warranty period only covers the faults and problems as developed from the manufacturer’s errors. Any damage caused by improper use or carelessness or incorrect wiring is not covered.
Thermogroup is not responsible for any monetary loss or injuries caused by improper use of this product.
Our goods and services come with guarantees that cannot be excluded under the Australian Consumer Law. For major failures with the service, you are entitled: to cancel your service contract with us; and to a refund for the unused portion, or to compensation for its reduced value.
You are also entitled to choose a refund or replacement for major failures with goods. If a failure with the goods or a service does not amount to a major failure, you are entitled to have the failure rectified in a reasonable time. If this is not done you are entitled to a refund for the goods and to cancel the contract for the service and obtain a refund of any unused portion. You are also entitled to be compensated for any other reasonably foreseeable loss or damage from a failure in the goods or service.
Technical Spefications
| Stock Code | Size L x W (mm) | Heat Output (W) | Voltage | Frequency |
| TM2828 | 280 x 280 | 16 | 220-250V | 50Hz |
| TM2841 | 280 x 410 | 24 | 220-250V | 50Hz |
| TM3545 | 350 x 450 | 38 | 220-250V | 50Hz |
| TM4040 | 400 x 400 | 30 | 220-250V | 50Hz |
| TM5050 | 500 x 500 | 55 | 220-250V | 50Hz |
| TM4170 | 410 x 700 | 60 | 220-250V | 50Hz |
| TM5868 | 580 x 680 | 80 | 220-250V | 50Hz |
| TM5885 | 580 x 850 | 100 | 220-250V | 50Hz |
| TM6010 | 600 x 1000 | 145 | 220-250V | 50Hz |
| Supply Voltage | 220-250V |
| Wiring Method | Hardwired |
| Mounting Method | Fully self-adhesive |
| Protection Rating | IP64 |
| Warranty | 10 Years |
| Max. Temperature on Glass (6mm Thick) | 35-40°C |
Call us on 1300 368 631 or visit www.thermogroup.com.au
![]() Complies with wiring standard AS/NZS60335.1
Complies with wiring standard AS/NZS60335.1![]() Thermogroup
Thermogroup
PO Box 822
19 Ridley Ave
Leeton NSW 2705
1300 989 464
[email protected]
www.thermogroup.com.au
E&EO © Thermogroup 2022![]()


