Capello
Capello CR22 Sleep and Charge Dual Alarm Clock
SAFETY PRECAUTIONS
- Do not expose this unit or the AC/DC adaptor to dripping or splashing water. Keep liquid-filled objects such as vases, away from this unit and AC/DC adaptor.
- To ensure that this unit is completely disconnected, unplug it from the wall.
- Ensure that the AC/DC adaptor is easily accessible.
- Please note the information printed underneath the unit.
- Batteries should not be exposed to excessive heat such as direct sunshine, Are, etc.
- Do not impede the ventilation of this unit by covering the ventilation openings with items such as newspapers, table-cloths, curtains, etc.
- Keep open flames, such as lighted candles, away from this unit.
- Do not place this unit in closed bookcases, racks, or other spaces without proper ventilation.
- Use only the same or equivalent type batteries as there is a danger of explosion if the incorrect batteries are used or they are installed incorrectly.
- Dispose of batteries properly according to environmental regulations.
inside the box
CR220 Digital FM clock radio, AC power adapter, user guide, a set of cable spool and cable clip.
power source
ac connection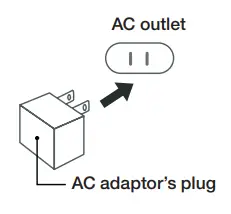
Insert the small end of the AC adaptor into the DC In Jack (located on the rear of the unit).
Connect the other end to a wall outlet providing 100-240V AC, 50/60 Hz.
The output of the provided AC/DC Adaptor is DC 5V 3A.
notes: Disconnect both ends of the power cord when not in use. Use only the supplied AC adaptor with the following specs: AC In – 100-240V AC, 50/60Hz / DC Out – 5V 3A
adjusting the volume
Press the VOL UP or VOL DOWN button to increase or decrease the volume to a safe listening level.
inserting batteries
Two (2) ‘AAA’ size batteries are used to back up the clock, alarm time, and preset memories if the AC/DC adapter is disconnected or there is a power failure.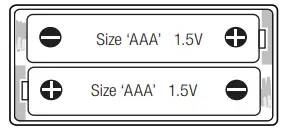
- open the battery door by pushing in on the tabs, then remove the door.
- Insert two (2) ‘AAA’ batteries as shown. Alkaline batteries are recommended for the longest playing time.
- Replace the battery door back on the compartment.
note: The batteries are used to back up the clock and alarm times when the AC adaptor is disconnected or there is a power failure.
The battery indicator will appear and flash in the display when there are no batteries or when the batteries are low and need to be replaced.
When replacing the battery, do not disconnect the AC power adapter otherwise the current time, alarm, and station presets will be erased.
battery precautions
Follow these precautions when using batteries in this device:
- Warning – Danger of explosion if batteries are incorrectly replaced. Replace only with the same or equivalent type.
- Use only the size and type of batteries specified.
- Be sure to follow the correct polarity when installing the batteries as indicated. A reversed battery may cause damage to the device.
- Do not mix different types of batteries together (e.g. Alkaline, Rechargeable and Carbon-zinc) or old batteries with fresh ones.
- If the device is not to be used for a long period of time, remove the batteries to prevent damage or injury from possible battery leakage.
- Do not try to recharge a battery not intended to be recharged – it can overheat and rupture. (Follow battery manufacturer’s directions).
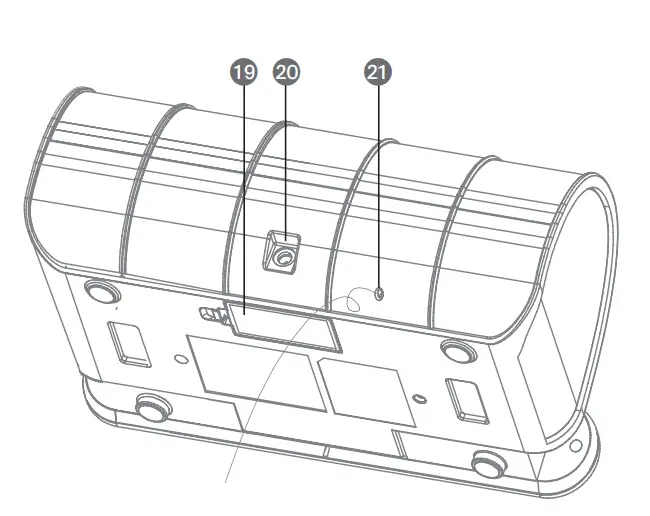
location of controls
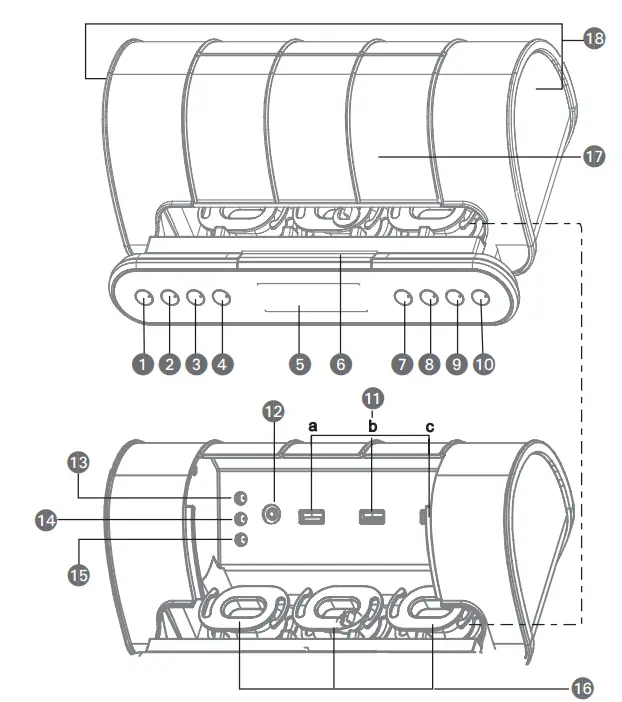
- Power Button
- Alarm 1 Button
- Alarm 2 Button
- Preset Button
- CD Display
- Snooze Button
- Volume / Brightness Down Button
- Volume / Brightness Up Button
- Tuning Down / Min Button
- Tuning Up / Hour Button
- Triple USB Charging Ports
- 3.5mm Line-in Jack
- DST Button
- Time Zone Button
- Clock Set Button
- Cord Management System
- Cover
- Stereo Speaker

- Battery Compartment
- DC Power In Jack
- Wire Antenna
LCD display
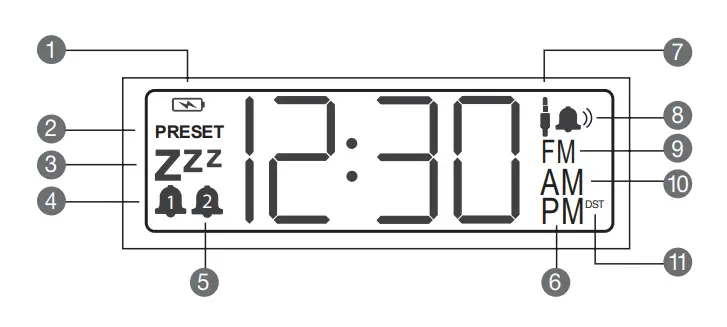
- Low Battery
- Preset
- Snooze
- Alarm 1
- Alarm 2
- PM
- AUX In
- Buzzer
- FM radio
- AM
- DST (Daylight Savings Time)
playing the radio
Press the POWER BUTTON to switch the unit ON. There are multiple methods to select the station of your choice.
- Preset tuning mode: Press the PRESET BUTTON repeatedly to select the desired preset (P01 to P10).
- Scanning mode: Press and hold < or > to scan through the frequency bands; scanning starts from the currently-tuned station and stops when a station is received.
- Manual tuning mode: Repeatedly press TUNE < or > to manually move through the frequency bands.
notes: When the unit turns ON, it is always on radio mode as default if no Line in audio cable is connected.
radio presets
- To set a radio preset, FIrst, follow the steps in the previous section to tune a station. Then press and hold the PRESET button to create a preset for the current station. “P” and “# #” (the preset number) will blink on the display.
- Press the TUNE UP or TUNE DOWN button to select a preset number (01-10). Press the PRESET button again to confirm the setting and the station will be saved into memory. Repeat these steps for up to 10 presets, as desired.
- Repeatedly press the PRESET button until the desired preset number appears in the display and the unit tunes to the station.
notes: Setting a new station preset will replace the previously stored station on that preset number.
improving the reception
Fully extend the FM wire antenna to increase reception sensitivity.
notes: Keep digital music players or mobile phones away from the FM antenna as this may cause interference.
Do not place the FM antenna near the AC power adaptor as this may lead to reception interference.
triple USB charging ports
This unit includes three USB ports placed inside the Cover (see”location of controls”). The USB ports support powering and charging most devices including iPhones, iPads, iPods, Android devices, E-readers, digital cameras and more. (USB cables sold separately).
One of USB port supply 5V/1A quick charging (see ” location of controls” 11c).
The other two USB ports supply 5V/0.5A charging (see “location of controls” 11a&b).
cord management system (CMS)
This unit also includes three built-in cord management system (see “location of controls”). This feature is designed to store excess lengths of cables by wrapping them around the CMS to keep cables neat and organized.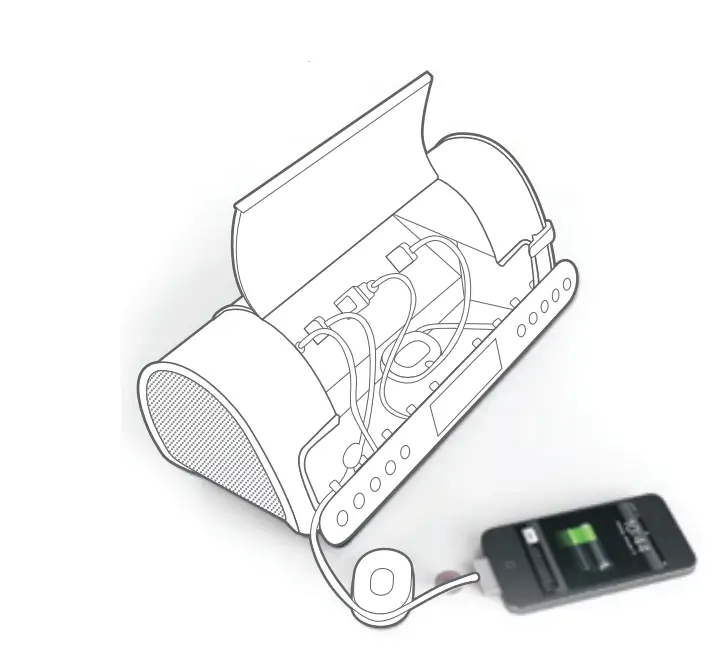
setting the alarm
- Press & hold the ALARM 1 or ALARM 2 BUTTON, the alarm time will flash.
- Press > to set the hour and press < to set the minute.
- Press the ALARM 1 or ALARM 2 BUTTON to confirm the alarm time setting.
- Press < or > to select the desired alarm source: Radio or Buzzer.
- Press the ALARM 1 or ALARM 2 BUTTON to complete the alarm setting. The ALARM 1 or ALARM 2 indicator will appear on the display.
- To stop and deactivate the alarm, press the ALARM 1 or ALARM 2 BUTTON briefly. The ALARM 1 or ALARM 2 indicator will disappear from the display.
notes: Before setting the alarm, make sure that the clock is set correctly (see “Setting the clock”).
To set the radio alarm, first tune to the desired station and adjust the volume (see “Playing the radio”). The alarm is set when the unit is on power OFF mode.
snooze
- When alarm is on… press the SNOOZE BUTTON to set the snooze time duration. The sound will turn off but will automatically come on again after about 10 minutes. Each time you press the SNOOZE BUTTON, the snooze time will change as follows:

- The maximum length of the snooze time is 60 minutes. The display will show the snooze time for about 3 seconds and then return to show the current time.
- Press the SNOOZE BUTTON and the residual time will appear, press the SNOOZE BUTTON repeatedly to select the desired snooze time setting.
notes: Once the snooze function has been activated, the user can press the SNOOZE BUTTON anytime and the display will show the residual time
setting the clock
- Plug in the unit.
- Press and hold the CLOCK SET BUTTON until the clock flashes in the display.
- Press the TUNNING UP / HOUR BUTTON repeatedly to set the hour and press the TUNNING DOWN / MIN BUTTON repeatedly to set the minute.
- Press the CLOCK SET BUTTON again to store the new clock setting.
select daylight savings time
- To activate the daylight savings time (summer time) adjustment, press the DST BUTTON.
- The DST indicator will appear in the display and the time will be adjusted to daylight savings time (summer time).
- To deactivate the daylight savings time (summer time) adjustment, press the DST BUTTON again.
- The DST indicator will no longer appear in the display and the time will be adjusted back to regular time.
select your time zone
- Press the TIME ZONE BUTTON.
By default, area number “02” is displayed. If you live in the Eastern Standard Time zone, you do not need to adjust the setting.Area number Time zone Area number Time zone 01 Atlantic Standard/Daylight Time 05 Pacifc Standard/Daylight Time 02 (default) Eastern Standard/Daylight Time 06 Yukon Standard/Daylight Time 03 Central Standard/Daylight Time 07 Hawaiian Standard/Daylight Time 04 Mountain Standard/Daylight Time - If you live in another time zone, press the TIME ZONE BUTTON repeatedly until the desired number appears.
The display will return to the clock about 4 seconds after the operation is complete.l
setting the display brightness
There are three levels of display brightness available (the default setting is High). With the unit Off, press the
VOLUME / BRIGHTNESS UP BUTTON or VOLUME / BRIGHTNESS DOWN BUTTON to select the desired setting.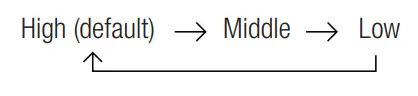
aux-in connection
- Insert one end of the 3.5mm audio cable (not included) into the LINE OUT jack on your external audio device (e.g. iPad, iPod shufe, mobile phone, MP3 player, digital media player, etc.) and the other end into the LINE IN jack on the unit.
- To listen to the external audio unit, turn this unit on using the POWER button and turn on the external audio unit.
- The unit will automatically switch to AUX mode when Line in audio cable is plugged in to the unit. The display will show “AUX In ” indicator and the clock time. Sound from the external audio unit will be heard through this unit’s speakers.
- If you wish to listen to radio source, pull out the end of 3.5mm audio cable from AUX IN Jack, the unit will switch back to radio mode.
notes: When the Alarm wakes and set to FM source, at that time the unit doesn’t switch to AUX mode even though you plug in the audio cable to this unit, until you stop the Alarm and power on the unit again, then will switch to AUX mode if audio cable is still connecting.
troubleshooting
| symptom | cause | solutions |
| No Sound | Volume is set to minimum. | Increase volume. |
| Radio, no sound. | Power is not on. | Press the power button to turn the power on. |
| Volume is set to minimum. | Increase volume. | |
| Radio, poor sound. | Station is not tuned properly. | Retune the FM broadcast station. |
| FM: Wire antenna is not extended. | Extend FM wire antenna. | |
| Aux mode, no sound. | Incorrectly connected. | Check the connection. |
| Volume is set to minimum. | Increase volume. | |
|
Time reset to “12:00” | Batteries connected improperly, not connected or dead. | Check the batteries. |
| Clock not set | Set the clock. | |
| Alarm does not turn on | Alarm is not activated or set properly | Set and activate alarm. |
| Clock is not set | Set the clock. |
specifications
general
- Power Source: DC 5V 3A Adaptor (Center Positive)
- AC Power Supply:100 – 240V – 50/60Hz 1A
- Battery Backup:2 x 1.5V “AAA” size batteries
- Speaker:2 x 4 ohms
- Output Power:1.5 W X 2
radio section
- Frequency Range (FM):87.5 – 108 MHz
Specifications are subject to change without notice.
For further assistance, please visit our website: hellocapello.com or contact customer service at [email protected] or 1-855-896-1795
Life Lab International Ltd.
FAQS
No wonder it is $15. No va. It doesn’t work.
If your brightness does not adjust by pushing the snooze bar, un plug the power cord for 2 seconds, then plug it back in. After doing that, the snooze bar worked to adjust the brightness.
Hold the CLOCK SET button for a few seconds until the time starts blinking. When it does use the up down arrow buttons to set the time.
Yes, you can change the brightness by hitting the snooze button while it is “off”. It has a low, medium and high function.
The problem is that digital clocks and other digital devices¹ that reference time in some fashion use an internal crystal clock. The vibration rate of the crystal is the source of the clock’s timing. If the temperature varies too much (such crystals change their vibration rate as the temperature changes) or the crystal is shaved (tuned) poorly, the crystal may be running too fast or too slow, resulting in a certain amount of chronological drift.
That even includes digital audio devices and can change the playback rate, changing the pitch of digital audio slightly. More expensive devices tend to have more precise crystal tuning.
Double click the button in which you set the alarm in. So if your alarm is set as alarm 1, click the alarm 1 button twice
Make sure the toggles on the top left and right with the bells are switched all the way to the right in the off position.
To activate the daylight savings time (summer time) adjustment, press the DST BUTTON.
A DST indicator will appear in the lower right of the display.
yes, but I don’t remember how. I recall three levels.
The instructions for the clock state the following. “When the alarm sounds, pressing the snooze/brightness button will temporarily silence the alarm. The alarm will sound again after approximately 10 minutes. Repeatedly press the snooze/brightness button to cycle through and select on of the following presets: 10, 20, 30, 40, 50, 60”
I looked at the instructions for the clock and the clock takes 3 AAA. The instructions read as follows “The batteries are used to backup the clock and alarm times when the AC adaptor is disconnected or there is a power failure.” I do not believe there would be enough power to charge a device on the 3 AAA batteries
It is not an electrical plug, only a USB.
First you need to find the manual online. This is a Catch-22 snafu. Apparently, Capello does not have a CR22 online manual. So first you have to find the online manual. Catch 22. Remember the movie Groundhog Day or the Albert Camus novel Waiting for Godot? Same old hangup. Catch 22.


