![]() Operation Instructions
Operation Instructions
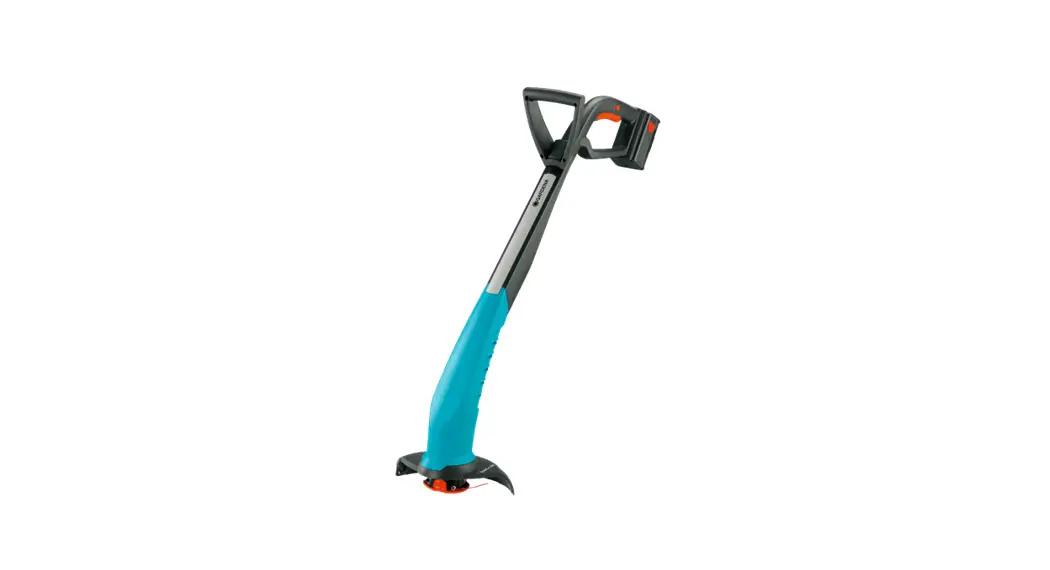
Turbotrimmer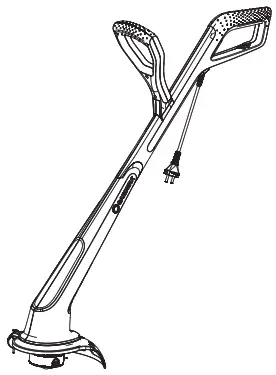
![]() SmallCut 300/23 Art. 9805
SmallCut 300/23 Art. 9805
SmallCut Plus 350/23 Art. 9806
SmallCut 300-23 Rasen Trimmer
GARDENA Turbotrimmer SmallCut 300/23 /SmallCut Plus 350/23
Original instructions.![]() This product may be used under supervision, or if instruction regarding the safe use of the product has been provided and the resulting dangers have been understood, by children aged 8 and above, as well as by per sons with physical, sensory or mental disabilities or a lack of experience and knowledge. Children must not be allowed to play with the product. Cleaning and user maintenance must not be performed by children without supervision. The use of this unit by young people under the age of 16 is not recommended. Never operate the unit when you are tired, ill or under the influence of alcohol, drugs or medicine.
This product may be used under supervision, or if instruction regarding the safe use of the product has been provided and the resulting dangers have been understood, by children aged 8 and above, as well as by per sons with physical, sensory or mental disabilities or a lack of experience and knowledge. Children must not be allowed to play with the product. Cleaning and user maintenance must not be performed by children without supervision. The use of this unit by young people under the age of 16 is not recommended. Never operate the unit when you are tired, ill or under the influence of alcohol, drugs or medicine.
Intended use:
The GARDENA Turbotrimmer is used to trim and to cut grass and lawns in private house and hobby gardens.
Do not use the unit in public facilities, parks, sports grounds, adjacent to roads or in agriculture or forestry.
DANGER! Risk of injury! Do not use the unit to cut hedges, to shred or to make compost.
SAFETY
Symbols on the unit:
 | Read operator’s manual. |
 | Keep other persons away. |
 | Danger! Risk of injury to other persons! →Keep other persons out of the work area. |
 | Wear safety glasses and ear protection. |
 | Do not let the unit become wet with rain or other moisture. Do not leave the unit outdoors while it is raining. |
 | Disconnect the mains cable if the cable becomes damaged or entangled. |
Important
Read carefully before use.
Keep for further reference.
Safe operating practices
Training
a) Read the instructions carefully. Be familiar with the controls and the correct use of the machine.
b) Never allow children or people unfamiliar with these instructions to use the machine. Local regulations can restrict the age of operator.
c) Keep in mind that the operator or user is responsible for accidents or hazards occurring to other people or their property.l
Preparation
a) Before use check the supply and extension cord for signs of damage or aging. If the cord becomes damaged during use, disconnect the cord from the supply immediately.
DO NOT TOUCH THE CORD BEFORE DISCONNECTING THE SUPPLY.
Do not use the machine if the cord is damaged or worn.
b) Before use, always visually inspect the machine for damaged, missing or misplaced guards or shields.
c) Never operate the machine while people, especially children, or pets are nearby.
Operation
a) Keep supply and extension cords away from cutting means.
b) Wear eye protection and stout shoes at all times while operating the machine.
c) Avoid using the machine in bad weather conditions especially when there is a risk of lightning.
d) Use the machine only in daylight or good artificial light.
e) Never operate the machine with damaged guards or shields or without guards or shields in place.
f) Switch on the motor only when the hands and feet are away from the cutting means.
g) Always disconnect the machine from the power supply (i.e. remove the plug from the mains, remove the disabling device or removable bat- tery).
- whenever the machine is left unattended;
- before clearing a blockage;
- before checking, cleaning or working on the machine;
- after striking a foreign object;
- whenever the machine starts vibrating abnormally.
h) Take care against injury to feet and hands from the cutting means.
i) Always ensure that the ventilation openings are kept clear of debris.
Maintenance and storage
a) Disconnect the machine from the power supply
(i. e. remove the plug from the mains, remove the disabling device or removable battery) before carrying out maintenance or cleaning work.
b) Use only the manufacturer’s recommended replacement parts and accessories.
c) Inspect and maintain the machine regu larly. Have the machine repaired only by an authorized repairer.
d) When not in use, store the machine out of reach of children.
Recommendation
The machine should be supplied via a resid ual current device (RCD) with a tripping current of not more than 30 mA.
Additional Safety Recommendations
Warning! Keep toddlers away when you assemble the unit. Small parts can be easily swallowed. There is also a risk that the polybag can suffocate toddlers.
Warning! When wearing hearing protection, and due to the noise produced by the unit, the operator may not notice persons approaching.
If the unit starts unintentionally when the mains plug is connected, disconnect the mains at once. Contact GARDENA Service to check the unit.
Warning! This unit makes an electromagnetic field while it operates. This field may under some conditions interfere with active or passive medical implants. To decrease the
risk of conditions that can possibly injure or kill, we recommend persons with medical implants to speak with their physician and the medical implant manufacturer before
operating.
Cables
Use only permitted extension cables as per HD 516.
→ Ask your electrical specialist.
If the unit got hot during operation, let it cool down before storage.
ASSEMBLY
![]() DANGER! Risk of physical injury!
DANGER! Risk of physical injury!
Cut injury when the unit starts accidentally.
→ Before you assemble the unit, make sure that the mains cable is disconnected.
To assemble the trimmer:
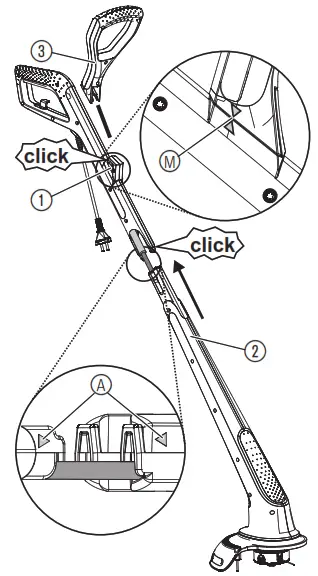
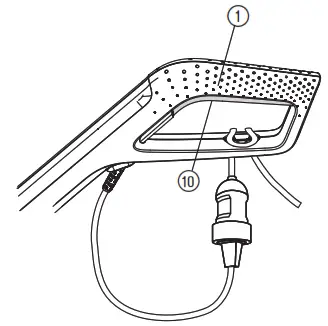
 Put the top part of the handle 1 and the trimmer head 2 together until they make a click (click). Ensure that the two arrows A face each other. The cable must not be stretched or caught when you do this.
- Put the bottom handle 3 on the top part of the handle 1 until it makes a click (click). Ensure that the two arrows M face each other.

- Put the cover 4 on the trimmer head 2 while you feed the cutting filament 5 through the opening in the cover 4.
- Put the cover 4 on the trimmer head 2 until it makes a click (click). Make sure that all cams lock in position.
 Put the top part of the handle 1 and the trimmer head 2 together until they make a click (click). Ensure that the two arrows A face each other. The cable must not be stretched or caught when you do this.
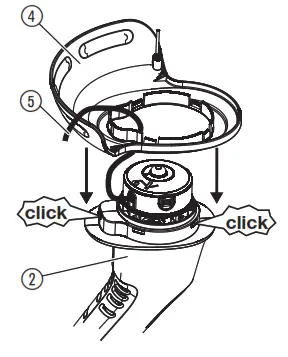
OPERATION
![]() DANGER! Risk of physical injury!
DANGER! Risk of physical injury!
Cut injury when the unit starts accidentally.
→ Before you connect, adjust or transport the unit, disconnect the mains cable and transport the unit by the bottom handle.
To connect the trimmer:
![]() DANGER! Risk of electric shock!
DANGER! Risk of electric shock!
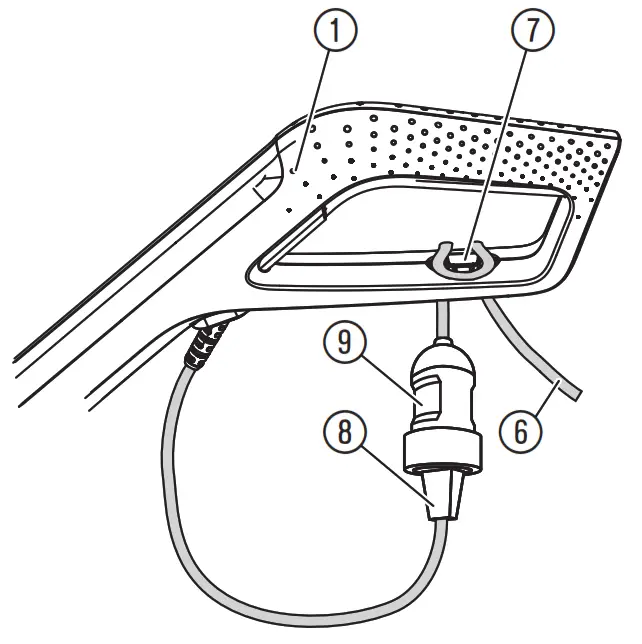
To avoid damage to the mains cable 8 the extension cable 6 must be inserted into the cable lock 7.
→ Before you operate the unit insert the extension cable 6 into the cable lock 7.
- Loop the extension cable 6, insert the loop into the cable lock 7 and pull tight.
- Connect the plug 8 of the unit into the socket 9 of the extension cable 6.
- Connect the extension cable 6 into a 230 V mains socket.
Work position:
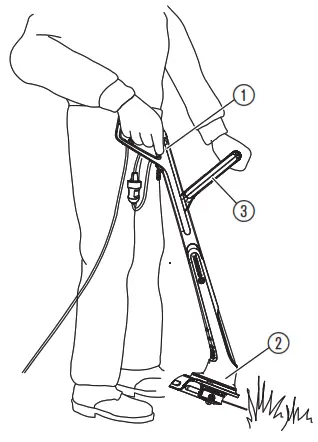
→ Hold the unit by the top part of the handle 1 and the bottom handle 3 so that the trimmer head 2 is tilted a small distance forward.
Make sure, the filament does not touch hard objects such as walls, stones and fences to prevent the filament from welding together or breaking.
To start the trimmer:
![]() DANGER! Risk of physical injury!
DANGER! Risk of physical injury!
Risk of injury if the unit does not stop when you release the start button.
→ Do not bypass the safety devices or switches. For example do not attach the start button 10 to the handle.
To start:
→ Push the start button 10 on the top part of the handle 1.
To stop:
→ Release the start button 10.
To extend the cutting filament (Tip mechanism):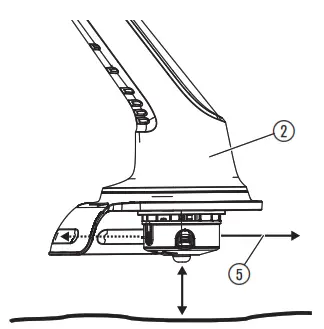 The tip mechanism operates when the motor operates. The best result occurs only with the maximum cutting filament length.
During first operation, it can be necessary to extend the cutting filament many times.
- Start the unit.
- Hold the trimmer head 2 parallel to the ground and briefly tap the trimmer head 2 onto a solid surface (prevent constant pressure for extended periods).
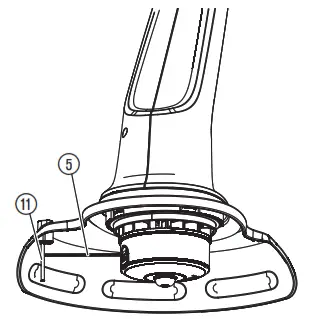
The cutting filament 5 is automatically extended with a mechanism that can be heard and adjusted to the correct length with the filament limiter q. If necessary tap many times again and again.
MAINTENANCE
![]() DANGER! Risk of physical injury!
DANGER! Risk of physical injury!
Cut injury when the unit starts accidentally.
→ Before you maintain the unit, make sure that the mains cable is disconnected.
To clean the trimmer:
![]() DANGER! Electric shock!
DANGER! Electric shock!
Risk of injury and risk of damage to the unit.
→ Do not clean the unit with water or with a water jet (in particular high-pressure water jet).
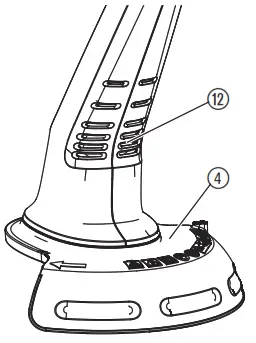
The airflow slots must always be clean.
- Clean the airflow slots 12 with a soft brush (do not use a screwdriver).
- Clean all movable parts after each operation. Especially remove any grass and dirt from the cover 4.
To replace the filament cassette:![]() DANGER! Risk of physical injury!
DANGER! Risk of physical injury!
Risk of injury from metal cutting parts!
→ Do not use metal cutting parts or replacement parts and accessories not approved by GARDENA.
Only use original GARDENA Filament Cassettes. You can order Replacement Filament Cassettes from your GARDENA dealer or directly from the GARDENA Customer Service.
For Art. 9805 SmallCut 300/23 / Art. 9806 SmallCut Plus 350/23: GARDENA Filament Cassette for Turbotrimmers Art. 5307
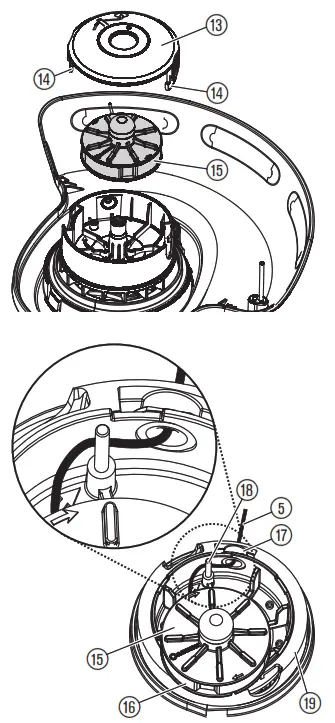
- Push in cassette cover 13 on the two locking clips14 at the same time and remove.
- Remove the filament cassette 15.
- Remove all dirt.
- Pull approximately 15 cm of the cutting filament 5 out of the new filament cassette 15 through the hole in the plastic ring 16.
- First put the cutting filament 5 through the metal sleeve 17.
- Put the cutting filament 5 around the guide pin 18.
- Put the filament cassette 15 into the filament cassette holder 19.
- Attach the cassette cover 13 on the filament cassette holder 19 until you hear both locking clips r make a click.
When attaching the cassette cover 13, the cutting filament 5 must be put around the guide pin 18 and must not be caught.
→ If the cassette cover 13 cannot be fully installed, turn the filament cassette 15 back and forth, until the filament cassette 15 is fully in the filament cassette holder 19.
STORAGE
To put into storage:
The unit must be stowed away from children.
- Disconnect the mains cable.
- Clean the unit (see 4. MAINTENANCE).
- Stowe the unit in a dry area where it has protection from frost.
Recommendation:
The unit can be hung up by the handle. The cutting head is not put under too much strain if the unit is stowed hanging up.
Disposal:
(in accordance with RL2012/19/EC)![]() The unit must not be added to usual household waste.
The unit must not be added to usual household waste.
Refer to local environmental laws for discarding.
→ Important: Make sure that the unit is discarded through your municipal recycling collection centre.
TROUBLESHOOTING
![]() DANGER! Risk of physical injury!
DANGER! Risk of physical injury!
Cut injury when the unit starts accidentally.
→ Before you troubleshoot the unit, make sure that the mains cable is disconnected.
To pull the cutting filament out of the filament cassette: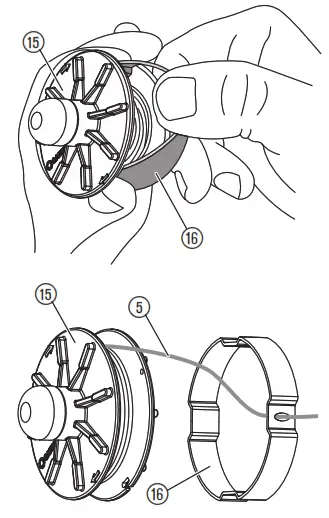 If a cutting filament is pulled into the filament cassette you can pull it out again with the instructions below.
- Remove the filament cassette 15 with the instructions under 4. MAINENANCE “To replace the filament cassette”.
- Push together the plastic ring 16 on the filament cassette 15 between your thumb and index finger.
- Pull the plastic ring 16 over the side part of the filament cassette (if necessary, use a screwdriver).
- You can at this time get the cutting filament that was pulled into the filament cassette.
- Unwind the cutting filament 5 by approx. 15 cm and put it through the eye of the plastic ring 16 (if necessary, loosen the welded cutting filament beforehand using a screwdriver, and unwind and wind fully).
- Pull the plastic ring 16 onto the filament cassette 15.
- Install the filament cassette 15 with the instructions under
- MAINTENANCE “To replace the filament cassette”.
| Problem | Possible Cause | Remedy |
| Unit no longer cuts | Cutting filament worn or too short. | → Extend the cutting filament (see 3. OPERATION “To extend the cutting filament (Tip mechanism)”). |
| Filament cassette empty. | → Replace the filament cassette (see 4. MAINTENANCE “To replace the filament cassette’). | |
| Cutting filament pulled into the cassette or stuck together. | → Pull the cutting filament out of the filament cassette (see above). | |
| Cutting filament cannot be extended or cutting filament is used quickly | The cutting filament became too dry and brittle (e.g. during the winter). | → Place the filament cassette in water for approx. 10 hours. |
| The cutting filament frequently touched hard objects. | → Prevent the cutting filament from touching hard objects. |
For any other malfunctions please contact the GARDENA service department.
Repairs must only be done by GARDENA service departments or specialist dealers approved by GARDENA.
TECHNICAL DATA
| Turbotrimmer | SmallCut 300/23 (Art. 9805) | SmallCut Plus 350/23 (Art. 9806) |
| Motor power consumption | 300 W | 350 W |
| Mains voltage/ Mains frequency | 230 V/ 50 Hz | 230 V / 50 Hz |
| Cutting filament thickness | 1,6 mm | 1,6 mm |
| Cutting width | 230 mm | 230 mm |
| Cutting filament supply | 6 m | 6 m |
| Cutting filament feed | Tip mechanism | Tip mechanism |
| Rpm of filament cassette | 13,000 rpm | 13,000 rpm |
| Weight | 1.6 kg | 1.8 kg |
| Sound pressure level Lpa¹ Uncertainty Kpa | 83 dB (A) 3 dB (A) | 83 dB (A) 3 dB (A) |
| Sound power level LwA² Uncertainty kWA | measured 92 dB (A)/ guaranteed 94 dB (A) 2.04 dB (A) | measured 92 dB (A)/ guaranteed 94 dB (A) 2.32 dB (A) |
| Hand/arm vibration awhw¹ Uncertainty Ka | 4.3 m/s² 2.2 m/s² | 4.3 m/s² 2.2 m/s² |
![]() The stated vibration emission value has been measured according to a standardized test procedure and can be used for comparison of one electric power tool with another. It can also be used for preliminary evaluation of exposure. The vibration emission value can vary during actual use of the electric power tool.
The stated vibration emission value has been measured according to a standardized test procedure and can be used for comparison of one electric power tool with another. It can also be used for preliminary evaluation of exposure. The vibration emission value can vary during actual use of the electric power tool.
ACCESSORIES
GARDENA Filament Cassette for Turbotrimmers
SERVICE / WARRANTY
Service:
Please contact the address on the back page.
Guarantee:
Please contact the address on the back page.
GARDENA guarantees this unit for 2 years (from date of purchase).
This guarantee includes all important defects of the unit that can be proved to be material or manufacturing faults. Under warranty we will replace the unit or repair it for no cost if these conditions are applicable:
- The unit must have been used properly and in keeping with the requirements of the operation instructions.
- Neither the purchaser or a not approved third party have tried to repair the unit.
The filament cassette and cassette cover are consumables and are not included in the guarantee.
This manufacturer’s guarantee does not have an effect on the user’s existing warranty claims against the dealer/seller.
If you have problems with this unit, please contact our Service or send the defective unit together with a short description of the problem – if there is a guarantee, with a copy of the receipt – postage paid to one of the GARDENA Service Centres on the back of this leaflet.
Product Liability
We expressly point out that, in accordance with the product liability law, we are not liable for any damage caused by our units if it is because of improper repair or if parts replaced are not original GARDENA parts or approved parts, and, if the repairs were not done by a GARDENA Service Centre or an approved specialist. The same applies to spare parts and accessories.
CE Declaration
The undersigned Husqvarna AB, 561 82 Huskvarna, Sweden hereby certifies that, when leaving our factory, the units indicated below are in accordance with the harmonised EU guidelines, EU standards of safety and product specific standards. This certificate becomes void if the units are modified without our approval.
Description of the unit: Turbotrimmer
Product type:
SmallCut 300/23
SmallCut Plus 350/23
ArticleNumber: 9805/9806
CEDirectives:
2006/42/EC
2004/108/EC (valid to 19.04.2016)
2014/30/EC (valid from 20.04.2016)
2000/14/EC
2011/65/EC
Harmonised EN:
EN 60335-1
EN 50636-2-91
EN ISO 12100
| Deposited Documentation: GARDENA Technical Documentation, M. Kugler 89079 Ulm | Conformity Assessment according to: 2000/14/EC Procedure: art. 14 Annex VI |
| Noise level: | measured / guaranteed |
| 9805 9806 | 92 dB (A) / 94 dB (A) 92 dB (A) / 94 dB (A) |
Year of CE marking: 2015
Ulm, 24.08.2015
Authorized representative:
Reinhard Pompe (Vice President)
| Deutschland / Germany GARDENA GmbH Central Service Hans-Lorenser-Straße 40 D-89079 Ulm Produktfragen: (+49) 731 490-123 Reparaturen: (+49) 731 490-290 [email protected] | China Husqvarna (China) Machinery Manufacturing Co., Ltd. No. 1355, Jia Xin Rd., Ma Lu Zhen, Jia Ding Dist., Shanghai 201801 Phone: (+86) 21 59159629 Domestic Sales www.gardena.com.cn | South Africa Husqvarna South Africa (Pty) Ltd Postnet Suite 250 Private Bag X6, Cascades, 3202 South Africa Phone: (+27) 33 846 9700 [email protected] |
| Belgium GARDENA Belgium NV/SA Sterrebeekstraat 163 1930 Zaventem Phone: (+32) 2 7 20 92 12 Mail: [email protected] | Denmark GARDENA / Husqvarna Consumer Outdoor Products Salgsafdelning Danmark Box 9003 S-200 39 Malmö [email protected] | Mexico AFOSA Av. Lopez Mateos Sur # 5019 Col. La Calma 45070 Zapopan, Jalisco Mexico Phone: (+52) 33 3818-3434 [email protected] |
| Canada / USA GARDENA Canada Ltd. 100 Summerlea Road Brampton, Ontario L6T 4X3 Phone: (+1) 905 792 93 30 [email protected] | Japan KAKUICHI Co. Ltd. Sumitomo Realty & Development Kojimachi BLDG., 8F 5 -1 Nibanncyo Chiyoda-ku Tokyo 102-0084 Phone: (+81) 33 264 4721 [email protected] | Serbia Domel d.o.o. Autoput za Novi Sad bb 11273 Belgrade Phone: (+381) 118 48 88 12 [email protected] |
![]() 1885-20.960.03 / 0915
1885-20.960.03 / 0915
© GARDENA
Manufacturing GmbH
D-89070 Ulm
http://www.gardena.com
References
 Husqvarna UK | Chainsaws, Lawn Mowers & Garden Tools
 Husqvarna Forest & Garden
-
Husqvarna Australia | Tools & Equipment for Lawn, Garden and Forestry
-
Husqvarna Brasil
-
Husqvarna Colombia
-
Husqvarna Ecuador
-
Husqvarna Magyarország
-
Husqvarna Group
-
一瀬製作所 | ステンレス建具のプロフェッショナル■設計・製作・施工
-
www.net.ve - This website is for sale! - www Resources and Information.
-
GARDENA - Garden tools - GARDENA
-
GARDENA Service - GARDENA Support
-
Produkt Service - Reparatur Service - GARDENA
-
GARDENA - puutarhatyökalut - GARDENA
-
Садовый Инвентарь | Садовые Инструменты | GARDENA


