
FEIT Electric S9DFL Smart Dual Head Motion Security Flood Ligh Instructions
Safety Information
READ BEFORE INSTALLATION
- Follow all safe guards stated in the manual, in addition to normal safety precautions in working with electrical devices. Always follow basic safety precautions to reduce the risk of fire, electric shock and personal injury.
- WARNING: RISK OF SHOCK: House electric current can cause painful shock or serious injury unless handed properly. For your safety, always remember to:
- Turn Off the power at the fuse or circuit breaker box before you install the fixture.
- Ground the fixture to avoid potential electric shocks and to ensure reliable starting.
- Double check all connections to be sure they are tight and correct.
- Wear Rubber sole shoes and work on a sturdy ladder.
- This fixture is designed for use in a circuit protected by a fuse or circuit breaker. It is also designed to be installed in accordance with local electrical codes. If you are unsure about your wiring, consult a qualified electrician or local electrical inspector, and check your local electrical code.
- WARNING: RISK OF CUTS: Some metal parts in the fixture may have sharp edges. To prevent cuts and scrapes, wear gloves when handling the parts.
- Account for small parts and destroy packaging material, as these may be hazardous to children.
![]() WARNING: These products may represent a possible shock or fire hazard if improperly installed or attached in any way. Products should be installed in accordance with the owners manual, current electrical codes and/or the current National Electric Code (NEC). Properly ground electrical enclosure. Use only UL or IEC approved wire for input/output connections.
WARNING: These products may represent a possible shock or fire hazard if improperly installed or attached in any way. Products should be installed in accordance with the owners manual, current electrical codes and/or the current National Electric Code (NEC). Properly ground electrical enclosure. Use only UL or IEC approved wire for input/output connections.
![]() WARNING: Risk of fire. Use only on 120v 60Hz circuits. Suitable for wet locations. Do not use with dimmers. Do not look directly at the operating LED lamp. The luminaire should be grounded. This device is not intended for use with emergency exits or emergency lights.
WARNING: Risk of fire. Use only on 120v 60Hz circuits. Suitable for wet locations. Do not use with dimmers. Do not look directly at the operating LED lamp. The luminaire should be grounded. This device is not intended for use with emergency exits or emergency lights.
![]() CAUTION: To avoid risk of fire, explosion, or electrical shock, this product should be installed, inspected and maintained by a qualified electrician only, in accordance with all applicable electrical codes. Be certain electrical power is OFF before and during installation and maintenance.
CAUTION: To avoid risk of fire, explosion, or electrical shock, this product should be installed, inspected and maintained by a qualified electrician only, in accordance with all applicable electrical codes. Be certain electrical power is OFF before and during installation and maintenance.
SAVE THESE INSTRUCTIONS
Pre-Installation
HARDWARE THAT IS PRE-INSTALLED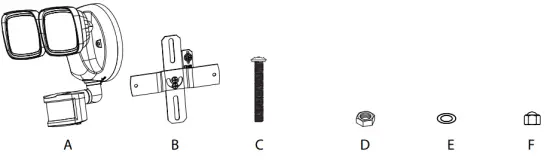
PARTS IN THE BAG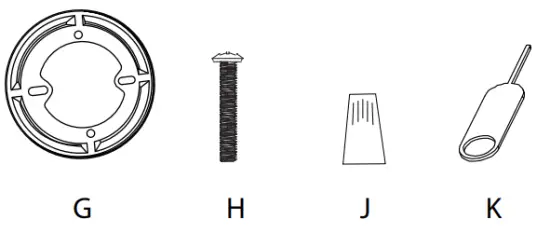
TOOLS REQUIRED (NOT INCLUDED)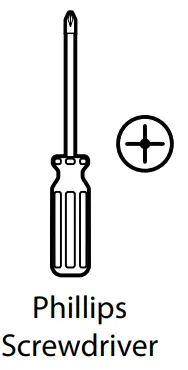
Parts List
| Part | Description | Quantity | Part | Description | Quantity |
| A | Flood Light | 1 | F | Canopy Mounting Nuts | 2 |
| B | Crossbar | 1 | G | Round Plate | 1 |
| C | Fixture Mounting Screws | 2 | H | J-Box Mounting Screws | 2 |
| D | Fixture Mounting Nuts | 2 | J | Wire Nuts | 2 |
| E | Rubber Washers | 2 | K | Reset Key Pin | 1 |
Flush J-Box Installation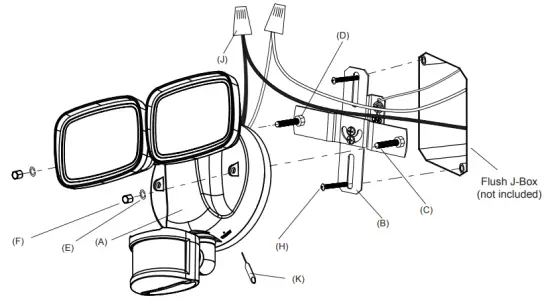
External J-Box Installation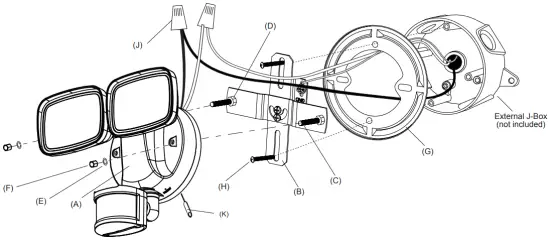
Flush J-Box Installation
- Turn the power OFF at the switch and fuse box or the circuit breaker.
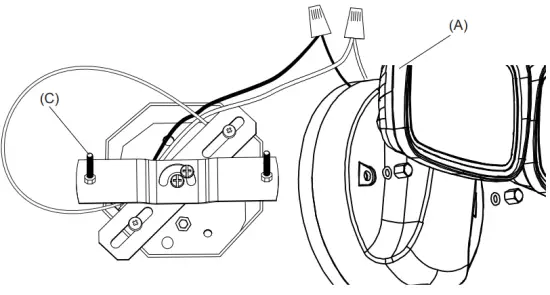
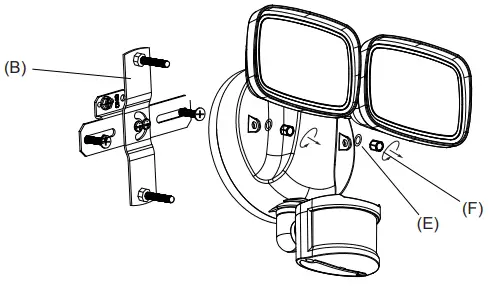
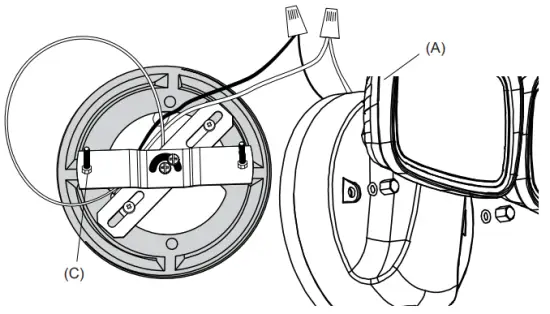
- Unscrew the Canopy Mounting Nuts (F) and remove the Rubber Washers (E) to detach the Crossbar (B) from the fixture.

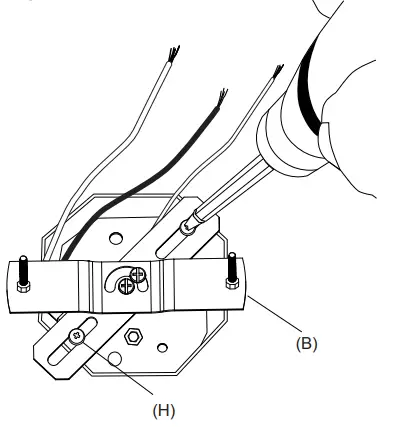
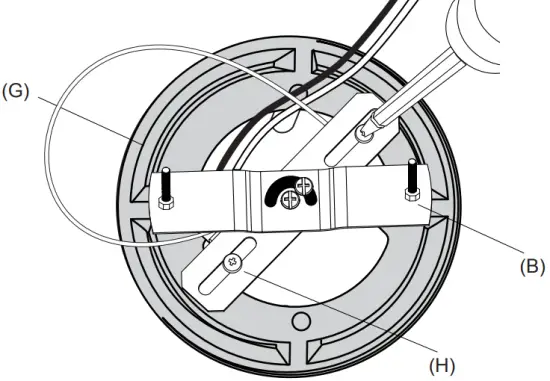
- Pull the supply wires to the side and position the Crossbar (B) against the J-Box and align the holes. Position the J-Box Screws (H) into each hole and tighten it.

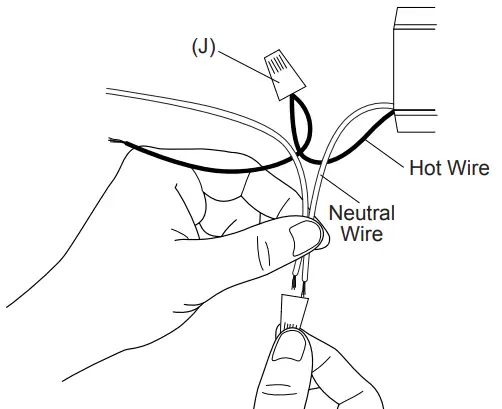
- Using the Wire Nuts (J) provided, connect the white fixture wire to the neutral (white) supply wire. Connect the black fixture wire to the hot (black) supply wire. Connect the ground or bare supply wire to the ground screw of the crossbar.

- Adjust the crossbar to best fit the fixture then tighten both screws at the center swivel joint. Carefully push all the wires into the box. Align the Fixture Mounting Screws (C) with the holes on the Flood Light (A) and press together.

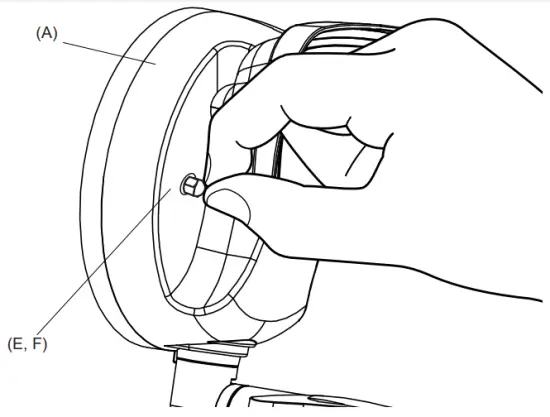
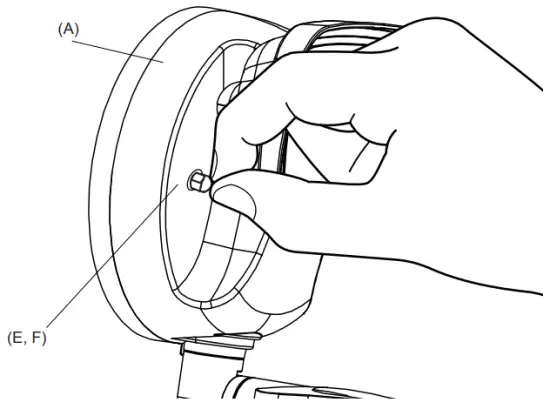
- Secure the Flood Light (A) by installing the Rubber Washers (E) and the Canopy Mounting Nuts (F) then tighten the nuts.

- Once the fixture is tightly secured to J-Box, apply silicone sealant around the base of the fixture to prevent water from seeping into the box.
 NOTE: Silicone sealant not included.
External J-Box Installation
- Turn the power OFF at the switch and fuse box or the circuit breaker.
- Unscrew the Canopy Mounting Nuts (F) and remove the Rubber Washers (E) to detach the Crossbar (B) from the fixture

- Pull the supply wires through the center of the Round Plate (G). Position the Round Plate (G) and Crossbar (B) against the J-Box and align the holes. Position the J-Box Screws (H) into each hole and tighten it.

- Using the Wire Nuts (J) provided, connect the white fixture wire to the neutral (white) supply wire. Connect the black fixture wire to the hot (black) supply wire. Connect the ground or bare supply wire to the ground screw of the crossbar.

- Adjust the crossbar to best fit the fixture then tighten both screws at the center swivel joint. Carefully push all the wires into the box. Align the Fixture Mounting Screws (C) with the holes on the Flood Light (A) and press together.

- Secure the Flood Light (A) by installing the Rubber Washers (E) and the Canopy Mounting Nuts (F) then tighten the nuts.

- Once fixture is tightly secured to J-Box, apply silicone sealant around the base of the fixture to prevent water from seeping into the box.

![]() NOTE: Silicone sealant not included
NOTE: Silicone sealant not included
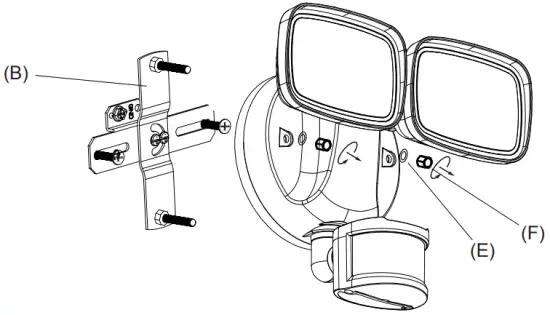
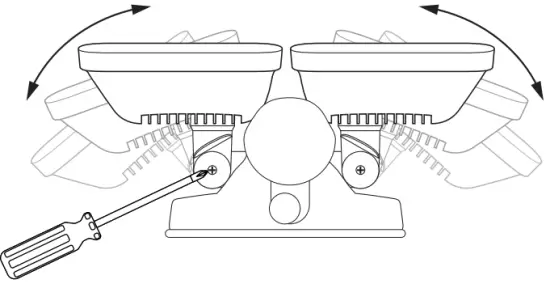
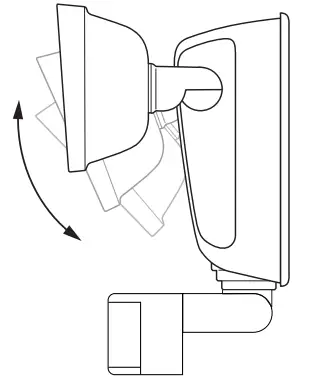
Adjusting Dual Head
- To adjust the Flood Light Heads, loosen screws and move to the ideal position. Tighten the screw to secure in place.

- Adjust Flood Light Heads up and down.

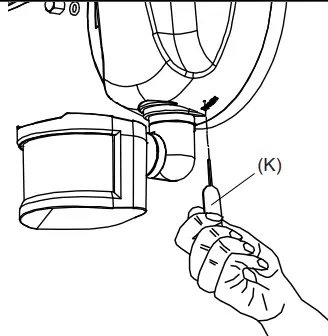
Resetting Flood Light
To reset the Flood Light, use the Reset Key Pin (K) to push and hold for 3 seconds. The Flood Light will blink rapidly to indicate that reset was successful and is now in pairing mode.

Troubleshooting
If you are having difficulty connecting:
- Make sure the Wi-Fi network is a 2.4 GHz network. The Smart Motion Flood Light will not connect to a 5 GHz network.
- Test your Wi-Fi network with other devices such as your phone to make sure it is operating properly.
- The Wi-Fi connection may not have good coverage during set up. Try moving the Smart Motion Flood Light closer to your Wi-Fi router.
- Your Wi-Fi network password is case sensitive, make sure you are entering correctly.
Quick Guide for App Setup
Getting Started:
- Download the Feit Electric app on your smart device.
Feit Electric app


Only supports 2.4GHz Wi-Fi networks
- After hardwiring to the power, turn on your Smart Motion Flood Light. The Smart Motion Flood Light must be blinking rapidly to connect. If not already blinking, use the Reset Key Pin (K) to push and hold for 3 seconds. By doing so, this will activate the pairing mode.
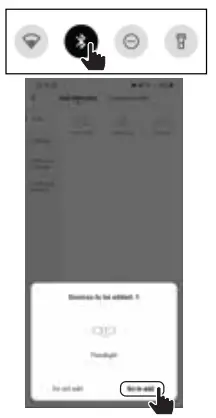
- Turn on the phone’s Bluetooth and open the Feit Electric app to complete the set up. Tap Add Device or the + sign. The device name(s) will pop up on the Feit app. Tap on Go to add, then select the device to add. You will be prompted to enter your Wi-Fi network name and password.

- (Optional) Connect to Google Assistant or Alex
Tap the context menu (…) and choose Alexa or Google Assistant


Limited Warranty
This product is warrantied to be free from defects in workmanship and materials for up to 1 year from date of purchase. If the product fails within the warranty period, please visit feit.com/help for instructions on replacement/refund or call 866.326.BULB. REPLACEMENT OR REFUND IS YOUR SOLE REMEDY. EXCEPT TO THE EXTENT PROHIBITED BY APPLICABLE LAW, ANY IMPLIED WARRANTIES ARE LIMITED IN DURATION TO THE DURATION OF THIS WARRANTY. LIABILITY FOR INCIDENTAL OR CONSEQUENTIAL DAMAGES IS HEREBY EXPRESSLY EXCLUDED. Some states and provinces do not allow the exclusion of incidental or consequential damages, so the above limitation or exclusion may not apply to you. This warranty gives you specific legal rights, and you may also have other rights which vary from state to state or province to province.
FCC/ICES STATEMENT
This device complies with part 15 of the FCC Rules/Canada Industry license-exempt RSS standard(s). Operation is subject to the following two conditions:
- This device may not cause harmful interference, and
- this device must accept any interference received, including interference that may cause undesired operation.
Note: This equipment has been tested and found to comply with the limits for a Class B digital device, pursuant to Part 15 of the FCC Rules. These limits are designed to provide reasonable protection against harmful interference in a residential installation. This equipment generates, uses and can radiate radio frequency energy and, if not installed and used in accordance with the instructions, may cause harmful interference to radio communications. However, there is no guarantee that interference will not occur in a particular installation. If this equipment does cause harmful interference to radio or television reception, which can be determined by turning the equipment off and on, the user is encouraged to try to correct the interference by one or more of the following measures:
- Reorient or relocate the receiving antenna.
- Increase the separation between the equipment and receiver.
- Connect the equipment into an outlet on a circuit different from that to which the receiver is connected.
- Consult the dealer or an experienced radio/TV technician for help.
Changes or modifications to this unit not expressly approved by the part responsible for compliance could void the user’s authority to operate the equipment. CAN ICES-005.
Radiation Exposure Statement
The device has been evaluated to meet general RF exposure requirement. The device can be used in fixed/mobile (min20cm) exposure condition without restriction.
Supplier’s Declaration of Conformity:
47 CFR § 2.1077 Compliance Information
Responsible Party:
Feit Electric Company 4901 Gregg Road, Pico Rivera, CA 90660, USA
562-463-2852
Unique Identifier:
S9DFL/CCT/MOT/WH/AG
Need Help?

Thank you for your purchase. Questions, comments or feedback? We’d love to hear from you. Visit feit.com/help for support or connect with us:
![]() @FeitElectric
@FeitElectric![]() @FeitElectricInc
@FeitElectricInc![]() feitelectriclighting
feitelectriclighting


 Motion Security Floodlight Sensor Instruction Manual")
 White Dual Head Led Flood Solar Instruction Manual")


