![]() PTGV-DM Compaq Desktop PCs Motherboard
PTGV-DM Compaq Desktop PCs Motherboard
User Guide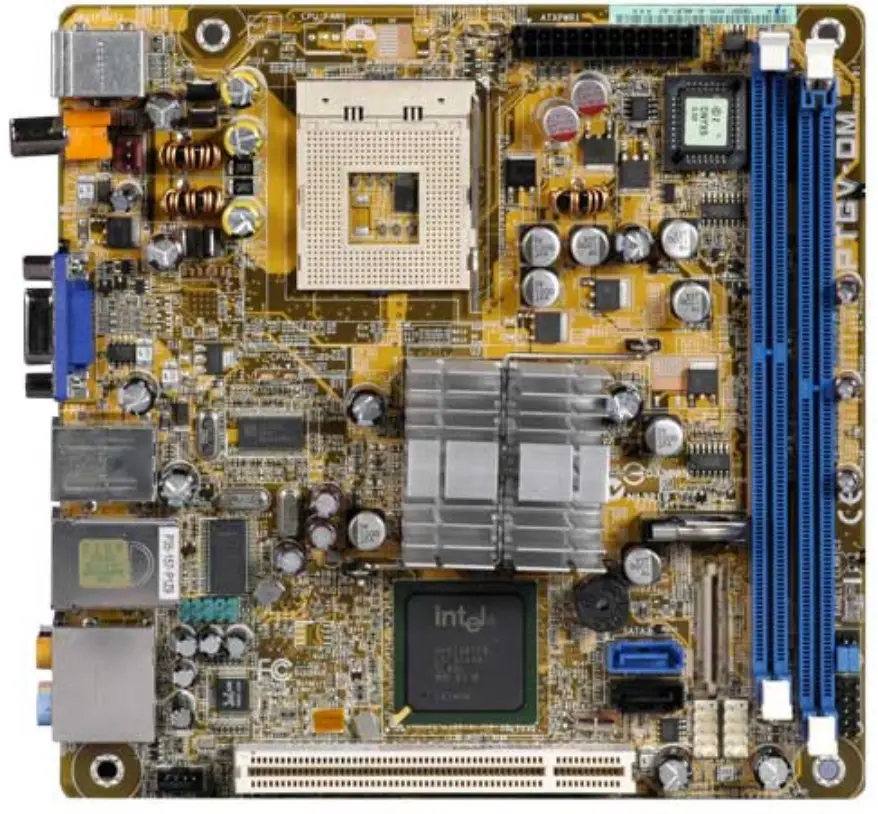
PTGV-DM Compaq Desktop PCs Motherboard
HP and Compaq Desktop PCs – Motherboard Specifications, PTGVDM (Onyx2)![]() Motherboard specifications table
Motherboard specifications table![]() Motherboard layout and photos
Motherboard layout and photos![]() Clearing BIOS settings
Clearing BIOS settings![]() Clearing BIOS password
Clearing BIOS password
Motherboard specifications table
| Part/Feature | Specification/Support |
| Motherboard description | • Motherboard manufacturer’s name: ASUS PTGV-DM • HP/Compaq name: Onyx2-GL8E |
| CPU/Processor | • Socket: 479 • Supports the following processors: • Pentium M (Mobile) • Celeron M (Mobile) |
| Front-side bus (FSB) | •400/533 MHz |
| Chipset | • Northbridge: i915GV • Southbridge: ICH6 |
| BIOS features | • AMI 4Mb FWH EEPROM • HP BIOS with enhanced ACPI, DMI, Green, and PnP Features Plus |
| Form factor | • ATX form factor, 6.69 in x 6.69 in |
| Memory | • 2 x 240-pin DDR2 DIMM socket for up to 2 GB non-ECC DDR2 533/400 SDRAM • Maximum HP/Compaq approved memory is 2 GB |
| Expansion slots | • One PCI |
| Video graphics | • Integrated |
| Serial ATA | • 2 SATA connectors • Each connector supports 1 serial ATA-150 disk drive |
| Onboard audio or audio card | Realtek ALC880 8-channel High Definition Audio CODEC |
| Onboard LAN | • Intel 82562GT • 10/100 Mbps |
| Back panel I/O | • PS/2 keyboard port (purple) • PS/2 mouse port (green) • One VGA (monitor) port • Four USB (2.0) ports • One IEEE 1394a port • One RJ-45 networking port • One SPDIF out port • Audio ports: • line in (light blue) • line out (lime) • microphone (pink) • side speaker out (gray) • rear speaker out (black) • center/subwoofer (yellow orange) |
| Back panel I/O | • One 24-pin ATX “Micro-Fit” power connector • One IDE connector • Two SATA connectors • One CPU fan connector • One PC fan connector • One PC indicator LEDs / power switch / reset button connector • Front panel power and LED connectors • Two USB 2.0 connectors ports |
NOTE: Motherboard specifications are subject to change without notice.
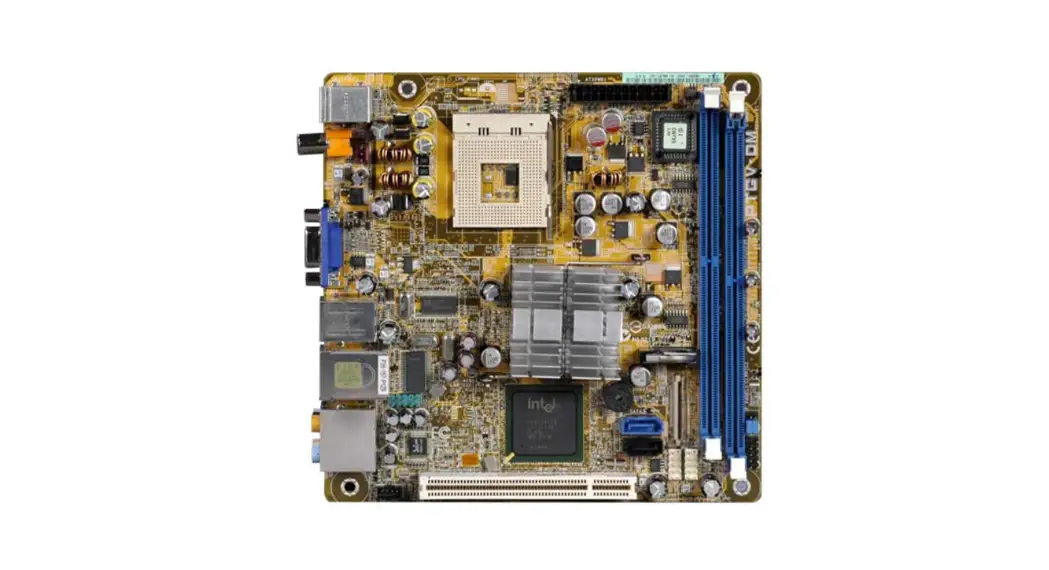
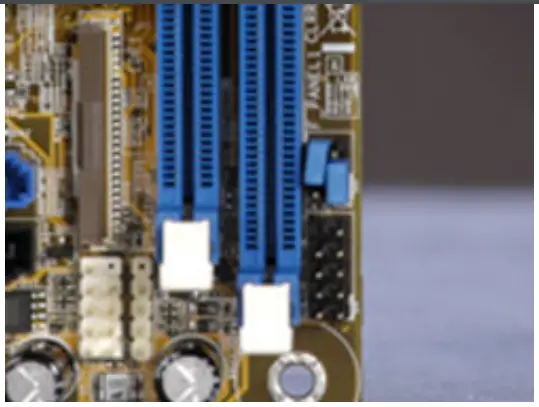
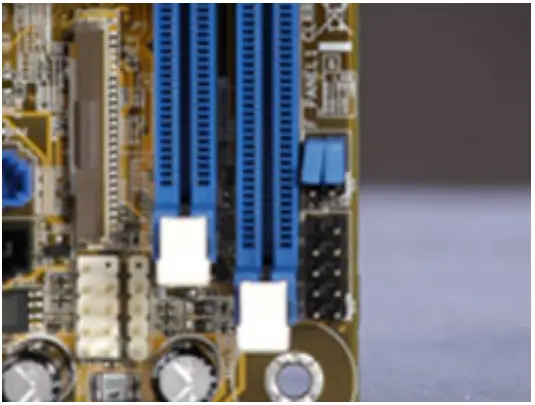
Motherboard layout and photos
Figure 1: layout
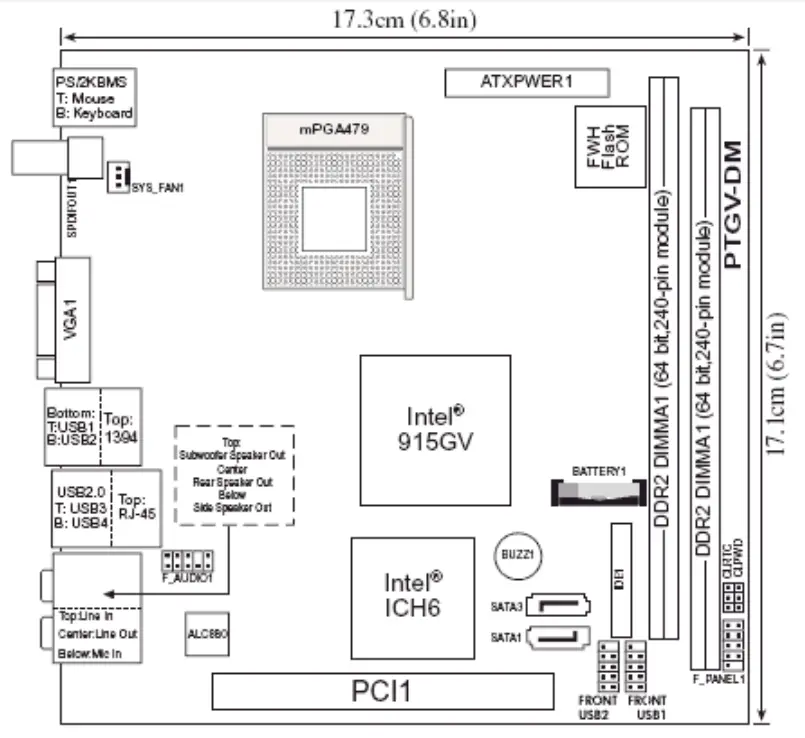 Figure 2: PhotographFigure 3: Backplate
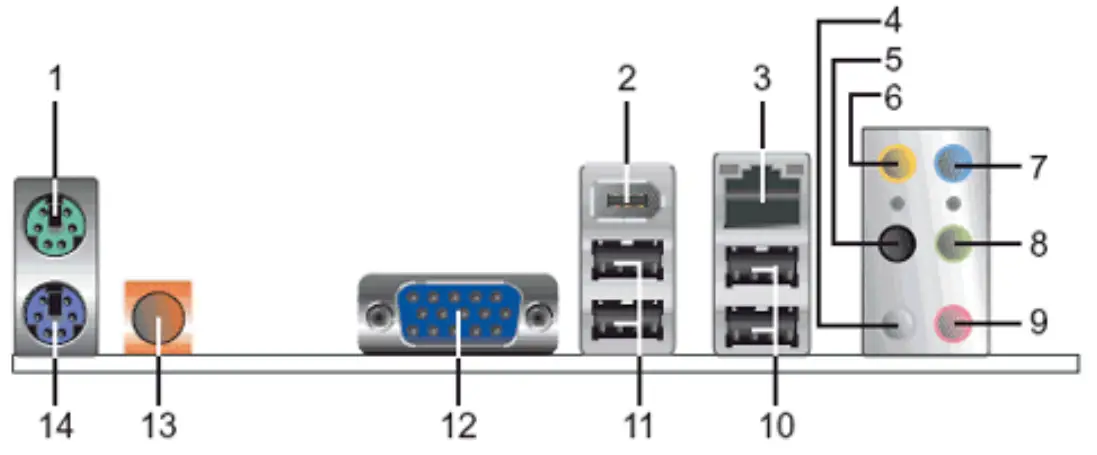
- PS/2 mouse port (green). This port is for a PS/2 mouse.
- IEEE 1394a port. This 6-pin IEEE 1394a port provides high-speed connectivity for audio/video devices, storage peripherals, PCs, or portable devices.
- LAN (RJ-45) port. This port allows connection to a Local Area Network (LAN) through a network hub.
- Side Speaker Out port (gray). This port connects to the side speakers in an 8-channel audio configuration.
- Rear Speaker Out port (black). This port connects to the rear speakers on a 4-channel, 6-channel, or 8-channel audio configuration.
- Center/Subwoofer port (yellow orange). This port connects the center/subwoofer speakers.
- Line In port (light blue). This port connects a tape, CD, DVD player or other audio sources.
- Line Out port (lime). This port connects a headphone or a speaker. In 4-channel, 6-channel, and 8-channel mode, the function of this port becomes Front Speaker Out.
- Microphone port (pink). This port connects a microphone.
- USB 2.0 ports 3 and 4. These two 4-pin Universal Serial Bus (USB) ports are available for connecting USB 2.0 devices.
- USB 2.0 ports 1 and 2. These two 4-pin Universal Serial Bus (USB) ports are available for connecting USB 2.0 devices.
- Video Graphics Adapter port. This 15-pin port is for a VGA monitor or other VGA-compatible devices.
- Coaxial SPDIF Out port. This port connects an external audio output device via a coaxial SPDIF cable.
- PS/2 keyboard port (purple). This port is for a PS/2 keyboard.
Clearing BIOS settings
Resetting BIOS settings are done by moving a jumper onto a pair of pins on the motherboard. Use this section to clear settings for the
CMOS RAM (sometimes referred to as Real Time Clock or RTC) or the BIOS password.![]() CAUTION: Do not change any jumper setting while the computer is on. Damage to the motherboard can result.
CAUTION: Do not change any jumper setting while the computer is on. Damage to the motherboard can result.
This motherboard has jumpers to:
- Clear the Real Time Clock (RTC) RAM in CMOS.
- Disable password checking.
Figure 4: Jumper locations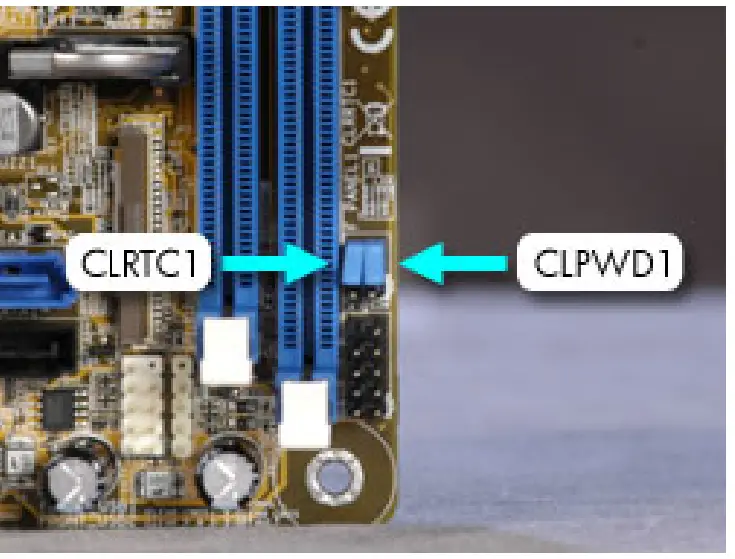
Clearing CMOS
To clear CMOS, follow these steps:
- Set jumper CLRTC1 to pins 1-2.

 WARNING: Do NOT start the system with this jumper set to pins 1-2.
 - Wait 10 seconds and then return the jumper to pins 2-3.

- You may now restart the PC.

Clearing BIOS password
This motherboard has a jumper to disable password checking.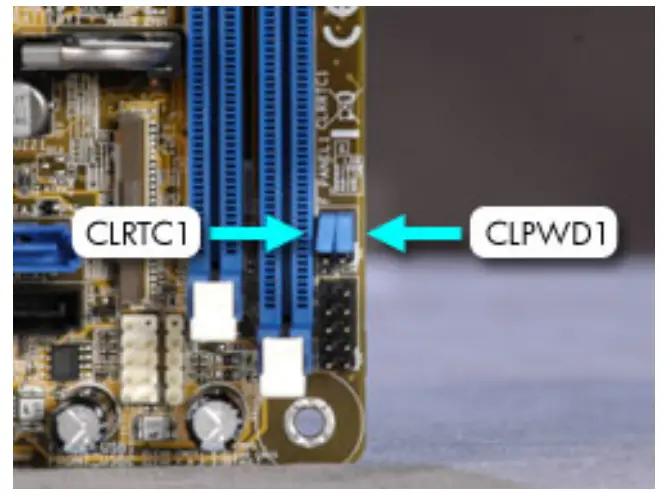
To clear the BIOS password follow these steps:
- To disable BIOS password checking, move the jumper CLPWD1 to pins 1 and 2.

- You may now start the computer, enter BIOS setup, and change or erase the password.
- To enable BIOS password checking, replace the jumper on pins 2-3.

Please help us improve by providing feedback on your experience
Was this document helpful?![]()
Additional support options
Country/Region:
United States
| About Us Contact HP Careers Investor relations Sustainable impact Press center The Garage | Ways to buy Shop online Call an HP rep Find a reseller Enterprise store Public sector purchasing | Support Download drivers Support & troubleshooting Community Register your product Authorized service providers Check repair status Training & certification Fraud alert Security Center | HP Partners HP Amplify Partner Program HP Partner Portal Developers |
![]() Stay connected
Stay connected![]() Recalls | Product recycling | Accessibility | CA Supply Chains Act | Site Map | Privacy | Use of cookies | Personal data rights |
Recalls | Product recycling | Accessibility | CA Supply Chains Act | Site Map | Privacy | Use of cookies | Personal data rights |
Terms of use | Limited warranty statement | Terms & conditions of sales & service
© Copyright 2022 HP Development Company, L.P.
References
 HP Developers Portal | Home
 The Garage by HP | Great ideas deserve great stories
-
h20195.www2.hp.com/v2/GetDocument.aspx?docname=c05388050
-
HP Customer Support
-
Public Sector Home | HP® Official Public Sector Site
-
Home - HP Support Community
-
HP - Home
-
Jobs and Careers At HP - HP Careers
-
Find an HP reseller | HP® United States
-
Login - HP Partner Portal
-
PRESS CENTER
-
HP® | Official Site
-
support.hp.com/us-en
-
support.hp.com/us-en/
-
support.hp.com/us-en/contact-hp
-
Official HP® Drivers and Software Download | HP® Customer Support
-
HP® Service Center Locator - United States | HP® Support
-
HP Support Diagnostic Tools – Automated fix for HP Laptop Computers & Printers
-
Contact HP | HP® Official Site
-
Orders and Customer Support | HP® Official Site
-
Laptop Computers, Desktops, Printers, Ink & Toner | HP® Official Site
-
About Us | HP® Official Site
-
Accessibility Aging | HP® Official Site
-
Replacement programs and product recalls | HP® Official Site
-
Sustainable Impact | HP® Official Site
-
HP Fraud Alert: Protecting Yourself from Scams | HP® Official Site
-
Personal Data Rights Notice | HP® Official Site
-
HP Limited Warranty Statements | HP® Official Site
-
HP Privacy Central | HP® Official Site
-
Use of Cookies and Other Technologies | HP® Official Site
-
Cyber security news and information from the HP Security Center | HP® Official Site
-
HP® Computer and Laptop Store | HP.com
-
hp.com/us-en/shop/cv/termsandconditions?jumpid=re_r11662_redirect_ETR&ts=20151012014516_LIymYBM9Ho1W
-
HP Amplify Partner Program | HP® Official Site
-
Terms-of-use | HP® Official Site


![Hp Notebook Pc [l19434-002] User Manual](https://static-data1.manualsee.com/1/img/26/16910/2020/12/HP-Notebook-PC-L19434-002.png "Hp Notebook Pc [l19434-002] User Manual")
