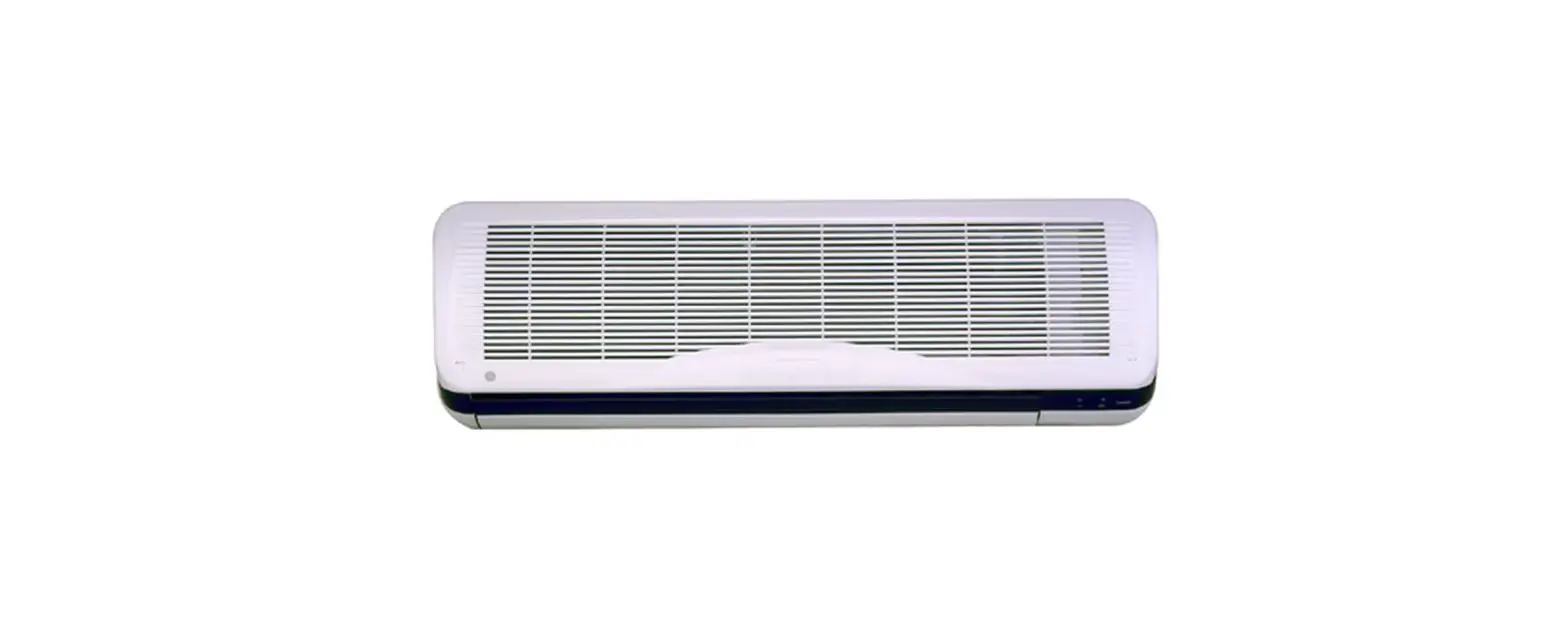
GE Appliances AS0RD18DA0 Duct Free System Remote Control Owner’s Manual
IMPORTANT SAFETY INFORMATION
READ ALL INSTRUCTIONS BEFORE USING THE SYSTEM
![]() WARNING
WARNING
For your safety, the information in this manual must be followed to minimize the risk of fire, electric shock or personal injury.
- Use this appliance only for its intended purpose as described in this Owner’s Manual.
- This heat pump must be properly installed in accordance with the Installation Instructions before it is used.
- Turn the unit OFF and unplug your heat pump before cleaning the air filter.
- GE Appliances, a Haier company does not support any servicing of the heat pump. We strongly recommend that you do not attempt to service the heat pump yourself.
- For your safety…do not store or use combustible materials, gasoline or other flammable vapors or liquids in the vicinity of this or any other appliance. If you are getting rid of an old product with refrigerants, check with the company handling disposal about what to do.
- These R410A heat pump systems require contractors and technicians use tools, equipment and safety standards approved for use with this refrigerant. DO NOT use equipment certified for R22 refrigerant only.
![]() WARNING
WARNING
Keep batteries away from children.
This remote controller contains batteries. If a new or used battery is swallowed or enters the body, it can cause severe internal burns and can lead to death in as little as 2 hours. Always completely secure the battery compartment. If the battery compartment does not close securely, stop using the product, remove the batteries, and keep it away from children.
- If you think batteries might have been swallowed or placed inside any part of the body, seek immediate medical attention.
- The cells shall be disposed of properly, including keeping them away from children.
- Even used cells may cause injury.
Remote Control Features and Settings
Remote Control
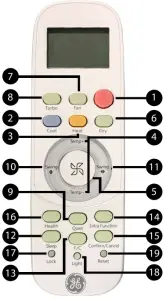
- Power Button
Press the ON/OFF button on the remote control to start or stop the unit. - COOL Button
In COOL mode, the unit operates in cooling. When FAN is set to AUTO, the heat pump automatically adjusts the fan speed according to the room temperature. The will be displayed during COOL mode. - HEAT Button
In HEAT mode, warm air will blow out after a short period of the time due to cold-air prevention function. When FAN is set to AUTO, the heat pump automatically adjusts the fan speed according to room temperature. The will be displayed during HEAT mode. - Temperature +/- Buttons
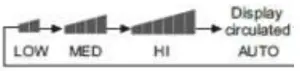
Temp + : Every time the button is pressed, the temperature setting increases. Temp – : Every time the button is pressed, temperature setting decreases. The operating temperature range is 60°F-86°F (16°C-30°C). - FAN SPEED Button
FAN SPEED: For each press the fan speed changes as
follows: Remote control:
- DRY Button
DRY mode is used to reduce humidity. In DRY mode, when room temperature becomes lower than temp. setting +2°F, unit will run intermittently at LOW speed regardless of FAN setting. The will be displayed during DRY mode. - FAN MODE Button
FAN mode circulates air only; there is no temperature adjustment available. Use the fan speed button (5) to adjust fan speed from low, medium to high. Auto, Turbo and Quiet are not available. - TURBO Button
The TURBO function is used for fastest air flow in Heating or Cooling modes. Control will display the TURBO icon [UP ARROW] on the bottom right side of the remote display. Pressing the TURBO button again or the FAN SPEED button will turn TURBO off. - Quiet Button
The QUIET function switches the fan to the lowest speed.
The control will display the QUIET icon [DOWN ARROW]
on the bottom left side of the remote display. Pressing the
QUIET button again or the FAN SPEED button will turn
QUIET off. - Louver UP/DOWN Button
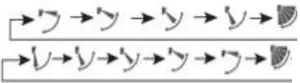
Press the LOUVER UP/DOWN button to choose the position of the horizontal airflow louvers.
Status display of air flow
COOL/DRY:
HEAT:
- Louver SIDE/SIDE Button (select models)
Press the LOUVER SIDE/SIDE button to choose the position of the vertical airflow louvers.
Status display of air flow
COOL/DRY/HEAT/FAN
NOTE- When humidity levels are high, condensate water may occur at the air outlet if all vertical louvers are adjusted to far left or right.
- When turning the unit on, the remote control will automatically return the louver to the previous setVC position.
- SLEEP Button
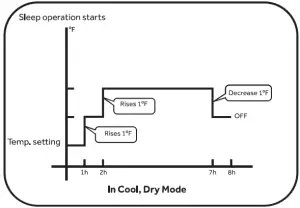
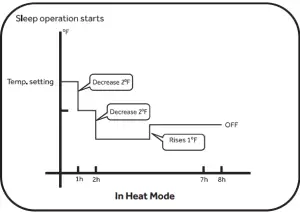
This SLEEP function automatically adjusts the set temperature of the heat pump to provide a comfortable sleeping environment. SLEEP function only available in COOL, HEAT and AUTO mode. The unit will exit SLEEP function in the event of pressing SLEEP button again, tuning off the unit with remote controller or shutting down the whole system from power outlet. If no other command chosen during SLEEP function, the unit will shut off itself after 8 hours of run time. During SLEEP function, the fan speed can be adjusted to the desired comfort level. The control logics for SLEEP function will follow as below charts for different modes:- COOL or DRY modes

- Heat Mode

- COOL or DRY modes
- Fahrenheit/Celcius Button
- Press F/C to toggle remote and unit display temperature
between Fahrenheit and Celsius.
- Press F/C to toggle remote and unit display temperature
- EXTRA FUNCTION Button
Press the EXTRA FUNCTION button to view all other operations. Press CONFIRM/CANCEL to select and save the chosen operation. If no button is pressed for 10 seconds, the remote will exit EXTRA FUNCTION mode.
A: Refresh air – Feature not available on this series.
B: A-B selection – This will allow you to control two separate units with a single remote control. Note: This feature would be setup at the time of installation by the contractor.
C: Auto mode – The heat pump will automatically select Cool, Heat, or Fan operation according to set temperature. When FAN is set to AUTO the heat pump automatically adjusts the fan speed according to room temperature.
D: Upper and Lower louver lock- Upper louver lock
 will lock the horizontal louver in the top position. Commonly used during cooling.
 - Lower louver lock
 will lock the horizontal louver in the lower position. Commonly used during heating.
 - To unlock the louver press EXTRA FUNCTION button until either a single louver icon
 or oscillate icon
 .
.
Note: When the louver is locked, the position cannot be changed with the LOUVER UP/DOWN button.
E: Timer ON/OFF: Sets a countdown timer until the unit is turned ON/OFF. TEMP+/TEMP- button is pressed with the length of time increment/decrement in 0.5 hour between 0-12 hours,and 1 hour increment/decrement between 12-24 hours- When the remote is set to ON, the system will turn off until the countdown timer ends. Then the indoor unit will turn on and operate in mode, temperature setting and fan speed that was displayed when timer was set.
- When the remote is set to OFF, the system will remain ON until the countdown timer ends
F: 50°F Heating sets the system to maintain 50°F. This is used to prevent freezing during long unoccupied periods of time.
- Upper louver lock
- Confirm/Cancel Button
- Saves and exits the EXTRA FUNCTION selection.
- HEALTH Button
- Feature is not Available
- LOCK Button
- Used to lock buttons and LCD display
- LIGHT Button
The indoor display panel will show indoor set temperature by default. Press this button once, it will display the room temperature. Press this button twice within 3 seconds, it will turn off the indoor display panel. Press again to go back to display indoor set temperature. - RESET Button
If the remote control is not functioning properly, use a pen point or a similar object to depress this button to reset the remote.

 – Feature not available on this series.
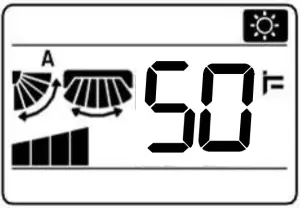
Emergency Operation and Maintenance
Emergency Operation
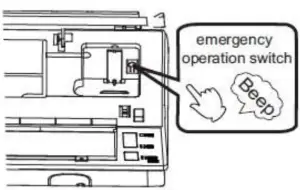
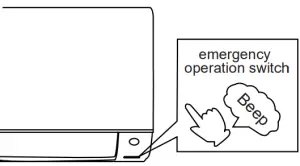
- Use this operation only when the remote control is defective or lost.
- When the emergency operation switch is pressed, the unit beeps once, which indicates the start of this operation.
- The unit will run automatically in the following modes:
Room
temperatureDesignated temperature Timer
modeFan speed Operation
modeAbove 73°F 79°F No AUTO COOL Below 73°F 73°F No AUTO HEAT 

** This image only applies to ASYW09CRDWA & ASYW12CRDWA model - During emergency operation, it is not possible to change the temperature or fan speed. It is also not possible to operate in timer or dry modes
Inserting the Batteries
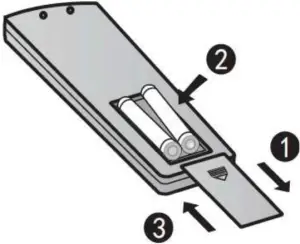
- Remove the battery cover
- Insert 2 AAA batteries as illustrated noting battery polarity
- Reinstall the battery cover
NOTE:- The distance from the remote control to the reciever should be less than 23 feet with no obstructions.
- If the remote control display is weak or the operating distance has diminished, the batteries may need to be replaced.
- Remote control malfunctions can sometimes be corrected by removing the batteries from the remote for a few minutes and then reinstalling them.
- Remove the batteries from the remote control if the unit will not be in use for an extended period of time. If any segments of the display remain active after battery removal, press the reset button.
Optimizing Performance
Close doors and window during operation.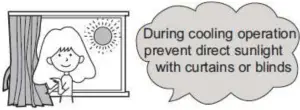
Do not block the air inlet or out let.
Wipe the cabinet using a soft and dry colth. For seriouse stanis, use a neutral detergent dilusted with water. Wring the water out of the cloth befoer wiping down the unit.
Then wipe off the detergent completely.
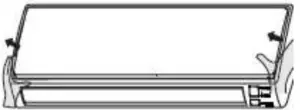
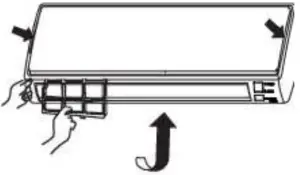
Cleaning the Front Cover
- Open the front cover by pulling it upward

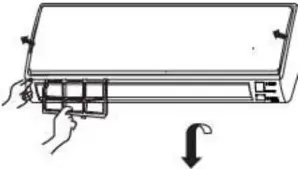
- Remove the Filter: Gently push up on the filter’s center tab until it is released from the stopper, and remove the filter in a downward motion.

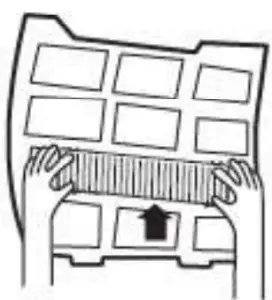
- Clean the filter
Use a vacuum cleaner to remove dust, or wash the filter with water. After washing, dry the filter completely.
- Attach the filter Attach the filter so that the “FRONT” label is facing outward.
Make sure that the filter is securly attached behind the holding tabs. If the filter is not attached correctly the unit may not achieve maximum efficiency.
- Close the front cover.


Troubleshooting Tips
Before you call for service
For additional troubleshooting tips, see the full installation manual at GEAppliances.com/ductless or Haierappliances.com/ductless
Problem | Cause and Solution | |
| Normal Performance Inspection |  The system does not restart immediately The system does not restart immediately | When the unit is stopped, it will not restart again for 3 minutes to protect the system. When electricity is disconnected then reconnected, the protection circuit will be active for 3 minutes to protect the heat pump. |
 Noise is heard Noise is heard | During unit operation or a sudden stop, a swishing or gurgling noise may be heard. The first 2-3 minutes after the unit has started is when the noise could be noticeable. This noise is generated by refigerant flowing in the system During unit operation, a cracking noise may be heard. This noise is sometimes generated by the casing expanding or shrinking due to temperature changes. If the airflow is creating a loud noise during unit operation, the air filter may be too dirty. | |
| Odors | The system circulates odors lingering in the airstream, such as the smell of furniture, paint, and/or cigarettes. | |
Mist or steam is blowing out | During COOL or DRY mode, the indoor unit may blow out mist or steam. This is due to the sudden cooling of the indoor air. | |
| In DRY mode, fan speed cannot be changed | In DRY mode, when the room temperature becomes lower than the set temperature by 2°F, the unit will run intermittently at LOW speed regardless of FAN setting. | |
| Items to look for |  | Is there a power failure? Is the circuit breaker off? Is the fuse blown? |
 Poor Cooling Poor Cooling | Is the air filter dirty? Is there anything blocking the inlet and/or outlet? Is the temperature set correctly? Are there any doors or windows open? Is there any direct sunlight shining through the window during the cooling operation? Are there too many heat sources or too many people in the room during cooling operation? |
Limited Warranty
For warranty detail please refer to installation manual.


