
ExcelSecu eSecuCard-S Display Smart Card
IMPORTANT INSTRUCTIONS
Please read this manual before operating your eSecuCard-S and keep it for future reference.
Getting Started with eSecuCard-S
- Please check eSecuCard-S’s battery level and make sure it’s not in low-power state before using it.
- Please make sure eSecuCard-S to be charged when it’s in low-power condition, otherwise the RTC will be lost permanentl
Safety Caution
- Do not put objects on the top of eSecuCard-S.
- Do not deliberately bend the card. Parts inside could get damaged.
- Keep eSecuCard-S away from flammable sources.
- Keep eSecuCard-S away from water, alcohol and benzene etc.
- Keep eSecuCard-S away from magnetic objects.
- Do not disassemble or modify eSecuCard-S on your own.
- To dispose of eSecuCard-S, cut along the dotted line on back side of product.
- In low temperature conditions, after removing the displayed picture, there will be a shadow remaining
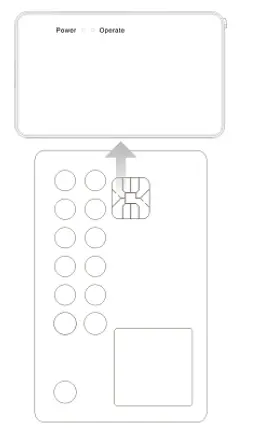
Product Picture
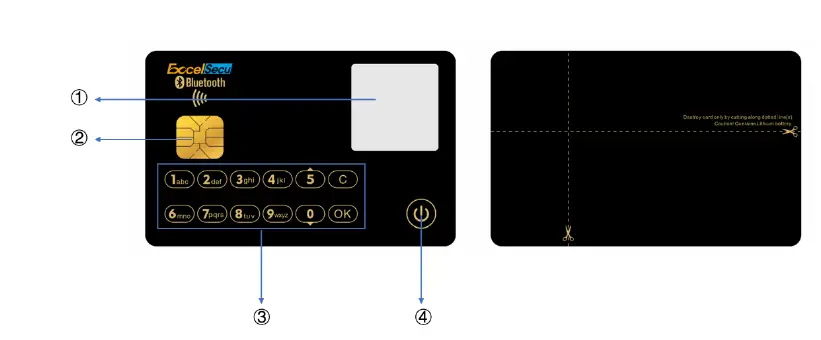
- EPD screen, 256*256 pixel.
- EMV chip, also battery recharging terminal.
- Touch keypad: 0~9, a~z, OK and Cancel.
- Power mechanical button.
How to Use eSecuCard-S
Turn ON/OFF eSecuCard-S
- Long press the mechanical Power Button to power on/off. You need to set the PIN first after power on. It supports 6 to 16 digits. After set successfully, it shows the boot up logo and enters the BLE mode. If you have set the PIN before, you need to verify the PIN first after power on. After verify successfully, it shows the boot up logo and enters the BLE mode.
(Note: Boot up logo can be changed by extended API, please refer to Java Card Extended APIs) - Standby time: 2 minutes.
eSecuCard-S Function Menu
Touch the OK button to enter the function menu. Touch the Cancel button to quit the function menu.
- Address
- Change PIN
- About
Of which:
- Address
To display QR code and text. Automatically return to the function menu after 10 seconds. - Change PIN
To change the password of the eSecuCard-S. - About
To show the version information.
- Address
Mobile Application
(Note: eSecuCard-S needs to be turned ON!)
Download Demo Application
Download mobile application and open it: Android: Bigplatform.apk, iOS: Bigplatform.ipa.
This is just a demo but not a perfect app because we need to show as more steps as we can to demonstrate the development for eSecuCard-S, so user experience is the second consideration.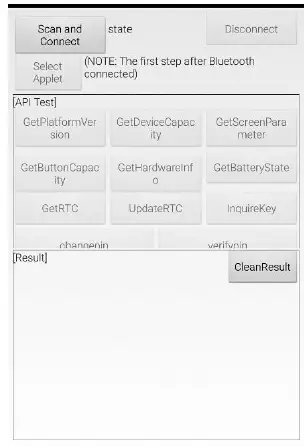
Bluetooth Mode
It enters the Bluetooth mode automatically after power-on.
- Connect and Disconnect.
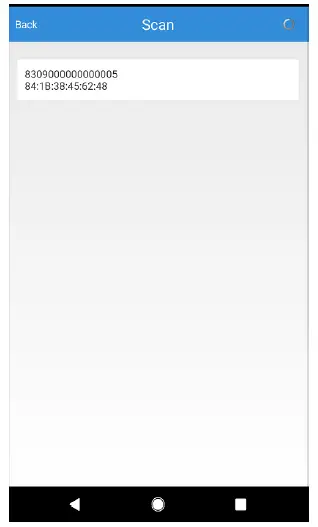
- Click Scan and Connect.
- Select SN: 830X000000XX
- (Note: SN is on the back of each card. SN can be customized.)
- eSecuCard-S will display “BLE Connected”, and shows an icon of bluetooth connected on the upper left of the screen.

- Select Applet
To select java applet. (Note: The first step after bluetooth connected.) - API Test
(Note: Results will be displaying on mobile app)- [GetplatformVersion] to get the JVM version.
- [GetDeviceCapacity] to get the supporting functions of this eSecuCard-S. For example, whether Bluetooth, display, keypad, RTC are supported.
- [GetScreenParameter] to get the size of screen and font.
- [GetButtonCapacity] to get which buttons are supported.
- [GetHardwareInfo] to get the information of Bluetooth MAC address and hardware ID.
- [GetBatteryState] to get the battery level of the eSecuCard-S.
- [GetRTC] to get the real time.
- [UpdateRTC] to update the real time.
- [InquireKey] to get the button value.
(Note: After pressing “InquireKey”, mobile app will be waiting for the button value, and button pressing on the eSecuCard-S is required, or it will return Timeout error.) - [changepin] to change the pin.
- [verifypin] to verify the pin.
- Screen Test
- [DisplayPic1] [DisplayPic2] [DisplayPic3] to display the existing pictures in the card.
- [WriteText] to write text from mobile app to card and display the text
- [Write Pic] to write picture from mobile app to card and display the picture.
(Note: 1. This function will overwrite the existing pictures. 2.The time to writePic will be around 30s.) - [Clearscreen] to clear the EPD screen display.
- [RunDemo] to run and display all the text and all the pictures in the card.
- Results
- To display all the results of the command.
- [CleanResult] to clean the command result displayed on mobile app.
PC Application
(Note: eSecuCard-S needs to be turned OFF!)
Contact and contactless reader are supported by eSecuCard-S.
Contact Mode
- Prepare contact card reader and insert eSecuCard-S into the reader. The card will be in charging in this mode.
- In folder “Displaying test”, select any one script to test eSecuCard-S.
Note: “Write-and-display” image/text includes writing data into card and displaying data to the screen. For image, the time will be around 22s, while the text is 3s. “Only-display” image will be around 7s, while the text is 3s. - Results will be returned and general error refers to Appendix 1.
Contactless Mode
- Prepare contactless card reader and place eSecuCard-S on the reader.
- In folder “Displaying test”, select any one script to test eSecuCard-S.
Note: “Write-and-display” image/text includes writing data into card and displaying data to the screen. For image, the time will be around 10s, whilst text 3s. “Only-display” image will be around 7s, whilst text 3s. - Results will be returned and general error refers to Appendix 1.
How to Charge eSecuCard-S
The matching card charger does not have the function of card reader, so you need to purchase the card reader separately.
| LED | Status |
| Red on | Power on Cannot read card |
| Blue on | Charging |
| Can read card | |
| Blue flashing | Charging Card data is being transmitted |
- Insert eSecuCard-S into eSecuRD. A blue LED light will turn on when it starts to charge.
- The light will change color to indicate status
- eSecuRD uses a standard micro-USB charging cable.
- eSecuCard-S uses the contact chip to charge.
- eSecuCard-S supports wireless charging, you need to prepare with NFC contactless card reader.
Product Specs
| Product | eSecuCard-S |
| Card Size | ISO 7810* |
| Screen | 256×256 pixel dot matrix EPD |
| Key Pad | 13 |
| Battery | Rechargeable |
| Smart Card Protocol | ISO 7816 T=0/ ISO 14443 Type A T=CL |
| Smart Card OS | Java |
| Bluetooth | √ |
| One Time Password | * |
|
Algorithm | [MessageDigest] MD5, SHA1, SHA256, SHA384, SHA512, SM3* [Symmetric] DES, AES, SM4* [Asymmetric] RSA1024, RSA2048, RSA4096*, ECC 256/384/521*, SM2* |
| Typical Applicaiton | Identity authentication, bitcoin wallet |
| √ available * optional | |
Appendix 1
The following tables describe the error status words that may be returned by any commands:
| SW1 | SW2 | Meaning |
| 6E | 00 | Invalid class |
| 6D | 00 | Invalid instruction |
| 67 | 00 | Wrong length in Lc |
| 6A | 86 | Incorrect P1 P2 |
| 69 | 82 | Security status not satisfied |
| 69 | 85 | Conditions of use not satisfied |
| 69 | 8A | Fail to setting (eg. bluetooth name) |
| 69 | 8B | No images in card |
| 69 | 8C | Fail to get device capacity |
| 69 | 8D | Fail to update RTC |
| 69 | 8E | Fail to clear screen |
| 69 | 8F | Fail to display text or image |
The following can be modified by users.
| SW1 | SW2 | Meaning |
| 93 | 00 | No response by card |
| 6F | F9 | 8 seconds timeout for card |
| 6A | 80 | Incorrect format in command data |
| 67 | 00 | Incorrect length in command data |
| 9F | FB | Wrong response by RTC |
FCC STATEMENT
This device complies with Part 15 of the FCC Rules. Operation is subject to the following two conditions:
- This device may not cause harmful interference, and
- This device must accept any interference received, including interference that may cause undesired operation.
Warning: Changes or modifications not expressly approved by the party responsible for compliance could void the user’s authority to operate the equipment.
NOTE: This equipment has been tested and found to comply with the limits for a Class B digital device, pursuant to Part 15 of the FCC Rules. These limits are designed to provide reasonable protection against harmful interference in a residential installation.
This equipment generates uses and can radiate radio frequency energy and, if not installed and used in accordance with the instructions, may cause harmful interference to radio communications. However, there is no guarantee that interference will not occur in a particular installation. If this equipment does cause harmful interference to radio or television reception, which can be determined by turning the equipment off and on, the user is encouraged to try to correct the interference by one or more of the following measures:
- Reorient or relocate the receiving antenna.
- Increase the separation between the equipment and receiver.
- Connect the equipment into an outlet on a circuit different from that to which the receiver is connected.
- Consult the dealer or an experienced radio/TV technician for help.
RF warning statement:
The device has been evaluated to meet general RF exposure requirement. The device can be used in portable exposure condition without restriction.


