![]()
user manual
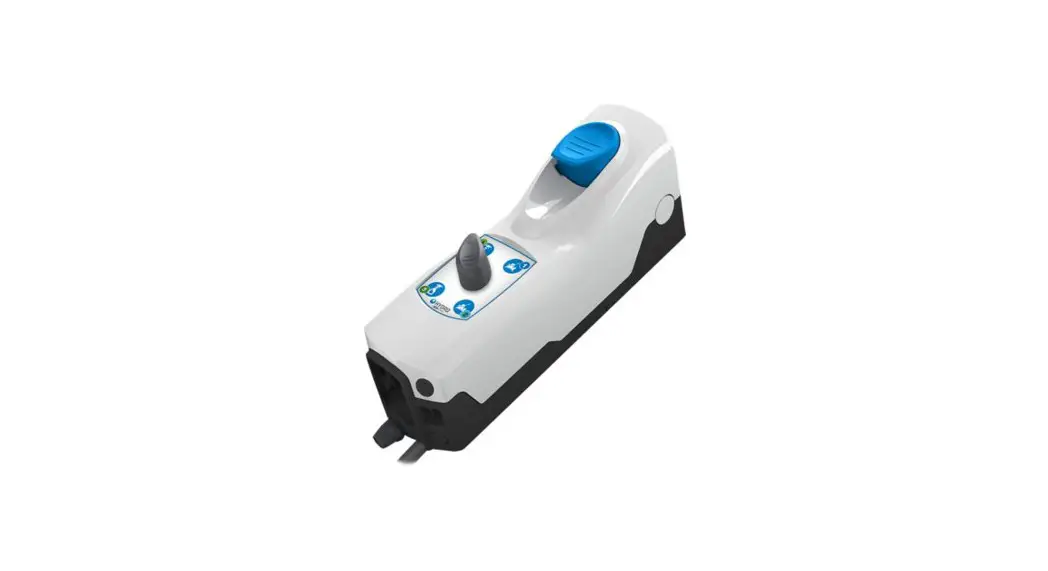
AccuMini
Safety Precautions
![]() WARNING! Please read precautions thoroughly before operation. Must meet all applicable local codes and regulations.
WARNING! Please read precautions thoroughly before operation. Must meet all applicable local codes and regulations.
THANK YOU FOR YOUR INTEREST IN OUR PRODUCTS
Please use this equipment carefully and observe all warnings and cautions.
WEAR protective clothing and eyewear when dispensing chemicals or other materials or when working in the vicinity of all chemicals, filling or emptying equipment, or changing metering tips.
ALWAYS observe safety and handling instructions of the chemical manufacturer.
direct discharge away from you or other persons or into approved containers.
dispense cleaners and chemicals in accordance with manufacturer’s instructions. Exercise CAUTION when maintaining your equipment.
reassemble equipment according to instruction procedures. Be sure all components are firmly screwed or latched into position.
KEEP equipment clean to maintain proper operation.
ATTACH only to water tap outlets (25 psi Minimum, 85 psi Maximum and Maximum water temperature 120° F).
NOTE If the unit is used to fill a sink, or the discharge hose can be placed into a sink, the unit must mounted be so the bottom of the cabinet is above the overflow rim of the sink.
Device shall be installed in a vertical orientation.
A plumbed, dedicated line is preferred for installation. When a dedicated line is not available, installation shall ensure that no cross-connections between hot and cold water are created, and that atmospheric
vaccum breakers integrated into the building water supply are not negatively affected by being under presssure for over 12 continuous hours.
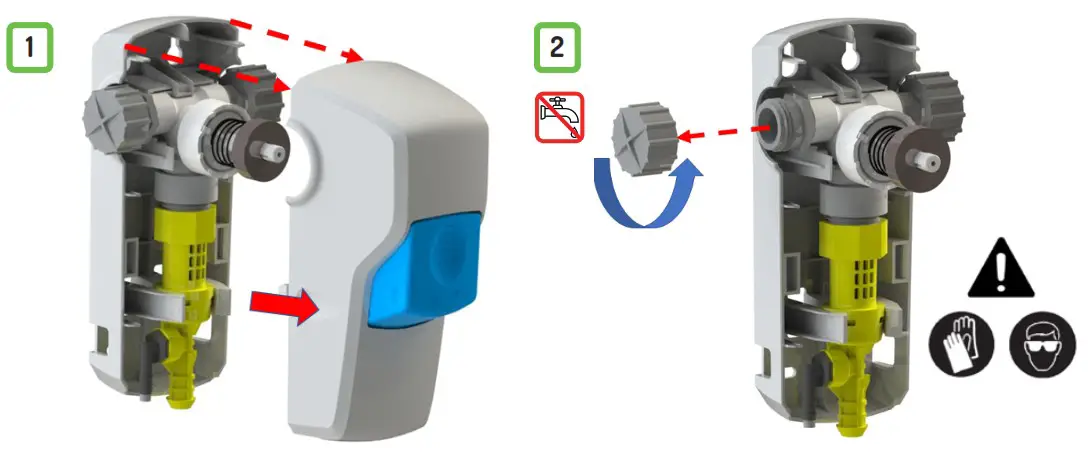
introduction

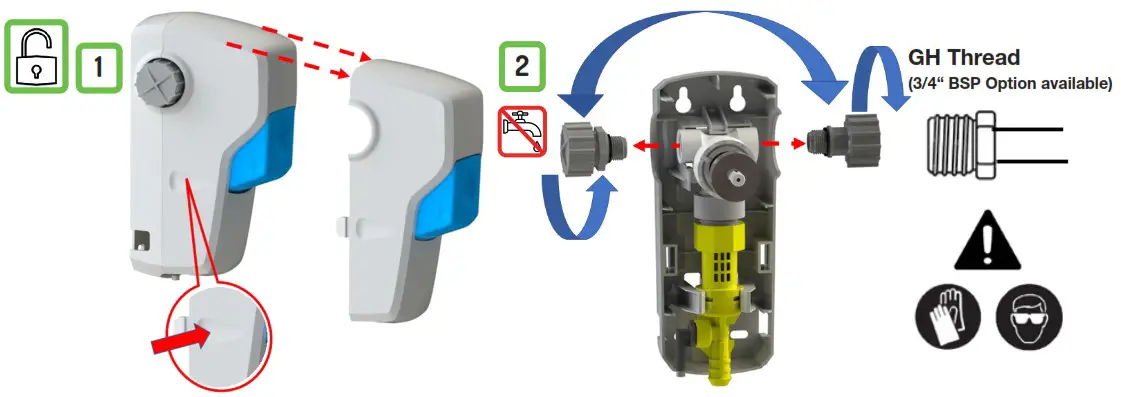
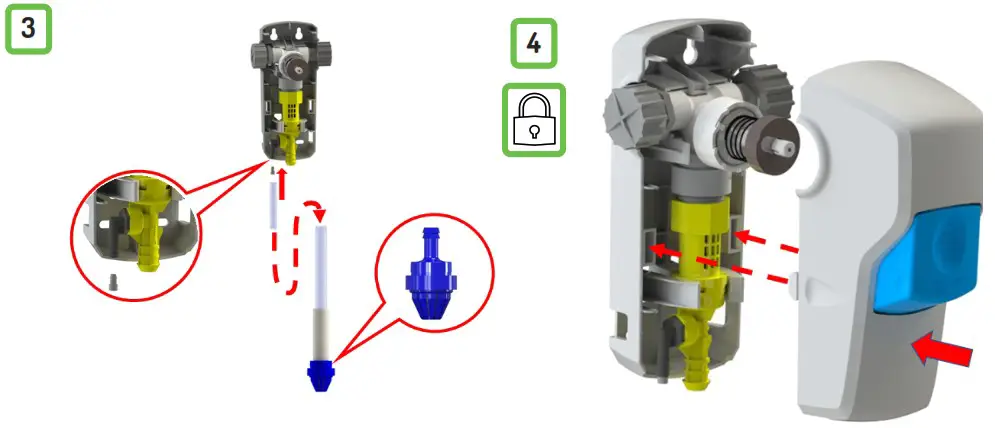
installation
Note: The installation process for E-Gap and AirGap versions are the same.
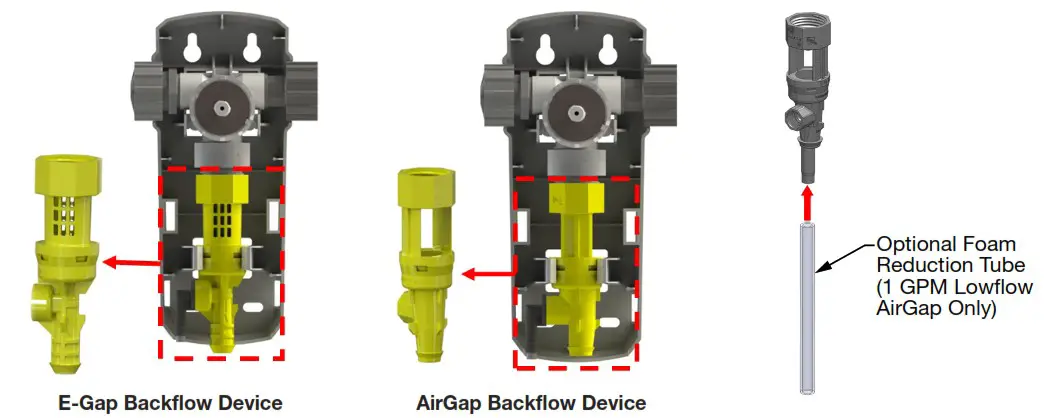
metering tip selection
APPROXIMATE AIRGAP AND E-GAP DILUTIONS AT 40 psi FOR WATER-THIN PRODUCTS (1.0 CP)
| Tip Color | Orifice Size | AirGap Ratio (per Eductor Flow) 1 GPM 3.5 GPM | E-Gap Ratio per Eductor Flow) 1 GPM 3.5 GPM | ||
| No Tip | .187 | 2.6:1 | 4:01 | 3:01 | 3.5:1 |
| Gray | .128 | 2.6:1 | 4:01 | 3:01 | 4:01 |
| Black | .098 | 2.5:1 | 5:01 | 3:01 | 4:01 |
| Beige | .070 | 3:01 | 8:01 | 4:01 | 8:01 |
| Red | .052 | 5:01 | 13:01 | 5:01 | 14:01 |
| White | .043 | 7:01 | 22:01 | 7:01 | 20:01 |
| Blue | .040 | 9:01 | 26:1 | 8:01 | 0:01 |
| Tan | .035 | 11:01 | 34:1 | 10:01 | 30:1 |
| Green | .028 | 17:01 | 52:1 | 16:01 | 45:1 |
| Orange | .025 | 19:01 | 64:1 | 20:01 | 56:1 |
| Brown | .023 | 22:01 | 71:1 | 0:01 | 64:1 |
| Yellow | .020 | 32:1 | 102:1 | 32:1 | 90:1 |
| Aqua | .018 | 39:1 | 128:1 | 38:1 | 128:1 |
| Purple | .014 | 64:1 | 213:1 | 64:1 | 180:1 |
| Pink | .010 | 128:1 | 447:1 | 128:1 | 350:1 |
Metering Tip Selection:
The final concentration of the dispensed solution is related to both the size of the metering tip opening and the viscosity of the liquid being siphoned. For water-thin products, the chart can be used as a guideline. If product is noticeably thicker than water, consult the Measurement of Concentration procedure to achieve your desired water-to-product ratio. Because dilution can vary with water temperature and pressure, actual dilution achieved can only be ascertained by using the Measurement of Concentration procedure. The clear, undrilled tip is provided to permit drilling to size not listed should you need a dilution ratio that falls between standard tip sizes.
NOTE: A 1 GPM eductor is gray; a 3.5 GPM eductor is yellow. Refer to parts diagram if unfamiliar with names of system components.
Measurement of Concentration:
You can determine the dispensed water-to-product ratio for any metering tip size and product viscosity. All that is required is to operate the primed dispenser for a minute or so and note two things: the amount of dispensed solution, and the amount of concentrate used in preparation of the solution dispensed. The water-to-product ratio is then calculated as follows:
Dilution Ratio (X:1) where X = Amount of Mixed Solution — Amount of Concentrate Drawn Amount of Concentrate Drawn
Dilution Ratio, then, equals X parts water to one part concentrate (X:1). If the test does not yield the desired ratio, choose a different tip and repeat the test. Alternative methods to this test are 1) pH (using litmus paper) and 2) titration. Contact your concentrate supplier for further information on these alternative methods and the materials required to perform them.
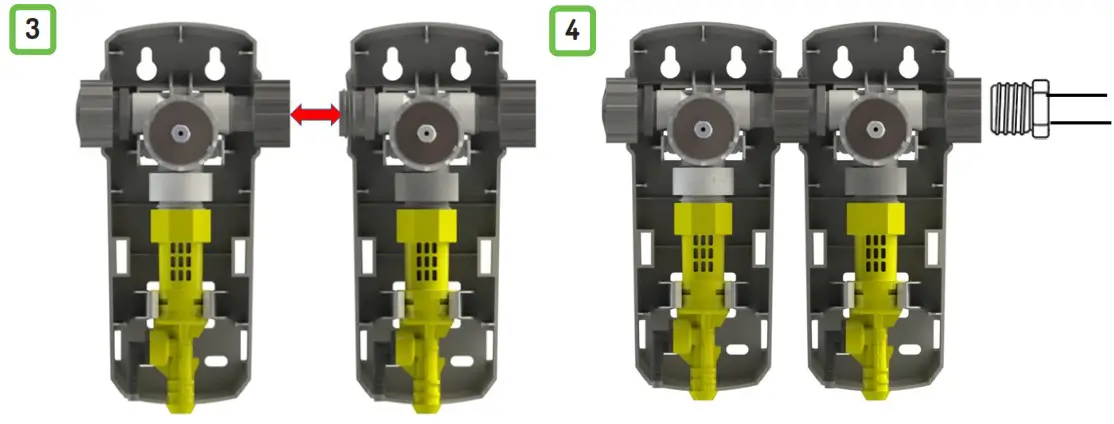
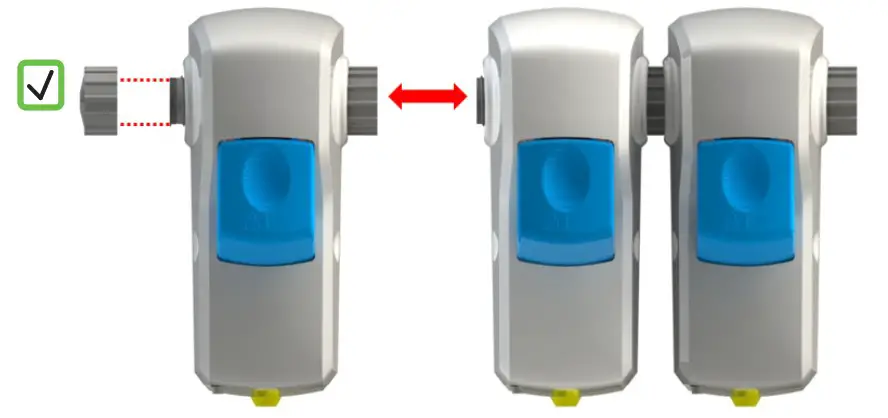
daisy-chain
parts diagram/list
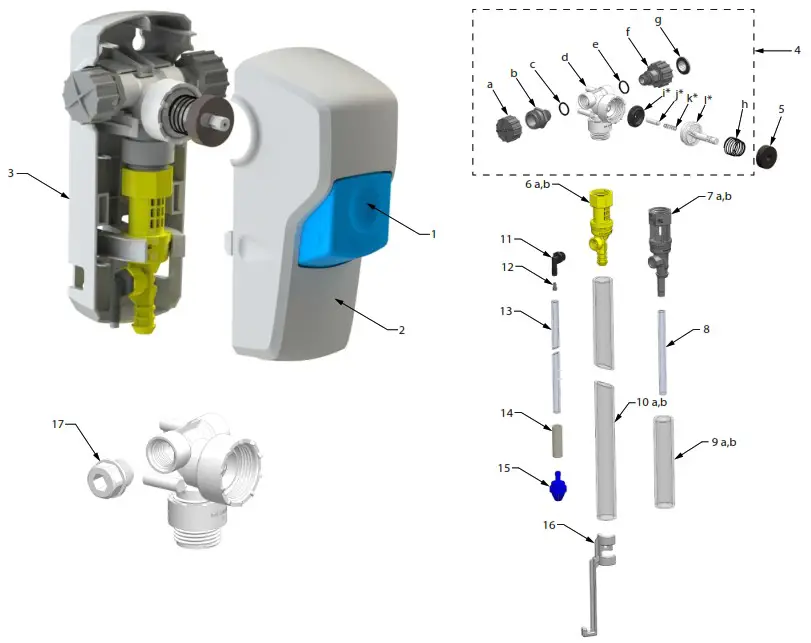
| Key | Part No. | Description |
| 1 | HYD10101300 | AccuMini button |
| 2 | HYD10100247 | AccuMini cover |
| 3 | HYD10100248 | AccuMini Rear |
| 4 a b c d e f g h i* j* k* l* | HYD10100286 | Water Body Assembly Hose cap Hose fitting O-ring Water body Inlet stem Inlet collar Strainer washer magnet spring diaphragm armature diaphragm spring valve bonnet |
| 5 | HYD10079000 | Magnet |
| 6 a b | HYD10088830 HYD10088840 | Eductor E-Gap version 1 GPM eductor – Gray 3.5 GPM eductor – Yellow |
| 7 a b | HYD10099710 HYD10099713 | Eductor AirGap version 1 GPM eductor – Gray 3.5 GPM eductor – Yellow |
| 8 | HYD10099721 | Optional Foam Reduction Tube (1 GPM Lowflow AirGap only) |
| 9 a b | HYD10088822 HYD10064794 | 1 GPM Outer Discharge Tube E-Gap 1 GPM Discharge Tube AirGap 1 GPM Discharge Tube |
| 10 a b | HYD90048495 HYD505804 | 3.5 GPM Outer Discharge Tube E-Gap 3.5 GPM Discharge Tube AirGap 3.5 GPM Discharge Tube |
| 11 | HYD10077500 | Angled Barb with Viton O-Ring |
| 12 | HYD690014 | Metering tip kit |
| 13 | HYD500828 | Tubing 1/4” x 8’ |
| 14 | HYD509900 | Weight |
| 15 | HYD10089410 | Footvalve – Viton (EPDM also available. Order 10076302) |
| 16 | HYD10080730 | Hose hook, Dark gray (Standard) |
| 17 | HYD10098573 | Optional Kit, Pipe plug & O-ring |
* These parts are also included with Valve Parts Kits (HYD10075980)
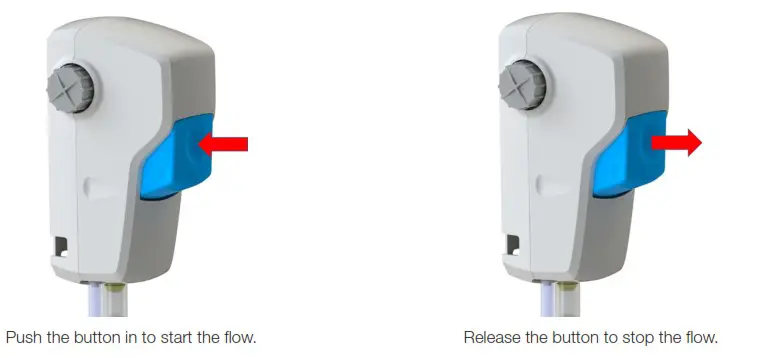
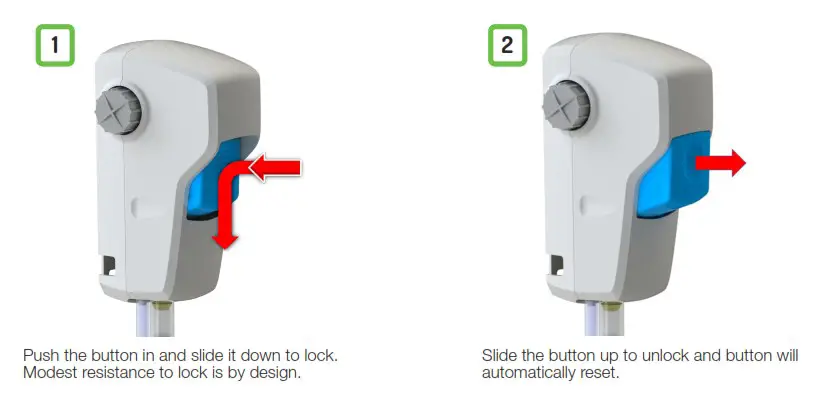
quick fill operation
troubleshooting
| Problem | Cause | Solution |
| 1. No discharge | a. No water | a. Open water supply |
| b. Excessive water pressure | b. Install regulator if water pressure (with water running) exceeds 85 psi. | |
| c. Clogged water inlet strainer | c. Disconnect inlet water line and clean strainer | |
| d. Magnetic valve not functioning | d. Install valve parts kit | |
| e. Eductor clogged | e. Clean* or replace | |
| 2. No concentrate draw | a. Clogged foot valve | a. Clean or replace |
| b. Metering tip or eductor has scale build-up | b. Clean (descale*) or replace | |
| c. Low water pressure | c. Minimum 25 psi (with water running) required to operate unit properly | |
| d. For E-Gap version, discharge tube not in place | d. Push tube firmly onto eductor discharge hose barb. | |
| e. Concentrate container is empty | e. Replace with full container | |
| f. Clogged water inlet strainer | f. Disconnect inlet water line and clean strainer | |
| g. Inlet hose barb not screwed into eductor tightly | g. Tighten, but do not overtighten | |
| h. Air leak in pick-up tube | h. Put clamp on tube or replace tube if brittle | |
| i. For AirGap version, no flooding feature in the eductor | i. Replace eductor if all other items in problem 2 are ok | |
| 3. Excess concentrate draw | a. Metering tip not in place b. Chemical above eductor | a. Press correct tip firmly into barb on eductor b. Place concentrate below eductor |
| 4. Failure of unit to turn off | a. Water valve parts dirty or defective | a. Clean or replace with valve parts kit |
| b. Magnet doesn‘t fully return | b. Make sure magnet moves freely replace spring if short or weak | |
| c. Push button stuck | c. Remove button and clean cabinet/button to remove excess dirt lodged in slide recess | |
| 5. Excess foaming in discharge | a. Air leak in pick-up tube | a. Put clamp on tube or replace tube if brittle |
| b. For 1 GPM AirGap version, excessive air mixed with chemical | b. Put foam reduction tube on eductor nozzle | |
| 6. Water Discharge from AirGap Backflow Device | a. Restricted discharge hose | a. Be sure discharge hose is not immersed, kinked or elevated. Be sure there is no liquid in the disharge hose when begining to operate dispenser. |
| b. High water pressure | b. Install pressure regulator if flowing water pressure exceeds 85 psi. |
* In hard water areas, scale may form inside the discharge end of the eductor, as well as in other areas of the unit that are exposed to water. This scale may be removed by soaking the eductor in a descaling solution (deliming solution). To remove an eductor located in the cabinet, firmly grasp water valve and unscrew the eductor. Replace in same manner. Alternatively, a scaled eductor can be cleaned (or kept from scaling) by drawing the descaling solution through the unit. Operate the unit with the suction tube in the descaling solution. Operate the unit until solution is drawn consistently, then flush the unit by drawing clear water through it for a minute. Replace concentrate container and put suction tube into concentrate.
warranty
Limited Warranty
Seller warrants solely to Buyer the products will be free from defects in material and workmanship under normal use and service for a period of one year from the date of completion of manufacture. This limited warranty does not apply to (a) hoses; (b) products that have a normal life shorter than one year; or (c) failure in performance or damage caused by chemicals, abrasive materials, corrosion, lightning, improper voltage supply, physical abuse, mishandling or misapplication. In the event the products are altered or repaired by Buyer without Seller’s prior written approval, all warranties will be void.
No other warranty, oral, expressed or implied, including any warranty of merchantability or fitness for any particular purpose, is made for these products, and all other warranties are hereby expressly excluded.
Seller’s sole obligation under this warranty will be, at Seller’s option, to repair or replace F.O.B. Seller’s facility in Cincinnati, Ohio any Products found to be other than as warranted.
Limitation of Liability
Seller’s warranty obligations and Buyer’s remedies are solely and exclusively as stated herein. Seller shall have no other liability, direct or indirect, of any kind, including liability for special, incidental, or consequential damages or for any other claims for damage or loss resulting from any cause whatsoever, whether based on negligence, strict liability, breach of contract or breach of warranty.
![]()
Hydro Systems Company 3798 Round Bottom Road
Cincinnati, OH 45244 U.S.A.
Phone 513-271-88OO
Toll Free 8OO.543.7184
Fax 513-271-O16O
Web hydrosystemsco.com
HYD10100415 Rev A 04/23


