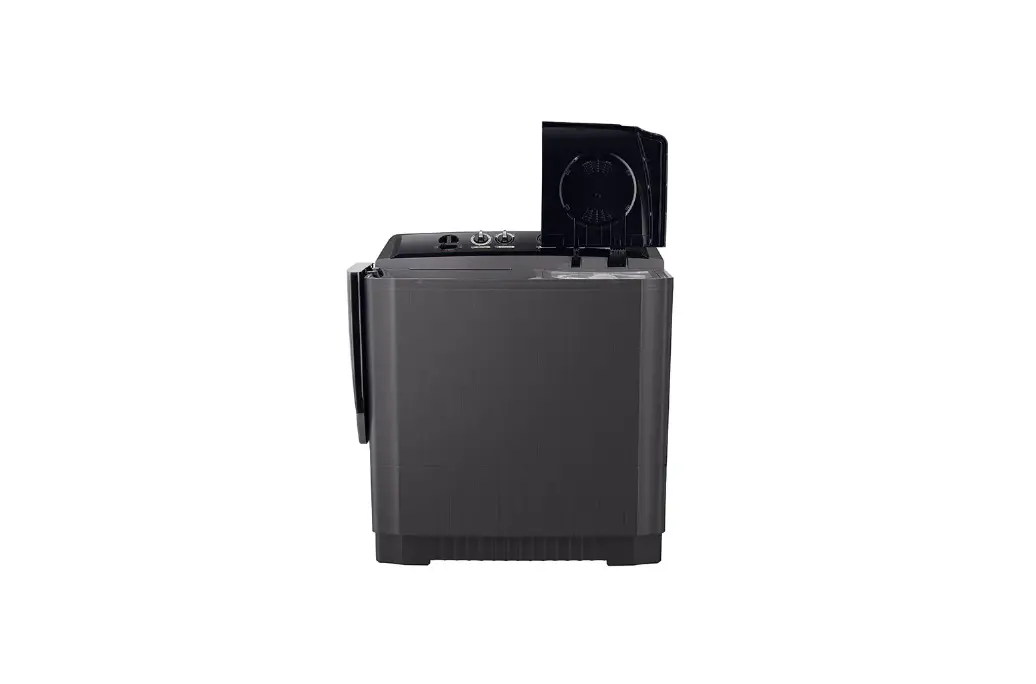
LG WP18MAR Washing Machine Owner’s Manual
![]() Before beginning installation, read these instructions carefully. This will simplify installation and ensure that the product is installed correctly and safely. Leave these instructions near the product after installation for future reference.
Before beginning installation, read these instructions carefully. This will simplify installation and ensure that the product is installed correctly and safely. Leave these instructions near the product after installation for future reference.
READ ALL SAFETY INFORMATION AND INSTALLATION INSTRUCTIONS BEFORE USE
![]() Follow all instructions in this manual to minimize the risk of fire, electric shock and to prevent property damage, personal injury or loss of life.
Follow all instructions in this manual to minimize the risk of fire, electric shock and to prevent property damage, personal injury or loss of life.
Installation
- Do not install in areas exposed to snow, rain or to the weather.
- Install the washing machine on a horizontal support. Otherwise it may cause vibration and noise.
Volatile Material
- Do not use volatile material such as Benzene, Gasoline, kesosene, Insecticide.
- Do not leave strong alkaline substance such as bleach inside the tub. Damage on plastic surface and rubber parts may occur.
Switch Area
- Avoid watering on the switch area. It may cause electric shock or fire.
Hot water
- Avoid using hot water over so°c*. It may deform plastic parts or cause malfunction.
Spin Motor
- After continuous using spinning program 3 times, please stop spinning more than 1 hour. Otherwise the spin motor clued be damaged of fired.
Heat
- Avoid electric heater, candle light, cigarette light, bug smoker, etc. near the machine. It may ignite or deform plastic part.
In Operation
- Do not put your hand into the spin dryer basket while the machine is in operation.
- Do not drain the water out of the wash tub while the spin dryer basket is in operation. Otherwise the spin motor colud be damaged.
- If during spining, opening the lid dose not stop the spin dryer basket within about 15 sec., immediately unplug and contact service.
Electric Outlet
- Avoid connecting several electric devices to single outlet. It may cause fire.
Power Cord and Plug
- Do not damage, bend, distort or place any heavy objects on its.
- If the supply cord is damaged, it must be replaced by the manufacturer or its service agent or a similarly qualified person.
- Wipe off dirt or dust on the contacts of the power plug. It may cause fire.
- Do not touch a power plug with a wet hand. It may cause electric shock.
- Unplug the supply cord when not using the washing machine for a long time.
- This appliance is not intended for use by persons (including children) with reduced physical, sensory or mental capabilities, or lack of experience and knowledge, unless they have been given supervision or instruction concerning use of the appliance by person responsible for their safety, Children should be supervised to ensure that they do not play with the appliance.
- Do not allow children to play on, with, or inside the washing machine.
- Do not step on the washing machine or place any heavy objects on it.
- Do not wash, rinse or spin dry the waterproof sheets and clothes.
- Connect the washing machine to a grounded outlet in accordance with all local codes and ordinances.
- Disconnect the power supply before cleaning or performing maintenance. Unplug the power cord by grasping the plug with dry hands. Never grasp the cord.
- The units should not be repaired, disassembled or modified by any person except the authorized technicians.
- This product may only be sold in Asia, Middle East and African countries and complies with the regulatory requirements in these countries.
- This product may not be sold outside these territories. LG Electronics cannot guarantee and is not responsible for the compliance of this product with the regulatory requirements in other regions/countries.
- A precaution indicates that the washing machine shall not be installed at a humid place.
- A precaution on the washing machine whose lid can be opened during water extraction, that if it takes 15 s or more for complete stop of water-extracting chamber tub such a case should be understood as a trouble.
- This appliance is intended to be used in household and similar applications.
- If this product is used for commercial purpose, it is not warranted.
(Example : Public places such as public bathroom, lodging house, training center, dormitory)
If the product is installed outside the normal service area, any cost of transportation involved in the repair of the product, or the replacement of a defective part, shall be borne by the owner.
*Remark : Avoid using hot water over 60°C (Only for Saudi Arabia Country)
FEATURES
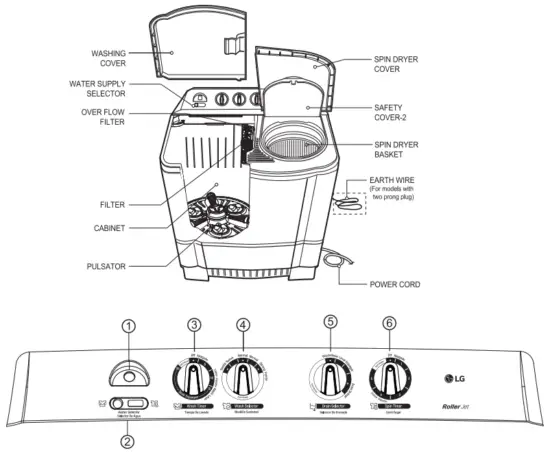
- Water Supply Inlet
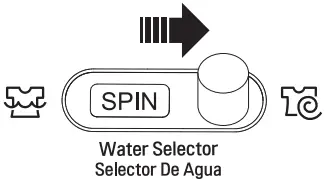
Connect here with the inlet hose from the water faucet to feed water to the tub. - Water Supply Selector
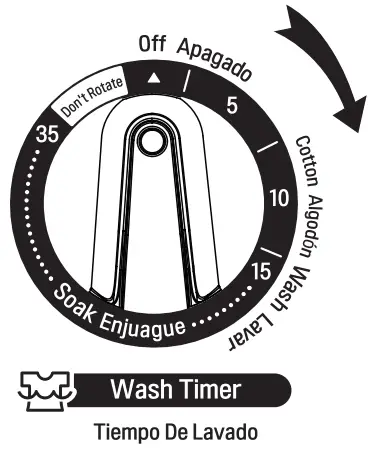
Select “WASH” to supply water for washing and rinsing and “SPIN” for spin shower rinse. - Wash Timer
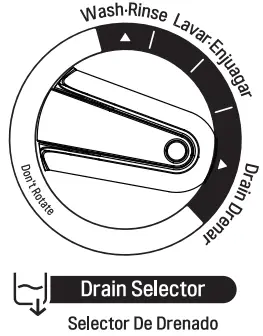
Select the desired time for washing or rinsing. The maximum is 35 min. 4. Wash Level Set the program to “Gentle”,”Normal”, “Strong” according to kinds and quantity of the laundry. - Drain Selector
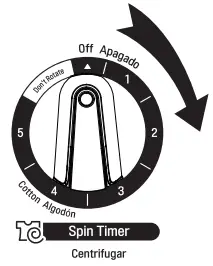
Select”Wash • Rinse” for washing and rinsing and”Drain” to drain the water out of the tub. - Spin Timer
Select the desired time for spinning. The maximum limit is 5 min. ,but shall not be continued over 3 cycle. Don’t rotate the knob more than prescribed limit.
**After continue using spinning program 3 times continue, Please stop spinning more than 1 hour otherwise the spin motor could be damage of fire or stop operation.
Installation
Installation area
- Set on flat and firm floor.
- Incorrect installation may course severe noise and break down.

- Maintain more than 10 cm. between the side of drain hose and the wall.
- A carpet must not obstruct the

Connecting the earth wire
- Install the earth wire to prevent short-circuit due to leaking current and electric shock.
- It is attached at the back of the washer. Connect it to the metal water pipe. If the water pipe is made of plastic, it does not have the earth effect.
- Do not connect the earth wire to the gas pipe, lightning arrested, telephone connector, etc.
*Warning – the appliance with two pronged plug must be grounded.
Connecting the power plug
- Insert the power plug into the outlet.
- Before connecting the power plug, check if the voltage setting of the washer matches the outlet voltage.
- If AC outlet with ground terminal is used, grounding is not needed. if not, never forget earthing.
- The appliance must be positioned so that the plug is accessible.
Other earthing method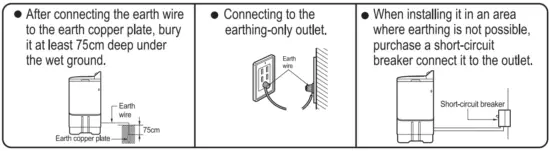
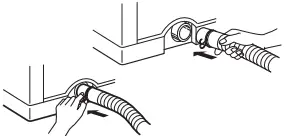
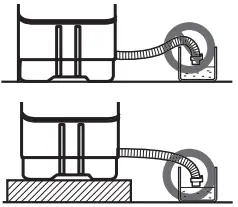
Connecting the drain hose
- Connect the drain hose to the outlet of the plunger valve located at the back side.
- Push the clamp toward the body of the washing machine as shown in the figure.

- Be sure to reroute the hose so that it is not kinked, kinks or sharp bending in the hose will prevent proper drainage.
- Make sure water is drained smoothly by placing a base under the machine or by applying other appropriate mean.

Installation
- This appliance must be grounded. In the event of malfunction or breakdown, grounding will reduce the risk of electric shock by providing a path of least resistance for electric current.
- This appliance is equipped with a power cord having an equipment-grounding conductor and a grounding power plug. The power plug must be plugged into an appropriate socket outlet that is installed and grounded in accordance with all local codes and ordinances.
- Improper connection of the equipment-grounding conductor can result in risk of electric shock. Check with a qualified electrician or service personnel if you are in doubt as to whether the appliance is properly grounded.
- Do not modify the power cord provided with the appliance.
- The washing machine is to be connected to the water mains using new hose-sets and old hose-sets should not be reused. A
INSTALLATION & HOW TO WASH
Before washing
- Look for a care label on your clothes. This will tell you about the fabric content of your garment and how it should be washed.
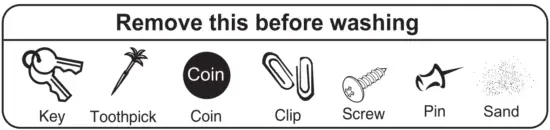
- Check all pockets to make sure that they are empty. Objects left in the pockets can damage both your washer and your clothes. (could be cause the drain hose to clogg).
- Sort clothes into loads that can be washed with the same wash cycle.
- For you convenience hang up the wash cover on the right or left side of the washing machine tub when not in use.

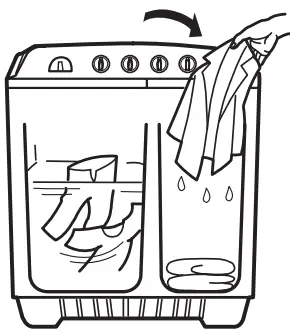
How to wash
- Set the drain selector Set as “Wash•Rinse” position.

- Set the water selector to “WASH”

- Open water supply and la Set the desired wash fill water till your desired time. level of tap mark. That is because clothes can absorb adequate amount of water and water will not short.

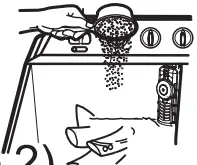
- Put the appropriate amount of detergent into detergent box and the laundry into the wash tub. And add water to the_ desired water level which you want. (Refer to TableL2)

- Select the wash program to “Gentle”, “Normal” or “Strong” according to the kinds and quantity of the laundry.
(Refer to Table 2)
- Set the desired wash time.

- When washing is finished, I locate the drain selector to “Drain” position and drain the water out.
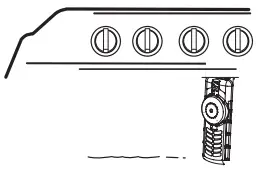
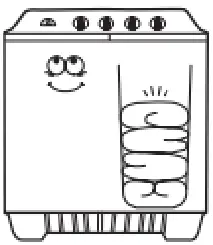
- Spinning in the spin dryer basket. Move the laundry into spin dryer basket. Put the laundry down lightly. Place the safety cover horizontally on the laundry. Set the desired spin time with the spin timer.


How to Rinse & How to Spin
Interim spin rinse
- Interim spin rinse prior to regular rinsing helps removing sudsy water from the laundry and improve rinsing efficiency. Also is helpful to water saving.
- After washing.
- Move the laundry into the spin dryer basket.
- Place the safety cover horizontally on the laundry.

- Set the water selector to “SPIN”.

- Set the desired 1/4) spin flow appropriately.
“5 minutes maximum rotation in rinse. (See table 3)
- After interim spin rinse, move the laundry into the wash tub for rinsing.

Note for
- Put the laundry evenly into the spin dryer basket.
- Put the laundry down lightly.
- Place the safety cover horizontally over the laundry, washing machine will be damage if the safety cove is not placed.
- Close the spin dryer cover.
- Do not drain the water out of the wash tub while the spin dryer basket is in operation.
- If the spin dryer basket is off-balance and vibrates excessively, stop the spinning, rearrange the clothes evenly, and then resume spinning.
CARE & MAINTENANCE
To Clean the Filter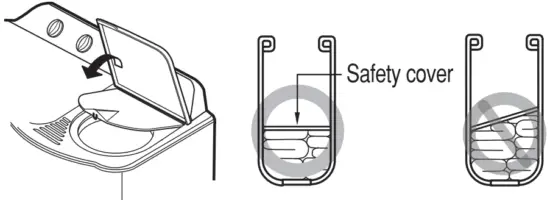
- Push the upper and lower part of the filter down and pull forward.
- Open the lid and remove lint and then wash out.
- Push the upper part of overflow filter down and pull forward.
- Open the lid and remove lint and then wash out.
- Close the lid and then insert the lower part of the overflow filter into the wash tub and press down then press top part into position until you hear a click sound.
- Replace the filter to the original position.
REFERENCE
TABLE 1. WEIGHT GUIDE FOR CLOTHES
Type of clothing | Type of fabric | Weight per piece |
Handkerchief | Cotton | 50g( 1.8oz) |
| Bath towel | Cotton | 300g(10.6oz) |
Shirt | Mixed fabric | 200q( 7.1oz) |
| Pajama (shirt and pants) | Cotton | 500g(17.6oz) |
Workclothes | Mixed fabric | 800g(28.2oz) |
| Blouse | Mixed fabric | 200g(7.1oz) |
TABLE 2. GUIDE FOR WASHING
| Type of Fabric | Wash Selector | Water Level | Amount of Laundry (kg) | Amount of Water (I) | Amount of Detergent (g) |
| Synthetics, Silk, | Gentle | L M | 0 – 7.5 7.6 – 10.5 | 60 85 | 60 85 |
| Woolen, Knits | H | 10.6 – | 110 | 110 | |
| L | 0 – 7.5 | 60 | 60 | ||
| Cotton, Linen | Normal | M | 7 6 – 10.5 | 85 | 85 |
| H | 10.6 – | 110 | 110 | ||
| Very soiled | L | 0-7.5 | 60 | 60 | |
| cotton and linen | Strong | M H | 7.6 -r10.5 10.6 – | 85 110 | 85 110 |
TABLE 3. GUIDE FOR FUNCTION
| Rotation Times (min.) | Type of Fabric | |
| Spin Timer | 2 – 3 | Synthetic, Silk, Woolen, Knits. |
| 3 – 4 | Cotton, Linen. | |
| 4 – 10 | Very soiled, linen. | |
| Rinse Timer Use 3 cycles per rinse | 3 | Synthetic cotton, silk, cloth, fabric Point, cotton, linen and very dirty linen. |
| Wash Timer | 5 | Synthetic, Silk, Woolen, Knits. |
| 10 | Cotton, Linen. | |
| 15 | Very soiled, linen. | |
- Amount of laundry is based on dry laundry.
- Detergent amount is based on a general synthetic detergent.
- If washing and spinning must be operated together, starting washing and spinning operation shall be done at the same time to cope with EMC requirement.
TROUBLESHOOTING
Before Requesting Service
| Problem | Checking point |
| Motor does not operate, |
|
| Spin dryer basket does not operate. |
|
| No draining |
|
SPECIFICATIONS
| Power source | On specification label | |
| Capacity (Wash/Spin) | On specification label | |
| Water Level | H : 110 Litres, M: 85 Litres, L: 60 Litres | |
| Water Pressure | Less than 100 kPa (1 kgf/cm2) | |
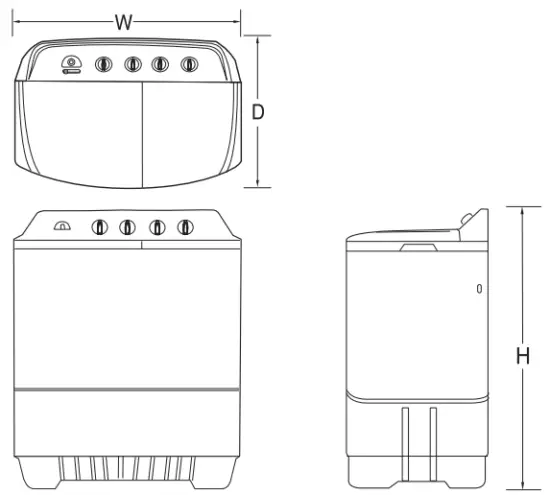
| Dimension | 964 x 540 x 1043 (W x D x H) | |
| Weight | 34.5 kg | |
| Wash | Spin | |
| Rating | 120 V- 60 Hz | |
| Rated Input | 550 W | 210 W |
| Rate Output | 120 W | 105 W |
| Capacity | ||
| WP18WAR | 18.0 kg | 10.0 kg |
| WP18MAR | 18.0 kg | 10.0 kg |


